Panasonic LP-GS Series Setup & Maintenance Manual
Laser marker
Hide thumbs
Also See for LP-GS Series:
- Operation manual (358 pages) ,
- Serial communication command manual (208 pages) ,
- Quick reference (46 pages)

Related Manuals for Panasonic LP-GS Series


Summary of Contents for Panasonic LP-GS Series
- Page 1 Laser Marker Setup / Maintenance Guide LP-GS series Please read these instructions carefully before using this product, and save this manual for future use. ME-LPGS-SM-8 2019. 4 panasonic.net/id/pidsx/global...
-
Page 2: Preface
Preface Thank you for purchasing our product. For full use of this product safely and properly, please read this document carefully. This product has been strictly checked and tested prior to its delivery. However, please make sure that this product operates properly before using it. -
Page 3: Cautions In Handling
Cautions in Handling ALWAYS FOLLOW THESE IMPORTANT SAFETY PRECAUTIONS! To reduce the risk of injury, loss of life, electric shock, fire, malfunction, and damage to equipment or property, always observe the following safety precautions. The following symbols are used to classify and describe the level of hazard, injury, and property damage caused when the denotation is disregarded and improper use is performed. - Page 4 WARNING • Do not use this product anywhere where fire is strictly prohibited, near inflammable gas, objects or organic solvents such as thinner or gasoline, or in dusty place. There is a risk of fire. • Do not use this product in wet place. In addition, never conduct wiring or maintenance work with wet hands or when the product surface is wet.
- Page 5 WARNING • Remove the dust and/or gas which may be generated during the laser radiation with dust collector or exhauster. Use an appropriate dust collector or exhauster for dust or gas generated. Depending on the material of the objects, harmful dust and/or gas to the human body and the laser marker may be generated.
- Page 6 For the Proper Use of Product • Be sure to observe the following matters to prevent a failure or a malfunction of this product and to maintain the product performance properly. Operating environment • Do not use the product in a place with frequent vibrations or shocks. Moreover, please do not drop this product. It may affect the precision component and optical component inside, which could impair the performance or result in a failure.
- Page 7 For the Proper Use of Product • Be sure to observe the following matters to prevent a failure or a malfunction of this product and to maintain the product performance properly. Wiring • Verify that the cables are wired correctly before powering on. •...
- Page 8 Products) as occasioned by the improvements of Products. Consequently, when you place orders for these Products, Panasonic Industrial Devices SUNX asks you to contact one of our customer service representatives and check that the details listed in the document are commensurate with the most up-to-date information.
-
Page 9: Applicable Standards And Related Regulations
가정외의 지역에서 사용하는 것을 목적으로 합니다 . *1 : Contact for CE: Panasonic Marketing Europe GmbH, Panasonic Testing Center Winsbergring 15, 22525 Hamburg, Germany *2 : This standard is not applicable to the laser marker models with Bluetooth function (LP-GS051/LP-GS051-E/LP- GS051-L/LP-GS051-LE/LP-GS052/LP-GS052-E). - Page 10 Implementing safety measures for the laser products This product falls into Class 4 laser product according to IEC60825-1 “Safety of Laser Products”, FDA standards 21 CFR 1040.10 and JIS C 6802. By definition, class 4 lasers are “Laser products for which intrabeam viewing and skin exposure is hazardous and for which the viewing of diffuse reflections may be hazardous.
- Page 11 Panasonic Testing Center Winsbergring 15, 22525 Hamburg, Germany *3 : Hereby, Panasonic Industrial Devices SUNX declares that LP-GS051/LP-GS051-E/LP-GS051-L/LP-GS051-LE/LP- GS052/LP-GS052-E are in compliance with the essential requirements and other relevant provisions of Directive 2014/53/EU. The declaration of conformity is available at http://www.ptc.panasonic.eu/filedepot...
-
Page 12: How To Read This Document
In the text, multiple models may be described collectively, as shown in the table below. Please remind that the illustration and the screen image may vary with the model. Target model Description in the text LP-GS051 LP-GS051-E LP-GS051(-E) LP-GS051 LP-GS Series LP-GS051-F LP-GS051-FE LP-GS051-FN LP-GS051-F(-FE/-FN) LP-GS051-L LP-GS051-LE LP-GS051-L(-LE) -
Page 13: Table Of Contents
Contents Preface ....................... 2 Cautions in Handling ................... 3 Applicable Standards and Related Regulations ..........9 How to Read this Document ................12 1 Product Overview …………………………………………………… 17 1-1 Product Model ..................... 18 1-2 Product Configuration ................. 19 1-3 Package ...................... 20 1-4 Specification .................... - Page 14 3-3 Operation by PC Configuration Software ........... 52 3-3-1 Operation procedure ................. 52 3-3-2 Screen types ..................... 54 3-3-3 How to establish online connection ............56 3-3-4 How to disconnect online connection ............58 3-3-5 How to switch screens ................59 3-3-6 Test marking and RUN mode ..............
- Page 15 5 External Control by Communication Commands …………… 107 5-1 Serial Communication Interfaces ............... 108 5-2 RS-232C ....................109 5-2-1 Interface specifications and connection ........... 109 5-2-2 Communication settings (for command control) ........111 5-3 Ethernet ......................112 5-3-1 Port specifications and connection ............112 5-3-2 Communication settings ................113 5-3-3 Connecting to external control devices and its setting sample ....114 5-4 Checking the communication commands ...........115...
- Page 16 7-2-11 Replacement of cable ................157 7-3 Obtaining Backup Data ................158 7-4 Serial Number Checking Method ............... 159 7-5 Disposal of Laser Marker ................160 7-5-1 Separate disposal of head section ............160 7-5-2 Disposal of old equipment and batteries ..........160 Troubleshooting ………………………………………………………...
-
Page 17: Product Overview
1 Product Overview ME-LPGS-SM-8... -
Page 18: Product Model
None Model description LP-GS 051 -L F E Represents the series name. “LP-GS series” refers to the CO laser marker. Represents the laser output class and the marking field size. The following types are applicable to this product. 051:... -
Page 19: Product Configuration
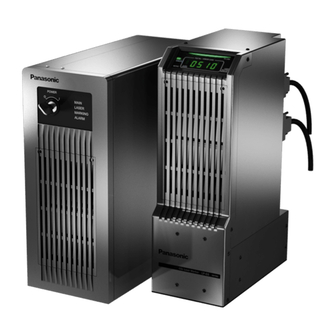
1-2 Product Configuration This product is a laser marker designed to mark and process the object by radiating a laser beam to the target. The laser marker LP-GS series mainly consists of the following devices: Name Description Head It is the unit that radiates the laser beam. The laser oscillator, the optical parts and the scanner are loaded inside. -
Page 20: Package
1-3 Package Before using this product, be sure to check the packed objects as shown below. This product is delivered in a set of head unit and controller unit packed in one box. If you find any missing item in the package, please contact the dealer you purchased it or our sales office. •... - Page 21 *1: Attached AC power cable varies depending on each model. Please select a cable suitable for the standards in the country or region where it is used. • LP-GS051(-L/-F/-LF)/LP-GS052(-F) : Attaches the PSE standards and CSA/UL standards compatible cable (rating 125V).
-
Page 22: Specification
1-4 Specification Model Item LP-GS051 LP-GS051-L LP-GS052 Laser type laser, Wavelength: 10,600nm, Class 4 laser Average output for 1.3W Marking laser processing *1 Laser oscillation CW Oscillation method Red semiconductor, Wavelength: 655nm, Guide laser Class 2 laser None Max. output: 1mW or less Red semiconductor, Wavelength: 655nm, Class 2 laser Laser pointer Max. - Page 23 Model Item LP-GS051 LP-GS051-L LP-GS052 Laser Marker NAVI smart display English, German, Simplified Chinese, Traditional Chinese, Japanese, Korean language Required time for system startup Approx. 10 seconds Required time for laser pumping Approx. 8 seconds to Max. 15 seconds 90V to 132V AC or 180V to 264V AC (including ±10% voltage fluctuations) *8 Power voltage Frequency: 50/60Hz Power...
-
Page 24: Outer Dimensional Drawing
1-5 Outer Dimensional Drawing 1-5-1 Head Unit: mm (125) (15) 131.5 Description Work distance (base position): LP-GS051/LP-GS051-L: 111 mm, LP-GS052: 71 mm Marking field (X, Y): LP-GS051/LP-GS051-L: 55 mm x 55 mm, LP-GS052: 30 mm x 30 mm Center of marking field: LP-GS051/LP-GS051-L: 54 mm, LP-GS052: 50.5 mm LP-GS051 / LP-GS051-L: 77.5 mm, LP-GS052: 69.5 mm LP-GS051 / LP-GS051-L: 27 mm, LP-GS052: 24 mm... -
Page 25: Controller
1-5-2 Controller Unit: mm (51) (155) (25) Description Controller fixing screw hole (four holes each on the bottom and the left side on the front): M5 screw, depth 6 Protective conductor terminal: M4 screw, depth 5 Screw for frame ground: M4 screw, depth 5 ME-LPGS-SM-8... -
Page 26: Cables
1-5-3 Cables Unit power cable Unit: mm Minimum bent radius 100mm Flex-resistant cable +200 5000 0 Signal cable Unit: mm Minimum bent radius 100mm Flex-resistant cable +200 5000 0 AC power cable Attached AC power cable varies depending on each model. Select a cable suitable for the standards in the country or region where it is used. -
Page 27: Name Of Each Component
1-6 Name of Each Component 1-6-1 Head Head display panel The display that shows the status of laser radiation and the laser marker. Display name Status Indication LASER Radiating the laser Orange lighted-up SHUTTER Laser pumping state/Shutter OPEN Green lighted-up MARKING Laser pumping state/Shutter CLOSE White lighted-up... - Page 28 Signal connector: SIGNAL This is the terminal for communicating between head and controller. Connect the attached signal cable. Power connector: POWER This is the connector for supplying the power to the head. Connect the attached unit power cable. Frame ground terminal: F.G. This is the terminal for ground.
-
Page 29: Controller
1-6-2 Controller Front Key switch: POWER The main power switch for the laser marker. Turn ON ( | ) the key switch to start-up the system, and turn OFF ( ○ ) to shutdown the system. Only when the key switch is turned OFF (in O position), the key can be pulled out. When the laser marker is not in use, the key should be in safekeeping by a laser safety manager. - Page 30 Rear Ethernet port: LAN The port to connect the LAN cable used when connecting the laser marker with the following devices via Ethernet. • The PC with Laser Marker NAVI smart installed • PLC or PC for control: Externally controls the laser marker using the communication commands. •...
- Page 31 Frame ground terminal: F.G. This is the terminal for ground. If you use a shielded wire for the I/O terminal block and the I/O connector cable, you can connect the shielded wire to this terminal. AC power supply terminal: AC INPUT Terminal for connecting AC power supply.
-
Page 32: Laser Marker Installation
2 Laser Marker Installation ME-LPGS-SM-8... -
Page 33: Installation Environment
2-1 Installation Environment Use this product in the following environments. Item Installation environment conditions Operating ambient temperature *1 0°C to +40°C Operating ambient humidity *1 35 to 85%RH Ambient temperature for storage *1 -10°C to +60°C *2 Vibration resistance Head (with/without current): Acceleration of 9.8 m/s or below Controller (without current): Acceleration of 9.8 m/s or below... -
Page 34: Installation Space
2-2 Installation Space To keep the appropriate air cooling performance, provide space around the laser marker as shown in the following figure. Head 200mm 50mm 150mm 50mm Intake Exhaust Controller 200mm 50mm 50mm 150mm Intake Exhaust • To maintain the air-cooling performance of the laser marker, install both the head and controller in a well-ventilated place. -
Page 35: Head Installation
2-3 Head Installation • Make sure that the power is turned OFF at installing. Failure to do so may cause electrical shock. WARNING • Install the product so that the laser beam path does not cross the eye height. • The laser beam path shall be enclosed with protective enclosure and make sure it is not exposed with direct light or reflected light. - Page 36 Position of the gravity center of head (without cables) Unit: mm G = gravity center (60) (100) (approximate dimension) Cautions for installing the head to a movable device Although the head of this product is resistant to vibration of acceleration 9.8 m/s or below, we do not guarantee the vibration resistance in all environments.
-
Page 37: Installation Method
2-3-2 Installation method • Install the head on a plate with a thickness of 10 mm to 15 mm or more which is made of aluminum or other material with radiation performance equivalent to that of aluminum. • For details of installation, refer to “1-5-1 Head” (P.24). •... -
Page 38: Marking Field And Marking Center Position
2-3-3 Marking field and marking center position Specified point LP-GS051 LP-GS051-L LP-GS052 Base position 111 mm 71 mm A : Work distance Setting range *1 108 mm to 114 mm – 69.5 mm to 72.5 mm B : Marking field (X, Y) 55 mm ×... -
Page 39: Marking Position Check
2-3-4 Marking position check Guide laser The marking position can be checked visually by using the guide function with the red laser beam. • Use the guide display function only as the guideline. For the appropriate marking quality, fine adjust the work distance and setting position of the target object by checking the actual marking results. -
Page 40: Controller Installation
2-4 Controller Installation • Make sure that the power is turned OFF at installing. Failure to do so may cause electrical shock. WARNING • To carry this product, wear the non-slip gloves. • In case it falls down, it may cause injury. ... -
Page 41: Connecting Laser Marker
2-5 Connecting Laser Marker • Be sure to turn the power off before you conduct wiring or connection. Failure to do so may cause electrical shock. WARNING • Be sure to connect the head and controller of the laser marker which have the same model number. -
Page 42: Power Connection And Earth (Grounding)
2-5-2 Power connection and earth (Grounding) When connecting the power supply, be sure to perform earth (grounding) properly. Failure to do so may cause electrical shock in case of a failure or electrical leakage. Further, it may cause malfunction of the device. The power supply terminal, protective conductor terminal and frame ground terminal are located as indicated below. - Page 43 Connect the three wires to the terminals. The signs of “L (black)”, “N (white)” and “PE (GND) (yellow/green)” show in the cables. Connect each cable to the appropriate terminal. Screw size: M4 Tightening torque: 1.2N·m • Connect the attached AC power cable (AC power supply cable). •...
-
Page 44: Connection Of Pc (Laser Marker Navi Smart)
2-5-3 Connection of PC (Laser marker NAVI smart) This product is set and operated with the PC with the PC configuration software “Laser Marker NAVI smart” installed and the laser marker connected. Installation of laser marker NAVI smart • Laser Marker NAVI smart is provided in the supplied CD-ROM “Laser Marker Smart Utility”. •... - Page 45 Connection type With one of the following method you can connect a PC with Laser Marker NAVI smart installed and the laser marker. Rear of controller Front of head • One PC can be connected with multiple laser markers. However, only one laser marker can be connected with Laser Marker NAVI smart online.
- Page 46 Bluetooth connection (Only the models with Bluetooth function) Products of the following models have an integral Bluetooth antenna and transmitter within the front display panel of the head. Bluetooth wireless connection is enabled when the Laser Marker NAVI smart is installed to a PC terminal compatible with Bluetooth.
-
Page 47: Construction Of System
2-6 Construction of System The following figure shows the construction sample of the system. Description Installation and control sample Laser marker head Laser marker controller PC for laser marker setting/monitoring Protective enclosure Laser protection shutter for work piece Construct a control system which will separate (cut off) the laser beams gateway or shut off the laser power when it is opened. -
Page 48: Operation Method
3 Operation Method ME-LPGS-SM-8... -
Page 49: Type Of Operations
3-1 Type of Operations The laser marker can be controlled by the following method: Control by the PC configuration software “Laser Marker NAVI smart” Establish an online connection of the laser marker and Laser Marker NAVI smart (PC). You can control the operations such as laser pumping or marking on the Laser Marker NAVI smart screen. -
Page 50: Start-Up & Termination
Click the “Start” button on Windows. Go to “All Programs” (for Windows 8 or Windows 10, go to “All apps”), click in the order of “Panasonic-ID SUNX Laser” - “Laser Marker Smart Utility” - “Laser Marker NAVI smart” to start the application. -
Page 51: Termination Procedure
3-2-2 Termination procedure Turn OFF the laser pumping. • PC configuration software control: Click “Laser pumping ON/OFF” of the “Laser Marker Operation” tool. • Remote control: Turn off the laser pumping by LASER SUPPLY IN (X6) of I/ O terminal or by the laser pumping command (LSR). Overwrite the data as needed. -
Page 52: Operation By Pc Configuration Software
3-3 Operation by PC Configuration Software You can configure the following settings and operations with Laser Marker NAVI smart respectively when the laser marker is not connected (offline) and when the laser marker is connected (online). Offline editing The followings are supported in the offline editing. •... - Page 53 Online connection: Operation example from editing to marking Turn ON key switch of laser marker controller Start up the Laser Marker NAVI smart. For test marking For RUN mode Online Connection: Select the model to connect and its connection method Screen selection To edit the marking data, select “Marking settings”...
-
Page 54: Screen Types
3-3-2 Screen types Laser Marker NAVI smart has the different screen mode depending on the settings and operation contents. Startup screen The screen of the laser marker selection appears when you start up Laser Marker NAVI smart. Select online operation/offline editing on this screen. ... - Page 55 Operator settings (restricted) This is the screen where you can edit and operate the enabled items only. Configure the enabled items for editing and operation on the system settings screen in advance. Main usages: • Change the specific items only. •...
-
Page 56: How To Establish Online Connection
3-3-3 How to establish online connection Connect the laser marker and the PC with a USB cable. Start the laser marker. Start the Laser Marker NAVI smart. The start-up screen of the laser marker selection appears. Check the laser marker name and the connection method displayed at “Available laser markers”. - Page 57 Setting procedure for Ethernet/Bluetooth online connection For communication between the laser marker and PC terminal using Ethernet or Bluetooth*1, you need to configure the following communication settings first. *1 : The Bluetooth function is not available with the models ending with “-F”. Connect Laser Marker NAVI smart and laser marker to online via a USB cable.
-
Page 58: How To Disconnect Online Connection
3-3-4 How to disconnect online connection • Disconnect the online connection before turning the laser marker power OFF. Click “Select Laser Marker/Status Display” tool located on the upper left corner of the screen to display the “Select Laser Marker” window. Click “X”... -
Page 59: How To Switch Screens
3-3-5 How to switch screens You can switch the screen mode in the screen selection menu. • If you have configured the password on the system settings screen, you are required to enter the password when you switch from “Monitor”, “Operator settings” or “Maintenance” screen to “Marking settings”, “Data management”, or “System settings”... - Page 60 Check the box next to “Clear the password” on the screen displayed, and then, click “OK”. Start Laser Marker NAVI smart and establish an online connection with the laser marker of which password setting you want to delete. This deletes the password, and the password lock in switching the screens is released. Exit from the Laser Marker NAVI smart.
-
Page 61: Test Marking And Run Mode
3-3-6 Test marking and RUN mode When you execute marking using the PC configuration software control, the laser irradiates in the following methods: Test marking procedure Test marking is a marking method of radiating laser by the button operations on the Laser Marker NAVI smart setting screen. -
Page 62: Operation By External Devices
3-4 Operation by External Devices 3-4-1 Operation method using external control device To control the laser marker with the external control device, the following connecting methods are applicable: External control (remote mode) using I/O Controls the laser marker from external devices such as PLC using I/O signals loaded into the laser marker. For details, refer to “4 External Control Using I/O”... -
Page 63: Operation Procedure With External Control
3-4-2 Operation procedure with external control ⿎ Operation example when controlling the laser marker from external control devices such as Turn ON key switch of laser marker controller Remote mode ON Refer to “3-4-4 Remote mode settings” (P.67). Control by serial communication I/O control commands Select file... -
Page 64: Settings Before External Control
3-4-3 Settings before external control To control the laser marker by using I/O or communication commands, configure the following items in advance at the system settings of Laser Marker NAVI smart. Connect the laser marker and Laser Marker NAVI smart online. Select “System settings”... - Page 65 Click “Set” on the lower right corner of the screen. When using I/O, click the “inputs/outputs” tab and configure the following items: • One-shot pulse duration: Configure the output time of the signal being output as • Warning detection at invalid trigger one-shot, such as PROCESSING END OUT (Y11).
- Page 66 On the “Command format” panel, specify the communication command format. • Start code: STX (initial setting) / None • Include command in response: ON (initial setting) / OFF • Sub-command for response data: Any single byte character of ASCII code from 01(HEX) to 7F(HEX) can be specified. •...
-
Page 67: Remote Mode Settings
3-4-4 Remote mode settings To control the laser marker externally using I/O or serial communication commands, set the operation mode to the remote mode with one of the following methods. Select the method to switch to the remote mode on the system settings screen of Laser Marker NAVI smart. Refer to “3-4-3 Settings before external control”... -
Page 68: External Control Using I/O
4 External Control Using I/O ME-LPGS-SM-8... -
Page 69: I/O Interface Specification
4-1 I/O Interface Specification The I/O terminal block and the I/O connector are available as the external control I/O interface of this product. • I/O terminal block: Loaded with the basic input/output to control the laser marker. • I/O connector: Loaded with the input/output for data configuration such as selecting a file number and the input/output for the specific functions. -
Page 70: Signals And Details Of I/O Terminal Block
4-2 Signals and Details of I/O Terminal Block The I/O terminal block is loaded with the basic input/output to control the laser marker. List of signals Name Name 24V OUT 0V OUT Internal power 24V Internal power 0V IN COM. 1 OUT COM. - Page 71 Input signal operation on the I/O terminal block • The ON/OFF listed in this section refers to the ON/OFF operations. It does not refer to the voltage level (High/Low). Name and description 24V OUT: Internal power (power for input/output) + 24V DC (max. output current 300mA) Power to operate the laser marker independently.
- Page 72 Name and description SHUTTER IN: Shutter open input While this input is turned on, the internal shutter opens. The control of this terminal is enabled when SHUTTER ENABLE IN (X9) is ON. There is a delay time of around 200ms to max. 1 second from turning ON/OFF of SHUTTER IN for the actual shutter open / close operation time.
- Page 73 Name and description INTERLOCK 1(+) INTERLOCK 1(-) INTERLOCK 2(+) INTERLOCK 2(-) The terminal used as the interlock, which is connected to the door or switches of the safety device. When the connection between INTERLOCK (+) and INTERLOCK (-) is opened, the shutter is closed and the laser pumping is turned OFF physically.
- Page 74 Output signal operation on the I/O terminal block • The ON/OFF listed in this section refers to the ON/OFF operations. It does not refer to the voltage level (High/Low). Name and description 0V OUT: Internal power (power supply for input/output) 0V Power to operate the laser marker independently.
- Page 75 Name and description SHUTTER OPEN 1 OUT SHUTTER OPEN 2 OUT Output ON during internal shutter of the head is open. Two sensors mounted inside of the head detect the shutter status and output them as SHUTTER OPEN 1 OUT and SHUTTER OPEN 2 OUT respectively. SHUTTER OPEN 1 OUT and SHUTTER OPEN 2 OUT will be output by the same operation, but their output timing has a margin of error.
- Page 76 Name and description INTERLOCK 1 MONITOR: Interlock 1 monitoring INTERLOCK 1 MONITOR COM.: Interlock 1 monitoring common INTERLOCK 2 MONITOR: Interlock 2 monitoring INTERLOCK 2 MONITOR COM.: Interlock 2 monitoring common INTERLOCK 1 MONITOR (Y16 - Y17) monitors the contact status of INTERLOCK 1 (X16 - X17). INTERLOCK 2 MONITOR (Y18 - Y19) monitors the contact status of INTERLOCK 2 (X18 - X19).
- Page 77 Laser marker operation when functions for safety measures are input If INTERLOCK (X16, X17, X18, X19) or LASER STOP 2 IN (X11) is opened, regardless laser emission ON/OFF status, the laser is powered OFF and the shutter is closed. The operation behavior of LASER STOP 1 IN (X10) varies depending on the laser emission ON/OFF status.
-
Page 78: Signals And Details Of I/O Connector
4-3 Signals and Details of I/O Connector The I/O connector is loaded with the input/output for data setting such as selecting a number and the input/output for the specific functions. List of signals Name Name IN COM. 2 OUT COM. 2 Input common 2 Output common 2 SET IN... - Page 79 Input signal operation on the I/O connector • The ON/OFF listed in this section refers to the ON/OFF operations. It does not refer to the voltage level (High/Low). Name and description IN COM. 2: Input common 2 The common terminal for each input of the I/O connector. In case of NPN connection, this terminal is connected to the “+ (plus)”...
- Page 80 Name and description Count-up value correction (SELECT 1 IN: ON) Count-down value correction (SELECT 0 IN, SELECT 1 IN: ON) Input this number when you change the next marking value of the counter function. The counter value is specified by the step times of count-up or count-down. The step value indicates a value to increase or decrease per one counting-up or counting-down.
- Page 81 Name and description Data number to switch when using the registered characters/external offset function (SELECT 0 IN: ON) The registered characters/external offset function is a function that switches marking characters (registered characters) or the position (external offset) using the input terminal D0 to D15. Configure the character or coordinate patterns to the data number corresponding to D0 to D15 in advance.
- Page 82 Name and description 19 to 21 SELECT 0 IN to SELECT 2 IN With SELECT 0 IN to SELECT 2 IN, the setting target of D0 IN to D15 IN and Guide laser indication target are specified. • Select the setting target of D0 IN to D15 IN Specify SELECT 0 IN to SELECT 2 IN corresponding to the setting target shown below.
- Page 83 I/O connector output signal operation • The ON/OFF listed in this section refers to the ON/OFF operations. It does not refer to the voltage level (High/Low). Name and description OUT COM. 2: Output common 2 The common terminal for each output of the I/O connector. In case of NPN connection, this terminal is connected to the “- (minus)”...
- Page 84 Name and description TIMING WAIT OUT: Timing wait output This is the terminal you will use when the link control function with the image checker is configured. This terminal turns ON when the laser marker enters into the link function operation trigger (TIMING IN) standby state.
-
Page 85: I/O Rating/Circuit
4-4 I/O Rating/Circuit 4-4-1 Input rating and input circuit This section shows the input rating and the input circuit for the I/O terminal block input and the I/O connector input. Note that the input rating and circuit of INTERLOCK terminals (X16, X17, X18, X19) are different from those shown here. Refer to “4-4-3 Interlock terminal rating and I/O circuit”... -
Page 86: Output Rating And Output Circuit
4-4-2 Output rating and output circuit This section shows the output rating and the output circuit for the I/O terminal block output and the I/O connector output. Note that the output rating and circuit of INTERLOCK MONITOR terminals (Y16, Y17, Y18, Y19) are different from those shown here. -
Page 87: Interlock Terminal Rating And I/O Circuit
4-4-3 Interlock terminal rating and I/O circuit This section shows the following interlock terminals and I/O circuit loaded onto the I/O terminal block. Interlock input terminals: Interlock monitoring terminals: INTERLOCK 1(+) (X16) INTERLOCK 1 MONITOR (Y16) INTERLOCK 1(-) (X17) INTERLOCK 1 MONITOR COM. (Y17) INTERLOCK 2(+) (X18) INTERLOCK 2 MONITOR (Y18) INTERLOCK 2(-) (X19) -
Page 88: Connecting I/O Terminal Block
4-5 Connecting I/O Terminal Block WARNING • Make sure that the power is turned OFF at wiring. 4-5-1 Factory default wiring The following terminals are connected by short bars at the factory default. Remove these short bars when you connect them to an external device. -
Page 89: Connecting Common Terminals
4-5-2 Connecting common terminals Connect IN COM. 1 (X2) and OUT COM. 1 (Y2) respectively to the power supply for input and output. For the I/O connector terminals, connect IN COM. 2 and OUT COM. 2 respectively to the power supply in the same manner. -
Page 90: Sensor Connection Example
4-5-3 Sensor connection example Use the sensor as a marking trigger (operate the sensor by the internal power) NPN connection PNP connection Sensor Sensor 24V OUT 0V OUT 24V OUT IN COM. 1 IN COM. 1 OUT COM. 1 OUT COM. -
Page 91: Checking The I/O Terminal Status
4-5-5 Checking the I/O terminal status Check the I/O connection status and its operation using the functions in the PC configuration software “Laser Marker NAVI smart” Operation procedure. I/O check monitor I/O check monitor indicates ON/OFF status of the I/O terminals on the laser marker. Open the I/O check monitor with the following procedure. -
Page 92: Basic Control Timing Chart
4-6 Basic Control Timing Chart • ON/OFF on the timing chart refers to ON/OFF operations. It does not refer to the voltage level (High/Low). • In the following timing charts, the timing of output operation corresponding to the each input has a small delay of 0ms or more. - Page 93 Item Time Remarks Approx. 10 sec. Time for system startup. Turn ON the remote mode upon verifying SYSTEM STANDBY OUT (Y7). Approx. 8 sec. Time for completion of laser pumping. • Normal: Approx. 8 sec. • Re-pumping right after turning the laser pumping OFF: Approx. 15 sec. Max.
-
Page 94: Shutter Open/Close
4-6-2 Shutter open/close LASER STANDBY OUT (Y6) TRIGGER IN (X5) ON (Open) SHUTTER ENABLE IN (X9) OFF (Close) ON (Open) SHUTTER IN (X8) OFF (Close) ON (Open) SHUTTER OPEN 1 OUT (Y8) OFF (Close) ON (Open) SHUTTER OPEN 2 OUT (Y9) OFF (Close) READY OUT (Y5) PROCESSING OUT (Y10) -
Page 95: Marking Trigger Input: Single Trigger
4-6-3 Marking trigger input: Single trigger When the trigger mode is set to “single trigger” in the file settings, one lasing operation is executed by the edge of turning on of TRIGGER IN (X5). READY OUT (Y5) TRIGGER IN (X5) Marking interruption PROCESSING OUT... -
Page 96: Marking Trigger Input: Continuous Trigger
4-6-4 Marking trigger input: Continuous trigger Without “allow to stop halfway” setting When the trigger mode is set to “continuous trigger” in the file settings, lasing operation is repeated while TRIGGER IN (X5) is on. Without “allow to stop halfway” setting if TRIGGER IN turns OFF when the lasing operation is running, the lasing operation is terminated after finishing the running operation. - Page 97 With “allow to stop halfway” setting When the trigger mode is set to “continuous trigger” in the file settings, lasing operation is repeated while TRIGGER IN (X5) is on. With “allow to stop halfway” setting, the lasing operation is terminated immediately when TRIGGER IN turns OFF. READY OUT (Y5) TRIGGER IN (X5) Marking...
-
Page 98: Guide Laser Radiation Input
4-6-5 Guide laser radiation input Supported model: LP-GS051(-L) SHUTTER ENABLE IN (X9) SHUTTER IN (X8) SELECT 0 - 2 IN (No.19-21) GUIDE IN (No.23) READY OUT (Y5) ON (Open) SHUTTER OPEN 1 OUT (Y8) SHUTTER OPEN 2 OUT (Y9) OFF (Close) Item Time Remarks... -
Page 99: Select File
4-6-6 Select file SELECT 0 - 2 IN (No.19-21) File File D0 - D15 IN (No.3-18) number A number B SET IN (No.2) TRIGGER IN (X5) SET OK OUT (No.28) File number A File number B READY OUT (Y5) ready ready File PROCESSING OUT (Y10) -
Page 100: Time/Date Hold Input And Date Gap Output
4-6-7 Time/date hold input and date gap output Actual date Day 1 Day 2 8 o’clock of day 2 Example: at 15 o’clock of day 1 TIME HOLD IN (No.22) TRIGGER IN (X5) Mark Mark PROCESSING OUT (Y10) retained time retained time (15 o’clock of day 1) (15 o’clock of day 1) -
Page 101: Count-Up/Count-Down Value Correction
4-6-9 Count-up/count-down value correction SELECT 0 - 2 IN (No.19-21) D0 - D7 IN (No.3-10) D8 - D15 IN (No.10-18) SET IN (No.2) SET OK OUT (No.28) TRIGGER IN (X5) READY OUT (Y5) PROCESSING OUT (Y10) Item Time Remarks 0.5ms or more After a lapse of 0.5ms or more from specifying SELECT 0 IN to SELECT 2 IN and D0 IN to D15 IN, turn on SET IN (No.2). -
Page 102: Counter Reset Input
4-6-10 Counter reset input SELECT 0 - 2 IN (No.19-21) D0 - D15 IN (No.3-18) SET IN (No.2) TRIGGER IN (X5) SET OK OUT (No.28) READY OUT (Y5) PROCESSING OUT (Y10) Item Time Remarks 2ms or more Keep the ON status for 2ms or more. 0ms or more Keep the input until SET OK OUT (No.28) turns on. -
Page 103: Registered Characters/External Offset Marking
4-6-11 Registered characters/external offset marking SELECT 0 - 2 IN (No.19-21) D0 - D15 IN (No.3-18) Data B Data C Data A SET IN (No.2) TRIGGER IN (X5) SET OK OUT (No.28) READY OUT (Y5) Data A Data B Data C PROCESSING OUT (Y10) Item Time... -
Page 104: Laser Stop 1 Input
4-6-12 Laser stop 1 input If LASER STOP 1 IN is released when laser is not radiating, the shutter is closed keeping the laser pumping on. If LASER STOP 1 IN is released when laser is radiating, the laser pumping is turned off, and the shutter is closed. Refer to “Laser marker operation when functions for safety measures are input”... -
Page 105: Laser Stop 2 Input
4-6-13 Laser stop 2 input If LASER STOP 2 IN is released, the laser pumping is turned off and the shutter is closed, regardless of whether or not the laser is radiating. Refer to “Laser marker operation when functions for safety measures are input” (P.77). LASER SUPPLY IN (X6) SHUTTER ENABLE IN (X9) SHUTTER IN (X8) -
Page 106: Interlock Input
4-6-14 Interlock input If INTERLOCK (X16 - X17 and X18 - X19) is opened, the laser pumping is turned off and the shutter is closed, regardless of whether or not the laser is radiating. Refer to “Laser marker operation when functions for safety measures are input” (P.77). LASER SUPPLY IN (X6) SHUTTER ENABLE IN (X9) SHUTTER IN (X8) -
Page 107: External Control By Communication Commands
5 External Control by Communication Commands ME-LPGS-SM-8... -
Page 108: Serial Communication Interfaces
5-1 Serial Communication Interfaces This product has the following serial communication interfaces on the controller. Rear of Controller Name Description RS-232C port For the connection details, refer to “5-2 RS-232C” (P.109). To use the RS-232C port, select the RS-232C usage from communication command control or code reader linkage function in the system settings screen in advance. -
Page 109: Rs-232C
5-2 RS-232C To control the laser marker by communication commands, use RS-232C or Ethernet connection. For the control by communication commands, configure the communication settings in advance at the system settings of Laser Marker NAVI smart. Refer to “3-4-3 Settings before external control” (P.64). •... - Page 110 ⿎ Connecting to external control devices • To connect the laser marker to the PC for control, use a commercially available RS-232C straight cable (laser marker side: 9pin male). • In case of connecting to PLC, a type of the cable (straight or cross) differs depending on a manufacturer or a model. Please follow the PLC manual.
-
Page 111: Communication Settings (For Command Control)
5-2-2 Communication settings (for command control) Item RS-232C communication settings (for command control) Synchro system Start-stop method Communication type Full-duplex transmission Baud rate 1200 / 2400 / 4800 / 9600 / 19200 / 38400 / 57600 / 115200 bps (initial setting: 9600 bps) Data length 8-bit fixed Parity... -
Page 112: Ethernet
5-3 Ethernet 5-3-1 Port specifications and connection To control the laser marker by Ethernet communication, use an Ethernet port on the controller. • The Ethernet port of this product is compatible with both straight cable and cross cable. • Although the maximum length of cables connecting devices permitted by the standards of Ethernet is 100 m, in order to prevent communication failure due to noise or breakdown of the device, it is recommended to keep the length to 10 m or less. -
Page 113: Communication Settings
5-3-2 Communication settings Item Ethernet communication settings Communication protocol TCP/IP Standards IEEE802.3 (10BASE-T) / IEEE802.3u (100BASE-TX) Applicable cable Category 5 or higher Applicable HUB (or rooter) 10BASE-T / 100BASE-TX compatible IP address 1.0.0.0 to 223.255.255.255 * (Initial value: 192.168.1.5) Subnet mask 128.0.0.0 to 255.255.255.254 (Initial value: 255.255.255.0) Default gateway 1.0.0.0 to 223.255.255.255 * (Initial value: 0.0.0.0 (Unspecified)) -
Page 114: Connecting To External Control Devices And Its Setting Sample
5-3-3 Connecting to external control devices and its setting sample Connect the two or more laser markers and an external device via a HUB or a router: Use a HUB (or a rooter) that supports 100BASE-TX/10BASE-T and a cable of Category 5 or higher for the connection. HUB (or rooter) External controller (PC, etc.) Laser marker controller... -
Page 115: Checking The Communication Commands
5-4 Checking the communication commands Check the communication commands transmitted and received by the laser marker using the command history function in the PC configuration software “Laser Marker NAVI smart”. The command history is displayed with the following procedures. Connect Laser Marker NAVI smart and the laser marker online. Click the screen selection menu and select “Maintenance”. -
Page 116: Link Control With External Devices
6 Link Control with External Devices ME-LPGS-SM-8... -
Page 117: Link Control With Image Checker
6-1 Link Control with Image Checker This product can be connected with specific image checker and code reader via Ethernet and control the laser marker linking with these devices. The following series of operations related to marking can be controlled from the laser marker when the image checker linkage function is used. -
Page 118: Example Of Image Checker Linkage System
6-1-1 Example of image checker linkage system Illumination Image checker camera Laser marker head Code reader Laser marker controller Checkup result display Image checker controller HUB (for Ethernet connection) • Detect the work position Image checker • Transmit the detected position information to the laser marker •... -
Page 119: Operation Flow
6-1-2 Operation flow Example of operations for Position correction → Marking → Code checking Start the image checker and laser marker Start up and online connect the Laser Marker NAVI smart Remote mode ON Select File Laser pumping ON Shutter open Check the marking ready output ON Laser marker marking trigger input Image checker: Operation start •... -
Page 120: Connection
Connectable image checker Image checkers compatible with this product are listed below. Usage Model Manufacturer name Position correction PV230/PV200 Panasonic Devices SUNX Co, Ltd. Code checking PV230 LP-ABR series DataMan series (Ethernet supported model) Cognex Corporation Character checking PV230 Panasonic Devices SUNX Co, Ltd. -
Page 121: Set The Laser Marker Communication Settings
6-1-4 Set the laser marker communication settings Connect the laser marker and Laser Marker NAVI smart online. Select “System settings” from the Screen selection menu, and click the “Communication” tab. Set the Ethernet communication configuration of the laser marker. View the “Image checker” panel items and configure the communication settings according to the functions to use. -
Page 122: Set The Laser Marker Overall File Conditions
6-1-5 Set the laser marker overall file conditions Set the overall file conditions of the Laser Marker NAVI smart according to the type of the system to establish. Connect the laser marker and Laser Marker NAVI smart online. Select Marking settings screen in the screen selection menu and click “File settings”... - Page 123 When the application of the image checking after marking is set to “Code checking” or “Character checking”, input “Object number to check” that is the same number with the object number you set in barcode/2D code settings or character settings. If you use PV230/PV200 for image checking after marking, input the following items, so that the setting values are same with the settings in...
- Page 124 Details of TIMING IN signal TIMING IN signal: Use TIMING IN signal is used when the laser marker operation trigger and image checker/code reader operation trigger is input separately, e.g. when the camera (code reader) field of view is away from the laser marker marking position. For image checking before marking For image checking after marking Laser marker...
-
Page 125: Image Checker Setting
6-1-6 Image checker setting Settings to use the image checker PV230/PV200 for link control with the laser marker are described below. • For specifications and setting of image checker PV230/PV200, refer to the instruction manual for PV230/PV200. Communication settings of image checker PV230/PV200 To connect the laser marker with PV230/PV200, configure the PV230/PV200's communication settings as follows. - Page 126 Settings of PV230/PV200 for position correction When PV230/PV200 is used for position correction, set the following items: In PV230/PV200 setting software, select “Type” - “Type Setting” - “Camera” - “Calibration” and set the following items. • Calibration: Available • Method: Base X points Mark the calibration marks with the laser marker and register their coordinates (mm) to the global (0, 0)
- Page 127 Settings of PV230 for code checking When PV230 is used for code reading, set the following items: In PV230 setting software, select “Inspection” - “Checker” and set “Code Reader” to the checker type. Specify the Checker No. • Input the same value with the Checker No. for the code reader set here to “CDR checker number set on PV” in the file settings of the laser marker.
- Page 128 Settings of PV230 for character checking When PV230 is used for character checking, set the following items: In PV230 setting software, select “Inspection” - “Checker” and set “Optical Character Recognition” to the checker type. Specify the Checker No. for the optical character recognition. •...
-
Page 129: Code Reader (Lp-Abr) Setting
6-1-7 Code reader (LP-ABR) setting To use the code reader LP-ABR series for the code checking of image checking after marking, set the followings by using Configurator LP-ABR software. • Set the code reading parameters of LP-ABR such as the code type and inversion to read the marked code symbols without errors. -
Page 130: Timing Chart
6-1-9 Timing chart Position correction - Marking (when TIMING IN signal is used) TRIGGER IN (X5) Starting location detection signal TIMING IN (No.24) Marking trigger READY OUT (Y5) TIMING WAIT OUT (No.36) PROCESSING OUT (Y10) LASING OUT (Y20) SCRIPTING OUT (No.37) PROCESSING END OUT (Y11) Item Time... - Page 131 Marking - Image checking (when TIMING IN signal is used) TRIGGER IN (X5) Starting marking signal TIMING IN (No.24) Starting image checking signal READY OUT (Y5) TIMING WAIT OUT (No.36) CHECK OK OUT (No.34) CHECK NG OUT (No.35) PROCESSING OUT (Y10) LASING OUT (Y20) SCRIPTING OUT (No.37) PROCESSING END OUT (Y11)
- Page 132 Position correction - Marking - Image checking (when TIMING IN signal is used) TRIGGER IN (X5) Starting location detection signal TIMING IN (No.24) Starting marking signal Starting image checking signal READY OUT (Y5) TIMING WAIT OUT (No.36) CHECK OK OUT (No.34) CHECK NG OUT (No.35) PROCESSING OUT (Y10) LASING OUT (Y20)
- Page 133 Position correction - Marking - Image checking (when TIMING IN signal is not used) TRIGGER IN (X5) Starting a series of interfaced operations signal READY OUT (Y5) CHECK OK OUT (No.34) CHECK NG OUT (No.35) PROCESSING OUT (Y10) LASING OUT (Y20) SCRIPTING OUT (No.37) PROCESSING END OUT (Y11) *1: CHECK OK OUT (No.34) / CHECK NG OUT (No.35) outputs before PROCESSING OUT (Y10) is turned OFF.
-
Page 134: Link Control With Code Reader
6-2 Link Control with Code Reader This product can be connected with a commercially available code reader via the RS-232C port. The code reader linkage function allows for control of the laser marker according to the contents of the code read by the code reader. Items to control by the code reader linkage function are listed below. -
Page 135: Operation Flow
6-2-2 Operation flow Example of operations to change the file Start the code reader and laser marker Start up and online connect the Laser Marker NAVI smart During remote mode control During RUN mode operation Remote mode ON Laser pumping ON Laser pumping ON RUN mode ON Shutter open... - Page 136 Example of operations to change the character data to mark Start the code reader and laser marker Start up and online connect the Laser Marker NAVI smart During remote mode control During RUN mode operation Remote mode ON Marking target file selection Select File Laser pumping ON Laser pumping ON...
-
Page 137: Connection
6-2-3 Connection Connection method Connect the code reader to the RS-232C port on the controller. Code reader Rear of controller RS-232C port Laser marker side connector specifications: D-sub 9-pin female • Do not connect to other than three lines RxD (RD), TxD (SD) and GND to the laser marker. •... -
Page 138: Preparation Of Readout Code
Connectable code reader This product can be connected with a code reader that can be operated in the RS-232C communication settings described below. Communication settings (for code reader linkage control) Communication settings for use of the code reader linkage function are listed below. Specify the code reader communication settings according to this setting. -
Page 139: Setting Of Code Reader Linkage Functions
6-2-5 Setting of code reader linkage functions For use of the code reader linkage function, set the following items in the Laser Marker NAVI smart system settings screen. Connect the laser marker and Laser Marker NAVI smart online. Select “System settings” from the Screen selection menu, and click the “Communication” tab. Select the usage and communication settings of RS-232C. - Page 140 To transfer a part of the code string read, set the data extraction. If “OFF” is selected, the read string is transmitted as is. To set the data extraction, specify the start position and data length of the code data in bytes. Setting range: •...
-
Page 141: Maintenance
7 Maintenance ME-LPGS-SM-8... -
Page 142: Maintenance Items
7-1 Maintenance Items Listed below are typical parts that require cleaning or replacement depending on the usage environment or duration of service of the laser marker. Some parts are maintainable by the customer, and other parts are required to be repaired or replaced by our service representative, depending on the types of parts and the defects. -
Page 143: Maintenance Details Of Parts
7-2 Maintenance Details of Parts • Maintenance work must be conducted with the power to the laser marker turned OFF, and the AC power cable disconnected. Doing so may cause exposure to the laser beam or electrical shock. WARNING • Do not insert your hands or objects to the exhaust port of each unit or the gaps between units during the maintenance work. -
Page 144: Intake/Exhaust Vent
7-2-2 Intake/exhaust vent Air-cooling system is used in the laser marker, thus the cooling effect will drop if dust is adhered to the intake or exhaust vent and it may result in the failure of the laser marker. Clean them regularly according to the usage environment. ... -
Page 145: Air Filter
7-2-3 Air filter The air filter is placed in the air-cooling intake vent of this product. (1 filter on the controller, 1 filter on the head) Effect from deterioration The air filter soiled with dust may reduce the cooling effect of the air-cooling fan. This may cause the marking performance to degrade, or failure of the laser marker. -
Page 146: Air-Cooling Fan
7-2-4 Air-cooling fan The air-cooling fan cools the laser oscillator and internal power circuit. This product has two fans (intake) on the head and two fans (exhaust) on the controller. The fans in the head rotate at the time of laser pumping and during guide laser radiation (except during guide pointer radiation), the controller fans rotate all the time during power on. - Page 147 Disconnect the two (2) connectors of the fans and remove them from the controller. (One connector for one fan) Loosen the screws (4 screws for 1 fan), and remove the fan guard and the fan itself from the Fan guard head.
- Page 148 Install the fan in the direction so that the fan cable will be on the right side of the head front. Fasten the screws (M4, depth 45 mm) (4 screws for 1 fan) from the top of the fan guard to secure the fan to the Connector head.
- Page 149 Loosen the screws (4 screws for 1 fan), and remove the fan guard and the fan itself from the controller. Fan guard Screws Remove dust and dirt adhered onto the fan by air-blowing. • Do not rinse the fan. This may cause failure of the electronic parts inside. Install the fan guard against the direction of arrow on the Screws side of the fan indicating the air flow, as shown in the figure...
-
Page 150: Laser Oscillator
7-2-5 Laser oscillator A CO (carbon dioxide) laser oscillator is installed in the head. The laser beam output from the oscillator is scanned and focused to mark or process the target materials. Effect from deterioration Laser output characteristics such as laser power will deteriorate over time due to aging of oscillator. As the laser output characteristics deteriorate, symptoms such as ununiform marking density, chipped characters, or unstable processing quality, etc. - Page 151 Confirm laser output (Daily inspection) Confirm the laser output regularly in order to maintain consistent marking quality. The laser output should be measured with a commercially available meter using the following steps: Prepare a commercially available power meter. • Be sure to use the calibrated power meter. •...
- Page 152 Connect the laser marker and Laser Marker NAVI smart online, and select “Maintenance” from the screen selection menu. Click the “Laser pumping ON/OFF” of the “Laser Marker Operation” tool to pump laser. Click “Laser radiation for measurement” of the “Laser Marker Operation”...
-
Page 153: Galvano Scanner
Check the measurement results of the power meter. If the power decays lower than the default setting, correct the laser power setting value using the “System offset” panel of the “System settings” screen. Setting range of laser power correction: 50 to 200 [%] •... -
Page 154: Z-Axis Adjustment Module
7-2-7 Z-axis adjustment module * Note that this module is not attached to models with “-L” in the model code. The Z-axis adjustment module controls the focal length optically. Effect from deterioration The degradation in the movable parts may affect the control over focal length, resulting in ununiformity in marking density. ... -
Page 155: Replacement Of Battery Inside The Controller
Model Manganese dioxide lithium primary battery (coin- AFPX-BATT (CR-2450) type) with dedicated connector (made by Panasonic Industrial Devices SUNX Co., Ltd.) Steps for replacement Turn OFF the key switch of the controller, and disconnect the AC power cable. Lay the controller on its side, loosen screws (six locations) on the side panel, and remove the panel. - Page 156 Remove the connector for the battery inside the controller (coin-type). Attach the connector to the new battery. • If you wish to dispose used batteries, please comply with its regional regulation. For the correct method of disposal, please contact your local municipality, waste disposal services, or the point of sale where you purchased the batteries.
-
Page 157: Replacement Of Fuse
7-2-10 Replacement of fuse Replace fuse of the controller when blowing. The power of the laser marker cannot be turned on if the fuse is blown. Models of replacement parts Be sure to use the following type of fuse: If the user applies any other fuses than the specified one, failure might result. Type Model Time Lag Fuse (Rating 250V 10A) -
Page 158: Obtaining Backup Data
7-3 Obtaining Backup Data Obtain and keep a backup of data registered in the laser marker periodically in case of replacing laser markers for repairing and maintaining purposes. Obtain and keep a backup of data registered in the laser marker periodically using the Laser Marker NAVI smart in case of replacing laser markers for repairing and maintaining purposes. -
Page 159: Serial Number Checking Method
7-4 Serial Number Checking Method Notify our sales office or representatives of the laser marker serial number for inspection or repair. The head and controller is delivered with the same serial numbers. Check it on laser marker main unit The serial number of the laser marker is written on the area marked by a circle in the figure below. -
Page 160: Disposal Of Laser Marker
7-5 Disposal of Laser Marker To dispose of the laser marker, in accordance with the regional regulation, please request the industrial waste disposer. Dispose of the laser marker as industrial waste, and never discard it with regular trash. • Be sure to delete all registered data when transferring or discarding the laser marker. Retained data might result in illegal read out and leaking of information by a third-party with malicious intent. - Page 161 MEMO ME-LPGS-SM-8...
-
Page 162: Troubleshooting
Troubleshooting ME-LPGS-SM-8... -
Page 163: Troubleshooting
I/O terminal block. • INTERLOCK 2(+) - INTERLOCK 2(-) (X18 - X19) • If the safety equipment such as door • For LP-GS series: and switch is in released status, restore LASER STOP 2 IN (X11) - OUT COM. 1 the original condition. - Page 164 Bluetooth communication setting is the Bluetooth communication in the system disabled. settings. Then, restart the laser marker. For LP-GS series: PC's Bluetooth module is apart from Operate the product with the laser marker head Bluetooth online the head of the laser marker.
- Page 165 Distance to work piece is not marker head and the work piece surface as appropriate. specified. For LP-GS series: The set Z-position does not match the Set the Z-position according to the work piece height of the actual target object.
- Page 166 Distance to the work piece is not marker head and marking surface of the work appropriate. piece. For LP-GS series: The set Z-position does not match the Set the Z-position according to the work piece height of the actual target work piece.
- Page 167 Troubles Causes Measures • For LP-GS/LP-RC series: Set “Power optimization by marking position” The marking around Decrease of the laser energy density in in “System offset” in System settings screen. edge of the marking field the edge of marking field may affect the •...
- Page 168 • Adjust the laser power or scan speed. readable. • For LP-GS series: Decrease scan speed or increase laser Setting of laser frequency and scan frequency. speed is inadequate.
- Page 169 ⿎ External control Troubles Causes Measures • Select the remote mode by following the procedure indicated in Setup/Maintenance Guide. • Check if the entering method of the remote mode set in the Laser marker is not in remote system settings screen (I/O or PC software) and the actual mode.
- Page 170 Troubles Causes Measures • If you want to use the same command format with the former models of LP-400/LP-V series, enable “LP-400/V Control by serial Command mode (LP-400/V compatibility” in system settings of Laser Marker NAVI smart. communication fails compatibility setting) is wrong. •...
- Page 171 Troubles Causes Measures To control the following commands with the serial communication, specify the control method to the communication command in Laser Marker NAVI smart system settings and restart the laser marker. • Laser pumping (LSR) The requested operation can •...
- Page 172 ⿎ Link control with external devices Troubles Causes Measures The connections with the image checker or code • Refer to Setup/Maintenance Guide for the wiring and Link control with reader are inadequate. communication settings. image checker and • If the Ethernet communication settings or RS-232C usage are code reader fails Communication settings are changed, restart the laser marker.
-
Page 173: Error Indication
Error Indication When an error occurs, an error code appears on the display panel of the laser marker. Errors are categorized into alarm and warning depending on their details. This chapter describes the details and measures of errors. Alarm: E001 - E599 Errors that occur when highly emergent safety function is activated or there is any abnormality in laser marker are output as alarm. - Page 174 ERROR Description Measures *1 CODE • Abnormality occurs on the internal shutter. Check the connection of the cable and various E205 - E207 • Signal cable is not connected properly. signal lines, and then restart the laser marker. E220 Laser head housing is open. Contact our sales office or representatives.
- Page 175 ERROR Description Measures *1 CODE • Connect the LASER STOP IN terminals of the I/O terminal block. • Check the status of the safety equipment E402 LASER STOP IN of the I/O terminal block was connected to the LASER STOP IN terminals. E403 released.
- Page 176 *1 : If the error persists after restart of the laser marker, contact our sales office or representatives. *2 : Error that may occur for LP-GS series only. *3 : Error that may occur for LP-RC series only.
-
Page 177: Warning: E600 - E799
Warning: E600 - E799 Errors that notify of that the setting data are incorrect or laser radiation conditions are not met are output as warnings. Marking cannot be started while any warning of E600 to E699 is active. Laser pumping maintains the state before the warning. - Page 178 ERROR Description Measures *1 CODE The counter value was reset to that prior to E608 • Check the current value of counter. marking because the power was cut off during E720 • Do not turn off the power during marking. data marking including the counter.
- Page 179 ERROR Description Measures *1 CODE • When Trigger mode is set to Marking at regular intervals, set the larger value to Marking spacing. • When Trigger mode is set to Multiple triggers, take more time for the trigger input intervals. •...
- Page 180 ERROR Description Measures *1 CODE • Check the connecting status of the laser marking system and image checker. No response from the image checker. Trigger E625 • Check if the reading process of the image checker processing terminated abnormally. was successful. •...
- Page 181 ERROR Description Measures *1 CODE Lasing operation/shutter open operation was cancelled due to a timeout after the laser start- up check. • When operating with Laser Marker NAVI smart, Try again. retry to start test marking/laser radiation for measurement/run mode operation. E640 *3 (Details: For the first operation of opening shutter •...
- Page 182 ERROR Description Measures *1 CODE • Reduce the number of characters and segments in the graphic data. Insufficient marking memory. Marking data in the • Reduce the number of characters and start/end E661 file are too large. points of the graphic data. •...
- Page 183 ERROR Description Measures *1 CODE • Correct the separator height ratio or the barcode height ratio so that the height is larger than the “line The settings for separator height ratio or row width (calculation value)” specified in the object E672 height ratio are too small.
- Page 184 ERROR Description Measures *1 CODE Any of the following functions that are not available with the seamless loop setting are • Deactivate the seamless loop in the laser settings. configured. • If you want to radiate laser continuously without E686 •...
- Page 185 *1 : If the error persists after restart of the laser marker, contact our sales office or representatives. *2 : Error that may occur for LP-GS series only. *3 : Error that may occur for LP-RC series only.
-
Page 186: Index
Index ME-LPGS-SM-8... - Page 187 AC power cable ..........26 Key switch ............29 Air filter ............145 Alarm ............... 173 Applicable Standards .......... 9 Laser emission port ........143 Laser Marker NAVI smart ......19, 44 Laser Marker Smart Utility ......19, 20 Backup ............158 Laser oscillator ..........
- Page 188 Unit power cable ..........26 USB ............. 30, 45 Vibration resistance .......... 33 Warning ............177 Z-axis adjustment module ....... 154 ME-LPGS-SM-8...
- Page 190 © Panasonic Industrial Devices SUNX Co., Ltd. 2014 - 2019 April, 2019...