
Related Manuals for Emerson 1410H


Summary of Contents for Emerson 1410H
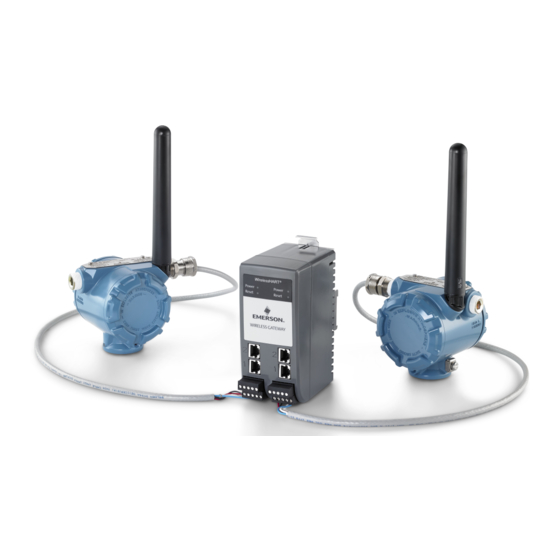
- Page 1 Quick Start Guide 00825-0300-4410, Rev AA February 2019 ™ Emerson Wireless 1410H Gateway and 781 Field Links...
-
Page 2: Table Of Contents
Wireless 1410H Gateway. It does not provide instructions for diagnostics, maintenance, service, or troubleshooting. Refer to the Emerson Wireless Gateway 1410H Reference Manual for more information and instructions. The manuals and this guide are available electronically on Emerson.com/Rosemount. This device complies with Part 15 of the FCC Rules. Operation is subject to the following conditions. -
Page 3: Wireless Planning
February 2019 Quick Start Guide Wireless planning Power up sequence The Gateway should be installed and functioning properly before power modules are installed in any wireless field devices. Wireless field devices should also be powered up in order of proximity from the Gateway beginning with the closest. -
Page 4: Pc Requirements
Configuration of the Gateway is done through a secure web interface. Recent versions of the following browsers are supported: ® • Internet Explorer ™ • Chrome browser ® • Mozilla Firefox • Microsoft Edge Hard disk space • AMS Wireless Configurator: 1.5 GB • Gateway Setup CD: 250 MB Emerson.com/Rosemount... -
Page 5: Initial Connection And Configuration
1410H, bench top power will be needed to power the Gateway by wiring a 10.5–30 VDC (20–30 VDC if a 781 is connected with I.S. barriers to the Emerson 1410D) power source, with a capacity of at least 250 mA to the power terminals. -
Page 6: Establishing A Connection
IP addresses if you are running two separate networks. Windows 7 Procedure 1. Click the Internet Access icon on the bottom right of the screen. Figure 3-2: Internet Access 2. Select the Network and Sharing Center. 3. Select Local Area Connection. Emerson.com/Rosemount... - Page 7 February 2019 Quick Start Guide Figure 3-3: Local Area Connection 4. Select Properties. 5. Select Internet Protocol Version 4 (TCP/IPv4) then select Properties. Figure 3-4: Internet Protocol Version 4 (TCP/IPv4) Note If the PC/laptop is from another network, record the current IP address and other settings so the PC/laptop can be returned to the original network after the Gateway has been configured.
- Page 8 Figure 3-5: IP Address 7. In the IP address field, enter 192.168.1.12 (DeltaV Ready enter 10.5.255.12). 8. In the Subnet mask field, enter 255.255.255.0. 9. Select OK for both the Internet Protocol (TCP/IP) Properties window and the Local Area Connection Properties window. Emerson.com/Rosemount...
- Page 9 February 2019 Quick Start Guide Windows10 Figure 3-6: Network Settings Procedure 1. Select the network icon in the lower right corner. 2. Select the Network settings link. 3. Select Change adapter options. Quick Start Guide...
- Page 10 192.168.2.10 192.168.2.12 255.255.255.0 Disable proxies Procedure 1. Open web browser. 2. Navigate Tools >Internet Options > Connections > LAN Settings (may be a different process for other browsers). 3. Under Proxy server, uncheck the Use a proxy server... box. Emerson.com/Rosemount...
-
Page 11: Configure The Gateway
February 2019 Quick Start Guide Example Configure the Gateway To complete initial configuration for the Gateway, follow the steps below. This will have to be done be done for both networks. Procedure 1. Access the default web page for the Gateway at https://192.168.1.10 a) Log on as Username: admin b) Type in password: default Example... - Page 12 Quick Start Guide February 2019 Example 3. Restart application at System Settings > Gateway > Backup and Restore > Restart Apps. Note Resetting applications will temporarily disable communications with field devices. 4. Disconnect the power and Ethernet cable from the Gateway. Emerson.com/Rosemount...
-
Page 13: Physical Installation
DIN rail. 3. Release the DIN rail lever, and make sure the Gateway is secured. Figure 4-1: Installing the Emerson 1410H 4. To remove the unit, press the DIN rail lever, and hold while pulling the bottom half of the Gateway from the DIN rail. - Page 14 A shielded twisted-pair cable is needed for connecting the Emerson 1410H and 781 Field Links. Each Emerson 781 can be located up to 656 ft. (200m) from the Emerson 1410H. This will need to be done twice for the two networks.
- Page 15 February 2019 Quick Start Guide The signal barrier needs additional power. You can wire it to the Emerson 1410H terminals or to a separate power supply. Make sure power supply is rated to handle power drawn for the barrier. Figure 4-3...
- Page 16 Quick Start Guide February 2019 Figure 4-4: Emerson 1410H and 781 with Additional Power Supplied Barrier Installation A. Emerson Wireless 1410H Gateway B. Attach shield pair cable (Belden 3083A) C. Tape back shield wire and foils D. Short these terminals for 250Ω...
- Page 17 Quick Start Guide Shield grounding The shields of the twisted-pair cables need to be grounded using the grounding terminal on the Emerson 1410H, and it should be taped back on the Emerson 781 side. Figure 4-5: Emerson 1410H Grounding A. #6 AWG copper wire B.
- Page 18 Quick Start Guide February 2019 Emerson 1410H grounding The Emerson 1410H DIN rail cabinet must be grounded as well. A #6 AWG (4.11 mm European) copper wire bonding connector with the shortest length possible, no sharp bends, and no coiling is recommended.
-
Page 19: Terminating Resistors
February 2019 Quick Start Guide Emerson 781 grounding Grounding of the electronics enclosure should be done in accordance with local and national installation codes. Grounding is accomplished through the external case grounding terminal. A. Grounding lug Terminating resistors Three DIP switches are provided to enable various terminating resistors to the RS-485 data bus. - Page 20 Gateway side. Insulate the shield to avoid grounding issues. ® In accordance with Emerson WirelessHART security guidelines (Emerson Wireless Security Whitepaper), the Gateway should be connected to the Host System via a LAN (Local Area Network) and not a WAN (Wide Area Network).
-
Page 21: Software Installation (Optional)
D:\SETUP.EXE (where D is the CD/DVD drive on the PC) and select OK. For more information about the Security Setup Utility and AMS Wireless Configurator, see the Emerson 1410H Gateway and 781 Field Links Reference Manual. Quick Start Guide... -
Page 22: Verify Operations
Explore tab using the web interface. The time needed for the network to form will depend on the number of devices. Emerson.com/Rosemount... -
Page 23: Product Certifications
All wireless devices require certification to ensure that they adhere to regulations regarding the use of the RF spectrum. Nearly every country ™ requires this type of product certification. Emerson is working with governmental agencies around the world to supply fully compliant products... - Page 24 Equipment must be installed in a suitable tool accessible enclosure subject to the end use application. • Using the 1410H and the 781 Field Links in a hazardous location requires barriers between the two units. Europe N1 ATEX Type n...
- Page 25 4. When fitted, the surface resistivity of the remote antenna is greater than 1GΩ. To avoid electrostatic charge build-up, it must not be rubbed with a dry cloth or cleaned with solvents. • Currently not available for 1410H option. Quick Start Guide...
- Page 26 Quick Start Guide February 2019 Emerson.com/Rosemount...
- Page 27 February 2019 Quick Start Guide Quick Start Guide...
- Page 28 The Emerson logo is a Facebook.com/Rosemount trademark and service mark of Emerson Electric Youtube.com/user/ Co. Rosemount is mark of one of the Emerson RosemountMeasurement family of companies. All other marks are the Google.com/+RosemountMeasurement property of their respective owners.