Table of Contents
Quick Links
Includes:
Part Number
9121-210AM-0-0-0-0
9121-210CT-0-0-0-0
9121-Jxx-M
9121-SA2/SA3-M/T
9121-JJ43-M/T
9121-AH2-M/AHx-T
9121-ED15-M/T
9120-REP6-M/T
9120-RF8-M/T
9121-UAA-T
Some 3-D Model Downloads are available on our website. Contact your Account Representative for more information.
Pinnacle Park
1031 Goodworth Drive
QC
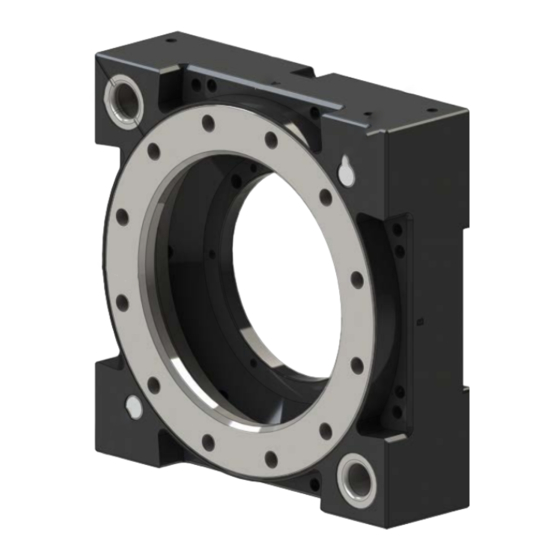
Robotic Tool Changer
(Application-specific Drawing Available upon Request)
Product Manual
Manual #: 9610-20-3474
Engineered Products for Robotic Productivity
Apex, NC 27539
Tel: 919.772.0115
-
210
Description
Tool Changer—Master
Tool Changer—Tool
Air Adapter (incl JA2-M,JA3-M,JB2-M,JB3-M,
JB4-M,JB8-M,JP2-M,JP3-M)
Control & Signal Module—Master & Tool
Mounting Adapter Module—Master & Tool
Air Module—Master & Tool
Servo Module—Master & Tool
Servo Module—Master & Tool
Electrical Module—Master & Tool
Protective Cover Module—Tool
Fax: 919.772.8259
www.ati-ia.com
Email: [email protected]
Chapters
Table of Contents
Troubleshooting

Related Manuals for ATI Technologies QC-210


Summary of Contents for ATI Technologies QC-210
- Page 1 Robotic Tool Changer (Application-specific Drawing Available upon Request) Product Manual Includes: Part Number Description 9121-210AM-0-0-0-0 Tool Changer—Master 9121-210CT-0-0-0-0 Tool Changer—Tool 9121-Jxx-M Air Adapter (incl JA2-M,JA3-M,JB2-M,JB3-M, JB4-M,JB8-M,JP2-M,JP3-M) 9121-SA2/SA3-M/T Control & Signal Module—Master & Tool 9121-JJ43-M/T Mounting Adapter Module—Master & Tool 9121-AH2-M/AHx-T Air Module—Master &...
-
Page 2: Table Of Contents
Quick Change Installation and Operation Manual Document #9620-20-A-General TOC and Introduction-08 Table of Contents A. Introduction ..........................A-2 Glossary of Terms ........................A-3 Safety ............................A-6 2.1 Explanation of Notifications .....................A-6 General Safety Guidelines ....................A-6 2.3 Safety Precautions ......................A-7 Product Overview ........................A-8 Tool Changers .........................A-8 3.1.1 Manually Actuated Tool Changers ..............A-8 3.1.2... -
Page 3: Introduction
Quick Change Installation and Operation Manual Document #9620-20-A-General TOC and Introduction-08 A. Introduction Please contact ATI Industrial Automation with any questions concerning your particular model. CAUTION: This manual describes the function, application, and safety considerations of this product. This manual must be read and understood before any attempt is made to install or operate the product, otherwise damage to the product or unsafe conditions may occur. Information contained in this document is the property of ATI Industrial Automation, Inc. (ATI) and shall not be reproduced in whole or in part without prior written approval of ATI. -
Page 4: Glossary Of Terms
Quick Change Installation and Operation Manual Document #9620-20-A-General TOC and Introduction-08 1. Glossary of Terms More specific terms pertaining to the Control and Signal modules can be found in the Control and Signal Module section of this manual. Table 1.1—Tool Changer/Utility Coupler and Module Glossary Definition Term Arcing is the discharge of current when a strong current jumps gap in a... - Page 5 Quick Change Installation and Operation Manual Document #9620-20-A-General TOC and Introduction-08 Table 1.1—Tool Changer/Utility Coupler and Module Glossary Definition Term A term describing various technologies for transmitting Ethernet frames at a rate of a gigabit per second as defined by the IEEE802.3-2008 standard Gigabit Ethernet generally with RJ45, X-coded M12, or A-coded M12 connectors over CAT6 cabling. Typically used in vision applications (GigE Vision). Any of a wide variety of utility modules that pass electrical power through High Current Module the Master and Tool modules to the end-effector. Optional customized component used to adapt a Tool Changer or Utility Interface Plate (IP) Coupler to the user’s robot or tooling. The output command supplied to the ATI Master module to couple the Tool Latch Changer. The lock air pressure provided to the Master plate locking mechanism Lock forcing the cam to press the locking balls against the bearing race. This locks the Master and Tool Plates together. Pneumatic port on the Master plate through which air pressure is supplied to Lock Port Lock the Master plate to the Tool plate.
- Page 6 Quick Change Installation and Operation Manual Document #9620-20-A-General TOC and Introduction-08 Table 1.1—Tool Changer/Utility Coupler and Module Glossary Definition Term A electrical circuit present on the ATI Master module that is driven by the RTL Relay RTL sensor and allows the Tool Changer locking mechanism to retract when there is no Tool present. Cover plate for the back side of the Master plate, seals the pneumatic Sensor Plate chamber and provides mounting points for the Lock/Unlock switches. Any of a wide variety of utility modules that pass electrical power and servo signals through the Master and Tool modules to the end-effector equipped Servo Module with a servo motor. Sensor Interface Plate used to adapt the Tool Changer Master to the customer-supplied robot. The SIP is essentially a Robot Interface Plate that contains sensors that determine the state (Locked/Unlocked/No Tool) of the Master plate.
-
Page 7: Safety
Quick Change Installation and Operation Manual Document #9620-20-A-General TOC and Introduction-08 2. Safety The safety section describes general safety guidelines to be followed with this product, explanation of the notification found in this manual, and safety precaution that apply to the product. More specific notification are imbedded within the sections of the manual where they apply. -
Page 8: Safety Precautions
Quick Change Installation and Operation Manual Document #9620-20-A-General TOC and Introduction-08 All pneumatic and fluid components (i.e. fittings, tubing) must be capable of withstanding the repetitive motions of the application without failing. The routing of electrical, fluid, and pneumatic lines must minimize the possibility of stress/strain, kinking, rupture, etc. -
Page 9: Product Overview
Quick Change Installation and Operation Manual Document #9620-20-A-General TOC and Introduction-08 3. Product Overview 3.1 Tool Changers There are many different types of Tool Changers, Manual, Heavy Automation, Rail, Hollow Wrist, etc, which are specifically suited for the application they are designed for. A Tool Changer enhances the flexibility and reliability of a robotic cell. -
Page 10: Terms And Conditions Of Sale
Quick Change Installation and Operation Manual Document #9620-20-A-General TOC and Introduction-08 4. Terms and Conditions of Sale The following Terms and Conditions are a supplement to and include a portion of ATI’s Standard Terms and Conditions, which are on file at ATI and available upon request. ATI warrants to Purchaser that robotic Tool Changer products purchased hereunder will be free from defects in material and workmanship under normal use for a period of three (3) years from the date of shipment. - Page 11 Manual, Robotic Tool Changer, QC-210 Document #9620-20-B-210 Series Base Tool Changer-26 Table of Contents B. Base Tool Changer ........................B-3 QC-210 Series—Robotic Tool Changer ..................B-3 Product Overview ........................B-3 Master Plate Assembly ......................B-4 Tool Plate Assembly ........................B-5 Optional Modules ........................B-5 Installation ..........................B-6...
- Page 12 Manual, Robotic Tool Changer, QC-210 Document #9620-20-B-210 Series Base Tool Changer-26 Serviceable Parts ........................B-36 Models 9121-210xM-0-0-0-0-S0 ....................B-36 Models 9121-210xM-0-0-0-0-SL and 9121-210xM-0-0-0-0-SE ..........B-37 Models 9121-210xM-0-0-0-0-SM, 9121-210xM-0-0-0-0-SP and 9121-210xM-0-0-0-0-SR ..B-38 Models 9121-210xM-0-0-0-0-ST and 9121-210xM-0-0-0-0-SU ..........B-39 Standard Tool Plate ........................ B-40 Bolt-Down Tool Plate ......................
-
Page 13: Base Tool Changer
Master plate and Tool plate by optional modules. See the respective manuals for these options for more details. For the most current product information and specifications on the QC-210 Series of Tool Changers, please click the following link: http://www.ati-ia.com/products/toolchanger/QC.aspx?ID=QC-210... -
Page 14: Master Plate Assembly
Manual, Robotic Tool Changer, QC-210 Document #9620-20-B-210 Series Base Tool Changer-26 1.1 Master Plate Assembly The Master plate assembly includes the following features: • An anodized aluminum body. A hardened stainless steel locking mechanism (a cam, male coupling, and chrome steel ball bearings). -
Page 15: Tool Plate Assembly
For assistance in the choosing the right modules for your particular application, visit our website (http:// www.ati-ia.com/products/toolchanger/QC.aspx?ID=QC-210) to see what is available or contact an ATI sales representative. Pinnacle Park • 1031 Goodworth Drive • Apex, NC 27539 • Tel: 919.772.0115 • Fax: 919.772.8259 •... -
Page 16: Installation
Manual, Robotic Tool Changer, QC-210 Document #9620-20-B-210 Series Base Tool Changer-26 2. Installation All fasteners used to mount the Tool Changer to the robot and to customer’s tooling should be tightened to a torque value as indicated. Refer to Table 2.1. -
Page 17: Master Interface
Manual, Robotic Tool Changer, QC-210 Document #9620-20-B-210 Series Base Tool Changer-26 2.1 Master Interface The Master plate is typically attached to the robot arm. An interface plate can adapt the Master plate to a specific robot arm. Alignment features (dowel holes and bosses) accurately position and bolt holes secure the Master plate to the robot arm or an interface plate. -
Page 18: Master Plate Installation
Manual, Robotic Tool Changer, QC-210 Document #9620-20-B-210 Series Base Tool Changer-26 2.2 Master Plate Installation ® Tools required: 8 mm Allen wrench (hex key), torque wrench Supplies required: Clean rag, Loctite ® 1. Clean the mounting surfaces. 2. If required, install the interface plate to the robot arm, align using the boss or dowel pins and secure with customer supplied fasteners. -
Page 19: Tool Interface
Manual, Robotic Tool Changer, QC-210 Document #9620-20-B-210 Series Base Tool Changer-26 2.4 Tool Interface The Tool plate is attached to the customer’s tooling. An interface plate can adapt the Tool plate to customer tooling. Alignment features (dowel holes and a recess) accurately position and bolt holes secure the Tool plate to customer tooling. -
Page 20: Tool Plate Installation (Includes Bolt-Down Plate
Manual, Robotic Tool Changer, QC-210 Document #9620-20-B-210 Series Base Tool Changer-26 2.5 Tool Plate Installation (includes Bolt-Down Plate) Tools required: 8 mm, 10 mm, or 12 mm Allen wrench (hex key), torque wrench Supplies required: Clean rag, Loctite 242 1. Clean the mounting surfaces. -
Page 21: Tool Plate Removal (Includes Bolt-Down Plate
Manual, Robotic Tool Changer, QC-210 Document #9620-20-B-210 Series Base Tool Changer-26 Bolt-Down Tool Plate Installation (210CWT Shown) (12) M8-1.25 Socket Head Cap Screw (Refer to Table 2.1) (Customer Supplied) Tool Plate Dowel Pin (Customer Supplied) Tool Interface Plate (Customer Supplied) 2.6 Tool Plate Removal (includes Bolt-Down Plate) -
Page 22: Pneumatic Requirements
Manual, Robotic Tool Changer, QC-210 Document #9620-20-B-210 Series Base Tool Changer-26 2.7 Pneumatic Requirements Proper operation of the locking mechanism requires a constant supply of the clean, dry, non-lubricated air, with the following conditions: • Pressure range of the 60 to 100 psi (4.1 - 6.9 bar) Suggested 80 psi. -
Page 23: Electrical Connections
Manual, Robotic Tool Changer, QC-210 Document #9620-20-B-210 Series Base Tool Changer-26 2.8 Electrical Connections The Tool Changer is available with integrated lock/unlock sensors. If the sensors are not used, plugs are provided to seal the locking mechanism. If a control/signal module is to be utilized on Flat ‘A’ when ordered, the sensors will be connected to the module prior to shipping. -
Page 24: Operation
Manual, Robotic Tool Changer, QC-210 Document #9620-20-B-210 Series Base Tool Changer-26 3. Operation The Master plate locking mechanism is pneumatically driven to couple and uncouple with the Tool plate bearing race. CAUTION: Operation of the Tool Changer is dependent on the maintaining an air pressure of 60 to 100 psi (4.1 - 6.9 bar). -
Page 25: Conditions For Coupling
Manual, Robotic Tool Changer, QC-210 Document #9620-20-B-210 Series Base Tool Changer-26 3.1 Conditions for Coupling The following conditions should be considered when operating the Tool Changer. For more details about programming the robot, refer to the Operation section of the Control/Signal Module Manual. -
Page 26: Fail-Safe Operation
Manual, Robotic Tool Changer, QC-210 Document #9620-20-B-210 Series Base Tool Changer-26 6. A sufficient delay must be programmed between locking valve actuation and robot motion so that the locking process is complete before moving the robot. If equipped with Lock and Unlock sensors, the Lock signal should read “ON”... -
Page 27: Conditions For Uncoupling
Manual, Robotic Tool Changer, QC-210 Document #9620-20-B-210 Series Base Tool Changer-26 3.3 Conditions for Uncoupling Refer to your Air/Valve Adapter and/or Control/Signal Module Manual’s Operation section for operation during coupling/uncoupling. 1. Move the robot to position Tool plate in the tool stand. The position for coupling and uncoupling are the same. -
Page 28: Tool Storage Considerations
Manual, Robotic Tool Changer, QC-210 Document #9620-20-B-210 Series Base Tool Changer-26 3.5 Tool Storage Considerations NOTICE: Tool stand design is critical to the operation of the Tool Changer. Improperly designed tool stands can cause jamming and excessive wear of the Tool Changer components. -
Page 29: Maintenance
Manual, Robotic Tool Changer, QC-210 Document #9620-20-B-210 Series Base Tool Changer-26 4. Maintenance WARNING: Do not perform maintenance or repair(s) on the Tool Changer or modules unless the Tool is safely supported or placed in the tool stand, all energized circuits (e.g. electrical, air, water, etc.) are turned off, pressurized connections are purged and power is discharged... -
Page 30: Cleaning And Lubrication Of The Locking Mechanism And Alignment Pins
Manual, Robotic Tool Changer, QC-210 Document #9620-20-B-210 Series Base Tool Changer-26 4.2 Cleaning and Lubrication of the Locking Mechanism and Alignment Pins ® Supplies required: Clean rag, MobilGrease XHP222 Special Grease 1. Place the Tool in a secure location. 2. Uncouple the Master and Tool plates. - Page 31 Manual, Robotic Tool Changer, QC-210 Document #9620-20-B-210 Series Base Tool Changer-26 6. Check each ball bearing to make sure it moves freely in the male coupling. Additional cleaning may be necessary to free up any ball bearings that are sticking in place.
-
Page 32: Pin Block Inspection And Cleaning
Manual, Robotic Tool Changer, QC-210 Document #9620-20-B-210 Series Base Tool Changer-26 4.3 Pin Block Inspection and Cleaning Tools required: Nylon Brush (ATI Part Number 3690-0000064-60) 1. Place the Tool in a secure location. 2. Uncouple the Master and Tool plates. -
Page 33: Troubleshooting And Service Procedures
Manual, Robotic Tool Changer, QC-210 Document #9620-20-B-210 Series Base Tool Changer-26 5. Troubleshooting and Service Procedures The following section provides troubleshooting and service information to help diagnose conditions and repair the Tool Changer or control/signal module. WARNING: Do not perform maintenance or repair(s) on the Tool Changer or modules unless the Tool is safely supported or placed in the tool stand, all energized circuits (e.g. -
Page 34: Service Procedures
Manual, Robotic Tool Changer, QC-210 Document #9620-20-B-210 Series Base Tool Changer-26 Table 5.1—Troubleshooting Symptom Cause Resolution Units Equipped with Electrical/Servo/Control/Signal Modules Debris in thed around contact pins. Inspect V-ring seal for damage, replace damaged seal. Refer to Contact Pin worn or damaged. - Page 35 Manual, Robotic Tool Changer, QC-210 Document #9620-20-B-210 Series Base Tool Changer-26 Figure 5.2—Lock and Unlock Sensor Assembly Replacement M3 Socket Flat Head Cap Screw M3 Socket Flat Head Cap Screw RTL Sensor Flat Pack Style RTL Sensor Flat Pack Style...
- Page 36 Manual, Robotic Tool Changer, QC-210 Document #9620-20-B-210 Series Base Tool Changer-26 5.2.1.3 Lock and Unlock Sensor Assembly Replacement (Serial Numbers QM0821 and higher) Parts required: Refer to Section 6—Serviceable Parts Tools required: 2 mm, 2.5 mm, and 5 mm Allen wrench (hex key), torque wrench Supplies required: Loctite 222 and 242 1.
- Page 37 Manual, Robotic Tool Changer, QC-210 Document #9620-20-B-210 Series Base Tool Changer-26 13. Secure the sensor assembly using the (2) M3 socket flat head screws. Tighten to 12 in-lbs (1.4 Nm) using a 2 mm Allen wrench. 14. Install the (2) cable retaining tabs on Flat D of the Tool Changer body and secure with the (2) M3 socket flat head cap screws.
- Page 38 Manual, Robotic Tool Changer, QC-210 Document #9620-20-B-210 Series Base Tool Changer-26 5.2.1.4 Lock and Unlock Sensor Assembly Replacement (with Sensor Assemblies) Parts required: Refer to Section 6—Serviceable Parts Tools required: 2 mm, 2.5 mm, and 5 mm Allen wrench (hex key), torque wrench Supplies required: Loctite 222 and 242 1.
- Page 39 Manual, Robotic Tool Changer, QC-210 Document #9620-20-B-210 Series Base Tool Changer-26 13. Insert the lock and/or unlock sensor assembly into the Tool Changer body. 14. Apply Loctite 222 to the M3 socket flat head screws, secure the sensor assembly using the (2) M3 socket flat head screws and tighten to 12 in-lbs (1.4 Nm) using a 2.5 mm Allen wrench.
- Page 40 Manual, Robotic Tool Changer, QC-210 Document #9620-20-B-210 Series Base Tool Changer-26 5.2.1.5 RTL Flat Pack Style Sensor Replacement (R2 Sensor) Parts required: Refer to Section 6—Serviceable Parts Tools required: 2 mm and 5 mm Allen wrench (hex key), torque wrench Supplies required: Loctite 222 and 242 1.
- Page 41 Manual, Robotic Tool Changer, QC-210 Document #9620-20-B-210 Series Base Tool Changer-26 15. If the optional module was removed from Flat D, install the module. 16. Apply Loctite 242 to the M6 socket head cap screws. Install the (2) M6 Socket Head Cap Screws that secure the module to the Tool Changer body and tighten to 70 in-lbs (7.9 Nm) using a 5 mm Allen wrench.
- Page 42 Manual, Robotic Tool Changer, QC-210 Document #9620-20-B-210 Series Base Tool Changer-26 5.2.1.6 RTL Flat Pack Style Sensor Replacement (R1 Sensor) Parts required: Refer to Section 6—Serviceable Parts Tools required: 2 mm and 3 mm Allen wrench (hex key), torque wrench Supplies required: Loctite 222 1.
- Page 43 Manual, Robotic Tool Changer, QC-210 Document #9620-20-B-210 Series Base Tool Changer-26 Figure 5.10—RTL Sensor Assembly Replacement using Master Cleat (R1 Sensor) Master Cleat (3) M5 Socket Flat Head Cap Screw RTL Sensor Flat Pack Style Connects to "R1" M3 Socket Flat Head...
-
Page 44: V-Ring Seal Replacement
Manual, Robotic Tool Changer, QC-210 Document #9620-20-B-210 Series Base Tool Changer-26 5.2.2 V-ring Seal Replacement Parts required: Refer to Section 6—Serviceable Parts The seal protects the electrical connection between the Master and Tool module. If the seal becomes worn or damaged, it must be replaced. -
Page 45: Alignment Pin Replacement
Manual, Robotic Tool Changer, QC-210 Document #9620-20-B-210 Series Base Tool Changer-26 5.2.3 Alignment Pin Replacement Parts required: Refer to Section 6—Serviceable Parts Tools required: 3 mm or 4 mm Allen wrench (hex key), torque wrench Supplies required: Clean rag, Loctite 242, MobilGrease XHP222 1. -
Page 46: Serviceable Parts
6.1 Models 9121-210xM-0-0-0-0-S0 Figure 5.15—Master Plate Item No. Part Number Description 9121-210xM-0-0-0-0-S0 QC-210 Base Master, No Options, with plugs in the sensor holes 9005-20-2241 1/2” (2) Piece Pin Assembly 3410-0001016-01 O-ring 1/16 x 1/8 I.D. x 1/4 O.D. 9005-20-1983 Sensor Bore Cover Plate Assembly, SS Screws M3 x 8 Socket Head Cap Screw, SS, ND Ind. -
Page 47: Models 9121-210Xm-0-0-0-0-Sl And 9121-210Xm-0-0-0-0-Se
6.2 Models 9121-210xM-0-0-0-0-SL and 9121-210xM-0-0-0-0-SE Figure 5.16—QC-210 Master Plates Item No. Part Number Description 9121-210xM-0-0-0-0-SL QC-210 Master and PNP lock/unlock and RTL Sensing, LED Cables 9121-210xM-0-0-0-0-SE QC-210 Master and NPN lock/unlock and RTL Sensing 9005-20-2241 1/2” (2) Piece Pin Assembly 3410-0001016-01 O-ring 1/16 x 1/8 I.D. -
Page 48: Models 9121-210Xm-0-0-0-0-Sm, 9121-210Xm-0-0-0-0-Sp And 9121-210Xm-0-0-0-0-Sr
9121-210xM-0-0-0-0-SM QC-210 Master and PNP lock/unlock and RTL Sensing, LED Cables 9121-210xM-0-0-0-0-SP QC-210 Master and NPN lock/unlock and RTL Sensing, LED Cables QC-210 Master and PNP lock/unlock and RTL Sensing, RTL 1 m cables & 5 m 9121-210xM-0-0-0-0-SR lock/unlock cables 9005-20-2241 1/2”... -
Page 49: Models 9121-210Xm-0-0-0-0-St And 9121-210Xm-0-0-0-0-Su
6.4 Models 9121-210xM-0-0-0-0-ST and 9121-210xM-0-0-0-0-SU Figure 5.18—QC-210 Master Plates Item No. Part Number Description 9121-210xM-0-0-0-0-SM QC-210 Master and PNP lock/unlock and RTL Sensing, LED Cables 9121-210xM-0-0-0-0-SP QC-210 Master and NPN lock/unlock and RTL Sensing, LED Cables 9005-20-2241 1/2” (2) Piece Pin Assembly 3410-0001016-01 O-ring 1/16 x 1/8 I.D. -
Page 50: Standard Tool Plate
Part Number Description 9121-210CT-0-0-0-0 Tool with 100 mm Recess and no other options 9005-20-1335 Tool back cover plate for QC-210 (Includes Items 3 and 4) M4x6 Flat Head Socket Cap Screw, Class 10.9, Blue dyed Magni-565, ND 3500-1262006-15A Microspheres Epoxy, Yellow. -
Page 51: Bolt-Down Tool Plate
Part Number Description 9121-210CWT-0-0-0-0 Tool with 100 mm Recess and Bolt-Down Option 9005-20-1335 Tool back cover plate for QC-210 (Includes Items 3 and 4) M4x6 Flat Head Socket Cap Screw, Class 10.9, Blue dyed Magni-565, ND 3500-1262006-15A Microspheres Epoxy, Yellow. -
Page 52: Specifications
Pattern Table 5.5—Bolt-Down Tool Plate NOTE: This value is lower than the standard Recommended Max Moment 18,000 in-lbs QC-210 Tool Changer. This is the maximum X-Y (Mxy) 2,034 (Nm) recommended working load for optimum performance of the Tool Changer. Weight (coupled, no access.) 17.5 lbs. - Page 53 Manual, Robotic Tool Changer, QC-210 Document #9620-20-B-210 Series Base Tool Changer-26 8. Drawings 8.1 QC-210 Tool Changer Pinnacle Park • 1031 Goodworth Drive • Apex, NC 27539 • Tel: 919.772.0115 • Fax: 919.772.8259 • • Email: www.ati-ia.com [email protected] B-43...
- Page 54 Manual, Robotic Tool Changer, QC-210 Document #9620-20-B-210 Series Base Tool Changer-26 Pinnacle Park • 1031 Goodworth Drive • Apex, NC 27539 • Tel: 919.772.0115 • Fax: 919.772.8259 • • Email: www.ati-ia.com [email protected] B-44...
- Page 55 Manual, Robotic Tool Changer, QC-210 Document #9620-20-B-210 Series Base Tool Changer-26 Pinnacle Park • 1031 Goodworth Drive • Apex, NC 27539 • Tel: 919.772.0115 • Fax: 919.772.8259 • • Email: www.ati-ia.com [email protected] B-45...
-
Page 56: Bolt-Down Tool Plate
Manual, Robotic Tool Changer, QC-210 Document #9620-20-B-210 Series Base Tool Changer-26 8.2 Bolt-Down Tool Plate Pinnacle Park • 1031 Goodworth Drive • Apex, NC 27539 • Tel: 919.772.0115 • Fax: 919.772.8259 • • Email: www.ati-ia.com [email protected] B-46... - Page 57 Manual, Control/Signal Module, Adapter Assembly, JJ43 Document #9620-20-C-JJ43-02 C. Control and Signal Modules JJ43—Control and Signal Module, Adapter Assembly No Manual exists for this control and signal module. A drawing is attached. For additional information, please refer to our catalog or contact our Sales department. We will be glad to assist you.
- Page 58 Manual, Control/Signal Module, Adapter Assembly, JJ43 Document #9620-20-C-JJ43-02 Pinnacle Park • 1031 Goodworth Drive • Apex, NC 27539 • Tel: 919.772.0115 • Fax: 919.772.8259 • • Email: www.ati-ia.com [email protected]...
- Page 59 Air Adapters ..........................C-2 Product Overview ........................C-2 Installation ..........................C-4 Air Adapter Installation for QC-113, QC-210, QC-213, GL6L, GL7L ........C-4 Air Adapter Removal for QC-113, QC-210, QC-213, GL6L, GL7L0 ........C-5 Air Adapter Installation for QC-310, QC-313, QC-510, QC-1210 ..........C-6 Air Adapter Removal for QC-310, QC-313, QC-510, QC-1210 ..........
-
Page 60: Control And Signal Modules
Air Adapter Description Air Port Size Compatible Tool Changer or Utility Coupler models 9121-JA2-M Air Adapter 1/4” NPT QC-113, QC-210, QC-213, GL6L, GL7L 9121-JA3-M Air Adapter 1/4” NPT QC-310, QC-313, QC-510, QC-1210 9121-JB2-M Air Adapter (BSPP) G 1/4 QC-113, QC-210, QC-213, GL6L, GL7L... - Page 61 Manual, Air Adapters Document #9620-20-C-Jxx Air Adapters-02 A tool adapter assembly (9005-20-1192) is required for the Tool side which provides the proper spacing and a ledge mount for the control/signal Tool module. Figure 1.3—Tool Adapters Assembly Tool Adapter Assembly (9005-20-1192) Ledge Mount Feature for Control/Signal Tool Module Pinnacle Park •...
-
Page 62: Installation
Tool Changer or modules. 2.1 Air Adapter Installation for QC-113, QC-210, QC-213, GL6L, GL7L Tools required: 5 mm Allen wrench (hex key), , 4 mm Allen wrench (hex key), torque wrench Supplies required: clean rag 1. -
Page 63: Air Adapter Removal For Qc-113, Qc-210, Qc-213, Gl6L, Gl7L0
(2) Cable Retaining Tabs Control/Signal Module (Shown for Reference) 2.2 Air Adapter Removal for QC-113, QC-210, QC-213, GL6L, GL7L0 NOTICE: Depending on maintenance or repair being performed, utilities to modules and Master plate may need to be disconnected. Tools required: 5 mm Allen wrench (hex key), 4 mm Allen wrench (hex key) 1. -
Page 64: Air Adapter Installation For Qc-310, Qc-313, Qc-510, Qc-1210
Manual, Air Adapters Document #9620-20-C-Jxx Air Adapters-02 2.3 Air Adapter Installation for QC-310, QC-313, QC-510, QC-1210 Tools required: 5 mm Allen wrench (hex key), 4 mm Allen wrench (hex key), torque wrench Supplies required: clean rag 1. If the Tool Changer is already installed, dock the Tool side of the Tool Changer safely in the tool stand and uncouple the Tool Changer to allow clear access to the Master and Tool plates of the Tool Changer. -
Page 65: Air Adapter Removal For Qc-310, Qc-313, Qc-510, Qc-1210
Manual, Air Adapters Document #9620-20-C-Jxx Air Adapters-02 2.4 Air Adapter Removal for QC-310, QC-313, QC-510, QC-1210 NOTICE: Depending on maintenance or repair being performed, utilities to modules and Master plate may need to be disconnected. Tools required: 5 mm Allen wrench (hex key), 4 mm Allen wrench (hex key) 1. -
Page 66: Tool Adapter Assembly Removal
Manual, Air Adapters Document #9620-20-C-Jxx Air Adapters-02 2.6 Tool Adapter Assembly Removal NOTICE: Depending on maintenance or repair being performed, utilities to modules may need to be disconnected. Tools required: 5 mm Allen wrench (hex key), 4 mm Allen wrench (hex key) 1. -
Page 67: Operation
Tool Changer and check for air leaks, damaged leaking or missing. or missing O-rings., Refer to Section 2.2—Air Adapter Removal for QC-113, QC-210, QC-213, GL6L, GL7L0 Section 2.4—Air Adapter Removal for QC-310, QC-313, QC-510, QC-1210 Customer supplied solenoid... -
Page 68: Serviceable Parts
Manual, Air Adapters Document #9620-20-C-Jxx Air Adapters-02 6. Serviceable Parts 6.1 Air Adapters Refer to Section 8—Drawings for Air Adapter serviceable parts. 6.2 Tool Adapter Assembly Table 5.2—Tool Adapter Assembly ITEM NO. PART NUMBER DESCRIPTION 9005-20-1192 Tool Adapter Assembly 3500-1066016-15A M6 x 16mm SHCS MB ND Microspheres 3500-1064035-15A M5 x 35mm SHCS MB, ND Microspheres... -
Page 69: Specifications
Air Adapter with SST Mounting Screws G, QC-310, QC-313, QC-510, QC-1210 Pneumatic Connection G 1/4 Weight 1.94 lbs (0.88 kg) 9121-JB8-M Air Adapter with Revered Air Ports G, QC-113, QC-210, QC-213, GL6L, GL7L Pneumatic Connection G 1/4 Weight 1.66 lbs (0.75 kg) 9121-JP2-M... -
Page 70: Drawings
Manual, Air Adapters Document #9620-20-C-Jxx Air Adapters-02 8. Drawings 8.1 Air Adapter for QC-210 Pinnacle Park • 1031 Goodworth Drive • Apex, NC 27539 • Tel: 919.772.0115 • Fax: 919.772.8259 • • Email: www.ati-ia.com [email protected] C-12... -
Page 71: Air Adapter For
Manual, Air Adapters Document #9620-20-C-Jxx Air Adapters-02 8.2 Air Adapter for QC-310 Pinnacle Park • 1031 Goodworth Drive • Apex, NC 27539 • Tel: 919.772.0115 • Fax: 919.772.8259 • • Email: www.ati-ia.com [email protected] C-13... - Page 72 Manual, Signal and Control Module, SA2 SA3 Document #9620-20-C-SA2 SA3-04 Table of Contents C. Control and Signal Modules ....................C-2 SA2—Control Module ........................C-2 SA3—Control Module (Potted version) ..................C-2 Product Overview ........................C-2 SA2 Master ..........................C-3 SA3 Master ..........................C-3 SA2 Tool ............................. C-4 SA3 Tool .............................
-
Page 73: Control And Signal Modules
Manual, Control and Signal Module, SA2 SA3 Document #9620-20-C-SA2 SA3-04 C. Control and Signal Modules SA2—Control Module SA3—Control Module (Potted version) 1. Product Overview The control modules are required to provide a means for the customer to communicate with and control the Tool Changer. -
Page 74: Sa2 Master
Manual, Signal and Control Module, SA2 SA3 Document #9620-20-C-SA2 SA3-04 1.1 SA2 Master The SA2 Master module provides up to 19 pass-through signals. The Master module uses (4) M8 3-pin Pico connectors to connect to the Lock, Unlock, and RTL sensors on the Tool Changer. The customer interface connection is an Amphenol 28-Pin MS-style connector. -
Page 75: Sa2 Tool
Manual, Control and Signal Module, SA2 SA3 Document #9620-20-C-SA2 SA3-04 1.3 SA2 Tool The SA2 Tool module provides up to 19 pass-through signals. The customer interface connection is an Amphenol 19-Pin MS-style connector. There is no Tool-ID. 1.4 SA3 Tool The SA3 Tool module provides up to 19 pass-through signals. -
Page 76: Installation
Manual, Signal and Control Module, SA2 SA3 Document #9620-20-C-SA2 SA3-04 2. Installation The control/signal modules are typically installed by ATI prior to shipment. The steps below outline the field installation or removal as required. For wiring information refer to Section 8—Drawings. DANGER: This module has a voltage of 50 V or greater;... -
Page 77: Master Module Removal
Manual, Control and Signal Module, SA2 SA3 Document #9620-20-C-SA2 SA3-04 Figure 2.1—Master Module Installation and Removal Use Ledge Mounting Feature to Properly Align Module Air Adapter on Master Side (Shown) R1 Sensor R2 Sensor (2) M6 Socket Head Cap Screws Master Module Amphenol Connector... -
Page 78: Tool Module Installation
Manual, Signal and Control Module, SA2 SA3 Document #9620-20-C-SA2 SA3-04 2.3 Tool Module Installation Figure 2.2 for Tool module installation instructions. Set the Tool-ID by using push button switches Refer to on the Tool modules. Refer to Section 2.5—Setting the Tool-ID on the SA3, SA4, SA5, and SA7 Tool Module. wrench (hex key), torque wrench ® Tools required: 5 mm Allen Supplies required: Clean rag, Loctite 242 (if fasteners do not have pre-applied adhesive) ®... -
Page 79: Tool Module Removal
Manual, Control and Signal Module, SA2 SA3 Document #9620-20-C-SA2 SA3-04 2.4 Tool Module Removal Figure 2.2 Refer to for Tool module removal instructions. Tools required: 5 mm Allen wrench 1. If the Tool Changer is already installed, place the tool safely in the tool stand and uncouple the Tool Changer to allow clear access to the Master and Tool plates of the Tool Changer. -
Page 80: Operation
Manual, Signal and Control Module, SA2 SA3 Document #9620-20-C-SA2 SA3-04 3. Operation Various Tool Changer I/O are provided to the customer through the military-style Amphenol connector on the control/signal Master module. Lock, Unlock, and Ready-to-Lock proximity sensor inputs are provided for confirmation of the Tool Changer and locking mechanism positions. -
Page 81: Lock, Unlock, And Rtl Sensor Cable Led Behavior
Manual, Control and Signal Module, SA2 SA3 Document #9620-20-C-SA2 SA3-04 3.1 Lock, Unlock, and RTL Sensor Cable LED Behavior The Lock, Unlock, and RTL sensor cables are equipped with two LEDs. The Green LED indicates the sensor has power and the yellow LED indicates the switch has been made. The LED behavior is affected by the control/signal module. -
Page 82: Recommended Sequence Of Operations
Manual, Signal and Control Module, SA2 SA3 Document #9620-20-C-SA2 SA3-04 3.2 Recommended Sequence of Operations This recommended sequence of operations procedure is a general guide when programming a robot or PLC for use with a Tool Changer and a control/signal module. This procedure is intended for “automatic” modes used during normal application processes. - Page 83 Manual, Control and Signal Module, SA2 SA3 Document #9620-20-C-SA2 SA3-04 5. Robot moves away from the tool stand with the Tool Changer coupled. 6. Normal operation: a. The following inputs are ON: i. Locked ii. RTL1 iii. RTL2 b. The following inputs are OFF: i.
-
Page 84: Maintenance
Manual, Signal and Control Module, SA2 SA3 Document #9620-20-C-SA2 SA3-04 4. Maintenance Once installed, the operation of the control modules are generally trouble free. The modules are not designed to be field serviced as all point-to-point wiring connections are soldered. Component replacement is limited to the V-ring seal on the Master. -
Page 85: Pin Block Inspection And Cleaning
Manual, Control and Signal Module, SA2 SA3 Document #9620-20-C-SA2 SA3-04 4.1 Pin Block Inspection and Cleaning Tools required: Nylon Brush (ATI Part Number 3690-0000064-60) 1. For a Tool Changer, if the Tool Changer is installed place the Tool safely in the tool stand. Uncouple the Tool Changer or Utility Coupler to allow clear access to the Master and Tool plates. -
Page 86: Troubleshooting And Service Procedures
Manual, Signal and Control Module, SA2 SA3 Document #9620-20-C-SA2 SA3-04 5. Troubleshooting and Service Procedures This troubleshooting section provides information to help diagnose conditions with the Tool Changer or control module. DANGER: This module has a voltage of 50 V or greater; NO contact should be attempted before removing power. -
Page 87: Service Procedures
Manual, Control and Signal Module, SA2 SA3 Document #9620-20-C-SA2 SA3-04 Table 5.1—Troubleshooting Procedures Symptom Possible Cause Correction Check/Replace signal cabling upstream and Damaged signal cabling downstream of Tool Changer modules. Inspect module contact pins for debris/wear/ damage. Refer to Section 4.1—Pin Block Inspection and Cleaning. -
Page 88: Serviceable Parts
Manual, Signal and Control Module, SA2 SA3 Document #9620-20-C-SA2 SA3-04 6. Serviceable Parts 6.1 Master and Tool Serviceable Parts Refer to Section 8—Drawings. 6.2 Accessories Table 6.1—Accessories ITEM NO. PART NUMBER DESCRIPTION 3690-0000064-60 Brush, Blue Nylon All Purpose (Contact Pin Cleaning) 7. - Page 89 Manual, Control and Signal Module, SA2 SA3 Document #9620-20-C-SA2 SA3-04 Table 7.3—SA2 Tool Module Specifications Discrete signal module with 19-pin Amphenol, 19-pin Block, 19 Pass-Through 9121-SA2-T signals - Tool Side Customer Interface: 19-pin female connector for Power and Signal Interface Connections Integrated Tool Changer I/O: (4X) 3-Pin M8 female connectors supporting Tool Changer Lock, Unlock, and Ready-to-Lock proximity sensors.
- Page 90 Manual, Signal and Control Module, SA2 SA3 Document #9620-20-C-SA2 SA3-04 Table 7.6—SA5 Tool Module Specifications Discrete Signal tool module with 19-pin Amphenol, 19-pin Block, 7 Pass- 9121-SA5-T Thru’s, 0-999 Tool-ID Customer Interface: 19-pin female connector for Power and Signal Interface Connections Integrated Tool Changer I/O: (4X) 3-Pin M8 female connectors supporting Tool Changer Lock, Unlock, and Ready-to-Lock proximity sensors.
-
Page 91: Drawings
Manual, Control and Signal Module, SA2 SA3 Document #9620-20-C-SA2 SA3-04 8. Drawings 8.1 SA2 Family Drawing Pinnacle Park • 1031 Goodworth Drive • Apex, NC 27539 • Tel: 919.772.0115 • Fax: 919.772.8259 • • Email: www.ati-ia.com [email protected] C-20... - Page 92 Manual, Signal and Control Module, SA2 SA3 Document #9620-20-C-SA2 SA3-04 Pinnacle Park • 1031 Goodworth Drive • Apex, NC 27539 • Tel: 919.772.0115 • Fax: 919.772.8259 • • Email: www.ati-ia.com [email protected] C-21...
- Page 93 Manual, Control and Signal Module, SA2 SA3 Document #9620-20-C-SA2 SA3-04 Pinnacle Park • 1031 Goodworth Drive • Apex, NC 27539 • Tel: 919.772.0115 • Fax: 919.772.8259 • • Email: www.ati-ia.com [email protected] C-22...
- Page 94 Manual, Signal and Control Module, SA2 SA3 Document #9620-20-C-SA2 SA3-04 Pinnacle Park • 1031 Goodworth Drive • Apex, NC 27539 • Tel: 919.772.0115 • Fax: 919.772.8259 • • Email: www.ati-ia.com [email protected] C-23...
- Page 95 Manual, Control and Signal Module, SA2 SA3 Document #9620-20-C-SA2 SA3-04 Pinnacle Park • 1031 Goodworth Drive • Apex, NC 27539 • Tel: 919.772.0115 • Fax: 919.772.8259 • • Email: www.ati-ia.com [email protected] C-24...
- Page 96 Manual, Signal and Control Module, SA2 SA3 Document #9620-20-C-SA2 SA3-04 Pinnacle Park • 1031 Goodworth Drive • Apex, NC 27539 • Tel: 919.772.0115 • Fax: 919.772.8259 • • Email: www.ati-ia.com [email protected] C-25...
-
Page 97: Sa2M Sa7T Drawing
Manual, Control and Signal Module, SA2 SA3 Document #9620-20-C-SA2 SA3-04 8.2 SA2M SA7T Drawing Pinnacle Park • 1031 Goodworth Drive • Apex, NC 27539 • Tel: 919.772.0115 • Fax: 919.772.8259 • • Email: www.ati-ia.com [email protected] C-26... - Page 98 Manual, Signal and Control Module, SA2 SA3 Document #9620-20-C-SA2 SA3-04 Pinnacle Park • 1031 Goodworth Drive • Apex, NC 27539 • Tel: 919.772.0115 • Fax: 919.772.8259 • • Email: www.ati-ia.com [email protected] C-27...
- Page 99 Manual, Control and Signal Module, SA2 SA3 Document #9620-20-C-SA2 SA3-04 Pinnacle Park • 1031 Goodworth Drive • Apex, NC 27539 • Tel: 919.772.0115 • Fax: 919.772.8259 • • Email: www.ati-ia.com [email protected] C-28...
- Page 100 Manual, Air Module, AH2 Document #9620-20-D-AH2-09 Table of Contents D. Air Modules ..........................D-2 AH2-M/T, AH3-T, AH4-T—Air Module ...................D-2 Product Overview ........................D-2 Installation ..........................D-3 Module Installation ........................D-3 Module Removal ........................D-4 Operation ..........................D-5 Maintenance ...........................D-5 Troubleshooting and Service Procedures ................D-6 Troubleshooting ........................
-
Page 101: Ah2-M/T, Ah3-T, Ah4-T-Air Module
Manual, Air Module, AH2 Document #9620-20-D-AH2-09 D. Air Modules AH2-M/T, AH3-T, AH4-T—Air Module 1. Product Overview Air modules provide air utility and are attached to the Master and Tool plates. When the Tool Changer is coupled, the Master module passes the air supply to the Tool module for use by the customer tooling. Significant forces are encountered when using these modules. -
Page 102: Installation
Manual, Air Module, AH2 Document #9620-20-D-AH2-09 2. Installation The air modules are typically installed on the Tool Changers by ATI prior to shipment. The following steps outline field installation or removal as required. For detail information refer to Section 8—Drawings. WARNING: Do not perform maintenance or repair(s) on the Tool Changer or modules unless the Tool is safely supported or placed in the tool stand, all energized circuits (e.g. -
Page 103: Module Removal
Manual, Air Module, AH2 Document #9620-20-D-AH2-09 Figure 2.1—Installation and Removal of the Module (2) M6 Socket Head Screw 9121-AH2-T (Shown) Tool Changer Use Ledge Mounting Feature to Properly Align Module (8) Customer Air Connection 2.2 Module Removal Tools required: 5 mm Allen wrench Supplies required: Clean rag 1. -
Page 104: Operation
Manual, Air Module, AH2 Document #9620-20-D-AH2-09 3. Operation Air modules pass air utilities from the Master to the Tool for use by the customer’s tooling. Unlike pass-through ports, self-sealing valves prevent the air circuits from discharging, which eliminates the need to close upstream circuits. -
Page 105: Troubleshooting And Service Procedures
Manual, Air Module, AH2 Document #9620-20-D-AH2-09 5. Troubleshooting and Service Procedures The following section provides troubleshooting information to help diagnose conditions with the Tool Changer and service procedures to help resolve these conditions. WARNING: Do not perform maintenance or repair(s) on the Tool Changer or modules unless the Tool is safely supported or placed in the tool stand, all energized circuits (e.g. -
Page 106: Service Procedures
Manual, Air Module, AH2 Document #9620-20-D-AH2-09 5.2 Service Procedures The following service procedures provide instructions for component replacement and adjustment. 5.2.1 Master Side Self Sealing Valve Parts required: Refer to Section 8—Drawings Tools required: 2.5 mm Allen Wrench, torque wrench Supplies required: Clean rag, Magnalube G lubricant 1. - Page 107 Manual, Air Module, AH2 Document #9620-20-D-AH2-09 11. Lubricate the bore in the module housing with Magnalube G (Teflon/Petroleum based grease). NOTICE: Do not lubricate the O-ring face seal until after installation. Lubricating the O-ring before installation can cause the O-ring to blow out during coupling and uncoupling.
-
Page 108: Tool Side Self Sealing Valve
Manual, Air Module, AH2 Document #9620-20-D-AH2-09 5.2.2 Tool Side Self Sealing Valve Parts required: Refer to Section 8—Drawings Tools required: 10 mm Allen wrench, Torque wrench Supplies required: Clean rag, Magnalube G lubricant 1. Place the Tool in a secure location. 2. - Page 109 Manual, Air Module, AH2 Document #9620-20-D-AH2-09 12. If replacing the O-rings, lubricate both new O-rings with Magnalube G (Teflon/Petroleum based grease). 13. Install the O-rings on the plug assembly and the valve assembly. Figure 5.4—Tool Self-Sealing Valve (Assembly) Torque Wrench Plug Assembly O-Ring Spring...
-
Page 110: Serviceable Parts
Manual, Air Module, AH2 Document #9620-20-D-AH2-09 6. Serviceable Parts See drawings in Section 8—Drawings of this manual. Table 6.1—Master module Mounting Fasteners Part Number Description M6 x 20 Socket Head Cap Screw, SS, ND Microspheres, 0-3 3500-1066020-21A uncoated lead thds. 5-7 coated thds. IFI525 Table 6.2—Tool module Mounting Fasteners Part Number Description... -
Page 111: Specifications
Manual, Air Module, AH2 Document #9620-20-D-AH2-09 7. Specifications Table 7.1—AH2 Master Module Specifications 9121-AH2-M Pneumatic Master module with (8) G 3/8 self-sealing ports Various - Stainless Steel valve components, aluminum housing, Nitrile Materials of Construction seals Weight: 2.87 lbs. (1.30 kg) Self-sealing Valves: Quantity Air Pressure Maximum pressure of 100 psi (6.9 bar) - Page 112 Manual, Air Module, AH2 Document #9620-20-D-AH2-09 Table 7.4—AH4 Tool Module Specifications 9121-AH4-T Pneumatic Tool module with (8) 3/8 G self-sealing ports Various - Stainless Steel valve components, aluminum housing, Nitrile Materials of Construction seals Weight: 2.31 lbs. (1.05 kg) Self-sealing Valves: Quantity Air Pressure Maximum pressure of 100 psi (6.9 bar) Cv, Min...
-
Page 113: Drawings
Manual, Air Module, AH2 Document #9620-20-D-AH2-09 8. Drawings Pinnacle Park • 1031 Goodworth Drive • Apex, NC 27539 • Tel: 919.772.0115 • Fax: 919.772.8259 • • Email: www.ati-ia.com [email protected] D-14... - Page 114 Quick Change Installation and Operation Manual Document #9620-20-E-ED15-04 Table of Contents E. Electrical Modules .........................E-2 ED15—Servo Module ........................E-2 Product Overview ........................E-2 ED15 Master Module .......................E-2 ED15 Master Module .......................E-2 Installation ..........................E-3 Module Installation ........................E-3 Module Removal .........................E-4 Operation ..........................E-4 Maintenance ...........................E-5 Pin Block Inspection and Cleaning ..................E-6 Troubleshooting and Service Procedures ................E-7 Troubleshooting .........................E-7...
-
Page 115: Ed15-Servo Module
Quick Change Installation and Operation Manual Document #9620-20-E-ED15-04 E. Electrical Modules ED15—Servo Module 1. Product Overview A servo module may be provided on the Tool Changer to pass electrical power and signal connections to a transgun Section 7—Specifications servo motor. Refer to for the details of each module. -
Page 116: Installation
Quick Change Installation and Operation Manual Document #9620-20-E-ED15-04 2. Installation The servo modules are typically installed by ATI prior to shipment. The steps below outline the field installation or removal as required. For wiring information refer to Section 8—Drawings. DANGER: This module has a voltage of 50 V or greater, NO contact should be attempted before removing power. -
Page 117: Module Removal
Quick Change Installation and Operation Manual Document #9620-20-E-ED15-04 2.2 Module Removal 1. If the Tool Changer is already installed, dock the Tool side of the Tool Changer safely in the tool stand and uncouple the Tool Changer to allow clear access to the Master and Tool plates of the Tool Changer. 2. -
Page 118: Maintenance
Quick Change Installation and Operation Manual Document #9620-20-E-ED15-04 4. Maintenance Once installed the operation of the servo modules is generally trouble free. The modules are not designed to be field serviced as all point-to-point wiring connections are soldered. Component replacement is limited to the V-ring seal on the Master. -
Page 119: Pin Block Inspection And Cleaning
Quick Change Installation and Operation Manual Document #9620-20-E-ED15-04 4.1 Pin Block Inspection and Cleaning 1. Dock the Tool side of the Tool Changer safely and uncouple the Tool Changer to allow clear access to the Master and Tool plates. 2. Turn off and de-energize all energized circuits (e.g. electrical, air, water, etc.). 3. -
Page 120: Troubleshooting And Service Procedures
Quick Change Installation and Operation Manual Document #9620-20-E-ED15-04 5. Troubleshooting and Service Procedures The following section provides troubleshooting and service information to help diagnose conditions and repair the Tool Changer or control/signal module. DANGER: This module has a voltage of 50 V or greater, NO contact should be attempted before removing power. -
Page 121: Servo Module, Drive, Or Motor Troubleshooting Procedure
Quick Change Installation and Operation Manual Document #9620-20-E-ED15-04 5.1.1 Servo Module, Drive, or Motor Troubleshooting Procedure DANGER: This module has a voltage of 50 V or greater, NO contact should be attempted before removing power. This especially includes separation or insertion of the mating connectors or any contact with the Tool Changer or its components. -
Page 122: Service Procedures
Quick Change Installation and Operation Manual Document #9620-20-E-ED15-04 5.2 Service Procedures The following service procedures provide instructions for component replacement. 5.2.1 V-ring Seal Replacement The seal protects the electrical connection between the Master and Tool module. If the seal becomes worn or damaged it needs to be replaced. 1. -
Page 123: Serviceable Parts
Quick Change Installation and Operation Manual Document #9620-20-E-ED15-04 6. Serviceable Parts 6.1 Master Module Table 6.1—Master Module Item No. Part Number Description 9121-ED15-M ED15 Master Servo module Assembly 4010-0000030-01 V-ring Seal Pinnacle Park • 1031 Goodworth Drive • Apex, NC 27539 USA • Tel: 919.772.0115 • Fax: 919.772.8259 • www.ati-ia.com • Email: [email protected] E-10... -
Page 124: Tool Module
Quick Change Installation and Operation Manual Document #9620-20-E-ED15-04 6.2 Tool Module Table 6.2—Tool Module Item No. Part Number Description 9121-ED15-T ED15 Tool Servo module Assembly 6.3 Accessories Table 6.3—Accessories Part Number Description 3690-0000064-60 Brush, Blue Nylon All Purpose (Contact Pin Cleaning) Pinnacle Park •... -
Page 125: Specifications
Quick Change Installation and Operation Manual Document #9620-20-E-ED15-04 7. Specifications Table 7.1—ED15 Master Module Specifications Master Servo module assembly, M23 Motor and Resolver Connections, 9121-ED15-M Special 12-pin Connector Key Orientation Customer Interface: Interface Connector(s) 6-pin Intercontec male connector for power 12-pin Intercontec male connector for signal Connector: Electrical Rating Power: 13 A, 630 V... -
Page 126: Drawings
Quick Change Installation and Operation Manual Document #9620-20-E-ED15-04 8. Drawings Pinnacle Park • 1031 Goodworth Drive • Apex, NC 27539 USA • Tel: 919.772.0115 • Fax: 919.772.8259 • www.ati-ia.com • Email: [email protected] E-13... - Page 127 Quick Change Installation and Operation Manual Document #9620-20-E-ED15-04 Pinnacle Park • 1031 Goodworth Drive • Apex, NC 27539 USA • Tel: 919.772.0115 • Fax: 919.772.8259 • www.ati-ia.com • Email: [email protected] E-14...
- Page 128 Quick Change Installation and Operation Manual Document #9620-20-E-ED15-04 Pinnacle Park • 1031 Goodworth Drive • Apex, NC 27539 USA • Tel: 919.772.0115 • Fax: 919.772.8259 • www.ati-ia.com • Email: [email protected] E-15...
- Page 129 Quick Change Installation and Operation Manual Document #9620-20-E-ED15-04 Pinnacle Park • 1031 Goodworth Drive • Apex, NC 27539 USA • Tel: 919.772.0115 • Fax: 919.772.8259 • www.ati-ia.com • Email: [email protected] E-16...
- Page 130 Manual, Electrical Module, REP6 Document #9620-20-E-REP6-02 E. Electrical Modules REP6—Electrical Module No Manual exists for this electrical module. A drawing is attached. For additional information, please refer to our catalog or contact our Sales department. We will be glad to assist you. How to Reach Us Sale, Service and Information about ATI products: ATI Industrial Automation...
- Page 131 Manual, Electrical Module, REP6 Document #9620-20-E-REP6-02 Pinnacle Park • 1031 Goodworth Drive • Apex, NC 27539 • Tel: 919.772.0115 • Fax: 919.772.8259 • • Email: www.ati-ia.com [email protected]...
- Page 132 Manual, Electrical Module, REP6 Document #9620-20-E-REP6-02 Pinnacle Park • 1031 Goodworth Drive • Apex, NC 27539 • Tel: 919.772.0115 • Fax: 919.772.8259 • • Email: www.ati-ia.com [email protected]...
- Page 133 Quick-Change Installation and Operation Manual Document #9620-20-E-RF8-02 No Installation and Operation Manual exists for this module. A drawing is attached. For additional information, please refer to our catalog or contact our Sales department. We will be glad to assist you. How to Reach Us Sale, Service and Information about ATI products: ATI Industrial Automation...
- Page 134 Quick-Change Installation and Operation Manual Document #9620-20-E-RF8-02 Pinnacle Park • 1031 Goodworth Drive • Apex, NC 27539 • Tel: 919.772.0115 • Fax: 919.772.8259 • • Email: www.ati-ia.com [email protected]...
- Page 135 Quick-Change Installation and Operation Manual Document #9620-20-F-NA-03 F. High Current Modules High Current Modules are not used in this application. For a list of available options please refer to our catalog or contact our Sales department. We will be glad to assist you. How to Reach Us Sale, Service and Information about ATI products: ATI Industrial Automation...
- Page 136 Quick-Change Installation and Operation Manual Document #9620-20-G-NA-04 G. Interface Plates Interface Plates are not used in this application. For a list of available options please refer to our catalog or contact our Sales department. We will be glad to assist you. How to Reach Us Sale, Service and Information about ATI products: ATI Industrial Automation...
- Page 137 Quick-Change Installation and Operation Manual Document #9620-20-h-uaa-04 No Installation and Operation Manual exists for this module. A drawing is attached. For additional information, please refer to our catalog or contact our Sales department. We will be glad to assist you. How to Reach Us Sales, Service and Information about ATI products: ATI Industrial Automation...
- Page 138 Quick-Change Installation and Operation Manual Document #9620-20-h-uaa-04 Pinnacle Park 1031 Goodworth Drive Apex, NC 27539 Tel: 919.772.0115 Fax: 919.772.8259 www.ati-ia.com Email: [email protected] H - 2...