Table of Contents
Table of Contents
Troubleshooting

Related Manuals for Honeywell Vocollect


Summary of Contents for Honeywell Vocollect
- Page 1 Honeywell Vocollect Hardware Reference...
-
Page 3: About Honeywell Documentation
Notice About Honeywell Documentation © Copyright 1987-2018 Honeywell International Inc. All rights reserved. Honeywell and its product names are among the trademarks and/or service marks owned by Honeywell International, Inc., or its subsidiaries. Published By Honeywell Vocollect Solutions 703 Rodi Road... -
Page 5: Table Of Contents
Adjusting the Volume Using Device Buttons..................25 Adjusting the Speed..........................25 Changing the Speaker's Gender......................26 Understanding Talkman Commands........................26 Options for Hearing Impaired Users........................27 Part Numbers: Vocollect Talkman Devices......................27 Part Numbers: Talkman Accessories........................28 Part Numbers: Talkman MP Solutions.......................29 Choosing the Right Headset..........................29 Part Numbers: Wired Headsets.......................... 30 Part Numbers: Wired Headset Accessories......................31... - Page 6 | Contents | vi Connect to the Side Battery Terminal....................62 Fasten the Ground Wire......................... 63 Attach the A700 VMT to the Vehicle....................63 Remove the A700 VMT from the Vehicle.....................64 A700 VMT Installation Best Practices....................64 Charging an A700 Device Battery........................66 A700 Product Battery Specifications.....................
- Page 7 About LED Indicators............................134 T2-Series Device LED Indicators......................134 Accessories..............................136 Belts and Belt Clips..........................136 Device Covers............................137 Vocollect T2 Series Bluetooth Adapters Specifications...............138 Chapter 7: Talkman T1..................141 T1 Specifications: Talkman T1........................142 Charging the T1..............................142 T1 Batteries Specifications........................142 Charging a T1 Battery in a Device......................
- Page 8 Accessories..............................145 T1 Holster............................. 146 Chapter 8: Talkman MP Solution...............149 Chapter 9: Honeywell Wired Headsets.............. 151 SL-4 and SL-14 Vocollect Light Industrial Behind-the-Head Headset............152 SL-14 Headset Specifications.......................152 SL-4 Headset Specifications.........................153 Wearing the SL-14 or SL-4 Behind-the-Head Headset................153 Proper Use and Care Instructions for Talkman T1 and SL-4/SL-14 Headsets........153 SR-10 and SR-15 Vocollect Behind-the-Head Headset...................
- Page 9 SRX2 Compatibility..........................178 Charging the SRX2 Headset.........................179 Wearing an SRX2 Wireless Headset....................182 Headset Functions and LED Patterns for SRX2..................185 Vocollect SRX2 Hard-Hat Headset........................187 SRX2 Hard-Hat Headset Specifications....................187 Installing the SRX2 Hard-Hat Clip......................187 Attaching the SRX2 to a Hard Hat......................188 Wearing the SRX2 Hard-Hat Headset....................189...
- Page 10 The Device Keeps Shutting Off........................259 Troubleshooting Guide for the Talkman A500/T5 Battery Charger..............259 About Sending Equipment Back for Repairs....................262 Packaging Items for Return to Honeywell...................263 Sending Equipment Back for Repairs: Return Material Authorization (RMA) Procedures....263 Troubleshooting VMT Configurations......................263 Troubleshooting Problems Indicated by LED....................264...
- Page 11 Training Using a Visual Training Device.................... 279 Training through VoiceConsole's Display......................280 Training Using a Printed List of Words......................280 Training Using the Device Screen........................281 ™ Appendix B: Honeywell Regulatory Compliance..........283 Statement of Agency Compliance........................284 Federal Communications Commission Compliance..................284 Canadian Compliance............................286 Cumplimiento de normas mexicana.........................
-
Page 13: Chapter 1: Introduction
• Hardware specifications • Contact Information • Installation procedures, and basic operating instructions for Honeywell • Patents and Intellectual hardware and/or third party devices that are compatible with Honeywell Property software • Part numbers • Regulatory and compliance statements •... -
Page 14: General Safety Guidelines
Honeywell Vocollect Solutions devices and wireless headsets are designed to be compliant with the rules and regulations in the locations into which they are sold and are labeled as required. Honeywell devices are type approved and do not require the user to obtain license or authorization before using them. Changes or modifications not expressly approved by Honeywell could void the user's authority to operate the equipment. - Page 15 Handling Used Batteries • When shipping batteries, place tape or insulating material securely over the battery contacts to avoid accidental contact in transit. Honeywell batteries can be shipped under Special Provision 188 of 49 CFR 172.102 or IATA exception A45. •...
- Page 16 Warning: Failure to follow approved instructions for wearing, securing, and mounting devices could result in damage to the units capable of causing a catastrophic release of energy harming workers and property. Honeywell is not responsibile for any damage caused by equipment not being worn, secured, or mounted in an approved manner.
-
Page 17: Cleaning Procedures For Honeywell Equipment
Honeywell Solutions products have a long service life if they are maintained properly. Follow recommended cleaning practices. While Honeywell equipment is manufactured and tested to be resistant to normal dirt and deposits from the workplace environment, the build-up of residue can damage the equipment and degrade performance over time. -
Page 18: Contact Information
Honeywell Vocollect Technical Support. Find most technical documentation on VoiceWorld, https://www.voiceworld.com. Honeywell Vocollect Reseller Services If you purchased equipment or services through a Honeywell Vocollect reseller, please contact that reseller first for support or purchase questions. Honeywell Vocollect Technical Support Submit incidents or questions to http://vocollect.custhelp.com... -
Page 19: Patents And Intellectual Property
Email: [email protected] Japan and Korea Phone: +813 6730 7234 Email: [email protected] Honeywell Vocollect RMA To return equipment for repair, contact Honeywell Vocollect RMA to request an RMA number: Email: [email protected] Sales and General Inquiries Honeywell Vocollect Solutions Honeywell Vocollect Solutions Europe... -
Page 21: Chapter 2: Talkman Devices And Headsets
Speech Recognition Headsets • Part Numbers: Chargers A Vocollect speech recognition headset with an attached microphone allows the operator to hear the device's instructions or questions. The operator talks to the device to request information and enters data by responding to the device's prompts. - Page 22 Holstering with the opening facing down or to the side places the unit at risk for dropping. • Always use pads and windscreens with Honeywell headsets to protect the equipment and ensure optimum speech recognition performance. • Honeywell recommends changing headset windscreens every 90 days to ensure the best performance.
-
Page 23: Turning A Talkman Device On
| Talkman Devices and Headsets | 23 Turning a Talkman Device On Before you turn on a device, make sure a headset and charged battery are properly connected to it. 1. Press the Play/Pause button on the device. The LED indicator differs depending on the device being used. Device Type Indicator A700 series... -
Page 24: Loading An Operator's Templates
"Current operator is (your operator name). Good night." The device then goes to sleep. The next time you turn the device on, it will be ready to use. Adjusting the Voice Each Vocollect Talkman device uses Vocollect Voice software to provide instructions to the operator and prompt him or her for responses. -
Page 25: Adjusting The Pitch
| Talkman Devices and Headsets | 25 The actual voice that speaks to the operator can be adjusted in several ways so that the operator can hear and understand the information clearly. • Adjust the pitch of the voice lower or higher •... -
Page 26: Changing The Speaker's Gender
| Talkman Devices and Headsets | 26 The device says "Current operator is operator name. Select menu item." 2. Press the + or — button until the device says "Change speed." 3. Press the Operator button. If you use the + button to scroll through the options, Change Speed is the fourth menu item in the list. 4. -
Page 27: Options For Hearing Impaired Users
Users may find that their assistive devices are passing through additional background noise that makes it difficult to hear the Talkman device prompts. In this case, Honeywell recommends using a cupped headset to help eliminate distracting input from the assistive devices. -
Page 28: Part Numbers: Talkman Accessories
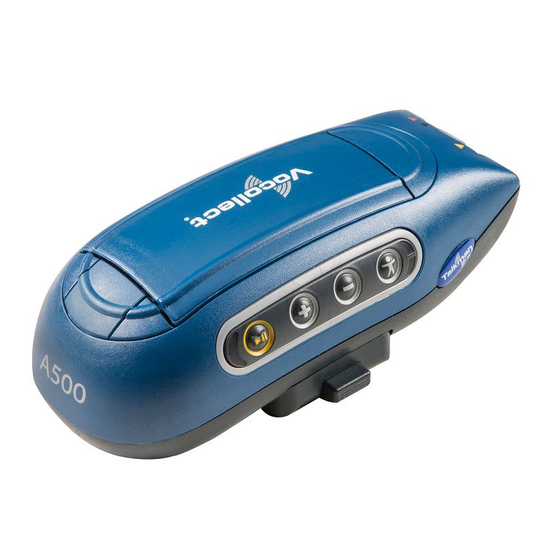
| Talkman Devices and Headsets | 28 Device Honeywell Part Number Talkman A500 (b/g) TT-801 Talkman A500 (a/b/g/n) TT-802 Talkman T5m TT-700-100-M Talkman T5 TT-700 Talkman T2x TT-601 Talkman T1 TT-100 Part Numbers: Talkman Accessories Accessory Honeywell Part Number A700 Device Belt... -
Page 29: Part Numbers: Talkman Mp Solutions
Number Talkman MP TM-CN70-01 (Includes: 1 Intermec CN70-CN70AN3KN00W1100, 1 Vocollect SRX2 Wireless Bluetooth Headset and Battery, 1 Vocollect VoiceClient MP license, 1 Vocollect VoiceConsole license) Available in EMEA countries only. Note: CN70 and SRX2 battery chargers are sold separately. Choosing the Right Headset In deciding which headset to purchase, it may be beneficial for workers to try several different models to find the best fit for their jobs and environments. -
Page 30: Part Numbers: Wired Headsets
Note: The SR-35 Headset can only be used with a hard hat that has a slot on HD-704-2 (coiled cord) the side that accepts a Peltor clip. This clip is sold separately by Honeywell(part number HD-704-101) and is required with each SR-35 headset. -
Page 31: Part Numbers: Wired Headset Accessories
| Talkman Devices and Headsets | 31 Part Part Number HS-708-4-L (left ear) SL-4 Vocollect Light Industrial Behind-the-Head Headset With Training Cable for HS-708-100-R (right Talkman T1 ear) Part Numbers: Wired Headset Accessories Part (SL-4/SL-14 Wired Headset) Part Number Windscreen, SL-Series Headsets (Bag of 50) - Page 32 Earpad, Textured Leatherette, SR-30, 31, 35, and 40 (Bag of 10) HD-702-103b Mounting Disks, SR-30 (Bag of 5) HD-702-108b Clip, SR-35 Vocollect Hard Hat Headset (required to mount the headset to a hardhat) HD-704-101 Part (SR-40 Wired Headset) Part Number...
-
Page 33: Part Numbers: Wireless Headsets
| Talkman Devices and Headsets | 33 Part Numbers: Wireless Headsets Part Part Number SRX Speech Recognition Headset Complete HD-800-1 (SRX is not supported with WT41N0 Wearable Terminal) SRX2 Headset 1 Complete Headset, 1 Battery (1 headband, all pads and strap, 1 HD-1000-1 electronics module, 1 battery, 1 mic cap) SRX2 Headset Bundle, 20 Complete SRX2 Headsets, 20 Batteries, 1 20-Bay Charger (20... -
Page 34: Part Numbers: Chargers
BT-1000-101B SRX2 20-Bay Charger CM-1000-20 SRX2 Micro USB Cable CM-1000-101 Part Numbers: Chargers Charger - Device Vocollect Part Number A700 6-Bay Device Charger and Power Supply CM-901 A700 12-Bay Battery Charger and Power Supply CM-902 A700 Charger Power Supply CM-901-101... - Page 35 | Talkman Devices and Headsets | 35 Charger - Device Vocollect Part Number A500 Charger, Power Supply (For use with CM-700-1) T2 Series Charger, Power Supply PS-601-1 (For use with CM-601-1 & CM-602-1) A500 10-Bay Combination Charger Mounting Bracket CM-701-1...
-
Page 37: Chapter 3: Talkman A700
Chapter Talkman A700 Topics: • A710 Specifications • A720 Specifications • A730 Specifications • Talkman A700 VMT Installation Guide • Charging an A700 Device Battery • Scanning with the Talkman A730 Device • About LED Indicators • TouchConfig: Bringing Additional A700 Devices Online •... -
Page 38: A710 Specifications
| Talkman A700 | 38 A710 Specifications Weight 5.6 ounces (158.76g) With standard battery: 8.4 ounces (238.14g) With high-capacity battery: 10.2 ounces (289.17g) Length 5.4" (13.7 cm) Width 2.5" (6.35 cm) With high-capacity battery: 3.046" (7.74 cm) Depth 1.7" (4.32 cm) I/O Ports USB maintenance port with audio out and virtual serial support... -
Page 39: A730 Specifications
100% condensing Enclosure Rating IP67 Note: Packaging varies for product shipments. Generally, packing materials are about 15% of the total shipment weight. Talkman A730 Symbologies Registry Key Default Value Description [HKEY_LOCAL_MACHINE\Software\Vocollect\Imager\Postnet] - Postnet Symbology Configuration PostnetActivation Enables the Postnet symbology. - Page 40 BPOCheckDigitTransmission Enable transmission of the check digit. BPOUDSI "P2" User-defined symbology identifier. Range is 0-4 characters. [HKEY_LOCAL_MACHINE\Software\Vocollect\Imager\Canada Post] - Canada Post Symbology Configuration CanadaPostActivation Enables the Canada Post symbology. CanadaPostCodeMark 0x2a A single character inserted before the barcode data to indicate the symbology.
- Page 41 | Talkman A700 | 41 Registry Key Default Value Description [HKEY_LOCAL_MACHINE\Software\Vocollect\Imager\Sweden Post] - Sweden Post Symbology Configuration SwedenPostActivation Enables the Sweden Post symbology. SwedenPostCodeMark 0x2a A single character inserted before the barcode data to indicate the symbology. SwedenPostUDSI "P7" User-defined symbology identifier. Range is 0-4 characters.
- Page 42 | Talkman A700 | 42 Registry Key Default Value Description [HKEY_LOCAL_MACHINE\Software\Vocollect\Imager\Code 93] - Code 93 Symbology Configuration Code93Activation Enables the Code 93 symbology. Code93CodeMark 0x44 A single character inserted before the barcode data to indicate the symbology. Code93BarCodeLengthL1 Length value L1. Range is 0x0 to 0xFF (0 to 255).
- Page 43 User-defined symbology identifier. Range is 0-4 characters. GS1-128UDSI "C9" User-defined symbology identifier. Range is 0-4 characters. [HKEY_LOCAL_MACHINE\Software\Vocollect\Imager\Interleaved 2 of 5] - Interleaved 2 of 5 Symbology Configuration Interleaved2of5Activation Enables the Interleaved 2 of 5 symbology. Interleaved2of5ReadingRange Enables Vesta algorithm decoding for better read range.
- Page 44 Enable transmission of the check digit. Interleaved2of5UDSI "B2" User-defined symbology identifier. Range is 0-4 characters. [HKEY_LOCAL_MACHINE\Software\Vocollect\Imager\Matrix 2 of 5] - Matrix 2 of 5 Symbology Configuration Matrix2of5Activation Enables the MSI Code symbology. Matrix2of5StartStop Enables special ChinaPost mode, where a specific start/stop is required and the checksum is transmitted.
- Page 45 PlesseyCheckDigitTransmission Enable transmission of the check digit. PlesseyUDSI "C2" User-defined symbology identifier. Range is 0-4 characters. [HKEY_LOCAL_MACHINE\Software\Vocollect\Imager\Standard 2 of 5] - Standard 2 of 5 Symbology Configuration Standard2of5Activation Enables the Standard 2 of 5 symbology. Standard2of5CodeMark 0x44 A single character inserted before the barcode data to indicate the symbology.
- Page 46 Code11CheckDigitTransmission Enable transmission of the check digit. Code11UDSI "C1" User-defined symbology identifier. Range is 0-4 characters. [HKEY_LOCAL_MACHINE\Software\Vocollect\Imager\EAN / UPC] - EAN/UPC Symbology Configuration UPC-AActivation Enables the UPC-A symbology. UPC-EActivation Enables the UPC-E symbology. EAN-8Activation Enables the EAN-8 symbology.
- Page 47 EAN-8UDSI "FF" User-defined symbology identifier. Range is 0-4 characters. EAN-13UDSI "F" User-defined symbology identifier. Range is 0-4 characters. [HKEY_LOCAL_MACHINE\Software\Vocollect\Imager\PDF417] - PDF417 Symbology Configuration PDF417Activation Enables the PDF417 symbology. MicroPDF417Activation Enables the "micro" variant of PDF417. PDF417IrregularPDF Enables the reading of labels for a symbol length descriptor of 0.
- Page 48 User-defined symbology identifier. Range is 0-4 characters. CodablockFUDSI "K1" User-defined symbology identifier. Range is 0-4 characters. [HKEY_LOCAL_MACHINE\Software\Vocollect\Imager\TLC 39] - TLC 39 Symbology Configuration TLC39Activation Enables the TLC 39 symbology (requires Micro PDF417 and Code 39 to be enabled as well).
- Page 49 A single character inserted before the barcode data to indicate the symbology. DatamatrixUDSI "D0" User-defined symbology identifier. Range is 0-4 characters. [HKEY_LOCAL_MACHINE\Software\Vocollect\Imager\QR Code] - QR Code Symbology Configuration QRCodeActivation Enables the QR (Quick Response) Code symbology. QRCodeInverseVideo Decoding mode for black/white inverted labels, where 0 = normal (black on white), 1 = inverse (white on black), and 2 = automatic.
- Page 50 User-defined symbology identifier. Range is 0-4 characters. CompositeCUDSI TODO User-defined symbology identifier. Range is 0-4 characters. [HKEY_LOCAL_MACHINE\Software\Vocollect\Imager\Multicode] - Multiple Symbology Concatenation Support MulticodeActivation Activates the ability to read multiple barcodes with one trigger press. If this value is set to 1 (enabled),...
- Page 51 | Talkman A700 | 51 Registry Key Default Value Description MulticodeLengthForBarcode1 Specifies a fixed number of characters for this symbology. Range is 0x0 to 0xFFFF (0 to 32767), where 0x0 is any length. MulticodeLengthForBarcode2 Specifies a fixed number of characters for this symbology. Range is 0x0 to 0xFFFF (0 to 32767), where 0x0 is any length.
- Page 52 Used when incomplete transmission is enabled and the timeout is reached. MulticodeBarcodeSeparator "<>" Separation string between barcodes. Range is 0-4 characters. [HKEY_LOCAL_MACHINE\Software\Vocollect\Imager\Data Editing] - Barcode Data Editing ActivationForScenario1 Enables the barcode editing scenario. ActivationForScenario2 Enables the barcode editing scenario. ActivationForScenario3 Enables the barcode editing scenario.
- Page 53 | Talkman A700 | 53 Registry Key Default Value Description BarcodeLengthForScenario2 Specifies a fixed number of characters for this symbology. Range is 0x0 to 0xFFFF (0 to 32767), where 0x0 is any length. BarcodeLengthForScenario3 Specifies a fixed number of characters for this symbology. Range is 0x0 to 0xFFFF (0 to 32767), where 0x0 is any length.
-
Page 54: Talkman A700 Vmt Installation Guide
A set of instructions, up to 100 characters, to be executed for this scenario. See manufacturer's website for details. [HKEY_LOCAL_MACHINE\Software\Vocollect\Imager\Message format] - Additional information added to barcode data MessageFormatSymbologyIdentifier Chooses which symbology identifier is inserted before the barcode data. 0 = disabled, 1 = Code Mark, 2 = AIM format, 3 = User Defined. -
Page 55: Talkman A700 Vmt Mounting Options
| Talkman A700 | 55 Talkman devices in this configuration may use any wired or wireless equipment (headsets, scanners, etc.). Honeywell sells the complete solution including mounting kits and power systems to enable any Talkman A700 devices to be used in an A700 VMT configuration. -
Page 56: Talkman Vmt Parts And Accessories
Figure 7: Claw Mounting Talkman VMT Parts and Accessories The following device-mounting options are supplied by Honeywell. Order one part from each line for your configuration. Table 1 describes items that support Talkman VMT configurations. Several electrical components are common for both Talkman A500 and Talkman A700 configurations. - Page 57 | Talkman A700 | 57 A500 A700 Order one of the following to attach the arm to the Order one of the following to attach the arm to the vehicle: vehicle: BL-710-101 - VEHICLE MOUNT, HOLDER/ BL-710-101 - VEHICLE MOUNT, HOLDER/ •...
- Page 58 851-810-001 AC Adapter stand-alone (wall plug) power use 137cm (4.5’) Note: A700 devices may be used in VMT configurations using a Honeywell battery without connecting to the vehicle’s power source. The BL-903 unpowered vehicle dock, which has no power components, should be used in lieu of the BL-904.
-
Page 59: Position The Talkman A700 Vmt
| Talkman A700 | 59 A500 A700 BL-710-102 - VEHICLE MOUNT, ARM, BL-710-102 - VEHICLE MOUNT, ARM, TALKMAN(R) T5 SERIES TALKMAN(R) T5 SERIES Order one of the following to attach the arm to the Order one of the following to attach the arm to the vehicle: vehicle: •... -
Page 60: Install The Mounting Brackets
In other words, the arm should not be tilted so far that these pieces touch. Route the Electrical Cables You will need the following equipment: • One fuse holder from Cooper Bussman. Honeywell recommends using a Cooper Bussmann HFA series in line waterproof fuse. • One fuse. Honeywell recommends a Cooper Bussmann ABC-20-R fuse. -
Page 61: Assemble The Vehicle Battery Cable
| Talkman A700 | 61 • Cables should not be run such that they can get caught on moving parts. • Cables should not be run on the outside of a vehicle. • Cables should not have 90 degree turns, the minimum bend radius should not be less than one inch •... -
Page 62: Connect To The Top Battery Terminal
| Talkman A700 | 62 Connect to the Top Battery Terminal The procedure you use to connect to the vehicle battery depends on the location of the battery terminal: Top or Side. CAUTION: Verify that the cable to battery connections are correct. Electrical energy from vehicle batteries can harm equipment and people. -
Page 63: Fasten The Ground Wire
| Talkman A700 | 63 Note: When you remove the battery terminal side post bolts from the vehicle battery, the vehicle computer and radio return to their default settings. 2. Fasten a 3/8-inch nut to the 3/8 x 1-1/2-inch positive battery terminal post. 3. -
Page 64: Remove The A700 Vmt From The Vehicle
Note: Honeywell does not support configurations of the A700 without a battery. Honeywell recommends that Talkman devices and cables be left in place after they are installed in vehicles. While these components may be removed for maintenance or temporary use in other areas, they should not be removed as a part of regular operation. - Page 65 To prevent this issue, remove the user-adjustable handle on the arm and install a 1/4" #20 nylon lock nut provided with the Vocollect VMT kit. The lock nut cannot be loosened by hand and resists most vibrations. Secure VMT cabling •...
-
Page 66: Charging An A700 Device Battery
A700 devices use a Honeywell Charger that charges the high-performance battery while still seated in a device and a separate charger for charging batteries that have been removed from the device. -
Page 67: Charging An A700 Battery In A Device
| Talkman A700 | 67 • Environmental specifications: The battery pack halves are sonically welded together to protect the internals from water and dust. The battery functions properly in the following conditions: Operation Temperature: -30°C to 50°C (-22°F to 122°F) Storage Temperature: -30°C to 60°C (-22°F to 140°F) Humidity: 95% condensing Rain/dust: IP67... -
Page 68: Removing A Battery From A Talkman A700 Device
Make sure the battery is firmly in place and can't be removed without pressing the battery release button. Warning: Replace a battery only with another battery that has been authorized by Honeywell for the product you are using. Use of an unqualified battery may present a risk of fire, explosion, leakage, or other hazard. -
Page 69: About Led Indicators
About LED Indicators Vocollect Talkman devices, SRX and SRX2 headsets, and their chargers have LEDs that indicate the state of the equipment. These LEDs may be on, off or blink. In some cases an LED will blink, alternating between two colors. - Page 70 Warning: Replace a battery only with another battery that has been authorized by Honeywell for the product you are using. Use of an unqualified battery may present a risk of fire, explosion, leakage, or other hazard.
- Page 71 | Talkman A700 | 71 Near Field Communication (NFC) Indicator Blink Pattern NFC State NFC radio is disabled. Fast blink The device is scanning for a tag. Blink TouchConfig sender or receiver mode entered On (for one second then off) The device successfully read a tag.
-
Page 72: Touchconfig: Bringing Additional A700 Devices Online
| Talkman A700 | 72 TouchConfig: Bringing Additional A700 Devices Online Prerequisite: A single device has been configured. The following instructions are for configuring additional devices. Note: TouchConfig uses near field communication (NFC). Data sent through NFC is not encrypted nor does it follow any specific safety protocol. -
Page 73: Installing The Usb Driver On Windows 7 Or Vista
Honeywell offers a variety of accessories for wearing, protecting, and facilitating the operations of Talkman and other devices. Handheld and other devices may require specific cables in order to use Honeywell accessories, such as headsets. See the release notes for the Vocollect Voice software for your device for more information. -
Page 74: Pidion Bm-170 Display
| Talkman A700 | 74 Pidion BM-170 Display The Pidion BM-170 is a display device that can be used along with a Talkman A500 or Talkman A700 device (VoiceCatalyst only) to run applications where it is more appropriate that voice be supplemented with a display. It has a touchscreen and various buttons and switches: Control Location... - Page 75 | Talkman A700 | 75 Figure 14: The Initial Screen 3. Press the Connect to a Voice Device button to begin connecting the display to your Talkman. A list of nearby devices' serial numbers that can accept a connection are displayed. Figure 15: List of Devices 4.
-
Page 76: Belts
Screens relevant to the application loaded onto the voice device will appear once the voice application is running. Belts To comply with government safety standards, the device must be used with the Vocollect belt and standard or scanning device holster. -
Page 77: Vehicle Mounts For Talkman A700
The holster is designed for the A710 and A720 devices that will not be handled frequently throughout a shift. Note: Honeywell strongly recommends using a Honeywell holster for your device. Placing a device in a pocket or other enclosed space can cause issues with WiFi performance. - Page 78 • Check the position of the device for user comfort over long periods. Installing the Mounting Brackets for a Talkman A700 Vehicle Dock The following parts are supplied by Honeywell for attaching the screw-on mount: Quantity Description Vehicle Mount, Holder/Base Screw On Attachment...
- Page 79 | Talkman A700 | 79 Quantity Description Vehicle Mount, Holder/Base Screw On Attachment 1. Drill the holes required to secure the base to the vehicle. If using the clamp or claw mount, skip this step. Note: Apply some lubricant (for example, light oil or anti-seize) to the threads of the clamp mount screws. 2.
-
Page 81: Chapter 4: Talkman A500
The device supports Bluetooth technology to connect to display devices as well as other peripherals and headsets. In the Vocollect Talkman product line, the Talkman A500 offers expanded operations with a more powerful processor, more available memory, and a more robust radio. -
Page 82: A500 Specifications
| Talkman A500 | 82 A500 Specifications Weight 6.31 ounces (178.89 g) With standard battery: 11.01 ounces (312.13 g) Length 5.5" (13.97 cm) Width 2.63" (6.68 cm) Depth 1.7" (4.3 cm) I/O Ports • Headset port (yellow) • Maintenance port with audio out and RS-232 serial support Operating Temperature -22°... -
Page 83: A500/T5 High-Performance Batteries Specifications
The A500 and T5 devices use a Honeywell Combination Charger that charges the high-performance battery while still seated in a device or when removed from the device. -
Page 84: Charging An A500 Or T5-Series Battery
1. Hold the Talkman so that the red and yellow ports are facing away from you. 2. Hold the battery with the pins facing away from you and so that the Vocollect logo is on top. 3. Place the battery in at an angle, pins end first. -
Page 85: Removing A Battery From A Talkman A500, T5-Series Or T2-Series Device
Make sure the battery is firmly in place and can't be removed without pressing the battery release button. Warning: Replace a battery only with another battery that has been authorized by Honeywell for the product you are using. Use of an unqualified battery may present a risk of fire, explosion, leakage, or other hazard. -
Page 86: Battery Warm-Up Time
About LED Indicators Vocollect Talkman devices, SRX and SRX2 headsets, and their chargers have LEDs that indicate the state of the equipment. These LEDs may be on, off or blink. In some cases an LED will blink, alternating between two colors. -
Page 87: Easy Configuration
You can set the device profile as a "default profile," which automatically loads to any bare-platform devices. The devices must be in standby mode and connected to VoiceConsole. Note: The Talkman A500 model TT-802 ships as a bare-platform device. It does not have Vocollect voice software—VoiceCatalyst or VoiceClient—preloaded. -
Page 88: Talkman A500 Vmt
Talkman devices in this configuration may use any wired or wireless equipment (headsets, scanners, etc.). Honeywell sells the complete solution including mounting kits and power systems to enable any Talkman A500 devices to be used in an A500 VMT configuration. -
Page 89: Talkman A500/T5 Vmt Accessories
The Talkman A500/T5 VMT is designed to be installed using RAM ® Mounting Systems hardware. Honeywell supplies a mounting bracket for the A500/T5 and mounting hardware from RAM Mounting Systems. Additional hardware mounting bracket options can be purchased directly from RAM Mounting Systems (www.ram-mount.com) to customize the installation. -
Page 90: Positioning The Talkman A500/T5 Vmt
Check the position of the device for user comfort over long periods. Talkman VMT Parts and Accessories The following device-mounting options are supplied by Honeywell. Order one part from each line for your configuration. Table 1 describes items that support Talkman VMT configurations. Several electrical components are common for both Talkman A500 and Talkman A700 configurations. - Page 91 | Talkman A500 | 91 A500 A700 Order one of the following to attach the arm to the Order one of the following to attach the arm to the vehicle: vehicle: BL-710-101 - VEHICLE MOUNT, HOLDER/ BL-710-101 - VEHICLE MOUNT, HOLDER/ •...
- Page 92 851-810-001 AC Adapter stand-alone (wall plug) power use 137cm (4.5’) Note: A700 devices may be used in VMT configurations using a Honeywell battery without connecting to the vehicle’s power source. The BL-903 unpowered vehicle dock, which has no power components, should be used in lieu of the BL-904.
-
Page 93: Connecting Cables To The Power Supply And Attaching The Power Supply To A Vehicle
BT-902 - BATTERY, A700 SERIES, HIGH- CAPACITY Connecting Cables to the Power Supply and Attaching the Power Supply to a Vehicle The following parts are supplied by Honeywell for attaching the 12 or 24 volt vehicle's power supply to a device: Item # Quantity... - Page 94 You will need the following equipment: • One Cable from the power supply to vehicle’s power source. Honeywell recommends an industrial rated cable with the following specifications: Number of conductors = 3, Gauge of wire = 16, Temperature = -40C to 90C •...
-
Page 95: Connecting The A700/T5 Vmt Device To A Vehicle's Power Source
10. Connect the yellow wire to the battery adapter by attaching the connector and tightening the nut. Connecting the A700/T5 VMT Device to a Vehicle's Power Source You will need the following equipment: • Two fuse holders from Cooper Bussman. Honeywell recommends using a Cooper Bussmann HFA series in line waterproof fuse. ™ •... -
Page 96: Removal Of An A500/T5 Vmt Device From Vehicle
• Fasteners Honeywell recommends choosing unswitched power as the source for the power supply. This will allow Talkman devices to be powered for software updates as well as prevent Talkman devices from accidentally being unpowered if the vehicle is quickly switched off unintentionally. -
Page 97: Vmt Installation Best Practices
Honeywell does not support configurations of the A700 without a battery. Honeywell recommends that Talkman devices, cables, and VMT battery adapters be left in place after they are installed in vehicles. While these components may be removed for maintenance or temporary use in other areas, they should not be removed as a part of regular operation. - Page 98 Consider additional options from RAM Mounts The Honeywell parts provided for mounting Talkman devices represent a small set of the mounting options available from RAM Mounts (www.rammount.com). Honeywell only requires that customers purchase the BL-710-1, vehicle mount holder for Talkman. When used with the screw-on base attachment (BL-710-102) or other parts that use a 1"...
- Page 99 To prevent this issue, remove the user-adjustable handle on the arm and install a 1/4" #20 nylon lock nut provided with the Vocollect VMT kit. The lock nut cannot be loosened by hand and resists most vibrations. •...
-
Page 100: Accessories
Honeywell offers a variety of accessories for wearing, protecting, and facilitating the operations of Talkman and other devices. Handheld and other devices may require specific cables in order to use Honeywell accessories, such as headsets. See the release notes for the Vocollect Voice software for your device for more information. - Page 101 | Talkman A500 | 101 Connecting the Pidion BM-170 Display to a Talkman A500/A700 1. Turn on the Talkman A500 or A700 device. 2. Turn on the display. The display will initialize. Figure 47: The Initial Screen 3. Press the Connect to a Voice Device button to begin connecting the display to your Talkman. A list of nearby devices' serial numbers that can accept a connection are displayed.
-
Page 102: T5/A500 Adjustable Shoulder Harness
Screens relevant to the application loaded onto the voice device will appear once the voice application is running. T5/A500 Adjustable Shoulder Harness To comply with government safety standards, the device must be used with either a Vocollect customized belt and clip, a Vocollect customized shoulder harness, or a Vocollect belt holder. -
Page 103: Belts And Belt Clips
T5/A500 Black Belt Clip connects a T5 or A500 device to the belt. • Attach the clip to the Honeywell belt at the beginning of a shift. You can attach the device to and remove the device from the clip as often as necessary throughout the shift. -
Page 104: Device Covers
Device Covers Honeywell offers optional protective covers for its devices. • The use of a device cover is not required; however, Honeywell strongly recommends using the cover to help preserve the appearance and prolong the life of the devices. •... - Page 105 | Talkman A500 | 105 • You must remove the device cover before placing the device into a device charger. Failure to do so could result in damage to both the device and the charger. T5/A500 Elastomer-SKIN Cover Specifications Fabric ThermoPlastic Elastomer (Dynaflex G2755) Putting a Cover on an A500 or T5-Series Device 1.
-
Page 107: Chapter 5: Talkman T5 Series
Chapter Talkman T5 Series Topics: • T5-Series Specifications: Talkman T5 and Talkman T5m • Charging an A500 or T5 Device • About LED Indicators • Easy Configuration • Talkman T5 VMT • Accessories Figure 57: Talkman T5 Figure 58: Talkman T5m The Talkman ™... -
Page 108: T5-Series Specifications: Talkman T5 And Talkman T5M
| Talkman T5 Series | 108 T5-Series Specifications: Talkman T5 and Talkman T5m Weight 6.50 ounces (184.27 g) With standard battery: 11.20 ounces (317.51 g) Length 5.5" (13.97 cm) Width 2.63" (6.68 cm) Depth 1.7" (4.3 cm) I/O Ports • Headset port (yellow) •... -
Page 109: Charging An A500 Or T5 Device
The A500 and T5 devices use a Honeywell Combination Charger that charges the high-performance battery while still seated in a device or when removed from the device. -
Page 110: Charging An A500 Or T5 Battery In A Device
Charging an A500 or T5-Series Battery 1. Remove the battery from the Talkman device. 2. Hold the battery with its contacts to the bottom and the Vocollect label facing you. Figure 60: Inserting a Battery Into the Charger 3. Place the battery into an open battery slot on the top level of the charger. -
Page 111: Inserting A Battery Into A Talkman A500, T5-Series Or T2-Series Device
1. Hold the Talkman so that the red and yellow ports are facing away from you. 2. Hold the battery with the pins facing away from you and so that the Vocollect logo is on top. 3. Place the battery in at an angle, pins end first. -
Page 112: Battery Warm-Up Time
About LED Indicators Vocollect Talkman devices, SRX and SRX2 headsets, and their chargers have LEDs that indicate the state of the equipment. These LEDs may be on, off or blink. In some cases an LED will blink, alternating between two colors. -
Page 113: Easy Configuration
| Talkman T5 Series | 113 State T5-Series Device Fast blink The device is in a charger Slow blink One of the following: • the device is in sleep mode and not in a charger • the voice application selection menu is in use •... -
Page 114: Easy Configuration: Bringing Additional T5, T5M, And A500 Devices Online
You can set the device profile as a "default profile," which automatically loads to any bare-platform devices. The devices must be in standby mode and connected to VoiceConsole. Note: The Talkman A500 model TT-802 ships as a bare-platform device. It does not have Vocollect voice software—VoiceCatalyst or VoiceClient—preloaded. -
Page 115: Mounts For Talkman A700/T5 Vmt
The Talkman A500/T5 VMT is designed to be installed using RAM ® Mounting Systems hardware. Honeywell supplies a mounting bracket for the A500/T5 and mounting hardware from RAM Mounting Systems. Additional hardware mounting bracket options can be purchased directly from RAM Mounting Systems (www.ram-mount.com) to customize the installation. -
Page 116: Positioning The Talkman A500/T5 Vmt
Check the position of the device for user comfort over long periods. Install the Mounting Brackets Warning: The device must be mounted in accordance with accepted aftermarket practices and materials supplied by Honeywell and/or RAM Mounting Systems. Honeywell does not support Talkman devices which... -
Page 117: Connecting Cables To The Power Supply And Attaching The Power Supply To A Vehicle
In other words, the arm should not be tilted so far that these pieces touch. Connecting Cables to the Power Supply and Attaching the Power Supply to a Vehicle The following parts are supplied by Honeywell for attaching the 12 or 24 volt vehicle's power supply to a device: Item #... - Page 118 | Talkman T5 Series | 118 • Cables should not have 90 degree turns, the minimum bend radius should not be less than one inch • To remove slack on a cable it should be coiled up and secured inside the vehicle with a cable tie. •...
-
Page 119: Connecting The A700/T5 Vmt Device To A Vehicle's Power Source
10. Connect the yellow wire to the battery adapter by attaching the connector and tightening the nut. Connecting the A700/T5 VMT Device to a Vehicle's Power Source You will need the following equipment: • Two fuse holders from Cooper Bussman. Honeywell recommends using a Cooper Bussmann HFA series in line waterproof fuse. ™ •... -
Page 120: Removal Of An A500/T5 Vmt Device From Vehicle
Talkman A500/T5 VMT components are designed for easy removal for occasional vehicle service, maintenance or flexible operational needs. CAUTION: Honeywell does not recommend removing the cables (CM-710-102) from the battery adapter except when required for occasional service (i.e. once per month at maximum). Excessive removal of these cables may damage the adapter and cable. -
Page 121: Vmt Installation Best Practices
Honeywell does not support configurations of the A700 without a battery. Honeywell recommends that Talkman devices, cables, and VMT battery adapters be left in place after they are installed in vehicles. While these components may be removed for maintenance or temporary use in other areas, they should not be removed as a part of regular operation. - Page 122 To prevent this issue, remove the user-adjustable handle on the arm and install a 1/4" #20 nylon lock nut provided with the Vocollect VMT kit. The lock nut cannot be loosened by hand and resists most vibrations. •...
-
Page 123: Accessories
Honeywell offers a variety of accessories for wearing, protecting, and facilitating the operations of Talkman and other devices. Handheld and other devices may require specific cables in order to use Honeywell accessories, such as headsets. See the release notes for the Vocollect Voice software for your device for more information. -
Page 124: T5/A500 Adjustable Shoulder Harness
Belts and Belt Clips To comply with government safety standards, the device must be used with a Vocollect customized belt and clip, a Vocollect customized shoulder harness, or a Vocollect belt holder. - Page 125 T5/A500 Black Belt Clip connects a T5 or A500 device to the belt. • Attach the clip to the Honeywell belt at the beginning of a shift. You can attach the device to and remove the device from the clip as often as necessary throughout the shift.
-
Page 126: Device Covers
Device Covers Honeywell offers optional protective covers for its devices. • The use of a device cover is not required; however, Honeywell strongly recommends using the cover to help preserve the appearance and prolong the life of the devices. •... - Page 127 | Talkman T5 Series | 127 Putting a Cover on an A500 or T5-Series Device 1. If the device is not already off, press and hold the yellow play/pause button until the LED indicator turns solid red and then off. 2.
-
Page 129: Chapter 6: Talkman T2 Series
Chapter Talkman T2 Series Topics: • T2 Series Specifications: Talkman T2x and Talkman T2 • Charging a T2-Series Device • About LED Indicators • Accessories Figure 87: Talkman T2x The Talkman ™ T2x is a rugged voice-enabled device that performs to military and international standards. -
Page 130: T2 Series Specifications: Talkman T2X And Talkman T2
| Talkman T2 Series | 130 T2 Series Specifications: Talkman T2x and Talkman T2 Weight 10.80 ounces (306.17 g) With standard battery: 15.50 ounces (439.42 g) With high-capacity battery: 18.40 ounces (521.63 g) Length 6.5" (16.51 cm) Width 3.38" (8.59 cm) Depth 1.5"... -
Page 131: Charging A T2-Series Device
• Battery Charging: The battery pack must only be charged in a Honeywell designated charger. Mechanical and Environmental Specifications •... -
Page 132: Charging A T2 Series Device
| Talkman T2 Series | 132 Temperature: -20°C to 50°C (-4°F to 122°F) Humidity: 95% non-condensing Rain/dust: IP67 Battery Notifications Battery warnings for a Talkman battery occur at the following levels: • First warning = 3,550 mV • Critical warning = 3,350 mV Charging a T2 Series Device 1. -
Page 133: Removing An A500, T2-Series Or T5-Series Device From A Charger
1. Hold the Talkman so that the red and yellow ports are facing away from you. 2. Hold the battery with the pins facing away from you and so that the Vocollect logo is on top. 3. Place the battery in at an angle, pins end first. -
Page 134: Removing A Battery From A Talkman A500, T5-Series Or T2-Series Device
About LED Indicators Vocollect Talkman devices, SRX and SRX2 headsets, and their chargers have LEDs that indicate the state of the equipment. These LEDs may be on, off or blink. In some cases an LED will blink, alternating between two colors. - Page 135 | Talkman T2 Series | 135 State T2-Series • adjusting volume • sampling noise • retraining a word • changing the active operator • after speaking: • "Talkman help" • "Talkman repeat" • "Talkman continue" • "Talkman backup" Fast Blink The device is in a charger Slow Blink One of the following:...
-
Page 136: Accessories
T5/A500 Black Belt Clip connects a T5 or A500 device to the belt. • Attach the clip to the Honeywell belt at the beginning of a shift. You can attach the device to and remove the device from the clip as often as necessary throughout the shift. -
Page 137: Device Covers
Device Covers Honeywell offers optional protective covers for its devices. • The use of a device cover is not required; however, Honeywell strongly recommends using the cover to help preserve the appearance and prolong the life of the devices. •... -
Page 138: Vocollect T2 Series Bluetooth Adapters Specifications
1. If the device is not already off, press and hold the yellow play/pause button until the LED indicator turns solid red and then off. 2. Disconnect any peripherals. Vocollect T2 Series Bluetooth Adapters Specifications The T2x Bluetooth Serial Adapater (part number BC-611-105) replaces the T2 Series Bluetooth Adapter (part number BC-611-104). The T2 Series adapter is discontinued. - Page 139 | Talkman T2 Series | 139 Figure 97: T2x Bluetooth Serial Adapter T2x Bluetooth Serial Adapter Antenna Integrated Baud Rate 921,600 KB/s Operating Temperature 0° to 70° C (32° to 158° F) Operating Humidity 20% to 75% non-condensing Storage Humidity 8% to 95% non-condensing Range 32.8 feet (10m)
- Page 140 Bluetooth Profile Serial Port The Bluetooth word mark and logos are owned by the Bluetooth SIG, Inc., and any use of such marks by Honeywell is under license. Other trademarks and trade names are those of their respective owners. See Advanced Settings in VoiceConsole Help for task parameters for the Bluetooth Serial Adapter.
-
Page 141: Chapter 7: Talkman T1
This device and headset solution is ideal for less noisy work areas because the SL-4 speaker sits farther from the head than in Vocollect's SR-Series headsets. As a result, users must set the device volume to a level appropriate for their environments. -
Page 142: T1 Specifications: Talkman T1
Charging the T1 The T1 battery is designed to be charged either while still seated in the device or separately in a Honeywell charger. Note: A fully depleted T1 battery requires 4.5 to 5 hours to charge. T1 Batteries Specifications Electrical Specifications •... -
Page 143: Charging A T1 Battery In A Device
| Talkman T1 | 143 Battery Notifications Battery warnings for a Talkman battery occur at the following levels: • First warning = 3,550 mV • Critical warning = 3,350 mV Charging a T1 Battery in a Device 1. Remove the device from the holster. 2. -
Page 144: Inserting A Battery Into A Talkman T1 Device
About LED Indicators Vocollect Talkman devices, SRX and SRX2 headsets, and their chargers have LEDs that indicate the state of the equipment. These LEDs may be on, off or blink. In some cases an LED will blink, alternating between two colors. -
Page 145: Accessories
Honeywell offers a variety of accessories for wearing, protecting, and facilitating the operations of Talkman and other devices. Handheld and other devices may require specific cables in order to use Honeywell accessories, such as headsets. See the release notes for the Vocollect Voice software for your device for more information. -
Page 146: T1 Holster
Operators should wear the T1 device with a customized holster. An industrial-grade belt may be purchased from Honeywell or the holster can be clipped to any belt. The holster protects the device from wear and protects the battery. T1 Holster Specifications... - Page 147 | Talkman T1 | 147 Using the T1 Holster 1. Make sure the opening on the holster is pointed up. 2. Slide the clip down onto a belt. 3. Insert the T1 device. 4. To remove the device, push the T1 from the bottom of the holster. CAUTION: Do not pull the device out of the holster by the headset cable.
-
Page 149: Chapter 8: Talkman Mp Solution
• Versatility - The Vocollect SRX2 wireless headset eliminates the distractions and costs associated with wired headsets. The solution can also be used in a vehicle mount configuration. -
Page 151: Chapter 9: Honeywell Wired Headsets
• SL-4 and SL-14 Vocollect Light Industrial Behind-the-Head Honeywell offers a variety of wired headsets designed for different Headset environments and wearing preferences. The SR-20 tends to be the most •... -
Page 152: Sl-4 And Sl-14 Vocollect Light Industrial Behind-The-Head Headset
| Honeywell Wired Headsets | 152 SL-4 and SL-14 Vocollect Light Industrial Behind-the-Head Headset The SL-4 and SL-14 Vocollect ™ light industrial, behind-the-head headsets are behind-the-head worn headsets designed for worker in light industrial environments. The design of these headsets is appealing for workers who can not wear typical over-the-head models due to hair style, headgear or comfort issues. -
Page 153: Headset Specifications
Damage may be caused to the equipment when used or maintained in an improper manner. Honeywell will not honor repair or replacement requests for damages caused by improper use, maintenance, negligence or abuse, including, but not limited to, those specifically identified below. - Page 154 | Honeywell Wired Headsets | 154...
-
Page 155: Sr-10 And Sr-15 Vocollect Behind-The-Head Headset
• If the cord can not be easily secured, Honeywell recommends that it be clipped near the center of the headband to evenly distribute any weight caused by a loose cord. SR-15 Headset Specifications Weight 3.4 ounces (96 g) with cable... -
Page 156: Wearing The Sr-15 Behind-The-Head Headset
| Honeywell Wired Headsets | 156 Drop Tested • 15 drops from 7 feet (2.1 m) at minimum and maximum operating temperatures • 50 drops from 6 feet (1.8 m) at minimum and maximum operating temperatures Enclosure rating Meets IP67... -
Page 157: Attaching The Sr-15 Headset Adjustment Strap
| Honeywell Wired Headsets | 157 Figure 105: Removing the Adjustment Strap 4. Repeat these steps for the clip on the other side. Attaching the SR-15 Headset Adjustment Strap 1. Align the keying rib on the plunger with the slot in the barrel. -
Page 158: Replacing The Ear Pad On The Sr-15 Headset
| Honeywell Wired Headsets | 158 5. Tighten the screws with 3.0 in-lbs (0.34 Nm) torque so that there is no gap between parts 1 and 2. 6. Using the plunger, attach the cord to the cord clip. Replacing the Ear Pad on the SR-15 Headset 1. -
Page 159: Sr-21 Headset Specifications
| Honeywell Wired Headsets | 159 Enclosure rating Meets IP67 Humidity 5-95% condensing Noise Reduction Rating Not applicable SR-20 with coiled cord Weight 6.5 ounces (184 g) with cable 3.9 ounces (110 g) without cable Operating temperature -40°F to 122°F (-40° to 50°C) Storage temperature -40°F to 158°F (-40°... -
Page 160: Sr-30 Vocollect High-Noise Headset
| Honeywell Wired Headsets | 160 SR-30 Vocollect High-Noise Headset ™ Figure 109: SR-30 Vocollect High Noise Headset The SR-31 Headset is a universal version designed to be used with handheld devices. SR-30 Headset Specifications Weight 7.7 ounces (218 g) with cable 6.2 ounces (175 g) without cable... -
Page 161: Sr-35 Vocollect Hard-Hat Headset
| Honeywell Wired Headsets | 161 Noise Reduction Rating Average 6 dB Note: Packaging varies for product shipments. Generally, packing materials are about 15% of the total shipment weight. SR-35 Vocollect Hard-Hat Headset The SR-35 Vocollect ™ hard-hat headset has a built-in clip that fits most industrial hard hats. The SR-35 headset can only be used with a hard hat that has a slot on the side that accepts a Peltor clip. -
Page 162: Sr-40 Vocollect Dual-Cup Headset
The headsets and microphones used with the Voice system are delicate pieces of electronic equipment. Proper care and use of these products will ensure that they work well for a long time. Important: For maximum hygiene, Honeywell discourages sharing headsets among operators. -
Page 163: Wearing Headsets: General Procedures
Adjusting Headsets for Comfort Honeywell has designed the SR Series headsets based on data for most head shapes and sizes. Because the headset is the most personal piece of voice equipment and must remain stable while workers perform very physical tasks, users may benefit from these headset adjustment guidelines. -
Page 164: Removing Headsets
Do not attempt to break ice from a windscreen. The pressure can grind ice into the foam and cause a water barrier as it melts. Ice build-up generally does not degrade performance because Vocollect's Adaptive Speech Recognition compensates for gradual changes in the environment. -
Page 165: Cleaning Headsets
The cupped headset ear pad cover is made of 100% cotton flannel and may shrink if washed and dried in a dryer. Honeywell recommends that the covers be hand or machine washed in cold or warm water and then air dried. -
Page 167: Chapter 10: Honeywell Wireless Headsets
Vocollect SRX2 Hard-Hat Headset Note: Verify support for your device in the release notes for your • Vocollect SRX2 High-Noise version of Vocollect Voice software or contact your Honeywell sales Headset representative. • Honeywell SRX-SL Wireless Vocollect SRX and SRX2 wireless headset features include: Headset •... -
Page 168: Vocollect Srx Wireless Headset
| Honeywell Wireless Headsets | 168 Vocollect SRX Wireless Headset Figure 114: SRX Wireless Headset The Vocollect ™ SRX speech-recognition headset features industrial grade use of Bluetooth Wireless Technology. The SRX headset manages the quality of voice input/output in the headset itself, has no cables to connect, and remains connected to a device at up to 10 meters away. -
Page 169: Charging The Srx Headset
This information is made available to voice management software. • Battery Charging: The battery pack must be charged only in a Honeywell designated charger. Charging SRX Wireless Headset Batteries Important: Once an SRX battery is placed in the charger, it must remain in the charger for a minimum of five seconds. -
Page 170: Installing The Srx Mobility Strap
2. Power off the headset by pressing and holding the Plus and Minus buttons on the earpiece for three seconds and then remove the battery. 3. Hold the battery with its contacts to the bottom and the Vocollect logo facing toward you, and insert it into an empty slot on the battery charger. - Page 171 | Honeywell Wireless Headsets | 171 2. Feed the lanyard end of the mobility strap through one of the eyelets in the headset's battery compartment. You may find it helpful to push the lanyard through with the tip of a screwdriver. Be sure to feed the lanyard in the direction shown in the image.
-
Page 172: Wearing An Srx Wireless Headset
| Honeywell Wireless Headsets | 172 Wearing an SRX Wireless Headset Make sure the Velcro mobility strap is installed on the headset. 1. Put the headset on and adjust the ear pad to fit snugly over your ear. 2. Position the battery compartment directly above, and as closely as possible to, your other ear. -
Page 173: Headset Functions And Led Patterns For Srx
| Honeywell Wireless Headsets | 173 Headset Functions and LED Patterns for SRX Headset Function User Action Headset Mode LED Pattern Tone Power On Hold the Plus (+) and Headset powers on Quick flutter Two high-pitched Minus (-) buttons for... - Page 174 | Honeywell Wireless Headsets | 174 Headset Function User Action Headset Mode LED Pattern Tone recommend this pairing mode for Talkman devices. This mode greatly increases the likelihood that your headset will pair with the wrong device. Lost connection: Repeating pattern of...
-
Page 175: Vocollect Srx2 Wireless Headset
Vocollect SRX2 Wireless Headset Figure 122: SRX2 Wireless Headset The Vocollect SRX2 Wireless Headset is the second generation wireless headset from Honeywell that has been designed to provide better recognition accuracy, work across all environments and create a more comfortable experience for the users. -
Page 176: Srx2 Wireless Headset Specifications
SRX2 Modular Design The SRX2 Wireless Headset introduces a modular design to the Vocollect headset product line. The potential for shared use of electronics modules across multiple shifts can lower the cost per user. To avoid passing germs between operators when sharing headsets, Honeywell recommends sharing only the electronics module. -
Page 177: Attaching The Srx2 Electronics Module To A Headband
Vocollect Voice Software (VoiceClient and VoiceCatalyst), along with VoiceConsole provide a feature called Automatic Operator Load. This feature enables a Honeywell device to recognize and load the profile of the operator who last used the headset, based on the unique ID of the electronics module. -
Page 178: Removing The Srx2 Electronics Module From A Headband
3. Pull the electronics module away from the earpiece hub. SRX2 Compatibility Honeywell has tested the SRX2 Wireless Headset with the following devices and Vocollect Voice Software versions. Support and compatibility of the SRX2 headset is not limited to these products, but the customer assumes risks related to untested configurations. -
Page 179: Charging The Srx2 Headset
The battery pack contains custom electronics that provide performance, temperature, and pack identification to the device. This information is made available to voice management software. • Battery Charging: The battery pack must be charged only in a Honeywell designated charger. - Page 180 | Honeywell Wireless Headsets | 180 Mechanical and Environmental Specifications • Drop-test specifications: The battery meets the transient drop criteria. • 24 drops at 6 feet (182.88 cm) • 12 drops at 7 feet (213.36 cm) • Environmental specifications: The battery functions properly in the following conditions: Temperature: -22°F to 122°F (-30°C to 50°C)
- Page 181 | Honeywell Wireless Headsets | 181 4. Hold the battery with the Vocollect logo facing toward you, and push it onto an empty port on the battery charger until it snaps into place. Note: See the chart on SRX2 Battery Charger LED Indicators for more information on LED patterns .
-
Page 182: Wearing An Srx2 Wireless Headset
| Honeywell Wireless Headsets | 182 Figure 127: Battery Latches for Removing SRX2 Battery 3. With your other hand, hold the battery at the end of the electronics module opposite the mic boom. 4. Press and hold both battery latches at the same time, squeezing them into the sides of the electronics module until the battery releases from the electronics module. - Page 183 | Honeywell Wireless Headsets | 183 Figure 129: Moving the Microphone Into Position 5. Make final adjustments with the flexible boom so that the microphone is positioned correctly. Position the microphone as close to your mouth as possible, but outside of your breath stream. It should be facing your upper lip, and not touching anything (for example, clothing, skin, or facial hair).
- Page 184 | Honeywell Wireless Headsets | 184 Figure 131: Inserting the strap into the headband slot 8. Position the strap to go around the back of your head. The strap swivels freely on the two knobs so that it can be positioned at the back of the head for either right-ear or left-ear wearing of the headset.
-
Page 185: Headset Functions And Led Patterns For Srx2
| Honeywell Wireless Headsets | 185 Headset Functions and LED Patterns for SRX2 Figure 133: SRX2 User Interface Headset Function User Action Headset Mode LED Pattern Tone Power on Press Power button Headset powers up Solid green High pitch double... - Page 186 | Honeywell Wireless Headsets | 186 Headset Function User Action Headset Mode LED Pattern Tone Note: Honeywell does not recommend this pairing mode for Talkman devices. This mode greatly increases the likelihood that your headset will pair with the wrong device.
-
Page 187: Vocollect Srx2 Hard-Hat Headset
The SRX2 Hard-Hat headset attaches to the side of a hard hat using a clip that must be mounted on the hard hat. Honeywell offers two clip styles, one designed to insert in a hard-hat slot and one that mounts over the side brim of a non-slotted hard hat. -
Page 188: Attaching The Srx2 To A Hard Hat
| Honeywell Wireless Headsets | 188 Note: The hard-hat clips are not designed for frequent removal. It may be necessary to order extra clips if users intend to alternate wearing the headset earcup on the left and right sides. •... -
Page 189: Wearing The Srx2 Hard-Hat Headset
| Honeywell Wireless Headsets | 189 Figure 137: Attaching the headset to a hard hat To remove the headset, apply pressure to the tab at the top of the hard-hat clip to release the disk from the clip. Then slide the disk up and out of the clip. It may be necessary to use a tool, such as a flat-head screwdriver, to press the tab. -
Page 190: Storing The Srx2 Hard-Hat Headset
6. Push the electronics module into the earcup pocket until it is firmly seated. Storing the SRX2 Hard-Hat Headset Honeywell recommends storing the hard hat with the headset earcup moved up on the side of the hat (see figure below) to reduce the risk of damage. -
Page 191: Replacing An Earpad On The Srx2 Hard-Hat Or High-Noise Headset
| Honeywell Wireless Headsets | 191 Figure 141: Moving headset to storage position on a hard hat Replacing an Earpad on the SRX2 Hard-Hat or High-Noise Headset 1. Remove the SRX2 electronics module from the earcup. 2. Pry the earcup apart by grasping the inside and outside sections of the earcup and pulling the two sections apart. -
Page 192: Srx2 High Noise Headset Specifications
| Honeywell Wireless Headsets | 192 The single cup design gives operators the option of wearing the headset speaker on either ear for their long-term comfort. It also provides protection in very cold environments, such as a warehouse freezer. ®... -
Page 193: Honeywell Srx-Sl Wireless Headset
5. Align the inside posts of the two sections of the earcup. 6. Push sections together until they click into place. Honeywell SRX-SL Wireless Headset This guide covers the use of the SRX-SL headset with a Honeywell device such as the A500 or A700. SRX-SL Headset Vocollect Talkman A730... -
Page 194: Components
| Honeywell Wireless Headsets | 194 • Modular design (separate headband and electronics modules) enable sharing of the electronic module across shifts to reduce costs • Enhanced comfort and ergonomics for long hours of use • Intuitive flip-to-mute microphone boom •... -
Page 195: Led And Tones
| Honeywell Wireless Headsets | 195 Desired Action Button Press Action Valid In These SRX-SL States Power On Power button Press and hold for at least ½ second Power Off Power button 5 seconds All except Off Volume Up Volume Up button... - Page 196 | Honeywell Wireless Headsets | 196 Use Case SRX-SL State Tones Disconnect/clear paired Discoverable and Brief rapid flashing None devices/enter pairing mode Connectable of GREEN LED's to acknowledge command, then green LED on Solid Volume up Volume increases Normal operation...
-
Page 197: Srx-Sl Wireless Headset Specifications
| Honeywell Wireless Headsets | 197 Use Case SRX-SL State Tones USB plugged in Headset detects fault while None Flashing Red - one second charging on, one second off See Use the SRX-SL Headset (see page A-274) USB plugged in... -
Page 198: Supported Bluetooth Profiles
• Certain legacy Honeywelldevices including the A700 and the A500 This guide is for the using the SRX-SL headset with Honeywell dedicated voice devices. Guides for using the SRX- SL headset with other devices can be found at www.honeywellaidc.com. Use the SRX-SL Headset... - Page 199 The 75% capacity is measured from a battery that has reached the point of software shutdown voltage. Not all chargers support fast charging. For best results use the Honeywell supplied charger. A computer port may provide sufficient power for fast charge. An Apple charger may not support fast charging.
- Page 200 | Honeywell Wireless Headsets | 200 Sharing the SRX-SL Headset By separating the parts of the modular SRX-SL headset, operators can share electronics modules in a multi-shift operation. • The electronics module detaches easily from the headband. • The electronics module can be disinfected with an alcohol wipe.
- Page 201 Adjust Headset for Comfort Honeywell has designed the SRX-SL headset based on data for most head shapes and sizes. Because the headset is the most personal piece of voice equipment and must remain stable while workers perform very physical tasks, users may benefit from these headset adjustment guidelines.
-
Page 202: About Pairing Wireless Headsets
Bluetooth addresses. Vocollect wireless headset pairings with Talkman or other devices are initiated by the device and remain paired until broken by user action. Note that the pairing exists between the headset and device hardware. If the operator moves to a different device, the original headset/device pairing will not follow that operator. - Page 203 | Honeywell Wireless Headsets | 203 For example, if the user takes the headset out of range of the paired device or powers it off, the device will notice the connection loss and try to reconnect. The two remain paired throughout this process.
- Page 204 | Honeywell Wireless Headsets | 204 This method insures that the SRX2 headset is only paired with the device it is touching. There are no additional buttons to press. Auto pairing: On startup or on removal from a charger, the device immediately searches for wireless headsets and initiates a pairing.
-
Page 205: Pairing An Srx Headset
| Honeywell Wireless Headsets | 205 Pairing an SRX Headset Once paired, an SRX headset and a device remember their association, even when powered off and on again or after the device recharges. The SRX headset will only connect with that paired device. - Page 206 Handheld Device Pairing Status Icons When using the Vocollect Voice or Voice MP application on a handheld wireless device, an icon in the upper right hand corner of the screen indicates the pairing status. Vocollect Voice on a PC displays similar browser-based...
-
Page 207: Pairing An Srx2 Headset
For best performance when using an SRX2 headset with a Talkman A700 device, use the latest SRX2 software version. Obtain the latest headset software from your Honeywell portal or reseller and use the Honeywell Accessory Update Utility to upgrade your SRX2 headset. - Page 208 | Honeywell Wireless Headsets | 208 Option Description (ring) indicator blinks green. Note that there is a 30-second timeout after a headband is recognized in step one. You must pair the electronics module within 30 seconds from associating the headband for full functionality.
- Page 209 | Honeywell Wireless Headsets | 209 The blue LED indicator on the Talkman device turns on, may flash a few times, and then remains lit. After 20 to 30 seconds, the headset beeps three ascending tones and its LED indicator flashes blue. These indicators confirm that a pairing has completed.
-
Page 210: Pairing A Headset By Voiceconsole Pairing
Handheld Device Pairing Status Icons When using the Vocollect Voice or Voice MP application on a handheld wireless device, an icon in the upper right hand corner of the screen indicates the pairing status. Vocollect Voice on a PC displays similar browser-based notifications, but the icons are different. -
Page 211: More About Srx/Srx2 Pairing Modes
Honeywell recommends using high power pairing only if low power pairing fails. Use this mode with care: While high power pairing mode makes it more likely that the connection will succeed, it also increases the likelihood of cross pairing. -
Page 212: Breaking A Pairing
If the paired device is running Vocollect VoiceCatalyst 1.2 and newer, the SRX2 headset signals the device that the pairing is being broken. With older versions of Vocollect Voice Software, the pairing breaks only after it times out. Headset Pairing FAQ Q: My device accidentally paired with a different headset. -
Page 213: Supervisor Audio With Srx/Srx2 Headsets
The supervisor must keep the operator's device within range of the operator's wireless headset. Note: This feature is designed to work with Vocollect Talkman devices. It may function properly with other devices depending on the available processing power. See the release notes for Vocollect Voice software and your device. - Page 214 | Honeywell Wireless Headsets | 214 Parameter Supported Description Values & Setting Location Devices SrxAutoPairEnable A700, Enables automatic pairing mode 0 = disabled A500, T5- on SRX and SRX2 headsets. 1 = enabled Series This parameter is not applicable The default setting depends for third-party handheld devices.
-
Page 215: Care And Use Of Headsets And Microphones
Important: For maximum hygiene, Honeywell discourages sharing headsets among operators. The design of the SRX2 Wireless Headset features an electronics module that can be removed from the headband and windscreen. -
Page 216: Wearing Headsets: General Procedures
Adjusting Headsets for Comfort Honeywell has designed the SR Series headsets based on data for most head shapes and sizes. Because the headset is the most personal piece of voice equipment and must remain stable while workers perform very physical tasks, users may benefit from these headset adjustment guidelines. -
Page 217: Removing Headsets
Do not attempt to break ice from a windscreen. The pressure can grind ice into the foam and cause a water barrier as it melts. Ice build-up generally does not degrade performance because Vocollect's Adaptive Speech Recognition compensates for gradual changes in the environment. -
Page 218: Cleaning Headsets
Cleaning Headsets The foam pads used with Vocollect headsets were designed for both comfort and hygiene. The materials naturally inhibit the growth of bacteria and can be cleaned by rinsing with water and drying. Note: Commercial cleaning solvents are not recommended. -
Page 219: Chapter 11: Chargers
Chapter Chargers Honeywell offers charger units that can charge one or more batteries Topics: individually or while inserted in Talkman devices. • A700 6-Bay Device Charger Talkman devices should be placed into a charger when not in use. The charger •... -
Page 220: A700 6-Bay Device Charger
The A700 charger and the A700 battery charger are ready for mounting on a standard DIN rail without any customer modifications. A DIN rail must be installed on a wall in a suitable location. Honeywell offers a DIN rail suitable for... -
Page 221: Mounting The A700 Device Or Battery Charger
Rails must be anchored to the wall at least 12 in. (30.5 cm.) from the floor to allow for proper attachment, seating, and removal of the charger unit. • If you are mounting a charger directly above another charger, Honeywell recommends clearance of at least 10 in. (25.4 cm.) between DIN rails. Figure 152: A700 charger - back view... -
Page 222: A700 Battery Charger
| Chargers | 222 Number of Minimum cut DIN rail specs Standard DIN rail chargers lengths for rail on rail Single unit length 550 mm; weight 550 mm 331.5 g (11.6933 oz) 1101 mm 1652 mm • Drill • Fasteners •... -
Page 223: Srx2 And A700 Battery Charger Led Indicators
| Chargers | 223 Height 6.14" (15.6cm) Power Input Voltage: 100-240 Vac Input Current: 2.0 A maximum Line Frequency: 50-60 Hz Cord Uses standard IEC 60320 plug Operating Temperature 32° to 104° F (0° to 40° C) Storage Temperature -40° to 158° F (-40° to 70° C) Charging Temperature 41°... -
Page 224: T5/A500 Combination Charger
| Chargers | 224 Ring LED (Charge Alert LED (Battery SRX2 Battery Status Status) Health) Solid Yellow Battery is charging Blinking Red Charging fault detected Solid Green Solid Red Battery alert condition; fully charged Solid Yellow Solid Red Battery alert condition; charging Blinking Red Solid Red Battery alert condition;... -
Page 225: T5/A500 Combination Charger Power Supply Specifications
| Chargers | 225 Power Input Voltage: 100-250 Vac Input Current: 2.4 A maximum Line Frequency: 50-60 Hz Cord Uses standard IEC 60320 plug Operating Temperature 50° to 140° F (10° to 40° C) Storage Temperature -22° to 158° F (-30° to 70° C) Humidity Functional to 90% non-condensing Note: Packaging varies for product shipments. -
Page 226: T5/A500 Combination Charger Wall Mount
| Chargers | 226 Figure 156: Cable Routed Through Plastic Clips 3. Push the clips to lock the cord in place. T5/A500 Combination Charger Wall Mount This unit provides a convenient surface for mounting the T5/A500 10-Bay Combination Charger and its power supply on a wall. -
Page 227: About Led Indicators
About LED Indicators Vocollect Talkman devices, SRX and SRX2 headsets, and their chargers have LEDs that indicate the state of the equipment. These LEDs may be on, off or blink. In some cases an LED will blink, alternating between two colors. -
Page 228: T2 Series Battery Charger Specifications
| Chargers | 228 Figure 158: T2 Series Battery Charger • The T2 series battery charger includes five battery slots. The charger can be used to store and charge up to five batteries at a time. • Wall mounts are available that can accommodate a single charger, multiple chargers, and battery chargers. T2 Series Battery Charger Specifications Length Approximately 24"... -
Page 229: Charger Wall Mount, Multiple Chargers: T2 Series
| Chargers | 229 1. Secure the rubber feet to the stand with the screws. 2. Position each stand so that its top lip is inserted into the center channel in the back of the charger. Figure 159: Attaching the feet Figure 160: Positioning the stand on the charger 3. - Page 230 | Chargers | 230 Item # Quantity Description Self-drilling screw anchor #8 Washer, #8, flat, type B regular Screw, #8x1.5 Phillips pan head Screw, #10-24x.312 hex, socket head Drilling template sheet You will need: • Drill with 1/8” bit • Screw driver, #2 Phillips •...
- Page 231 | Chargers | 231 Item # Quantity Description Power supply mounting panel Collar with nut Washer, #4, flat, type B regular Screw #4-40x.625, Phillips pan head Washer, #8, flat, type B regular Screw #8-32x.5, Phillips pan head Nut, #8-32 hex machine screw You will need: •...
- Page 232 | Chargers | 232 Item # Quantity Description Spring, Metric, 6.00x0.60x9.50 long (681006) Screw, M3x0.5x16 Phillips pan head (680128) Collar placement tool You will need: • Screw driver, #2 Phillips 1. Locate the collar placement tool on the back of the charger so that it is against the charger’s end cap. 2.
-
Page 233: About Led Indicators
About LED Indicators Vocollect Talkman devices, SRX and SRX2 headsets, and their chargers have LEDs that indicate the state of the equipment. These LEDs may be on, off or blink. In some cases an LED will blink, alternating between two colors. -
Page 234: T1 10-Bay Combination Charger
| Chargers | 234 Left Indicator Color Right Indicator Color If a device with a battery is the charger... Blinking Red The battery may not be inserted into the charger correctly. If the LED continues to blink red after inserting the battery into the charger correctly, troubleshoot the charger. -
Page 235: T1 10-Bay Combination Charger Power Supply Specifications
This unit provides a convenient surface for mounting five charger units and their associated power supplies on a wall. Customer assembly required. • Honeywell recommends that the charger have a minimum of 12 inches of clearance above it for placement and removal of the devices. Do not install another charger directly on top. •... - Page 236 | Chargers | 236 Item # Quantity Description Screw, #8x1.5 Phillips pan head Screw, #10-24x.312 hex, socket head Drilling template sheet You will need the following equipment: • Drill with 1/8” bit • Screw driver, #2 Phillips • Allen key, Hex 1/8” 1.
-
Page 237: T1 Single Charger Cable
| Chargers | 237 Figure 169: Cable Routed Through Plastic Clips 3. Push the clips to lock the cord in place. T1 Single Charger Cable Figure 170: T1 Single Charger Cable • The T1 Single Charger Cable allows you to use a commercially available 5V charger to charge a single T1 battery within a T1 device. -
Page 238: T1 Single Charger Cable Power Supply Specifications
| Chargers | 238 Input Current: 2.4 A maximum Line Frequency: 50-60 Hz Cord Uses standard IEC 60320 plug Operating Temperature 50° to 140° F (10° to 40° C) Storage Temperature -22° to 158° F (-30° to 70° C) Humidity Functional to 90% non-condensing Note: Packaging varies for product shipments. -
Page 239
| Chargers | 239 Cord: US, Mexico, Canada UL listed and CSA certified Three conductor 18 AWG Terminated with a molded-on plug cap rated at 125V 10A minimum Six feet minimum length Cord: Other Countries H05VVF3G1.00 per CENELEC HD-21 marked
Three conductor 1 mm Terminated with a molded-on plug cap rated at 125V 10A minimum... -
Page 240: Srx Battery Charger Wall Mount
SRX Battery Charger Wall Mount: Mounting the SRX Single-Bay Battery Charger Honeywell recommends storing the single-bay charger on a desktop, but it can also be mounted on a wall. Important: In order to mount the single-bay charger on a wall, the stand on the bottom of the charger must be reversed. -
Page 241: About Led Indicators
About LED Indicators Vocollect Talkman devices, SRX and SRX2 headsets, and their chargers have LEDs that indicate the state of the equipment. These LEDs may be on, off or blink. In some cases an LED will blink, alternating between two colors. -
Page 242: Srx2 Headset Battery Charger Specifications
The SRX2 battery charger is ready for mounting on a standard DIN rail without any customer modifications. A DIN rail must be installed on a wall in a suitable location. Honeywell offers a DIN rail suitable for mounting a single charger, but customers may choose to purchase rails from other suppliers as long as the rails meet Honeywell specifications. - Page 243 12 in. (30.5 cm.) from the floor with the product not exceeding 2 meters (200 cm.) from the floor • If you are mounting a charger directly above another charger, Honeywell recommends clearance of at least 10 in. (25.4 cm.) between DIN rails with the product not exceeding 2 meters (200 cm.) from the floor.
-
Page 244: About Led Indicators
About LED Indicators Vocollect Talkman devices, SRX and SRX2 headsets, and their chargers have LEDs that indicate the state of the equipment. These LEDs may be on, off or blink. In some cases an LED will blink, alternating between two colors. - Page 245 | Chargers | 245 SRX2 and A700 Battery Charger LED Indicators The SRX2 battery charger and the A700 battery charger have an LED indicator light, located at the bottom right of the charger face, that signals the status of the charger. •...
- Page 246 Part (SRX2 Wireless Headset) Part Number SRX2 T-Bar Pads #2 (Bag of 20) HD-1000-140B SRX2 Stability Straps (Bag of 20) HD-1000-108B SRX2 Hard Hat Headset Clip, Slotted Mount HD-1000-110...
-
Page 247: Chapter 12: Adapter Cables And Listening Kits
Systems (TR-605-x) When training new operators, you may want to listen in on their progress • Sony Wireless Listening working with the voice system. Honeywell recommends specific listening kits Systems (UTX-B2 and URX-P2) for this purpose. • Inline Adapter Cables: Talkman Note: CV41 devices do not support the use of listening kits. -
Page 248: Wired Listening Kits
CAUTION: Honeywell strongly recommends the use of only approved listening systems sold by Honeywell. If you choose to use a listening system that is not approved by Honeywell, Honeywell requires that the listening system is independently powered through its own source (such as a battery) and has an input impedance greater than or equal to 2K ohms. -
Page 249: Monitor Audio On A Handheld Device
1. Connect the 3.5 mm jack on the inline adapter training cable to the input jack on your listening system. Be sure to use the correct adapter cable for your device. 2. Connect the inline adapter training cable to your Vocollect SR-Series headset. 3. Connect the other end of the inline adapter training cable to your handheld device. -
Page 250: Using The Samson Wireless Listening System
"Y" cable, attached to the yellow port may be used. When using the "Y" cable, be sure to connect both a Vocollect headset and the listening system transmitter because the headset's performance is influenced by gain and headphones level adjustments. - Page 251 | Adapter Cables and Listening Kits | 251 3. Insert the 3.5mm male jack into the INPUT connector on the Samson transmitter. 4. Power on the transmitting radio. 5. Assure that output is enabled with the Mute/Audio switch set to the connect position. •...
-
Page 252: Sony Wireless Listening Systems (Utx-B2 And Urx-P2)
| Adapter Cables and Listening Kits | 252 If you are using an inline adapter training cable connected to a handheld device, it is likely you will have to readjust the gain. 9. Once the wireless listening system settings have been adjusted to maximum volume without distortion, use the volume control on the headphones, powered speaker, or the Plus and Minus buttons to lower the device's volume. -
Page 253: Setting Up The Transmitting Radio
A device-specific inline adapter training cable, also referred to as a "Y" or splitter cable, must be used with third-party handheld devices in order to connect both a Honeywell headset and listening system to the device. Inline adapter training cables must only be used with listening systems approved by Honeywell. -
Page 254: Connecting An Inline Adapter Cable To A Handheld Device
2. Connect the other end of the adapter cable to the appropriate port on your handheld device. Connecting Inline Adapter Training Cables 1. Connect your Vocollect SR-Series headset's connector to the matching end of the training adapter cable. 2. Connect the 3.5 mm jack on the training cable to the input jack on your listening device. -
Page 255: Part Numbers: Listening Kits
Audio adapter cable, Wireless Listening Kit, 1/32" or TR-604-101 2.5mm male (Worldwide) Audio cable, A700, Micro USB to 3.5 mm male TR-900-1 Adapter, Audio Splitter Cable for training to Vocollect AD-300-1 Headsets Choosing Cables for Your Training Configurations Device Headset... - Page 256 Device Headset Scanner Cable Configurations Talkman A500/T5 TR-603-101 or • wired (connects to • wireless, or TR-604-101 connects: A500/T5 YELLOW • no scanner port) • wired listening kit or transmitter for wireless to A500/T5 RED port Talkman T2x TR-603-101 or •...
-
Page 257: Chapter 13: Troubleshooting Equipment Problems
If none of the listed steps resolve • The Scanner will not Scan the problem, contact Honeywell to send the equipment back for repair or to • My Headset Won't Stay On speak with a support representative. -
Page 258: I Can't Hear Anything Through The Headset
6. Reboot the device. 7. If you are using an SRX or SRX2 headset, make sure your headset is paired with your device. 8. If the headset is broken, send it back to Honeywell for repair. The Scanner will not Scan These steps apply to bar code scanners external to the Talkman device and not the integrated scanner in the Talkman A730. -
Page 259: The Device Will Not Load A Voice Application
1. Make sure the device has a fully charged battery. 2. Reboot the device. 3. Send the device back to Honeywell for repair. The Device Will Not Turn On 1. Make sure the battery is properly seated on the device. - Page 260 If an item like a credit-card will fit in this space, there may be an alignment issue. Determine if this issue only occurs Send the battery to a Honeywell with one particular battery which Authorized Repair Center for is not excessively old and other evaluation.
- Page 261 | Troubleshooting Equipment Problems | 261 If this occurs... Try these steps... If the steps don't work... Check to see if the contacts on the Have the charger replaced or device and charger are clean. If repaired. This is not able to be not, follow cleaning procedures corrected by a customer.
-
Page 262: About Sending Equipment Back For Repairs
The Customer Service department generally issues RMAs to customers who are returning products for repair. However, Honeywell may issue RMAs for other reasons, such as the following: • The product belongs to Honeywell. Honeywell may have loaned the product to a customer or provided it as a sample. •... -
Page 263: Packaging Items For Return To Honeywell
• If VMT was installed after the vehicle key switch, ensure it powers on when the vehicle is turned on. Honeywell recommends the VMT be installed before the vehicle key switch to ensure it is always getting power when the vehicle has a battery. -
Page 264: Troubleshooting Problems Indicated By Led
Troubleshooting Problems Indicated by LED Vocollect Talkman devices, chargers and the SRX headset and its charger have LEDs that indicate the state of the equipment. These LEDs may be on, off or blink. In some cases an LED will blink, alternating between two colors. -
Page 265: About Error Messages
| Troubleshooting Equipment Problems | 265 1. Check the battery contacts and the charger contacts for dirt or other obstructions that might prevent the contacts from connecting properly. 2. Clean the contacts, if necessary. a) Use an isopropyl alcohol (isopropanol) swab or soft cloth dampened with isopropyl alcohol to clean metal connection points. - Page 266 | Troubleshooting Equipment Problems | 266 Number Text Solution 0x060c Train returned bad status to 1. Turn the device off and then turn it back on UpdTrain. again. 2. Reboot the device. 3. Reload VoiceClient. 0x060e Unable to train words. Not —...
- Page 267 | Troubleshooting Equipment Problems | 267 Number Text Solution 0x1213 Failed to load task Vocollect — configuration file. Task load failed. 0x1214 Failed to write the output — data record network transport information registration file. Task load failed. 0x1215 Failed to write dialog terminal- 1.
- Page 268 5. Verify the task's output data records (ODRs) and lookup tables (LUTs) have correct and valid socket host and service information. If you need assistance, contact Vocollect. 0x1427 Unable to send file via socket. 1. Turn the device off and then turn it back on Unable to open.
- Page 269 | Troubleshooting Equipment Problems | 269 Number Text Solution 0x1601 File Manager process message service receive failed. 0x1602 Warning, low flash memory. — 0x1603 Warning, low flash memory. — You must upload your collected data now. 0x1a01 Process history data 1.
-
Page 270: Spoken Error Messages
| Troubleshooting Equipment Problems | 270 Number Text Solution 0x2108 Flash failed because of invalid — flash read pointer argument. 0x2109 Flash library failed during read. — 0x210a Flash library failed while — deleting a file. 0x210b Flash library failed while —... - Page 271 | Troubleshooting Equipment Problems | 271 Error Message Solution 4. Reload VoiceClient. "Corrupt device emulation config file. Task load failed." "Corrupted operator data." Reload the operator. "Failed to load lookup table. Task load failed." 1. Go to an area of known good coverage. 2.
- Page 272 | Troubleshooting Equipment Problems | 272 Error Message Solution 2. Turn the device off and then turn it back on again. 3. Reboot the device. 4. Reload VoiceClient. "Headset battery is getting low." Change the battery. "Headset battery is getting low. Change headset battery Change the battery.
- Page 273 | Troubleshooting Equipment Problems | 273 Error Message Solution 3. Reload the task. 4. Reboot the device. 5. Reload VoiceClient. "Task load failed." 1. Go to an area of known good coverage. 2. Turn the device off and then turn it back on again. 3.
- Page 274 Error Message Solution "Warning, low flash memory! You must upload your 1. Go to an area of known good coverage. collected data now!" 2. Turn the device off and then turn it back on again. 3. Reboot the device. 4. Reload VoiceClient. 5.
-
Page 275: Chapter 14: Contacting Technical Support
Chapter Contacting Technical Support This section describes what you will need before contacting technical support Topics: with an issue and how to gather the needed files. • General Information Needed for Most Support Requests • Common Questions to Answer when Contacting Support •... -
Page 276: General Information Needed For Most Support Requests
General Information Needed for Most Support Requests Devices Types Vocollect Talkman model Non-Talkman device manufacturer/model Vocollect headset model Other headset Bar code reader type Vocollect Voice Software VoiceClient version displayed in VoiceConsole VoiceCatalyst version displayed in VoiceConsole Vocollect VoiceConsole VoiceConsole version... -
Page 277: Appendix A: Template Training Options
All new operators must train their voice templates (all the words that he or Topics: she will use in the voice-directed workflow) in order to perform a task with the Vocollect Voice system. Supervisors have options for operators to train • Training with the Talkman templates when using a device. -
Page 278: Training With The Talkman Device Only
• Honeywell provides a cable with a connector so that the QTERM device can be attached to the red port on the device. •... -
Page 279: Setting Up The Qterm Visual Training Device
The device will take a background noise sample and begin training. Training Using a Visual Training Device Honeywell recommends using a browser-based mobile display with Talkman A500 or A700 devices, and the QTERM-G55 with Talkman T5 or T2x devices. Note: In order to use QTERM devices with a Thai TTS, you must use a QTERM-G55 running device software version 3.1 or newer. -
Page 280: Training Through Voiceconsole's Display
| Template Training Options | 280 2. Connect the training device to your Talkman device. 3. Turn your Talkman device on by pressing the Play/Pause button. The LED indicator turns red for a few moments then turns green. The training device displays, "Please keep quiet for a few seconds."... -
Page 281: Training Using The Device Screen
3. If necessary, on the printed list, circle commonly misheard or confusing words. Figure 189: Printed List with Commonly Misheard or Confusing Words Circled 4. Honeywell recommends the new operator review the list prior to training so he or she is familiar with the words that will be used If templates have not been trained for the task the new operator is going to use, have the supervisor or current operator train templates for that task and perform the steps above. - Page 282 Figure 190: Voice Training text box If you cannot see the words displayed on the training device screen, there may be a problem with the contrast on the device. Refer to the manufacturer's documentation. As each word appears on the device display, say it to the device. The device will display the same word at least four times;...
-
Page 283: Appendix B: Honeywell Regulatory Compliance
Appendix ™ Honeywell Regulatory Compliance This appendix contains the regulatory compliance information for Honeywell Topics: products. • Statement of Agency Compliance • Federal Communications Commission Compliance • Canadian Compliance • Cumplimiento de normas mexicana • Vietnamese Compliance • Japanese Compliance •... -
Page 284: Statement Of Agency Compliance
Honeywell devices and wireless headsets are designed to be compliant with the rules and regulations in the locations into which they are sold and are labeled as required. Honeywell devices are type approved and do not require the user to obtain license or authorization before using them. Changes or modifications not expressly approved by Honeywell, Inc. - Page 285 être utilisé si le boîtier est ouvert ou si l'antenne interne est exposée. Lorsqu'il n'est pas utilisé, les dispositifs de Honeywell doivent être éteints. En outre, l'appareil doit être porté en conformité avec les instructions pour cet appareil.
-
Page 286: Canadian Compliance
| Honeywell ™ Regulatory Compliance | 286 Honeywell Device Card FCC ID# Canadian ID # Maximum SAR Value Manufacturer and Appareil de Fabricant de la La valeur maximale Honeywell carte et P/N 1 gm avg. 10 gm avg. MQO-TT-800-1-1 2570A-TT80011 0.148 W/Kg... -
Page 287: Japanese Compliance
| Honeywell ™ Regulatory Compliance | 287 Japanese Compliance Brazilian Compliance... -
Page 288: United Arab Emirates Compliance
| Honeywell ™ Regulatory Compliance | 288 United Arab Emirates Compliance Chinese Compliance 部件名称 有害物质 Hazardous substance A710 铅 (Pb) 汞 (Hg) 镉 (Cd) 六价铬 多溴联 多溴二苯 (Cr6+) 苯 (PBB) 醚 (PBDE) TAP-910-01 印刷电路板 (PCB) 本表格依据 SJ/T 11364 的规定编制。 (This table is created in accordance to SJ/T 11364 ) o: 表示该有害物质在该部件所有均质材料中的含量均在... - Page 289 | Honeywell ™ Regulatory Compliance | 289 印刷电路板 (PCB) 本表格依据 SJ/T 11364 的规定编制。 (This table is created in accordance to SJ/T 11364 ) o: 表示该有害物质在该部件所有均质材料中的含量均在 GB/T 26572 标准规定的限量要求以下。 ( Indicates that this hazardous substance contained in all of the homogeneous materials for this part is below the limit requirement in China's GB/T 26572) x: 表示该有害物质至少在该部件的某一均质材料中的含量超出...
- Page 290 | Honeywell ™ Regulatory Compliance | 290 部件名称 有害物质 Hazardous substance A700 铅 (Pb) 汞 (Hg) 镉 (Cd) 六价铬 多溴联 多溴二苯 (Cr6+) 苯 (PBB) 醚 (PBDE) TCH-901-01 TCH-901-02 TCH-902-01 TCH-902-02 印刷电路板 (PCB) 本表格依据 SJ/T 11364 的规定编制。 (This table is created in accordance to SJ/T 11364 ) o: 表示该有害物质在该部件所有均质材料中的含量均在...
- Page 291 | Honeywell ™ Regulatory Compliance | 291 部件名称 有害物质 Hazardous substance SRX2 铅 (Pb) 汞 (Hg) 镉 (Cd) 六价铬 多溴联 多溴二苯 (Cr6+) 苯 (PBB) 醚 (PBDE) HBT1000-01 印刷电路板 (PCB) 本表格依据 SJ/T 11364 的规定编制。 (This table is created in accordance to SJ/T 11364 ) o: 表示该有害物质在该部件所有均质材料中的含量均在...
-
Page 292: Маркировка Eac И Соблюдение Российские Нормативов (Russian Compliance)
Голос устройство Honeywell TT-802 TAP802-01 A500 Made in Mexico, сделано в Мексике Ratings (voltage), Напряжение : 100-240V ~ 2A, 50/60Hz Представитель в РФ: ЗАО «Хоневелл», 121059, г. Москва, ул. Киевская, 7 Compliance agent: ZAO Honeywell, 121059, Moscow, Kievskaya str. 7... - Page 293 Made in Mexico, сделано в Мексике Ratings (voltage), Напряжение : 100-240V ~ 2A, 50/60Hz Представитель в РФ: ЗАО «Хоневелл», 121059, г. Москва, ул. Киевская, 7 Compliance agent: ZAO Honeywell, 121059, Moscow, Kievskaya str. 7 Модель (Model) Инвентарного номера (Part Номер модели (Model Number) Number) Голос...
- Page 294 Made in Mexico, сделано в Мексике Ratings (voltage), Напряжение : 100-240V ~ 2A, 50/60Hz Представитель в РФ: ЗАО «Хоневелл», 121059, г. Москва, ул. Киевская, 7 Compliance agent: ZAO Honeywell, 121059, Moscow, Kievskaya str. 7 Модель (Model) Инвентарного номера (Part Номер модели (Model Number) Number) Голос...
-
Page 295: Ce Marking & European Compliance
| Honeywell ™ Regulatory Compliance | 295 CE Marking & European Compliance Products intended for sale within the European Union are marked with the CE Mark, which indicates compliance to applicable Directives and European Normes (EN) as follows. Amendments to these Directives or ENs are included. - Page 296 | Honeywell ™ Regulatory Compliance | 296 Table 7: 5GHz Restrictions 5150–5350 MHz band: Channels 36, 40, 44, 48, 52, 56, 60, or 64, are restricted to indoor use only for the entire European Community: This device must be used with Access Points that have employed and activated a radar detection feature required for European Community operation in the 5 GHz bands.
- Page 297 | Honeywell ™ Regulatory Compliance | 297 Table 9: 5 GHz WLAN/Wi-Fi Channel Availability (802.11 an) Channel Number Frequency MHz Europe ETSI North America Japan 5180 Indoors 5200 Indoors 5220 Indoors 5240 Indoors 5260 Indoors/DFS/TPC DFS/TPC 5280 Indoors/DFS/TPC DFS/TPC 5300...
- Page 298 | Honeywell ™ Regulatory Compliance | 298 Channel Frequency Transmitter Power (EIRP) ERP + Antenna Gain (2.18 dBi) at worst case (MHz) levels Average (dBm) Limit (dBm) Margin (dB) 2472 18.1 20.0 -1.9 Table 12: 802.11n Nominal Power Values Channel Frequency Transmitter Power (EIRP) ERP + Antenna Gain (2.18 dBi) at worst case...
- Page 299 | Honeywell ™ Regulatory Compliance | 299 Device Temperature A720 TAP920-01 -30C to 50C A730 TAP930-01 -20C to 50C Model Name Part Number Model Number A500 TT-802 TAP802-01 This wireless device operates in the 2.4GHz and 5GHz ISM frequency bands and is intended for light industrial use in all EU and EFTA member states.
- Page 300 | Honeywell ™ Regulatory Compliance | 300 Table 19: 5GHz Restrictions 5150-5350 MHz band: Channels 36, 40, 44, 48, 52, 56, 60, or 64, are restricted to indoor use only for the entire European Community: This device must be used with Access Points that have employed and activated a radar detection feature required for European Community operation in the 5 GHz bands.
-
Page 301: Regulatory Approvals For Bluetooth ® Radio Devices
(IEEE) and the American National Standards Institute Communications Commission (FCC). The Bluetooth word mark and logos are owned by the Bluetooth SIG, Inc. and any use of such marks by Honeywell is under license. Other trademarks and trade names are those of their respective owners. -
Page 302: For Users In Europe: Imager Compliance And Precaution
Annex of the RoHS Directive. Third Party products sold by Honeywell Honeywell has obtained verification from all suppliers of all third party products that versions of those products shipped by Honeywell as of 1 January 2012 to destinations where the DIRECTIVE 2011/65/EC OF THE EUROPEAN PARLIAMENT AND OF THE COUNCIL of 8 June 2011 (RoHS 2) applies are compliant with this directive on the restriction of the use of certain hazardous substances in electrical and electronic equipment. -
Page 303: Document: 1004616 Rev A
™ Regulatory Compliance | 303 Document: 1004616 Rev A Hereby, Vocollect by Honeywell, declares that the A700 Series Devices A710 TAP910-01, A720 TAP920-01, and A730 TAP930-01 are in compliance with the essential requirements and other relevant provisions of Directive 2014/53/EU. -
Page 304: Document: 1004615 Rev A
Document: 1004616 Rev A Document: 1004615 Rev A Hereby, Vocollect by Honeywell, declares that this A500 TAP802-01 is in compliance with the essential requirements and other relevant provisions of Directive 2014/53/EU. The full text of the EU Declaration of Conformity is available at the following address: www.honeywellaidc.com/compliance... -
Page 305: Document: 1004618 Rev A
| Honeywell ™ Regulatory Compliance | 305 Por medio de la presente Vocollect by Honeywell declara que el A500 TAP802-01 cumple con los requisitos esenciales y cualesquiera otras disposiciones aplicables o exigibles de la Directiva 2014/53/UE. Vocollect by Honeywell declara que este A500 TAP802-01 está conforme com os requisitos essenciais e outras disposições da Directiva 2014/53/EU. -
Page 306: Document: 1004617 Rev A
Document: 1004618 Rev A Document: 1004617 Rev A Hereby, Honeywell International Inc., declares that this SRX-SL HBT1100 is in compliance with the essential requirements and other relevant provisions of Directive 2014/53/EU. The full text of the EU Declaration of Conformity is available at the following address: www.honeywellaidc.com/compliance... - Page 307 | Honeywell ™ Regulatory Compliance | 307 Honeywell International Inc. declara que este SRX-SL HBT1100 está conforme com os requisitos essenciais e outras disposições da Directiva 2014/53/EU. Document: 1004617 Rev A...
-
Page 309: Index
| Index | 309 Index cables Pidion BM-170 display 74, A500 charger T1 device holster LED indicators Talkman, part numbers A500 device Talkman devices 73, 100, 123, 136, battery 82, vehicle mount 54, 88, battery specifications 83, adapter cables charging 82, connecting headset to handheld device combination charger connecting listening device... - Page 310 | Index | 310 pairing SRX2 headset 205, compatibility pairing SRX2 headset with handheld device 206, SRX2 with devices pairing wireless headsets SRX2 with Vocollect Voice button, not responding configuration parameters SRX/SRX2 headsets configure QTERM configuring scanner cables contact charger...
- Page 311 | Index | 311 SR-10 behind-the-head SR-15, wearing faster SR-15 behind-the-head female SR-15 specifications forklift SR-20 Lightweight connecting cables 93, SR-20 Series installing A500 into SR-20-Series Lightweight installing A700 into SR-21 Lightweight installing mounting brackets for device 56, 60, 78, 90, SR-30 High-Noise installing T5 into SR-30 High Noise specifications...
- Page 312 25, pair solutions display with device 74, Talkman MP Honeywell MS9535 with T2x Sony Wireless Listening System SRX2 headset 207, 208, speaker, changing pairing specifications wireless headsets A500 battery 83, part numbers A500 device...
- Page 313 | Index | 313 T1 battery electronics module, removing T1 single charger cable inserting battery T1 single charger power supply LED indicators T2 Series Bluetooth Adapter manual pair T2x battery modular design T2x battery charger 228, pairing 185, T2x Bluetooth Serial Adapter removing battery T5/A500 10-bay combination charger screen-based pairing...
- Page 314 | Index | 314 charging T5-Series devices holster battery specifications 83, holster specifications T5 series specifications inserting battery T5 VMT LED indicators accessories 55, 89, removing from combination charger connecting cables 93, removing from single charger installing in vehicle removing the battery positioning in forklift 59, 90, T1 single charger Talkman...
- Page 315 48-volt 93, accessories 55, 89, connecting cables 93, installing mounting brackets 56, 60, 78, 90, positioning device in forklift 59, 78, 90, installation best practices 64, 97, successful installation 64, 97, Vocollect contact voice adjusting changing gender changing pitch changing speed...
- Page 316 | Index | 316...