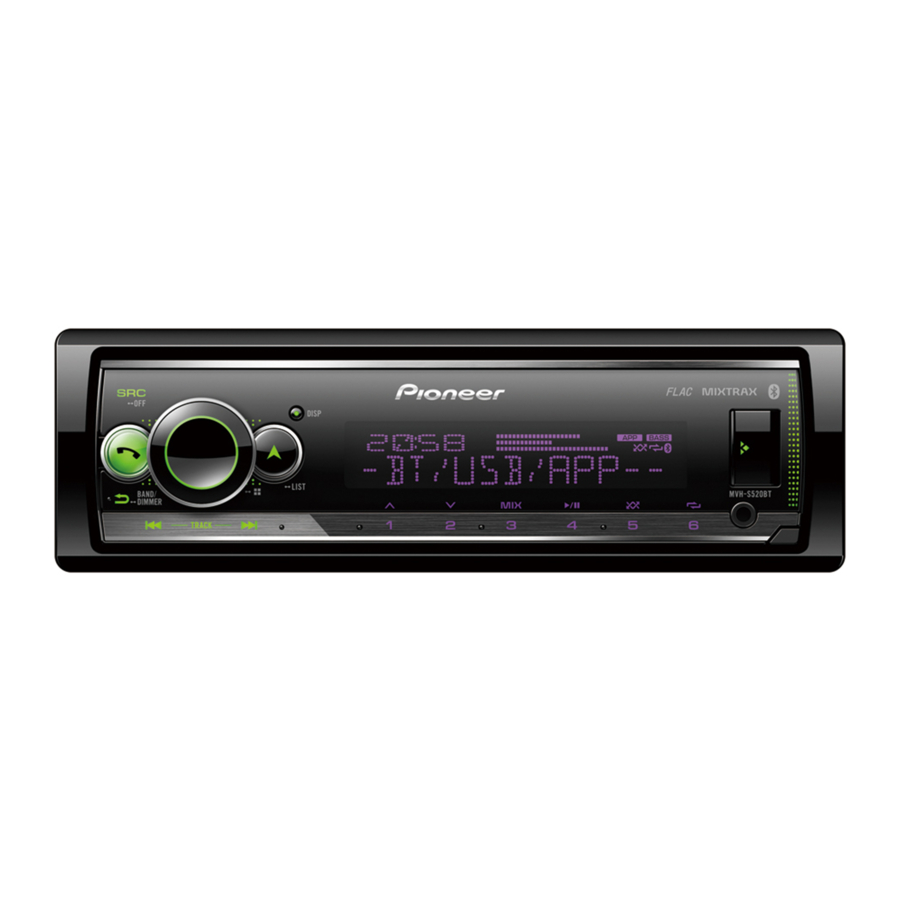
Pioneer MVH-S520BT - Digital Media Receiver Quick Start Guide
- Operation manual (259 pages)

Connections
In the following, "NW" represents network mode and "STD" represents standard mode. According to the connections you have established, change the speaker mode to standard mode (STD) or network mode (NW).

- When installing this unit in a vehicle without an ACC (accessory) position on the ignition switch, failure to connect the red cable to the terminal that detects operation of the ignition key may result in battery drain.
![]()
- Use of this unit in conditions other than the following could result in fire or malfunction.
- When rear speaker output is used by 2 Ω of subwoofer, use speakers over 70 W (maximum input power).
* Please refer to connections for a connection method.
- When rear speaker output is used by 2 Ω of subwoofer, use speakers over 70 W (maximum input power).
- To prevent a short-circuit, overheating or malfunction, be sure to follow the directions below.
- The graphical symbol
![]() placed on the product means direct current.
placed on the product means direct current.
This unit
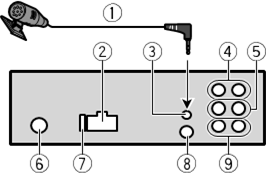
- Wired remote input
Hard-wired remote control adapter can be connected (sold separately).
Power cord

- Depending on the kind of vehicle, the function of
![]() and
and ![]() may be different. In this case, be sure to connect
may be different. In this case, be sure to connect ![]() to
to ![]() and
and ![]() to
to ![]() .
. - Yellow
Back-up (or accessory) - Yellow
Connect to the constant 12 V supply terminal. - Red
Accessory (or back-up) - Red
Connect to terminal controlled by the ignition switch (12 V DC). - Blue/white
The pin position of the ISO connector will differ depending on the type of vehicle. Connect![]() and
and ![]() when Pin 5 is an antenna control type. In another type of vehicle, never connect
when Pin 5 is an antenna control type. In another type of vehicle, never connect ![]() and
and ![]() .
. - Blue/white
Connect to the system control terminal of the power amp (max. 300 mA 12 V DC). - Blue/white
Connect to the auto-antenna relay control terminal (max. 300 mA 12 V DC). - Speaker leads
White: Front left![]() (STD) or high range left
(STD) or high range left ![]() (NW)
(NW)
White/black: Front left![]() (STD) or high range
(STD) or high range ![]() left (NW)
left (NW)
Gray: Front right![]() (STD) or high range right
(STD) or high range right ![]() (NW)
(NW)
Gray/black: Front right![]() (STD) or high range right
(STD) or high range right ![]() (NW)
(NW)
Green: Rear left![]() (STD) or middle range left
(STD) or middle range left ![]() (NW)
(NW)
Green/black: Rear left![]() (STD) or middle range left
(STD) or middle range left ![]() (NW)
(NW)
Violet: Rear right![]() (STD) or middle range right
(STD) or middle range right ![]() (NW)
(NW)
Violet/black: Rear right![]() (STD) or middle range right
(STD) or middle range right ![]() (NW)
(NW) - Orange/white
Connect to a car's illumination signal. - ISO connector
In some vehicles, the ISO connector may be divided into two. In this case, be sure to connect to both connectors.
NOTES
Power amp (sold separately)
Perform these connections when using the optional amplifier.

- System remote control
Connect to blue/white cable.
Installation

- Do not install this unit where:
- Optimum performance is obtained when the unit is installed at an angle of less than 60°.
![]()
- When installing, to ensure proper heat dispersal when using this unit, make sure you leave ample space behind the rear panel and wrap any loose cables so they are not blocking the vents.
![Pioneer - MVH-S520BT - Leave Ample Space Leave Ample Space]()
DIN mount installation
- Insert the supplied mounting sleeve into the dashboard.
- Secure the mounting sleeve by using a screwdriver to bend the metal tabs (90°) into place.
![Pioneer - MVH-S520BT - DIN Mount Installation DIN Mount Installation]()
When not using the supplied mounting sleeve
- Line up the holes on the mounting bracket with the holes on the sides of the unit to attach the bracket.
![]()
- Screw in one screw on each side to hold the unit in place.
![Pioneer - MVH-S520BT - DIN Mount Installation - When not Using Mounting Sleeve DIN Mount Installation - When not Using Mounting Sleeve]()
Using the included bracket
Check to make sure that the included bracket matches your particular model of vehicle and then attach it to the unit as shown below.


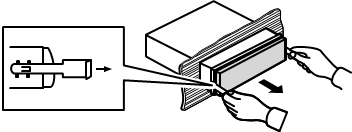
Removing the unit (installed with the supplied mounting sleeve)
- Remove the trim ring.
![Pioneer - MVH-S520BT - Removing the Unit - Step 1 Removing the Unit - Step 1]()
- Insert the supplied extraction keys into both sides of the unit until they click into place.
- Pull the unit out of the dashboard.
![Pioneer - MVH-S520BT - Removing the Unit - Step 2 Removing the Unit - Step 2]()
Installing the microphone
The microphone should be placed directly in front of the driver at a suitable distance to pick up their voice clearly.
It is extremely dangerous to allow the microphone lead to become wound around the steering column or shift lever. Be sure to install the microphone in such a way that it will not obstruct driving. It is recommended to use the clamps (sold separately) to arrange the lead.
NOTE
Depending on the vehicle model, the microphone cable length may be too short when you mount the microphone on the sun visor. In such cases, install the microphone on the steering column.
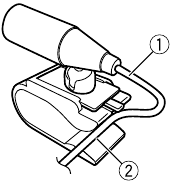
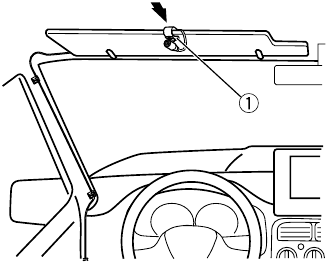
To install on the sun visor
- Fit the microphone lead into the groove.
![Pioneer - MVH-S520BT - Install Microphone on the Sun Visor - Step 1 Install Microphone on the Sun Visor - Step 1]()
- Install the microphone clip on the sun visor.
Lowering the sun visor reduces the voice recognition rate.
![Pioneer - MVH-S520BT - Install Microphone on the Sun Visor - Step 2 Install Microphone on the Sun Visor - Step 2]()
To install on the steering column
- Slide the microphone base to detach it from the microphone clip.
![Pioneer - MVH-S520BT - Install Microphone on the Steering Column - Step 1 Install Microphone on the Steering Column - Step 1]()
- Install the microphone on the rear side of the steering column.
![Pioneer - MVH-S520BT - Install Microphone on the Steering Column - Step 2 Install Microphone on the Steering Column - Step 2]()
Basic operation
MVH-S520BT
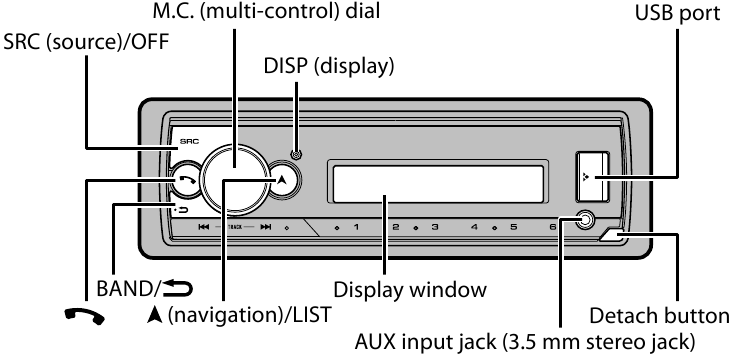
About the main menu
You can adjust various settings in the main menu.
- Press the M.C. dial to display the main menu.
- Turn the M.C. dial to select one of the categories below, then press to confirm.
- Turn the M.C. dial to select the options, then press to confirm.
Frequently used operations
| Purpose | Operation |
| Turn on the power | Press SRC/OFF to turn on the power. Press and hold SRC/OFF to turn off the power. |
| Adjust the volume | Turn the M.C. dial. |
| Select a source | Press SRC/OFF repeatedly. |
| Change the display information | Press DISP repeatedly. |
| Return to the previous display/list | Press BAND/ . . |
| Return to the normal display from the menu | Press and hold BAND/ . . |
| Change the display brightness | Press and hold BAND/ . . |
Setup operation
When you turn the ignition switch to ON after installation, the setup menu appears in the display.
Do not use the unit in standard mode when a speaker system for network mode is connected to the unit. Do not use the unit in network mode when a speaker system for standard mode is connected to the unit. This may cause damage to the speakers.
- Turn the M.C. dial to select the options, then press to confirm.
To proceed to the next menu option, you need to confirm your selection.
| Menu Item | Description |
| LANGUAGE [ENG](English), | Select the language to display the text information from a compressed audio file. |
| CLOCK SET | Set the clock.
|
| FM STEP [100], [50] | Select the FM tuning step from 100 kHz or 50 kHz. |
| SPEAKER MODE [STANDARD], | Switch between two operation modes: the 2-way network mode (NETWORK) and the standard mode (STANDARD) according to the connections you have established. After selecting the appropriate mode, turn the M.C. dial to select [YES], then press to confirm. |
- [QUIT:YES] appears.
To return to the first item of the setup menu, turn the M.C. dial to select [QUIT:NO], then press to confirm. - Press the M.C. dial to confirm the settings.
Tuner operation
Receiving preset stations
- Press SRC/OFF to select [RADIO].
- Press BAND/
![]() to select the band.
to select the band.
[FM1]![]() [FM2]
[FM2] ![]() [FM3]
[FM3] ![]() [MW]/[LW]
[MW]/[LW] - Press a number button (1/
![]() to 6/
to 6/![]() ).
).
Best stations memory (BSM)
- After selecting the band, press the M.C. dial to display the main menu.
- Turn the M.C. dial to select [FUNCTION], then press to confirm.
- Turn the M.C. dial to select [BSM], then press to confirm.
To store stations manually
- While receiving the station you want to store, press and hold one of the number buttons (1/
![]() to 6/
to 6/![]() ) until it stops flashing.
) until it stops flashing.
USB/iPhone/AUX operation
(iPhone source is not available when [USB MTP] is set to [ON] in the SYSTEM settings.)
USB/iPhone
MTP connection
A device installed with Android OS 4.0 or most of later versions can be connected to the unit via MTP, using the cable supplied with the Android device. However, depending on the connected device, OS version or the numbers of the files in the device, audio files/songs may not be able to be played back via MTP.
NOTE
If you use an MTP connection, [USB MTP] needs to be set to [ON] in the SYSTEM settings.
AUX
- Press SRC/OFF to select [AUX IN] as the source.
Bluetooth connection
Up to two Bluetooth telephones can be connected simultaneously.
Bluetooth telephone
Basic operations
| Purpose | Operation |
| Answer an incoming call | Press any button when a call is received. |
| End a call | Press  . . |
| Reject an incoming call | Press and hold  when a call is received. when a call is received. |
Activating voice recognition mode
- Press and hold
![]() and then talk into the microphone to input voice commands.
and then talk into the microphone to input voice commands.
To exit the voice recognition mode, press BAND/![]() .
.
Making a connection with Pioneer Smart Sync
Pioneer Smart Sync is the application that intelligently brings your maps, messages, and music together in the vehicle.
Do not attempt to operate the application while driving. Make sure to pull off the road and park your vehicle in a safe location before attempting to use the controls on the application.
- Turn the M.C. dial to select [APP CONTROL], then press to confirm.
- Turn the M.C. dial to select one of the below.
- Turn the M.C. dial to select [AUTO APP CONN], then press to confirm.
- Turn the M.C. dial to select [ON], then press to confirm.
- Connect this unit with the mobile device via USB or Bluetooth. Pioneer Smart Sync on the iPhone/Android device starts automatically.
NOTE
Regardless of whether the [AUTO APP CONN] setting is set to [ON] or [OFF], you can also perform the following to start Pioneer Smart Sync.- For devices other than the USB-connected Android device, press SRC/OFF to select any source and press and hold the M.C. dial.
Listening to Spotify®
(Not available when [USB MTP] is set to [ON] in the SYSTEM settings.)
Update the firmware of the Spotify application to the latest version before use.
Before you start, connect this unit with the mobile device via USB (iPhone only) or Bluetooth.
- Turn the M.C. dial to select [APP CONTROL], then press to confirm.
- Turn the M.C. dial to select one of the below.
- Press SRC/OFF to select [SPOTIFY].

Documents / Resources
References
Download manual
Here you can download full pdf version of manual, it may contain additional safety instructions, warranty information, FCC rules, etc.
Thank you! Your question has been received!


 placed on the product means direct current.
 and
and  may be different. In this case, be sure to connect
  to
to  to
to  and
and  when Pin 5 is an antenna control type. In another type of vehicle, never connect





 to select the band.
 [FM2]
[FM2]  to 6/
to 6/


Need Assistance?
Do you have a question about the MVH-S520BT that isn't answered in the manual? Leave your question here.