Quick Links
TECHNICAL SPECIFICATIONS
LED Type
LED Power
Power Connection
Colour Temp, CRI
& Lumens Opt. 2
Colour Temp, CRI
& Lumens Opt. 3
Lens Options
LED Life
Operating Environment
Min. Ambient Temperature
Max. Ambient Temperature
Material
Max Fitting Cable Length
(28AWG)
Notes:
Maximum cable length is defined by no discernable reduction
in light output.
*500mA variant not for use in USA or Canada
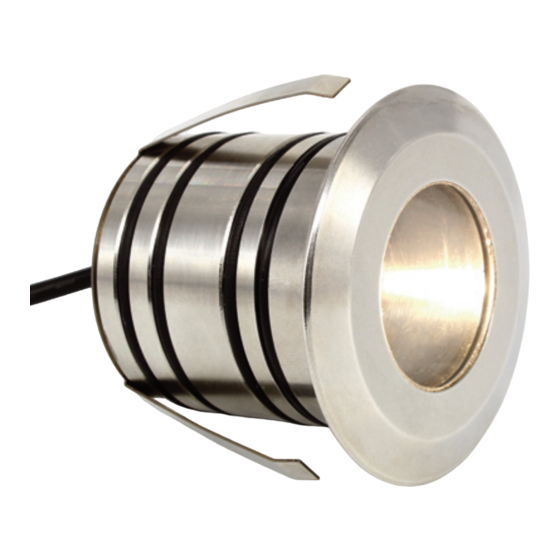
LP5 LED Paver
Troubleshooting Guide
Problem
Probable Causes
Mains supply off
Loose mains plugs
Loose DC output wire or
connection
Splitter LED channel not
terminated
Failed LED
Constant Current System
System is dead - no light
output from LED's
Failed LED
Driver failed
Failed joint/track on Splitter PCB –
check continuity with DVM
Short circuit - damages cable
Constant Current System
between LED and splitter
Some LED's not working
LED short circuit
Faulty or wrong connection at driver
or dimmer control box
Constant Current System
Faulty dimmer potentiometer or
LED's on full illumination
damaged dimmer control cable
- not dimming
Failed driver
Oslon Square
1W @ 350mA
1.5W @ 500mA*
Screw terminal
3000K, 83 lm/w
>96 CRI
4000K, 89 lm/w
>95 CRI
15° or 51°
>50,000h
IP65 rated for indoor or outdoor
use
10°C
+40°C
Aluminium or 316 stainless steel
10m (32.8')
Test & Remedy
Check supply and reinstate.
Check plugs.
Check all connections.
Check all splitter channels have LED
fittings plugged in or have continuity
jumpers fitted. Plug in LED's and/or jumpers
Using spare continuity plug unplug each LED
fitting from the Splitter in turn and replace
with continuity jumper. Replace failed LED
and cable
With Power off and Splitter cover removed,
put DVM on Ohms across each LED in turn.
On good LED should be OC one way and
approx. 6MΩ the other. Replace failed LED
and cable
Check output with DVM. With power ON
and no LED's lit, DC voltage output to
LED's should be at maximum
Replace splitter
Repair or replace.
Replace LED and cable.
Check driver and dimmer connections.
Replace/repair as necessary.
Remove dimmer control cable from
dimmer. Check continuity of cable and
dimmer pot. Replace/repair as necessary.
Replace driver.
QUICKSTART GUIDE
UFO LP5 LED PAVER
Please read the user guide carefully before installing, operating
or performing maintenance on these devices.
Universal Fiber Optic Lighting USA, LLC
Universal Fibre Optics Ltd
Home Place
\
Coldstream
TD12 4DT
\
UK
941-343-8115
+44 (0)1890 883416
\
www.ufo.lighting
LP5 LED Paver
Schematic Showing Driver & Splitter
1749 Northgate Blvd
Sarasota
\
FL34234
\
USA
93059 Regensburg
\
www.fiberopticlighting.com
+49 (0)9491 955880
Rev. C1
E360312
UFO Licht GmbH
Andreasstraße 20
\
Deutschland
\
www.ufo-licht.de

Related Manuals for UFO LP5 LED Paver


Summary of Contents for UFO LP5 LED Paver
- Page 1 93059 Regensburg Deutschland TD12 4DT 941-343-8115 www.fiberopticlighting.com +49 (0)9491 955880 www.ufo-licht.de +44 (0)1890 883416 www.ufo.lighting LP5 LED Paver LP5 LED Paver Troubleshooting Guide Schematic Showing Driver & Splitter Problem Probable Causes Test & Remedy Mains supply off Check supply and reinstate.
- Page 2 Series Splitter is centrally located to match LED fitting cable lengths. Fit all LP5 fittings in place as detailed below. The UFO splitters are supplied with removable continuity jumpers. Retain these jumpers for future use.