Table of Contents
Quick Links
Notes for operators and responsible maintenance personnel
Please read through the Instruction Manual carefully prior
to use.
Keep this Instruction Manual for future reference whenever
necessary.
©
Linear Array Probe
EUP-LV74
INSTRUCTION MANUAL
Tokyo , Japan
Hitachi, Ltd. 2013,2017. All rights reserved.
Q1E-EP1191-6
0123
Table of Contents

Related Manuals for Hitachi EUP-LV74


Summary of Contents for Hitachi EUP-LV74
- Page 1 Notes for operators and responsible maintenance personnel Please read through the Instruction Manual carefully prior to use. Keep this Instruction Manual for future reference whenever necessary. Tokyo , Japan Q1E-EP1191-6 © Hitachi, Ltd. 2013,2017. All rights reserved. 0123...
- Page 2 Manufacturer: Hitachi,Ltd 2-16-1, Higashi-Ueno, Taito-ku, Tokyo, 110-0015, Japan +81-3-6284-3668 http://www.hitachi.com/businesses/healthcare/index.html European Representative: Hitachi Medical Systems GmbH Otto-von-Guericke-Ring 3 D-65205 Wiesbaden, Germany EU Importer: Hitachi Medical Systems Europe Holding AG Address: Sumpfstrasse 13 CH-6300 Zug, Switzerland Local Distributor: Q1E-EP1191...
- Page 3 About this manual This instruction manual shall provide the procedure for inspection, operation and reprocessing of the EUP-LV74. The manual also contains the general information and the specification of the probe. The probe is usable with the HITACHI ultrasound diagnostic scanner.
- Page 4 Graphical Symbols for Use in Labeling of Hitachi Ultrasound Probes Some graphical symbols that are used in labeling of Hitachi Ultrasound Probes are compliant with EN980:2008 standard. Refer to the following table about the meanings of them. Explanation of Symbol...
- Page 5 Definition of symbol The following symbol is also used for HITACHI Ultrasound Probes. Location Symbol Definition This instrument complies with Directive 93/42/EEC relating to Probe connector Medical Device and Directive 2011/65/EU relating to RoHS IPX7 mark IPX7 Probe connector See section 1.6.
-
Page 6: Table Of Contents
CONTENTS Page 1. Introduction ······························································································ 1 1.1 General ··························································· 1 1.2 Principles of operation ··········································· 1 1.3 Intended Use ······················································ 1 1.4 Components List ··················································· 1 1.5 Accessories ······················································· 2 1.6 External View ····················································· 3 2. Inspection procedure ·················································································· 4 3. -
Page 7: Introduction
1. Introduction 1.1 General The model EUP-LV74 is a linear array electronic scanning type probe. The probe is capable of acquiring Real-time 3D image by mechanical drive of the acoustic elements. The acoustic output was measured with operating the Hitachi Ultrasound diagnostic scanner according to the IEC 60601-2-37 standard. -
Page 8: Accessories
CAUTION The CD-ROM contains the probe’s specific parameters to be loaded to the Hitachi ultrasound diagnostic scanner. Hitachi service engineer installs the CD-ROM to the scanner. Store the CD-ROM in a safe place. 1.5 Accessories 1.5.1 Needle Guide Bracket EZU-PA7LV1 (Option) (1) Needle guide bracket ·····... -
Page 9: External View
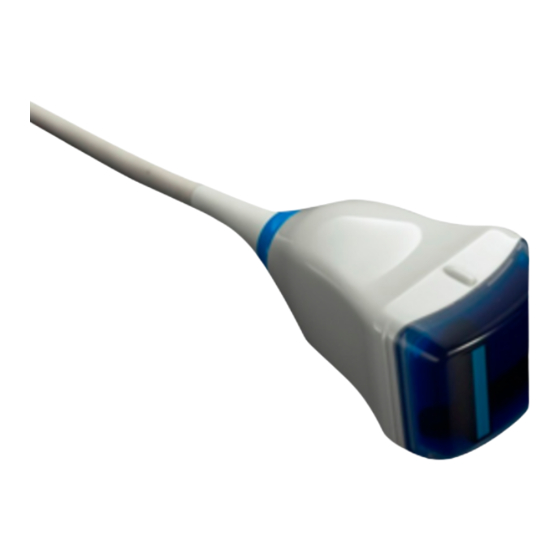
1.6 External View The external view of the EUP-LV74 is given in Fig. 1 Immersible part (IPX7) Handle housing Cable Applied part Connector Scan head Un-immersible part Immersible part: This part can be immersed in disinfectant solution and also can be cleaned by water. -
Page 10: Inspection Procedure
2. Inspection procedure Prior to each use, the probe must be carefully inspected that it is appropriate for use. (1) Visually inspect the surface of the probe head, the housing, the cable and the connector for any crack, scratch or denaturalization. -
Page 11: Operation Procedure
3. Operation Procedure (1) Confirm that the probe is cleaned and disinfected. (2) Cover the probe with a disposal probe cover to protect the probe. The probe cover should be allergy free material to avoid allergic reaction. Apply acoustic coupling gel inside and outside of the probe cover. -
Page 12: Reprocessing Procedure
4. Reprocessing Procedure The probe must be reprocessed after each use. Refer to the reprocessing instruction in this chapter. ‐ The probe is delivered unsterile. Prior to the first use, reprocess the probe. ‐ Temperature should not exceed 40°C during WARNINGS reprocessing. - Page 13 Application part contacts Disinfection semicritical mucosa (intracavitary (Disinfectant with application) virucidal effect) Cleaning Application part contacts Disinfection intracorporeal tissue (Disinfectant with critical directly (operative virucidal effect - application) minimum) Sterilization According to the intended use, EUP-LV74 probe is classified as uncritical. Q1E-EP1191...
- Page 14 The flowchart of the reprocessing process of this probe is as follows. Point of use (Pre-cleaning) Containment and transportation Manual cleaning and disinfection Manual Cleaning Rinsing after manual cleaning Manual Disinfection Rinsing after manual disinfection Drying Q1E-EP1191...
-
Page 15: Point Of Use (Pre-Cleaning)
4.1 Point of use (Pre-cleaning) Point of use Pre-cleaning should be done immediately after each use. (Pre-cleaning) The procedure is as follows: 1) Remove the probe cover. 2) Clean the probe of all patient’s blood or fluid with running tap water until the surface of the probe looks visually clean. - Page 16 Manual Cleaning: Prepare the detergent solution in a tank with cold water (please follow the instructions of the detergent manufacturer regarding application, dilution and contact time). 1) The temperature of the detergent solution should be between 15-30 °C, concentration is 1.6%. Please note the minimum contact time of the detergent in the manufacturer’s instruction.
- Page 17 Manual disinfection: 1) Prepare the disinfectant solution in a tank with cold water (please follow the instructions of the disinfectant manufacturer regarding application, concentration, microbiological efficiency, service life and contact time). 2) Confirm the concentration of the disinfectant before immersing the probe.
-
Page 18: Drying
Drying 4.4 Drying 1) Wipe the probe with a single-use, fluff-free wipe or towel to remove moisture from the surface of the equipment. 2) Dry the probe naturally in an ambient temperature between 15-30°C for a minimum of 4 hours. Alternatively the probe can be dried using a drying heater at a temperature of less than 40°C. -
Page 19: Daily Inspection (Maintenance)
(4) Use sterile acoustic coupling gel depending on the diagnostic part. The acoustic coupling gel which is an accessory of Hitachi Ultrasound diagnostic scanner is non-sterile acoustic coupling gel. (5) Do not hit or drop the probe because the inside of the probe head is easily broken by mechanical shocks. -
Page 20: Specifications
Volume sweep angle: 25° Probe materials: Biocompatible allergy free materials Acoustic output: Compliance with IEC 60601-2-37 Applicable ultrasound Contact your local HITACHI diagnostic scanner: distributor for detail. Classification: MDD classification IIa. Applicable detergent: Detergent listed in “7.2 Suppliers list” Applicable disinfectant: Disinfectant listed in “7.2 Suppliers list”... -
Page 21: Suppliers List
7.2 Suppliers List The products listed below are seriously tested and approved for use with the EUP-LV74. Product name Manufacturer Purpose Alkazyme ALKAPHARM Cleaner Klenzyme KLENZYME Cleaner ENZOL® Johnson & Johnson Cleaner Steranios 2% Laboratoires ANIOS High-level Disinfectant CIDEX® Activated Johnson &... -
Page 22: Disposal Of The Probe
8. Disposal of the probe Recycle or dispose the equipment properly in compliance with your organizational rules and your local laws. CAUTION Before disposing the equipment, disinfect or take other infection-prevention measures. Disposal of the equipment without taking the proper preventative measures can lead to infection. - Page 23 Unit: mm Fig. 4 Dimensions of the EUP-LV74 -17- Q1E-EP1191...