Table of Contents
Quick Links
Table of Contents

Related Manuals for Hitachi KHD150E


Summary of Contents for Hitachi KHD150E
- Page 1 Instruction Manual KHD150E PORTABLE DAB+/ FM RADIO...
-
Page 2: Table Of Contents
Contents Safety Warnings ..................6 Unpacking ....................9 Product Overview ..................10 Front View ........................10 Rear View ........................10 Top View ........................11 Side View ........................11 Power Source .................... 12 Mains Power ....................... 12 Battery Power ......................12 Battery Life (Approx. - Page 3 FM Operation .................... 20 Switching from DAB to FM Mode ............... 20 Auto Scan ........................20 Manual Scan ....................... 20 Scan Setting ....................... 20 Audio Setting ......................20 Viewing Station Information ................21 Presetting Stations ....................21 Recalling a Stored Station ..................22 System Settings ..................
- Page 4 SOME DOS AND DON’TS ON THE SAFE USE OF EQUIPMENT This equipment has been designed and manufactured to meet international safety standards but, like any electrical equipment, care must be taken if you are to obtain the best results and safety is to be assured.
- Page 5 Used correctly, domestic batteries are a safe and dependable source of portable power. Problems can occur if they are misused or abused – resulting in leakage or, in extreme cases, re or explosion. Here are some simple guidelines to safe battery use designed to eliminate any such problems.
-
Page 6: Safety Warnings
Safety Warnings Naked Flames • Read all the instructions carefully before using the unit and keep them • Never place any type of candle or for future reference. naked flame on the top of or near • Retain the manual. If you pass the the unit. - Page 7 Earphones • In the interests of safety and to avoid unnecessary energy consumption, • Listening to loud sounds for never leave the unit switched on prolonged periods of time while unattended for long periods of may permanently damage time, e.g. overnight, while on holiday your hearing.
- Page 8 ~ AC voltage: This symbol indicates The lightning flash with that the rated voltage marked with the arrowhead symbol, within an symbol is AC voltage. equilateral triangle, is intended to alert the user to the presence DC voltage: This symbol indicates of uninsulated “dangerous that the rated voltage marked with the voltage”...
-
Page 9: Unpacking
Thank you for purchasing your new product. We recommend that you spend some time reading this instruction manual in order that you fully understand all the operational features it offers. You will also find some hints and tips to help you resolve any issues. -
Page 10: Product Overview
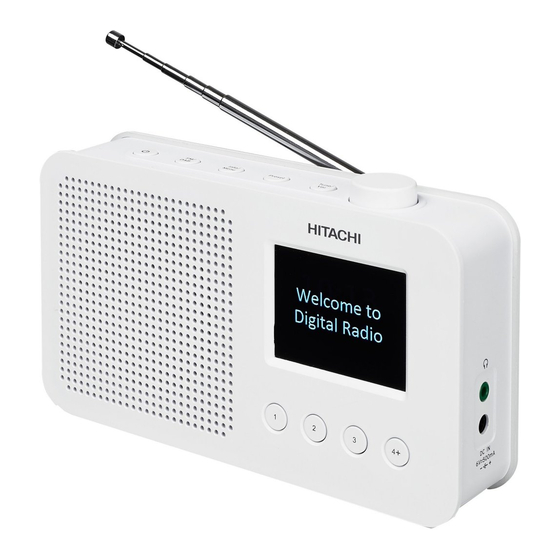
Product Overview Front View 1. Speaker 2. Display 3. Preset 1-4 Buttons Rear View 1. Aerial 2. Battery Compartment... -
Page 11: Top View
Top View 4. Preset Button Standby Button 5. Tune/Vol. Button 2. FM/DAB Button 6. Scroll/Select Button 3. Info/Menu Button Side View 2. DC IN 6V 500mA Earphones Socket Socket... -
Page 12: Power Source
Power Source Mains Power 1. Connecting the unit to any other power source may cause damage the unit. Unwind the mains adapter cable to its full length. Connect the end of the cable to the DC IN 6V 500mA socket at the right side of the unit and then connect the mains adapter to the mains socket. -
Page 13: Battery Life (Approx. Hours)
Battery Life (Approx. hours) When Using (2/3 volume) Alkaline (Size AA) Knowing when to Replace the Batteries • When the batteries become weak, the sound becomes weak and distorted. The display backlight becomes unstable when a button is pressed. The display will show “Battery Low”. • When the batteries are completely exhausted, the power is turned off. -
Page 14: Connections
Connections Using Earphones Turn down the volume before connecting earphones. Slowly raise the volume with the earphones on until you reach your desired level. Long-term exposure to loud music may cause hearing damage. It is best to avoid extreme volume when using earphones, especially for extended periods of time. -
Page 15: Basic Operation
Basic Operation Powering ON/OFF After connecting the mains adapter to the unit and the mains socket, Standby button to switch to Standby mode. • Press the • Press the Standby button again to switch on the unit. Standby button to switch off the unit. • Press and hold the • Disconnect the power cable of the mains adapter from the mains socket if you want to switch the unit off completely. -
Page 16: Dab Operation
DAB Operation When you turn on the radio it will automatically search and store all the available stations. You may conduct an additional Full Scan to ensure all stations are picked up and stored. It is also recommended every few months to run a new scan to pick up any new DAB/DAB+ that may have begun broadcasting after your radio scanned last time. -
Page 17: Secondary Services
Secondary Services You may see a “>>” symbol after the name of the station, this indicates that there are secondary services available to that station. These secondary services contain extra services that are related to the primary station. e.g. a sports station may want to add extra commentaries. The secondary services are inserted directly after the primary station in the station list. -
Page 18: Prune Invalid
Prune Invalid You may remove all unavailable stations from the list. 1. During DAB mode, press and hold Info/Menu, and then turn Scroll/ Select dial to select. Press Scroll/Select to confirm. 2. Turn Scroll/Select dial to select to confirm delete. Or select ... -
Page 19: Presetting Stations
Presetting Stations You can store up to 20 of your favourite DAB stations to the memory. This will enable you to access your favourite stations quickly and easily. 1. To store a preset, you must first be listening to the station that you would like to save. -
Page 20: Fm Operation
FM Operation Switching from DAB to FM Mode To switch the unit from DAB to FM mode, press FM/DAB once. Auto Scan To search for an FM station, press Tune/Vol. repeatedly to active tuning function of Scroll/Select dial. Turn Scroll/Select dial clockwise/ anti-clockwise and then press Scroll/Select to start the forward or reverse scanning. -
Page 21: Audio Setting
Audio Setting FM is able to search for Stereo or Mono stations. 1. Press and hold Info/Menu and then turn Scroll/Select dial to select -
Page 22: Recalling A Stored Station
Recalling a Stored Station 1. Once you have saved a station, you can recall it by pressing Preset. 2. Turn Scroll/Select dial to select the desired preset station number 3. Press Scroll/Select to confirm. 4. If you choose a preset station number that has not been allocated a station, “Preset Empty”... -
Page 23: System Settings
System Settings Setting Sleep Timer This function enables your unit to switch to standby mode by itself after a set sleep time when unit runs by mains power. 1. Press and hold Info/Menu, and then turn the Scroll/Select dial to select. -
Page 24: Setting Alarm
Setting Alarm Ensure the time and date is set before you can activate the alarm function. 1. Press and hold Info/Menu, and then turn Scroll/Select dial to select. Press Scroll/Select to confirm. 2. Turn the Scroll/Select dial to select or . Press Scroll/Select to confirm. -
Page 25: Setting Equaliser
Setting Equaliser This feature enables you to set a sound equalization profile. The equalization setting will change the tone of the sound from your radio. 1. Press and hold Info/Menu, and then turn Scroll/Select dial to select. Press Scroll/Select to confirm. 2. -
Page 26: Setting Backlight
Setting Backlight 1. Press and hold Info/Menu to display the menu, and then turn Scroll/ Select dial to select, and then press Scroll/Select to confirm. 2. Turn Scroll/Select dial to select , and then press Scroll/ Select to confirm. 3. -
Page 27: Factory Reset
Factory Reset When you move the unit to another part of the country, your pre-tuned and stored DAB/FM stations may no longer be available and you might need to reset the unit back to its original factory settings. To perform a factory reset, please do the following: 1. -
Page 28: Maintenance
Maintenance Ensure to unplug the unit from the mains socket before cleaning. • To clean the unit, wipe the case with a slightly moist, lint-free cloth. • Do not use any cleaning fluids containing alcohol, ammonia or abrasives. • Do not spray an aerosol at or near the unit. Hints and Tips Problem Solution... -
Page 29: Specifications
Specifications Main Unit Model KHD150E Battery DC 1.5V x 4, AA size Audio Output Power 1 W rms Radio Frequency FM 87.5 – 108 MHz DAB 174.928 – 240 MHz Power Consumption Operation: 3 W (Max) Standby: < 1 W Dimension (L) x (W) x (H) 200 ×... - Page 32 Importer: Elkjøp, Solheimsveien 6-8, PB 153, NO 1471 Lørenskog, Norge Norge: 815 32 000 Sverige: 0771 115 115 Danmark: 70 80 70 70 Suomi: 020321321 Manufacturer: Hitachi Europe Ltd., Whitebrook Park, Lower Cookham Road, Maidenhead, Berkshire SL6 8YA U.K. IB-KHD150E-GB-180906V2...