Table of Contents
Table of Contents

Related Manuals for Hitachi KH337E


Summary of Contents for Hitachi KH337E
- Page 1 Instruction Manual KH337E DAB+ FM Radio...
-
Page 2: Table Of Contents
Contents Safety Warnings ........................5 Unpacking ..........................7 Product Overview .........................8 Front View ...............................8 Rear View .................................8 Power Source ........................9 Battery Power ..............................9 Battery Life (Approx. hours) ........................9 Knowing When to Replace the Batteries .....................9 Mains Power ..............................10 Connections ........................10 Connecting to the Earphones Socket ....................10 Basic Operation ........................10 Powering ON/OFF ............................. - Page 3 SOME DOS AND DON’TS ON THE SAFE USE OF EQUIPMENT This equipment has been designed and manufactured to meet international safety standards but, like any electrical equipment, care must be taken if you are to obtain the best results and safety is to be assured. read the operating instructions before you attempt to use the equipment.
- Page 4 Used correctly, domestic batteries are a safe and dependable source of portable power. Problems can occur if they are misused or abused – resulting in leakage or, in extreme cases, re or explosion. Here are some simple guidelines to safe battery use designed to eliminate any such problems.
-
Page 5: Safety Warnings
Safety Warnings • Read all the instructions carefully before using the unit and keep them for future • To prevent the risk of electric shock or reference. fire hazard due to overheating, ensure • Retain the manual. If you pass the unit that curtains and other materials do not onto a third party make sure to include this obstruct the ventilation vents. - Page 6 • Children should be supervised to ensure that they do not play with the unit. • Never let anyone especially children push anything into the holes, slots or any other openings in the case - this could result in a fatal electric shock.
-
Page 7: Unpacking
Thank you for purchasing your new Hitachi DAB+ FM Radio. We recommend that you spend some time reading this instruction manual in order that you fully understand all the operational features it off ers. You will also fi nd some hints and tips to help you resolve any issues. -
Page 8: Product Overview
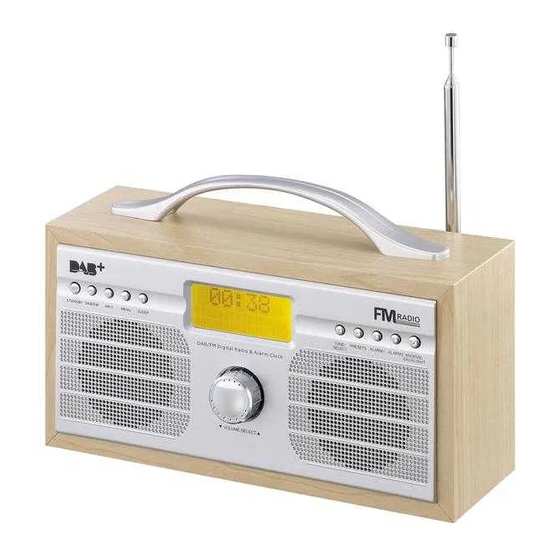
Product Overview Front View Handle STANDBY Button DAB/FM Button INFO Button MENU Button SLEEP Button STANDBY DAB/FM INFO MENU SLEEP TUNE/ PRESETS ALARM1 ALARM2 SNOOZE/ SELECT BACKLIGHT Speakers D A B / F M D i g i t a l R a d i o & A l a r m C l o c k VOLUME/SELECT Control LCD Display Window... -
Page 9: Power Source
Power Source Battery Power Insert 4 x 1.5V AA battery (not included) into the battery compartment located at the rear of the unit. Alarm and sleep function are not available under battery power. Battery Life (Approx. hours) When Using Alkaline (Size AA) Knowing When to Replace the Batteries •... -
Page 10: Mains Power
Mains Power Before using, connect the supplied power cable to the mains cable socket at the rear of the unit and to the mains socket. Connections Connecting to the Earphones Socket Connect earphones (3.5mm stereo mini plug) to the earphones socket. Adjust the volume control to obtain the desired volume level. -
Page 11: Dab Operation
DAB Operation If the unit is connected to the mains power and then switched on from standby for the fi rst time, the unit will automatically enter into the DAB mode and perform auto scan function. During the scan the display will show “Scanning ...”... -
Page 12: Secondary Services
Secondary Services You may see a “>” symbol after the name of the station, this indicates that there are secondary services available to that station. These secondary services contain extra services that are related to the primary station. e.g. a sports station may want to add extra commentaries. -
Page 13: Display Modes
Display Modes Every time you press the INFO button, the display will cycle through the following display modes: Ensemble/Multiplex (Group name), Time/Date, Frequency, Audio Bit Rate, Signal Strength, DLS, Programme Type. The information is displayed on the lower segment of the display. Multiplex Name Ensemble/Multiplex A multiplex is a collection of radio stations that... -
Page 14: Fm Operation
FM Operation Switching from DAB to FM Mode To switch the unit from DAB to FM mode, press the DAB/FM button once. The display will show FM and the frequency. Auto Scan To search for an FM station, press and hold the TUNE/SELECT button to start the auto scan. The display will show “Searching ... -
Page 15: Recalling A Stored Station
Recalling a Stored Station Once you have saved a station to one of the preset buttons, you can recall it by pressing the PRESETS button. Turn the VOLUME/SELECT control to select your desired preset station number. Press the TUNE/SELECT button to confirm the selection. If you choose a preset that hasn’t been allocated a station, “Empty preset #“... -
Page 16: Setting The Clock
Setting the Clock The clock can only be updated if you can receive DAB signals in your location. In order for the clock to synchronise to the current local time you must leave it on one DAB station for a short period of time. -
Page 17: Automatic Alarm Repeat
When the alarm time arrives, the selected wake-up mode will be on and the alarm icon in the display will fl ash to indicate the alarm is triggered. To stop the alarm sooner, STANDBY button. press the To check the alarm status, press the ALARM1 or ALARM2 button. The alarm status will show on the display. -
Page 18: Display Backlight
Display Backlight There are four backlight levels for you to select from in AC mode. During AC standby and DC on mode, the backlight will be turned on to full brightness for 5 seconds on every key press. To set the backlight, press the SNOOZE/BACKLIGHT button repeatedly and the brightness of the display will change in the below sequence on every press: Backlight off >... -
Page 19: Maintenance
This may occur if the broadcaster changes the label of a service blank or removes a label while tuned. The unit will try to retune or perform a scan. Specifi cations Model KH337E Mains Supply AC 100 – 240V~ 50/60Hz DC 6V 1.5V(UM3) x 4 Output Power 1.8W x 2 Radio Frequency FM87.5 –... - Page 20 Importer: Elkjøp, Solheimsveien 6-8, PB 153, NO 1471 Lørenskog, Norge Norge: 815 32 000 Sverige: 0771 115 115 Danmark: 70 80 70 70 Suomi: 020321321 Manufacturer: Hitachi Europe Ltd., Whitebrook Park, Lower Cookham Road, Maidenhead, Berkshire SL6 8YA U.K. 227-3123AP-EF3-V3...