
Related Manuals for Honeywell 2070A - 43 Cubic Foot Expandable Anti-Theft Wall Safe


Summary of Contents for Honeywell 2070A - 43 Cubic Foot Expandable Anti-Theft Wall Safe
- Page 1 Operation & Installation Guide MHAS2070AE0907 ENGLISH 2070A / 2070AE Model Read These Instructions Very Carefully! Home and Office Security Safes...
-
Page 2: Table Of Contents
Index Index Overview of Your Safe ........Page 1 Opening Safe For The First Time ....Page 2 Installing Your Wall Safe Page 3 ........ Programming a Personal Passcode Page 6 ... Using the Emergency Override Key ............. Page 7 Checking, Changing and Installing New Batteries ........... -
Page 3: Overview Of Your Safe
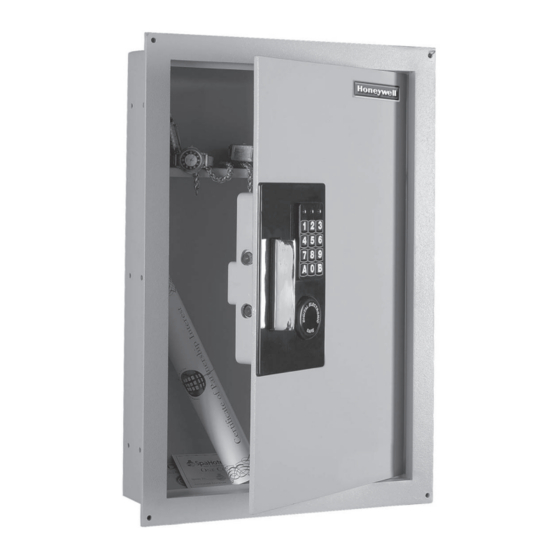
Overview of Your Safe WELCOME! Your new Honeywell Digital Anti-Theft Wall Safe will provide years of safe and secure protection for your valuables, important documents and other personal items. All Honeywell safes are designed and built using the highest manufacturing standards to ensure maximum user satisfaction under a variety of conditions. -
Page 4: Opening Safe For The First Time
Opening Safe For The First Time Opening Your Safe for the First Time Using the Pre-set Factory Code. Yellow Green Light Light Light Batteries have been pre- installed at the factory. Using the factory pre-set Passcode 159A, open the safe as follows: Enter the three digit number 159 on the keypad followed by the letter A. -
Page 5: Installing Your Wall Safe
Installing Your Wall Safe Location Your Honeywell Wall Safe should be mounted in an obscure location such as a bedroom or hall closet and must be installed in a 2’ x 4’ or thicker framed wall. Be sure that no plumbing pipes or electrical wires run through the wall cutout area where your wall safe is to be located and that there is room to swing the safe door open without obstruction. - Page 6 Installing Your Wall Safe STEP 1- Wall Cutout Determine the approximate location of the stud for the right hand side of your Wall Safe (hinge side). Drill or cut a large enough pilot hole to determine where the inside edge of this stud is located. Caution: With a flashlight, look through the pilot hole and make sure there are no electrical wires or plumbing in the cutout area before you start...
- Page 7 Installing Your Wall Safe Step 2 - Install Safe Install your wall safe into the wall cutout so that the hinge side of the safe is flush against the right hand stud and the front flange is flat against the wall. With the safe door open, extend the telescoping back by pushing it from the inside until maximum possible depth is achieved.
-
Page 8: Programming A Personal Passcode
Programming a Personal Passcode For security reasons, it is very important that you program your own personal 159A Passcode into the digital lock. The factory Passcode should be changed immediately. Programming Your Personal Passcode (159A) Using the factory assigned Passcode , open the safe. -
Page 9: Using The Emergency Override Key
Using the Emergency Override Key Using the Emergency Override Key Your safe is equipped with an Emergency Override Key which allows immediate access in case you forget your Passcode or the batteries need replacing. Remove the key lock cover located beneath the digital keypad. -
Page 10: Checking, Changing And Installing New Batteries
Checking, Changing and Installing New Batteries Your new safe arrived with 4-AA batteries pre-installed at the factory. It is important to periodically check the batteries and, if necessary, replace with a new set. Checking Batteries Yellow Locate the B key on the keypad and press. Light Light If the yellow LED flashes and you hear a beep, the batteries... -
Page 11: Use, Care And Maintenance
Use, Care and Maintenance Safe Care and Maintenance When properly maintained, your safe will continue to operate and accurately read the authorized Passcode for many years. In order to ensure optimum performance of your safe, please follow these simple precautions: Replace Batteries –... -
Page 12: Customer Support
Key Number Locating Model and Serial Numbers Most Honeywell safes include a small metallic silver or gray tag affixed to one of the surfaces. This tag is usually located on the front or right side of the safe. This tag contains the Serial Number, and on selected models a similar tag is attached containing the Model Number. - Page 13 Customer Support How to Contact Us 1-800-223-8566 (USA and Canada) Phone: Monday through Friday, 7:30 am to 4:30 pm Pacific Standard Time Email: [email protected] In addition to the required information regarding your safe, you must include the best time and proper telephone number to reach you during our normal Customer Service hours.
- Page 14 Notes...
- Page 15 Safe Identification Record Model Number Serial Number Key Number Digital Passcode Record Your Passcode must be at least 3 digits and no more than 8 digits followed by the letter A. Important: Once your personal Passcode is programmed, the factory pre-set code will no longer open the safe.
- Page 16 Limited Warranty If your Honeywell safe fails to operate because of a manufacturing defect any time up to five (5) years from the date of original purchase, we will, at our discretion, repair or replace the unit at no charge to the original owner. A copy of your sales receipt is required as Proof of Purchase.