HP 157770-001 - DAT Drive 20/40 Tape User Manual
Hp storageworks dat usb tape drives
Hide thumbs
Also See for 157770-001 - DAT Drive 20/40 Tape:
- Configuration manual (42 pages) ,
- Start here (2 pages)

Related Manuals for HP 157770-001 - DAT Drive 20/40 Tape


Summary of Contents for HP 157770-001 - DAT Drive 20/40 Tape
- Page 1 HP StorageWorks DAT USB Tape Drives User Guide Part number: DW049-90902 Second edition: September 2009...
- Page 2 Legal and notice information © Copyright 2009 Hewlett-Packard Development Company, L.P. The information contained herein is subject to change without notice. The only warranties for HP products and services are set forth in the express warranty statements accompanying such products and services. Nothing herein should be construed as constituting an additional warranty.
-
Page 3: Table Of Contents
Contents About this guide ................... 9 Intended audience ........................9 Related documentation ........................ 9 Document conventions and symbols ....................9 HP technical support ......................... 10 Registering your tape drive ......................10 Subscription service ........................11 HP websites ..........................11 Documentation feedback ......................11 1 Before you start ................ - Page 4 Connecting the power and USB cables ..................31 5 Verify installation ................35 6 Operating your tape drive ..............37 Front panel, DAT 320 tape drives ....................37 Front panel, DAT 160 tape drives ....................38 LED sequences, DAT 320 and DAT 160 tape drives ............... 38 Encryption LED, DAT 320 models only ...................
- Page 5 10 Troubleshooting ................61 General Procedure ........................61 Verifying USB installation for optimum performance ............... 63 Check for USB 2.0 port (Windows) ..................63 Ensure that the tape drive is the only device on a USB hub (Windows) ........63 For models prior to DAT 320 ensure that the hp_usbstor driver is being used (Windows) ....
- Page 6 Figures Front view of HP StorageWorks DAT 320 tape drive ............ 14 Front view of HP StorageWorks DAT 160 tape drive ............ 14 Front view of HP StorageWorks DAT 72 and 40 tape drive ........... 15 USB cables ......................16 Attaching mounting screws ..................
- Page 7 Tables Document conventions ....................9 Power requirements ....................16 LED sequences, DAT 320 and DAT 160 tape drives ............. 38 Encryption LED, DAT 320 tape drives ................. 40 Data cartridge compatibility ..................46 Cleaning cartridge compatibility ................49 DAT USB Tape Drives...
-
Page 9: About This Guide
About this guide This guide provides information about: • Installing the HP StorageWorks DAT USB tape drive • Using the HP StorageWorks DAT USB tape drive • Troubleshooting the HP StorageWorks DAT USB tape drive Intended audience This guide is intended for users who install, operate and maintain the HP StorageWorks DAT tape drive. -
Page 10: Hp Technical Support
Convention Element • Code variables text Monospace, italic • Command variables text Emphasized monospace text Monospace, bold WARNING! Indicates that failure to follow directions could result in bodily harm or death. CAUTION: Indicates that failure to follow directions could result in damage to equipment or data. IMPORTANT: Provides clarifying information or specific instructions. -
Page 11: Subscription Service
To ensure your registration is complete, there are a number of questions on the electronic form that are mandatory. Other questions are optional. However, the more you feel able to complete, the better HP can meet your needs. Subscription service HP recommends that you register your product at the Subscriber's Choice for Business website: http://www.hp.com/go/e-updates After registering, you will receive e-mail notification of product enhancements, new driver versions,... - Page 12 About this guide...
-
Page 13: Before You Start
1 Before you start In this chapter: • “HP StorageWorks DAT models” on page 13 • “Which operating systems are supported?” on page 15 • “USB tape drive and cables” on page 15 • “What are the mounting requirements for an internal tape drive?”... -
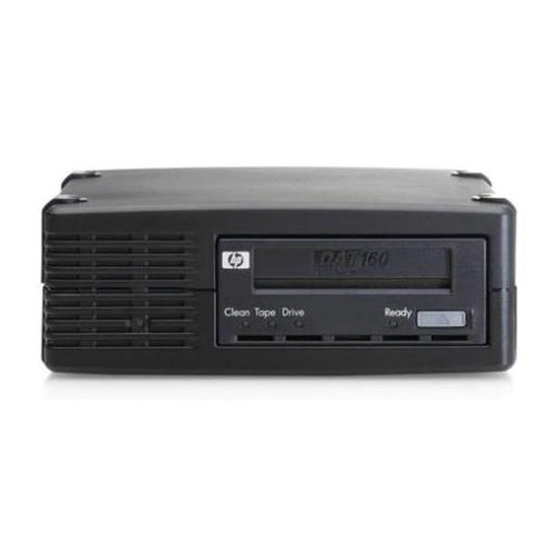
Page 14: Front View Of Hp Storageworks Dat 320 Tape Drive
1. Clean LED 4. Encryption LED 2. Tape LED 5. Ready LED 3. Drive LED 6. Eject button Figure 1 Front view of HP StorageWorks DAT 320 tape drive 1. Clean LED 4. Ready LED 2. Tape LED 5. Eject button 3. -
Page 15: Which Operating Systems Are Supported
1. Clean LED 3. Eject button 2. Tape LED Figure 3 Front view of HP StorageWorks DAT 72 and 40 tape drive Which operating systems are supported? HP StorageWorks DAT USB drives can be connected to servers running under Microsoft Windows Server 2008, Server 2003, Vista and XP, and Linux Kernels 2.6.x. -
Page 16: External Drives
Figure 4 USB cables • A USB cable with a 4–pin Intel connector (blue) • A USB cable with a 4–pin ProLiant connector (red) • A standard USB cable NOTE: If your server does not have an internal USB port, you must purchase and install a separate USB HBA with an internal port before you install the tape drive. -
Page 17: Mounting Hardware
Mounting hardware For many servers, no mounting tray or rails are required. Devices simply slide into the server's chassis and are fixed with screws. Other servers have built-in trays or rails. Rail kits for a number of industry-standard servers may be available. For more details refer to: http:/ /www.hp.com/go/connect. - Page 18 Before you start...
-
Page 19: Drivers And Backup Software
2 Drivers and backup software In this chapter: • “Install drivers ” on page 19 • “Upgrade backup software” on page 20 Install drivers Installing on Windows Two drivers are required in order to use HP StorageWorks DAT USB tape drives. hpdat: This is the HP Tape driver that works with all HP DAT products. -
Page 20: Alternative Install Process, After Connecting The Tape Drive
Alternative install process, after connecting the tape drive If you have not already installed drivers, the Windows Found New Hardware wizard may run when you power on the server and tape drive. Either: Follow the on-screen instructions to search for the required drivers on the CD-ROM. Cancel the wizard and insert the HP StorageWorks Tape CD-ROM. -
Page 21: Enabling Encryption (Dat 320 Only)
Enabling encryption (DAT 320 only) Your HP StorageWorks DAT 320 tape drive includes hardware capable of performing data encryption while writing and data decryption while reading, both at full speed. This is only possible with DAT 320 GB media. See also “DAT 320 tape drives and encryption”... - Page 22 Drivers and backup software...
-
Page 23: Installing An Internal Dat Tape Drive
3 Installing an internal DAT tape drive In this chapter: • “Prepare mounting bay” on page 23 • “Attach mounting hardware” on page 24 • “Install drive” on page 25 • “Attach USB cable” on page 25 • “Attach USB and power cable to the tape drive”... -
Page 24: Attach Mounting Hardware
Remove the filler panel from a spare 5¼-inch bay of your server, as described in your server's documentation. With some servers you may also need to remove the half-height device divider. Keep any screws for use in “Secure the drive” on page 30. You are now ready to install your tape drive. -
Page 25: Install Drive
Install drive CAUTION: Static electricity can damage electronic components. Always wear an antistatic wriststrap if one is available. If not, after you have disconnected power from the server and removed the cover, touch a bare metal part of the chassis. Similarly, touch a bare metal part of the drive before installing it. Slide the tape drive into the open bay, aligning the tray or rails with the slots in the bay, as shown Figure 6 on page 25. -
Page 26: To Check Whether Your Server Has An Internal Usb Port
Three USB cables are provided with the tape drive to support connection to three types of internal USB port: • A USB cable with a 4–pin Intel connector (blue) • A USB cable with a 4–pin ProLiant connector (red) • A standard USB cable NOTE: If your server does not have an internal USB port, you must purchase and install a separate USB HBA... -
Page 27: Connecting To A Standard Usb Port
Use the cable supplied with the tape drive to connect to the server. • If your server has a standard USB port, use a standard USB cable. You can use the supplied standard USB cable and cable ties to tidy excess cable length. Figure 8 Connecting to a standard USB port •... -
Page 28: Attach Usb And Power Cable To The Tape Drive
Figure 10 Connecting to a 4-pin USB port with ProLiant header pin layout (red) Attach USB and power cable to the tape drive NOTE: The drive is not powered from the USB bus. It must be connected to the server's power supply. Connect the Type B connector on the USB cable to the internal tape drive. -
Page 29: Attaching Power Cable
Attach a spare power cable from the server's internal power supply to the power connector. 1 and 5. USB cable, to server's internal USB port 3. tape drive 2 and 4. power cable 6. server's power supply Figure 11 Attaching power cable DAT USB Tape Drives... -
Page 30: Secure The Drive
Secure the drive Secure the drive, as described in your server documentation. The following diagrams are examples only. 2. server latch, push down to lock the tape drive 1. plastic rail into position Figure 12 Securing drive example 1, mounting hardware used 1. -
Page 31: Installing An External Dat Tape Drive
4 Installing an external DAT tape drive In this chapter: • “Connecting the power and USB cables” on page 31 Please refer to “Installing an internal DAT tape drive” on page 23, if you are installing an internal DAT tape drive. Connecting the power and USB cables NOTE: The drive is not powered from the USB bus. -
Page 32: Connecting Power And Usb Cables, Dat 320 Tape Drives
Plug the power cable securely into the socket on the rear panel of the drive and plug the other end of the power cable into the power outlet. 1. USB cable (pre-fitted) 3. power cable 2. on/off button on front panel Figure 14 Connecting power and USB cables, DAT 320 tape drives 1. - Page 33 Plug the USB cable into the USB connector on the server. NOTE: It is important to ensure that you connect your drive to a USB 2.0 port. The drive will work on a USB 1.1 port but performance will be severely degraded. See also “Verifying USB installation for optimum performance”...
- Page 34 Installing an external DAT tape drive...
-
Page 35: Verify Installation
5 Verify installation Once you have installed the drive hardware, check that drivers have been installed correctly and you have the correct version of backup software, and verify that the tape drive is functioning properly before you store your valuable data. NOTE: Certain backup applications require you to use their own Tape driver instead of the HP Tape driver. - Page 36 You are now ready to carry out a backup and restore test to check that the drive can write data to tape. Use a blank cartridge. Windows Backup or Linux native backup applications can be used to check basic tape drive operation, but they will not support all the advanced features of your tape drive.
-
Page 37: Operating Your Tape Drive
6 Operating your tape drive In this chapter: • “Front panel, DAT 320 tape drives” on page 37 • “Front panel, DAT 160 tape drives” on page 38 • “LED sequences, DAT 320 and DAT 160 tape drives” on page 38 •... -
Page 38: Front Panel, Dat 160 Tape Drives
Front panel, DAT 160 tape drives 1. cartridge slot 5. drive LED 2. power LED (external drives only) 6. ready LED 3. clean LED 7. eject button 4. tape LED Figure 17 Front panel, HP StorageWorks DAT 160 external drive LED sequences, DAT 320 and DAT 160 tape drives The LED sequences in the following table relate to the Clean, Tape, Drive and Ready LEDs. - Page 39 LED Sequence Cause Action required The drive is ready Ready is ON. None. This is normal. for operation. None. The drive is carrying Ready FLASHES. out a normal activity If the drive is upgrading firmware, do not reset or power (read, write).
-
Page 40: Encryption Led, Dat 320 Models Only
Encryption LED, DAT 320 models only The encryption LED is blue and is off, on or flashing, as described in the following table. The state of the other LEDs depends upon the activity, as described below. Table 4 Encryption LED, DAT 320 tape drives Encryption LED Drive LED (Amber) Ready LED (Green) -
Page 41: Front Panel, Dat 72 And Dat 40 Tape Drives
Front panel, DAT 72 and DAT 40 tape drives 1. cartridge door 4. tape LED 2. eject button 5. power LED (external drives only) 3. clean LED Figure 18 Front panel, HP StorageWorks DAT 72, 40 and 24 external drive LED sequences, DAT 72 and DAT 40 tape drives There are two LEDs, labeled Tape and Clean. -
Page 42: Loading And Unloading
Tape Clean Meaning This is the Media Caution Signal. Wait for the current operation to finish, then insert a different tape and repeat the operation that was being performed. If the media caution signal does not show this time, it indic- ates that the original cartridge was nearing the end of its useful life. -
Page 43: Removing Cartridges
Insert a compatible cartridge into the slot on the front panel. As the cartridge is inserted, the drive takes it and performs a load sequence. NOTE: The illustration shows an 8 mm cartridge. These cartridges are thicker than earlier-format DDS cartridges and can only be used with HP StorageWorks DAT 320 and DAT 160 tape drives. -
Page 44: Removing Power From The Drive
Removing power from the drive To ensure reliable operation, do not remove power from the drive during read, write, fast-search, load and unload activities. Operating your tape drive... -
Page 45: Use The Correct Media
7 Use the correct media For best performance we recommend HP branded media. Order online at: http://www.hp.com/go/ storagemedia. In this chapter: • “Data cartridges” on page 45 • “DAT 320 tape drives and encryption” on page 46 • “Write-protecting cartridges” on page 48 •... -
Page 46: Tape Drive/Media Compatibility
Tape drive/media compatibility For optimum performance and storage capacity, use tape cartridges that match your drive's format, and normally use only one cartridge per day. Ideally, use: • HP's DAT 320 cartridges with DAT 320 tape drives • HP's DAT 160 cartridges with DAT 160 tape drives •... -
Page 47: When Should I Use Encryption
To make use of this feature you need: • A backup application that supports hardware encryption • DAT 320 GB media; no hardware encryption will be performed when writing earlier generations of tape When should I use encryption? Your company policy will determine when you need to use encryption. For example, it may be mandatory for company confidential and financial data, but not for personal data. -
Page 48: Does Encryption Affect Tape Drive Performance
WARNING! You should keep a record or backup of your encryption keys and store them in a secure place separate from the computer running the backup software. Not even data recovery services will be able to recover encrypted data without the key! Does encryption affect tape drive performance? Hardware encryption can be used with or without compression and without speed or capacity penalties. -
Page 49: Cleaning Cartridges
1. tab closed, cartridge write-enabled 2. tab open, cartridge write-protected Figure 21 Write protecting a cartridge Cleaning cartridges You must use the correct type of cleaning cartridge for your tape drive, see Table 6 on page 49. DAT 320 tape drives: Only clean the tape drive when the Clean LED is flashing. All other models: HP recommends weekly cleaning of the tape drive using an HP cleaning cartridge. -
Page 50: Expired Cleaning Cartridges
the drive. Replace the cleaning cartridge when all the boxes are checked. New cleaning cartridges are available from HP. Insert a cleaning cartridge into the drive. The tape drive automatically loads the cartridge and cleans the heads. The Clean LED remains flashing and the Ready LED starts to flash. At the end of the cleaning cycle, the Clean LED turns off and the drive ejects the cartridge. - Page 51 • Do not overuse your tape drive—it is designed for approximately three hours of tape pulling per day, not constant usage—and clean the drive regularly. See “Cleaning cartridges” on page 49. • If you want to bulk erase cartridges, this should be done in a controlled environment. You need to make sure there are no other cartridges with sensitive information on them anywhere near the bulk eraser when in use.
- Page 52 Use the correct media...
-
Page 53: Using Hp Obdr
8 Using HP OBDR In this chapter: • “Compatibility” on page 53 • “What does HP OBDR do?” on page 53 • “Remote disaster recovery (ProLiant servers only)” on page 54 • “Testing for compatibility” on page 54 • “Running HP OBDR”... -
Page 54: Remote Disaster Recovery (Proliant Servers Only)
Remote disaster recovery (ProLiant servers only) The HP Remote Insight Lights-Out Edition (RILOE) on ProLiant servers gives the IT Administrator the ability to completely recover a failed server at a remote location without physically traveling to where the server resides. The on-site non-technical person need only insert the bootable cartridge into the tape drive when asked to do so by the administrator. -
Page 55: If Restore Fails
Hold down the eject button on the tape drive and keep it pressed down while power cycling the tape drive. This activates the HP One-Button Disaster Recovery process. Release the button as soon as the LEDs flash in OBDR sequence, which is: HP StorageWorks DAT 320 and DAT 160 tape drives: The Ready light shows a repeated pattern of flashing-steady on-flashing. - Page 56 Using HP OBDR...
-
Page 57: Diagnostic Tools And Performance
9 Diagnostic Tools and Performance In this chapter: • “Diagnostic tools” on page 57 • “Performance Assessment Tools” on page 59 Diagnostic tools HP Library & Tape Tools HP StorageWorks Library & Tape Tools (L&TT) is the recommended diagnostic and support tool for your HP tape storage product. -
Page 58: Troubleshooting With Library & Tape Tools
Wait for L&TT to scan and find your devices. Select the device you want to work with. 2. General information about the product and its 1. A visual representation of the product configuration 3. Cartridge information, if a data cartridge is 4. -
Page 59: Performance Assessment Tools
Performance Assessment Tools You can use our free, standalone performance assessment tools to check tape performance and test whether your disk subsystem can supply data at the maximum transfer rate. The tools are located online at http://www.hp.com/support/pat along with a complete guide to understanding the performance needs of your backup system and recommendations on finding and fixing performance issues. - Page 60 Diagnostic Tools and Performance...
-
Page 61: 10 Troubleshooting
10 Troubleshooting In this chapter: • “General Procedure” on page 61 • “Verifying USB installation for optimum performance” on page 63 • “Frequently asked questions about USB drivers” on page 64 • “Problems with cartridges” on page 65 Many users can use HP Library & Tape Tools to help them diagnose problems, see “Diagnostic tools”... - Page 62 Use the correct media type, for example: • DAT 320 media with DAT 320 drives. • DAT 160 media with DAT 160 drives. • DAT 72 media with DAT 72 drives. • DDS-4 media with DAT 40 drives. NOTE: When using the NT backup application with HP StorageWorks DAT 160 or DAT 320 tape drives, the user must choose 4 mm even when using 8 mm tape cartridges.
-
Page 63: Verifying Usb Installation For Optimum Performance
Verifying USB installation for optimum performance To confirm that an HP StorageWorks USB DAT drive is installed correctly: • Check that a USB 2.0 port is being used • Ensure that the tape drive is the only device on a USB hub •... -
Page 64: Check Drivers (Linux)
Expand Universal Serial Bus controllers and locate the tape drive. If the tape drive is connected to the HP USB Mass Storage Device, it is configured correctly. Check drivers (Linux) Use the following procedure to check that both drivers are present: usb_storage driver •... -
Page 65: Problems With Cartridges
“Verifying USB installation for optimum performance” on page 63. Problems with cartridges If you experience any problems using HP branded cartridges, check: • The cartridge case is intact and that it contains no splits, cracks or damage. • The cartridge has been stored at the correct temperature and humidity. This prevents condensation. See the insert included with the tape cartridge for storage conditions. - Page 66 Use a new or known-good piece of media and see if it loads. If it does, the original cartridge is faulty and should be discarded. Check if another DAT drive of the same model will accept the cartridge. If it does, the original drive may be faulty.
-
Page 67: 11 Replacing An Internal Tape Drive
11 Replacing an internal tape drive If your tape drive proves to be faulty and cannot be repaired and it is still covered by the original warranty, it will be replaced. HP will provide a replacement tape drive free of charge. Based on availability and where geography permits, the replacement tape drive will be shipped for next business day delivery. - Page 68 Replacing an internal tape drive...
-
Page 69: 12 Usb Configuration Guide
12 USB Configuration Guide In this chapter: • “USB in HP StorageWorks DAT devices” on page 69 • “USB terminology” on page 69 • “Setting up a USB network” on page 70 • “USB cables” on page 70 USB in HP StorageWorks DAT devices The HP StorageWorks DAT tape drive is a USB 2.0 logo certified device. -
Page 70: Setting Up A Usb Network
The host will give network bandwidth priority to periodic devices and will share any remaining bandwidth equally among any active bulk transfer devices. USB supports many types of devices and three data transfer rates, low speed, full speed, and high speed. -
Page 71: Index
Index DAT tape drive front view, audience, LEDs, 38, loading, models supported, power on, backup software powering off, encryption, unloading, supported, diagnostic tools buttons L&TT, Unload, performance assessment, disaster recovery See OBDR document cartridge life, conventions, cartridges related documentation, documentation best use of, HP website, cleaning,... -
Page 72: Hp Storageworks Dat
technical support, OBDR, HP OBDR compatibility, See OBDR how to run, hpdat, if restore fails, remote disaster recovery, testing for compatibility, what it does, inserting cartridges, One-Button Disaster Recovery installation, See OBDR problems, online, troubleshooting, operating systems supported, verifying, operation installing drives, 37, 38, drivers,... - Page 73 Unload button, unloading cartridges, upgrading firmware drives, verify installation, websites HP , HP Subscriber's Choice for Business, product manuals, write protect, DAT USB Tape Drives...