Parkside PMSHM 2 A1 - Multifunctional Moisture Meter Manual
- Operation and safety notes (120 pages)
List of pictograms used
 | Direct current / voltage |
 | Batteries included |
Introduction
You have chosen a high quality product. The instructions for use are part of the product. They contain important information concerning safety, use and disposal. Before using the product, please familiarise yourself with all of the safety information and instructions for use. Only use the unit as described and for the specified applications. If you pass the product on to anyone else, please ensure that you also pass on all the documentation with it.
Intended use
This product is suitable for measuring wood and building moisture, for example in firewood, mortar, concrete or plaster. The product is only intended for use in private households, and not intended for commercial use. This product is only for indoor use.
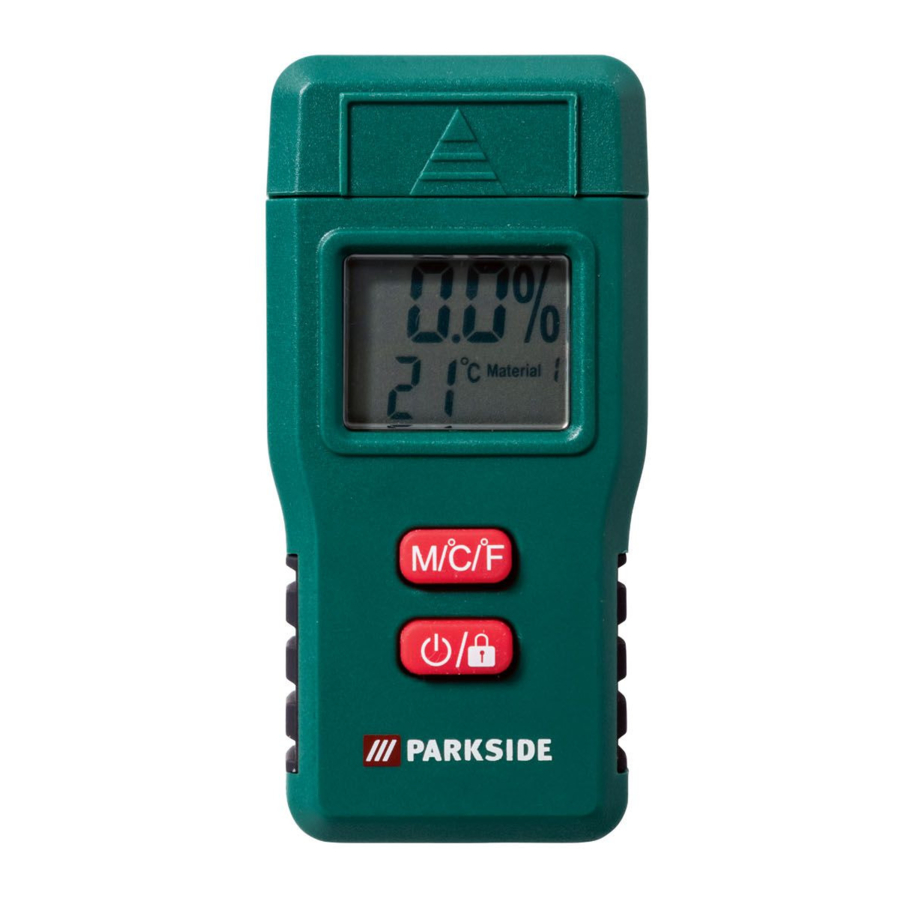
Parts description

![]() button (ON / OFF, Freeze the measured value on the display)
button (ON / OFF, Freeze the measured value on the display)
Technical data
| Operating voltage: | 3 V  |
| Battery type: | 2 x LR03 / AAA |
| Temperature accuracy: | + / - 1°C |
| Humidity accuracy: | |
| Precision: | see chapter "Making measurements" |
| Operating temperature: | 0°C to 40°C |
| Protection class: | IP 20 |
| Resolution: | 0.1 % |
| Air humidity: | up to a maximum of 80% (relative) |
Scope of delivery
Immediately after unpacking please check the package contents for completeness and if all parts and the product are in good condition.
1 Moisture Meter
2 LR03 / AAA batteries
1 Instructions for use
General safety instructions
 Before using the product, please familiarise yourself with all the operating and safety instructions. Please include all documentation when passing this product on to others.
- This product may be used by children age 8 years and up, as well as by persons with reduced physical, sensory or mental capacities, or lacking experience and / or knowledge, so long as they are supervised or instructed in the safe use of the product and understand the associated risks. Children should not be allowed to play with the product. Cleaning and user maintenance should not be performed by children without supervision.
![]()
The measuring pins are very sharp. Always be careful when using this product. Always attach the protective cap to the product when not in use. Otherwise there is a risk of injury!

Safety instructions for batteries / rechargeable batteries
![]()
DANGER TO LIFE! Keep batteries / rechargeable batteries out of reach of children. If accidentally swallowed seek immediate medical attention.![]()
![]()
DANGER OF EXPLOSION! Never recharge non-rechargeable batteries. Do not short-circuit batteries / rechargeable batteries and / or open them. Overheating, fire or bursting can be the result.


Risk of leakage of batteries / rechargeable batteries
- WEAR PROTECTIVE GLOVES!
![]()
Leaked or damaged batteries / rechargeable batteries can cause burns on contact with the skin. Wear suitable protective gloves at all times if such an event occurs.

Risk of damage of the product
Before use
- Before initial use, remove the protective film from the product display
![]() and insert the enclosed batteries.
and insert the enclosed batteries.
 and insert the enclosed batteries.
Inserting / changing the batteries
If the low battery indicator  appears in the display
  , the inserted batteries are almost drained and must be replaced. Empty batteries can falsify the measured result.
To insert the batteries proceed as follows:
- Open the battery compartment cover
![]() on the back of the product.
on the back of the product. - Insert the batteries in the battery compartment
![]() and close the battery compartment cover
and close the battery compartment cover ![]() again, so that it audibly latches into place.
again, so that it audibly latches into place.
Note: No button should be pressed while inserting the batteries.
 on the back of the product.
 and close the battery compartment cover
 Start-up
Before you take a measurement
- Ensure that both measuring pins
![]() touch the surface of the material at the same time.
touch the surface of the material at the same time. - Increase the pressure on the measuring pins
![]() for rough surfaces if necessary.
for rough surfaces if necessary. - For delicate surfaces complete the measurement on a section that is not in the visible area.
Note: The measuring pins![]() are sharp and may dent or damage the surface.
are sharp and may dent or damage the surface. - Remove the bark from firewood if needed. Press the measuring pins
![]() against the grain in various places on the wood.
against the grain in various places on the wood.
Taking a measurement
- Press the
![]() button
button ![]() to turn on the product. On the display
to turn on the product. On the display ![]() "0.0%", the surrounding temperature in °C and the previously selected material 1‒6 (see table reference values) appears.
"0.0%", the surrounding temperature in °C and the previously selected material 1‒6 (see table reference values) appears. - Press the M / °C / °F button
![]() and hold it down for approximately 5 seconds to switch the temperature display between °C and °F.
and hold it down for approximately 5 seconds to switch the temperature display between °C and °F. - Press the M / °C / °F button
![]() to select the material number of which you wish to measure the moisture level.
to select the material number of which you wish to measure the moisture level.
| Wood moisture approximate value for firewood | |||
 |  | 6– 15 % | ideal for heating – high heating value |
 | | 16– 20 % | restricted heating – low heating value |
 |  | 21– 44 % | not suitable for heating – further drying necessary |
Note: Above table is reference for checking the status of firewood. If the measured wood moisture level is 15% or below, the firewood is ideal for heating. If the measured wood moisture level is from 16 to 20%, the firewood is medium dry. If the measured wood moisture level is 21% or above, the firewood is not suitable for heating and further drying is necessary.

Note: When measuring under the measurement range, the display  shows "0.0%" or "Lo". For measurements above the measurement range, the display shows "Hi".
- Remove the protective cap
![]() .
. - Press both measuring pins
![]() against the surface at the same time. After 1–2 seconds you can read the percentage value.
against the surface at the same time. After 1–2 seconds you can read the percentage value. - If you are taking a measurement in an area in which you cannot read the display
![]() , press the
, press the ![]() button
button ![]() to freeze the result on the display
to freeze the result on the display ![]() . The display
. The display ![]() will then also show the lock symbol
will then also show the lock symbol ![]() .
.
 .
. .
.- Press the
![]() button
button ![]() again to take an- other measurement.
again to take an- other measurement. - If you have completed your measurement, switch the moisture measuring product off by pressing holding the
![]() button
button ![]() for more than 5 seconds.
for more than 5 seconds.
Note: The moisture measuring product switches itself off automatically if the product is not used for 60 seconds approximately.
Battery display
If the battery charge status is low, the low battery indicator  appears on the display . Please note that while the batteries are low, the measured values will be false or inaccurate. Replace the batteries as quickly as possible if this display appears. The battery change is described in the section "Inserting / changing the batteries".
Temperature display
You can change the temperature display between °C and °F by holding down M / °C / °F button  for approximately 5 seconds.
Reset function
A calibration can be performed if 0.0% is not shown on the display right after turn ON the product. For this, open the battery compartment cover  and press the reset button
  situated on the backside of the product using a sharp object. If the displayed reading is still not right, press the reset button again to calibrate again.
Note: Do not remove the batteries while using RESET function.
Troubleshooting
| Error | Possible causes and solutions |
| The measurement is obviously too high or low. | Check whether the product is set to the correct material. Check if the measuring pins  are correctly pressed against the material. Repeat the measurement process. are correctly pressed against the material. Repeat the measurement process. |
| The display is reading "Lo" or "Hi". | The measurement range has been exceeded or you have not reached the measuring range. |
| The number on the display is not re- acting. | If the lock symbol  appears on the display , press the appears on the display , press the  button button  . . |
| You can barely see the number on the display . | The batteries are low. See the chapter "Inserting/ changing the batteres". |
Electrostatic discharges can lead to malfunctions. In the event of such malfunctions, remove the batteries briefly and reinsert them.
Cleaning and care
- Clean the measuring pins
![]() with a slightly dampened cloth and dry it afterwards.
with a slightly dampened cloth and dry it afterwards. - Check the measuring pins
![]() for damage be- fore every use.
for damage be- fore every use.
Storage
- Always attach the protective cap
![]() to the product when not in use.
to the product when not in use.

VideosParkside Moisture Meter PMSHM 2 A1 Unboxing Testing - Video
Parkside 4-IN-1 Multi-Detector PMSHM 2 A1 Unboxing and Testing Video
Documents / ResourcesDownload manual
Here you can download full pdf version of manual, it may contain additional safety instructions, warranty information, FCC rules, etc.
Thank you! Your question has been received!


Need Assistance?
Do you have a question about the PMSHM 2 A1 that isn't answered in the manual? Leave your question here.