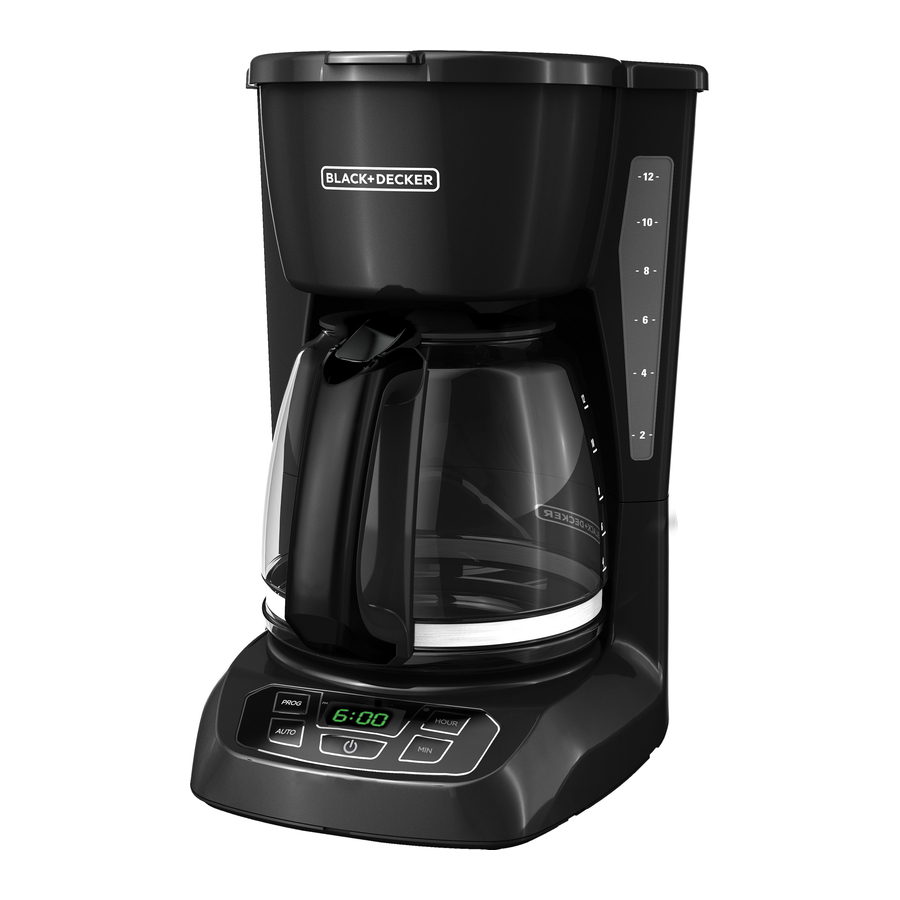
Overview of the device
Product may vary slightly from what is illustrated.

- One-piece cover
- Showerhead
- Removable filter basket
- Brew-thru lid
- Duralife™ carafe
- "Keep Hot" carafe plate
- Control panel
- Water reservoir with cup level markings
- Sneak-A-Cup™ feature
- Cord storage (inside of unit)
- Brew indicator light
ELECTRICAL CORD
- If an extension cord is used,
Note:
If the power supply cord is damaged, it should be replaced by qualified personnel or in Latin America by an authorized service.
How to Use
This product is for household use only.
GETTING STARTED
SETTING THE CLOCK
Note:
If the appliance is unplugged or power is interrupted even momentarily, the time may need to be reset.
BREWING COFFEE
- Open one-piece cover. Fill water reservoir with cold tap water. Use lines on side of reservoir as a guide. Do not fill with more than 12 cups of water.
![]()
If too much water is added it will leak from the back of the coffeemaker. - Place brew-thru lid on empty carafe, making sure it is in the down position. Then set carafe on carafe plate.
Note:
Coffee may overflow if brew-thru lid is not properly aligned. - Plug cord into an outlet. Press ON/OFF button (
![]() ) (indicator light to the left of the HOUR button will illuminate) and brewing begins. The "Keep Hot" carafe plate will keep the coffee warm for two hours or until the ON/OFF button (
) (indicator light to the left of the HOUR button will illuminate) and brewing begins. The "Keep Hot" carafe plate will keep the coffee warm for two hours or until the ON/OFF button (![]() ) is pressed.
) is pressed. - To turn off coffeemaker at any time press ON/OFF button (
![]() ) (indicator light to the left of the HOUR button will turn off).
) (indicator light to the left of the HOUR button will turn off).

 ) (indicator light to the left of the HOUR button will illuminate) and brewing begins. The "Keep Hot" carafe plate will keep the coffee warm for two hours or until the ON/OFF button (
BREWING 1 TO 4 CUPS
Note:
This feature slows down the brewing to extract the best flavor when brewing a small amount of coffee.
- Press the STRONG / 1-4 CUP button twice. 1-4 CUP is displayed.
Note: When using this feature coffee will be brewed at regular strength only. - Press the ON/OFF button, its light illuminates and the brewing cycle begins.
Note: Press the ON/OFF button to cancel this function.
SNEAK-A-CUP® FEATURE
Remove the carafe and brewing is paused. The carafe must be placed back on the carafe plate in 30 seconds to prevent overflow. Brewing begins again.
AUTO BREW
- Press AUTO button, holding it down until the AUTO light stops flashing.
The digital display changes to time of day. - To cancel Auto Brew function, press the ON/OFF button (
![]() ).
).
Care and Cleaning
This product contains no user serviceable parts. Refer service to qualified service personnel.
CLEANING
Make sure your coffeemaker is unplugged and cool.
- Wipe outside of coffeemaker, control panel and carafe plate with a soft, damp cloth.
Note: Do not use abrasive cleansers or scouring pads. Never immerse the coffeemaker in water.
CLEANING WITH VINEGAR
Note:
With regular use, minerals and hard water can clog your coffeemaker.
A full cleaning with vinegar is recommended once a month.

RISK OF FIRE OR ELECTRIC SHOCK. DO NOT OPEN.

The lightning symbol refers to "dangerous voltage"; the exclamation symbol refers to maintenance instructions. See below.

To reduce the risk of fire or electric shock, do not remove the cover of the coffeemaker. There are no user-serviceable parts inside. Repair should be done by authorized service personnel only.
NEED HELP?
For service, repair or any questions regarding your appliance, call the appropriate 800 number in front of this sheet. Please DO NOT return the product to the place of purchase. Also, please DO NOT mail product back to manufacturer, nor bring it to a service center. You may also want to consult the website listed on the cover of this manual.
IMPORTANT SAFEGUARDS
Please Read and Save this Use and Care Book.
When using electrical appliances, basic safety precautions should always be followed to reduce the risk of fire, electric shock, and/or injury to person's including the following:
- To disconnect, make sure brew indicator light is off by pressing ON/OFF button (
![]() ), then remove plug from wall outlet.
), then remove plug from wall outlet.
SAVE THESE INSTRUCTIONS.
This product is for household use only.
POLARIZED PLUG (120V Models Only)
This appliance has a polarized plug (one blade is wider than the other). To reduce the risk of electric shock, this plug is intended to fit into a polarized outlet only one way. If the plug does not fit fully into the outlet, reverse the plug. If it still does not fit, contact a qualified electrician. Do not attempt to modify the plug in any way.
TAMPER-RESISTANT SCREW
This appliance is equipped with a tamper-resistant screw to prevent removal of the outer cover. To reduce the risk of fire or electric shock, do not attempt to remove the outer cover. There are no user-serviceable parts inside. Repair should be done only by authorized service personnel.

Documents / ResourcesDownload manual
Here you can download full pdf version of manual, it may contain additional safety instructions, warranty information, FCC rules, etc.
Thank you! Your question has been received!


Need Assistance?
Do you have a question about the CM1105B that isn't answered in the manual? Leave your question here.