KERN FKB 6K0.02 Operating Manual
Table scales
Hide thumbs
Also See for FKB 6K0.02:
- Operating instructions manual (178 pages) ,
- Operating instructions manual (37 pages) ,
- Operating instructions manual (42 pages)
Table of Contents
Quick Links
Operating manual
Table scales
KERN FKB
Version 1.0
2020-05
GB
KERN & Sohn GmbH
Ziegelei 1
D-72336 Balingen
E-Mail: [email protected]
Phone: +49-[0]7433- 9933-0
Fax: +49-[0]7433-9933-149
Internet: www.kern-sohn.com
FKB-BA-e-2010
Table of Contents

Related Manuals for KERN FKB 6K0.02


Summary of Contents for KERN FKB 6K0.02
- Page 1 KERN & Sohn GmbH Ziegelei 1 Phone: +49-[0]7433- 9933-0 D-72336 Balingen Fax: +49-[0]7433-9933-149 E-Mail: [email protected] Internet: www.kern-sohn.com Operating manual Table scales KERN FKB Version 1.0 2020-05 FKB-BA-e-2010...
-
Page 2: Table Of Contents
KERN FKB Version 1.0 2020-05 Operating manual Table scales Content Technical data ......................5 Declaration of conformity ..................8 Appliance overview ....................9 Components ....................... 9 Operating elements ..................10 3.2.1 Keyboard overview ..................10 3.2.2 Numeric entry ..................... 11 3.2.3... -
Page 3
Rechargeable battery operation (optional) ............16 7.6.1 Recharge battery ..................16 Connection of peripheral devices ..............17 Initial Commissioning ..................17 Adjustment ....................... 17 7.9.1 External adjustment
............. 17 External adjustment with user-defined adjustment weight < caleud > . 18 7.9.2 Basic Operation ...................... - Page 4 Interfaces ......................36 14.1 Interface cable (RS232) ................36 14.2 Connect printer ....................37 14.3 KCP-interface commands ................37 14.4 Issue functions ....................38 Add-up mode < sum > ................38 14.4.1 Data output after pressing the PRINT button < manual > ....39 14.4.2 Automatic data output <...
-
Page 5: Technical Data
1 Technical data KERN FKB 6K0.02 FKB 8K0.1 FKB 8K0.05 FKB 15K0.5 Item no./ Type TFKB 6K-5-A TFKB 8K-4-A TFKB 8K-5-A TFKB 15K-4-A Readability (d) 0.02 g 0.1 g 0.05 g 0.5 g Weighing range (max) 6,000 g 8,000 g... - Page 6 KERN FKB 16K0.1 FKB 16K0.05 FKB 30K1 FKB 36K0.1 Item no./ Type TFKB 16K-4-A TFKB 16K-5-A TFKB 30K-3-A TFKB 36K-4-A Readability (d) 0.1 g 0.05 g 0.0001 kg Weighing range (max) 16,000 g 8,000 g 30,000 g 36 kg Taring range (subtractive)
- Page 7 KERN FKB 36K0.2 FKB 65K1 FKB 65K0.2 Item no./ Type TFKB 36K-4B-A TFKB 65K-3-A TFKB 65K-4-A Readability (d) 0.0002 kg 0.001 kg 0.0002 kg Weighing range (max) 36 kg 65 kg 65 kg Taring range (subtractive) 36 kg 65 kg...
-
Page 8: Declaration Of Conformity
The parts to be counted are subject to variation 2 Declaration of conformity The current EC/EU Conformity declaration can be found online in: www.kern-sohn.com/ce For verified weighing scales (= weighing scales assessed for conformity) a declaration of conformity is included in the scope of delivery. -
Page 9: Appliance Overview
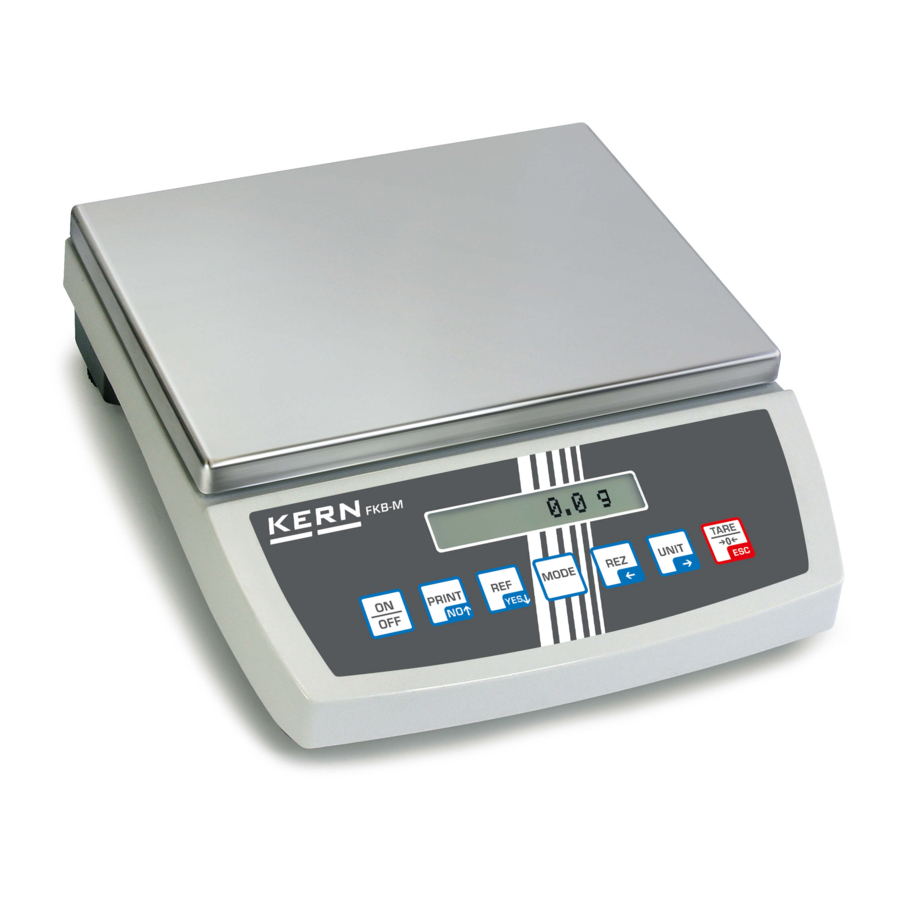
3 Appliance overview 3.1 Components Pos. Designation Weighing pan Display Keyboard Levelling screw Mains adapter connection Bubble level Anti-theft protection device connection USB-interface (Factory option) RS 232 interface Ethernet (Factory option) FKB-BA-e-2010... -
Page 10: Operating Elements
3.2 Operating elements 3.2.1 Keyboard overview Button Name Function in Operating Function in Menu mode Switch on/off (press button long time) Menu level back ON/OFF Switch on/off the Exit menu / back to button display background weighing mode. -
Page 11: Numeric Entry
3.2.2 Numeric entry Button Designation Function Select cipher Confirm entry. Press button repeatedly for every Navigation key digit. Wait until the numeric input window extinguishes. Navigation key Reduce flashing cipher (0 – 9) Navigation key Increase flashing cipher (0 – 9) 3.2.3 Display overview Position Display... -
Page 12: Basic Information (General)
The structure of the balance may not be modified. This may lead to incorrect weighing results, safety-related faults and destruction of the balance. The balance may only be used according to the described conditions. Other areas of use must be released by KERN in writing. 4.3 Warranty Warranty claims shall be voided in case •... -
Page 13: Monitoring Of Test Resources
Information is available on KERN’s home page (www.kern-sohn.com) with regard to the monitoring of balance test substances and the test weights required for this. In KERN's accredited DKD calibration laboratory test weights and balances may be calibrated (return to the national standard) fast and at moderate cost. -
Page 14: Unpacking, Setup And Commissioning
7 Unpacking, Setup and Commissioning 7.1 Installation Site, Location of Use The balances are designed in a way that reliable weighing results are achieved in common conditions of use. You will work accurately and fast, if you select the right location for your balance. Therefore, observe the following for the installation site: •... -
Page 15: Assembling, Installation And Levelling
Check, whether the voltage acceptance on the scales is set correctly. Do not connect the scales to the power mains unless the information on the scales (sticker) matches the local mains voltage. Only use KERN original mains adapter. Using other makes requires consent by KERN. Important: ... -
Page 16: Rechargeable Battery Operation (Optional)
7.6 Rechargeable battery operation (optional) The rechargeable battery and the battery match with each ATTENTION other. Only use the delivered mains adapter. Do not use the balance during the loading process. The rechargeable can only be replaced by the same or by a type recommended by the manufacturer. -
Page 17: Connection Of Peripheral Devices
Before connecting or disconnecting of additional devices (printer, PC) to the data interface, always disconnect the balance from the power supply. With your balance, only use accessories and peripheral devices by KERN, as they are ideally tuned to your balance. -
Page 18: External Adjustment With User-Defined Adjustment Weight < Caleud
Navigation key Press button, the first selectable adjustment weight will be displayed. Use the navigation keys to select the desired adjustment weight, see chap. 1 „Adjustment points“ or „Recommended adjustment weight“ Prepare the required adjustment weight. ... -
Page 19: Basic Operation
8 Basic Operation 8.1 Turn on/off Start-up: Press the ON/OFF button. The display lights up and the balance carries out a selftest. Wait until the weight display appears, then the balance is ready for weighing. Switch off: Keep ON/OFF button pressed until the display disappears 8.2 Simple weighing ... -
Page 20: Underfloor Weighing
• When the balance is unloaded the saved taring value is displayed with negative sign. • To delete the stored tare value, remove load from weighing pan and press the TARE button. • The taring process can be repeated any number of times, e.g. when adding several components for a mixture (adding). -
Page 21: Operating Concept
9 Operating concept From factory the balance is delivered with various applications (normal weighing, check weighing, counting). After the first start-up the balance is in theapplication. In the application menu (see chap.13.2.) however, you can define, selecting an application, in which mode the balance after switching-on has to continue working. -
Page 22: Application
10 ApplicationHow to carry out a simple weighing and taring, please refer to chap. 8.2 or 8.3. Further specific settings you will find in the following chapters. Shouldn’t the application already be enabled, select the menu setting < mode weig h >, see chap. 9 10.1 Application-specific settings + Navigation in the application menu see chap. -
Page 23: Description Of Individual Functions
Time The background illumination of the 10 s display will switch off automatically after the set time without load change 30 s or operation 1 min 2 min 5 min 30 min mode Autoff Automatic switch-off function switched off Automatic The balance is automatically switched-off switch-off function according to the time without load change or... - Page 24 The entered tare weight remains invalid until a new tare weight is input. To delete press the TARE key or confirm the menu setting < clear > using the TARE button. 10.1.2.2 Enter the known tare weight numerically < Ptare manuel > ...
-
Page 25: Application
11 ApplicationShouldn’t the application already be enabled, select the menu setting < mode count >, see chap. 9 11.1 Application-specific settings + Navigation in menu see chap. 13.1 11.1.1 Overview Press the TARE button and keep it pressed until the first menu item < ref > will be displayed Level 1 Level 2... -
Page 26: Using The Application
11.2 Using the application 11.2.1 Parts counting Before the balance can count parts, it must know the average piece weight (i.e. reference). Proceed by putting on a certain number of the parts to be counted. The balance determines the total weight and divides it by the number of parts, the so-called reference quantity. -
Page 27: Check Counting
The balance will calculate the average item weight and then displays the quantity of pieces. Remove reference weight. The balance is now in parts counting mode counting all units on the weighing pan. 2. Parts counting Put the empty container on the weighing pan and press the TARE button. The container is tared, the zero display will appear. - Page 28 Procedure: 1. Define upper and lower limit value: Make sure that the balance is in counting mode. If necessary, switch over with the button Press the TARE button and keep it pressed until the first menu item < ref > will be displayed.
-
Page 29: Application
12 ApplicationShouldn’t the application already be enabled, select the menu setting < mode check >, see chap. 9 12.1 Application-specific settings + Navigation in menu see chap. 13.1 12.1.1 Overview Press the TARE button and keep it pressed until the first menu item < ref > will be displayed Level 1 Level 2... - Page 30 Audio signal: The acoustic signal depends on the menu setting < setup beeper >, see chap. 13.3.1. Procedure: 1. Define upper and lower limit value: Make sure that the balance is in weighing mode. If necessary, switch over with the ...
-
Page 31: Menu
13 Menu 13.1 Navigation in the menu Call up menu: Application menu Setup menu Press the TARE button and keep it Press the TARE and ON/OFF button at pressed until the first menu item will be the same time and keep it pressed until displayed the first menu item will be displayed Select and adjust parameter:... -
Page 32: Setup Menu
13.3 Setup menu In the setup menu you have the possibility to adapt the behaviour of the balance to your requirements (e.g. environmental conditions, especial weighing processes). These settings are global and do not depend on the selected application. 13.3.1 Overview < setup > Level 3 Level 4 / Description Level 1... - Page 33 Rs232 baud Communication 1200 Usb-d 2400 4800 9600 14400 19200 38400 57600 115200 128000 256000 7dbits data 8dbits None parity even 1bit stop 2bits none handsh protoc Print intfce Rs232 RS 232 interface Data output USB-d USB device interface Switch on / off add-up mode, see chap.
- Page 34 Reference quantity 5 Reference quantity 10 Reference quantity Reference quantity 20 Reference quantity 50 free Optional, numeric input, see chap. 3.2.2. BEEPER keys Switch on / off acoustic signal by Audio signal pressing button Check Acoustic signal off Slow Slow Standard Fast Fast...
- Page 35 mode Autoff Automatic switch-off function switched Automatic switch-off function The balance is automatically switched- off according to the time without load Auto change or without operation defined in menu item < Time > Automatic switch-off only with zero Only0 display 30 s Time After the set time without load change...
-
Page 36: Interfaces
Pin 6: Low Signal (signal light “IN4”) Pin 7: Hi Signal (signal light ”IN2”) Pin 8: OK Signal (signal light ”IN1”) Pin 9: No assignment • 8 Data bit KERN Standard setting • 1 Stop bit • No parity FKB-BA-e-2010... -
Page 37: Connect Printer
33 pcs Quantity placed on balance 0.1000 kg Average piece weight REF: 10 pcs Reference quantity 14.3 KCP-interface commands A detailed description you will find in the „KERN Communications Protocol“ manual, available in the download area on our KERN homepage. FKB-BA-e-2010... -
Page 38: Issue Functions
14.4 Issue functions 14.4.1 Add-up mode < sum > With this function the individual weighing values are added into the summation memory by pressing a button and edited, when an optional printer is connected. Activate function: In Setup menu invoke the menu setting < Print sum> and confirm with button . -
Page 39: Data Output After Pressing The Print Button < Manual
Sample log (KERN YKB-01N): Menu setting prmode format short First weighing Second weighing Third weighing Number of weighings/ Total sum 14.4.2 Data output after pressing the PRINT button < manual > Activate function: In Setup menu invoke the menu setting -
Page 40: Automatic Data Output < Auto
14.4.3 Automatic data output < auto > Data output happens automatically without having to press the PRINT-key as soon as the corresponding output condition has been met, dependent on the setting in the menu. Enable function and set the output condition: ... -
Page 41: Data Format
Sample log (KERN YKB-01N): 14.5 Data format In Setup menu invoke the menu setting < Print PrMode > and confirm with button . Use the navigation keys to select the menu setting < format > and confirm with ... -
Page 42: Servicing, Maintenance, Disposal
Spilled weighing goods must be removed immediately. 15.2 Servicing, maintenance The appliance may only be opened by trained service technicians who are authorized by KERN. Before opening, disconnect from power supply. 15.3 Disposal Disposal of packaging and appliance must be carried out by operator according to valid national or regional law of the location where the appliance is used. -
Page 43: Instant Help
16 Instant help In case of an error in the program process, briefly turn off the balance and disconnect from power supply. The weighing process must then be restarted from the beginning. Fault Possible cause • The balance is not switched on. The displayed weight does not glow.