Allen-Bradley MicroLogix 1500 User Manual
Hide thumbs
Also See for MicroLogix 1500:
- User manual (174 pages) ,
- Installation instructions manual (122 pages) ,
- Installation instructions (2 pages)
Table of Contents
Table of Contents

Related Manuals for Allen-Bradley MicroLogix 1500


Summary of Contents for Allen-Bradley MicroLogix 1500
- Page 1 MicroLogix™ 1500 Programmable Controllers (Bulletin 1764) User Manual AB Spares...
- Page 2 Important User Because of the variety of uses for the products described in this publication, those responsible for the application and use of this control equipment must satisfy Information themselves that all necessary steps have been taken to assure that each application and use meets all performance and safety requirements, including any applicable laws, regulations, codes and standards.
- Page 3 If you do not, obtain the proper training before using this product. Purpose of this Manual This manual is a reference guide for MicroLogix 1500 controllers. It describes the procedures you use to install, wire, and troubleshoot your controller. This manual: •...
- Page 4 Information on the MicroLogix 1500 Controllers instruction set MicroLogix 1200 and 1500 1762-RM001B-US-P Programmable Controllers Instruction Set Reference Manual Information on mounting and wiring the MicroLogix 1500 Base Units, MicroLogix 1500 Programmable 1764-IN001A-ML-P including a mounting template for easy installation Controllers Base Unit Installation Instructions A description on how to install and connect an AIC+.
-
Page 5: Preface P
Preface Rockwell Automation Rockwell Automation offers support services worldwide, with over 75 Sales/ Support Offices, 512 authorized Distributors and 260 authorized Systems Support Integrators located throughout the United States alone, plus Rockwell Automation representatives in every major country in the world. Local Product Support Contact your local Rockwell Automation representative for: •... - Page 6 Preface Publication 1762-RM001A-US-P...
-
Page 7: Table Of Contents
Hardware Features ........1-1 MicroLogix 1500 Component Descriptions ....1-2 Programming . - Page 8 Replacement Parts MicroLogix 1500 Replacement Kits ......B-1 Lithium Battery (1747-BA) ......B-2 Replacement Terminal Blocks.
-
Page 9: Hardware Features
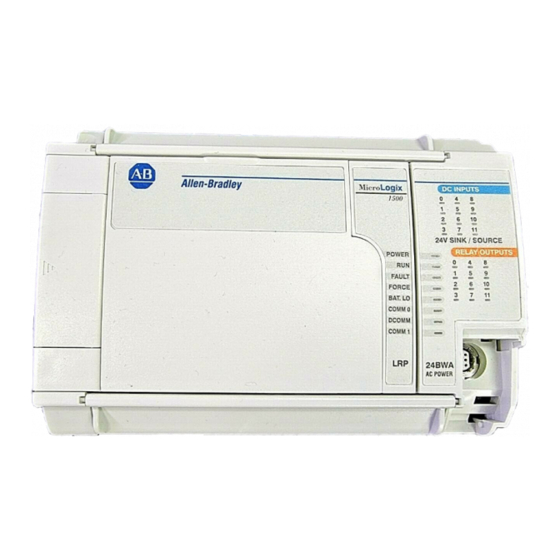
Chapter Hardware Overview Hardware Features The MicroLogix 1500 programmable controller contains a power supply, input circuits, output circuits, and a processor. The controller is available in 24 I/O and 28 I/O configurations. The hardware features of the controller are: PROG... -
Page 10: Micrologix 1500 Component Descriptions
Hardware Overview MicroLogix 1500 A controller is composed of a standard processor (1764-LSP or enhanced 1764-LRP with RS-232 port) and one of the base units listed below. The FET Component Descriptions transistor outputs are available on the 1764-28BXB base only. - Page 11 Hardware Overview Data Access Tool (Catalog Number 1764-DAT) 1764-DAT mounted on 1764-LSP processor. Memory Modules/Real-Time Clock Memory module mounted on 1764-LSP processor. The following memory modules and real-time clock modules are available: Catalog Number Function Memory Size 1764-RTC Real-Time Clock not applicable 1764-MM1 Memory Module...
-
Page 12: Programming
RSLogix™ 500, Rev. 4.0 or later. Communication cables are not included with the software. Communication Options The MicroLogix 1500 can be connected to a personal computer. It can also be connected to the DH-485 network using an Advanced Interface Converter (catalog number 1761-NET-AIC) and to the DeviceNet™ network using a DeviceNet Interface (catalog number 1761-NET-DNI). - Page 13 To use an additional bank of I/O, you must have. Product Catalog Number MicroLogix 1500 Processor 1764-LSP, Series A, Revision C or higher 1764-LSP, Series B, Revision A or higher 1764-LRP, Series B, Revision A or higher Operating System Version Firmware Revision Number (FRN) 3 or higher Programming Software RSLogix 500, Version 3.01.09 or higher, RSLinx, Version 2.10.118 or...
- Page 14 Adding an I/O Bank System Guidelines A maximum of one 1769 Expansion Cable can be used in a MicroLogix 1500 system, allowing for two banks of I/O modules (one connected directly to the controller, and the other connected via the cable). Each I/O bank requires its own power supply (Bank 1 uses the controller’s embedded power supply).
- Page 15 Hardware Overview The following illustrations show a MicroLogix 1500 with an expansion I/O bank. Vertical Orientation Expansion I/O Bank 1 1769-CRRx Expansion Cable Expansion I/O Bank 2 1769-ECL End Cap (1) The x in this catalog number can be either a 1 or a 3 representing the length of the cable: 1 = 1 foot (305 mm) and 3 = 3.28 feet (1 meter).
-
Page 16: Micrologix 1200 And
Expansion I/O Bank 2 Expansion I/O Power Failure Expansion I/O errors represent failures of the I/O bus or the modules themselves. The error codes are listed in the MicroLogix 1200 and MicroLogix 1500 Programmable Controllers Instruction Set Reference Manual, publication 1762-RM001B-US-P. -
Page 17: Agency Certifications
Chapter Installing Your Controller This chapter shows you how to install your controller system. The only tools you require are a Flat or Phillips head screwdriver and drill. Topics include: • agency certifications • compliance to European Union Directives • using in hazardous locations •... -
Page 18: Installation Considerations
EN 61131-2 Programmable Controllers, Part 2 - Equipment Requirements and Tests. For specific information required by EN 61131-2, see the appropriate sections in this publication, as well as the following Allen-Bradley publications: • Industrial Automation Wiring and Grounding Guidelines for Noise Immunity, publication 1770-4.1 •... -
Page 19: Safety Considerations
Installing Your Controller Safety Considerations Safety considerations are an important element of proper system installation. Actively thinking about the safety of yourself and others, as well as the condition of your equipment, is of primary importance. We recommend reviewing the following safety considerations. - Page 20 Installing Your Controller Disconnecting Main Power WARNING Explosion Hazard - Do not replace components or disconnect equipment unless power has been switched off. The main power disconnect switch should be located where operators and maintenance personnel have quick and easy access to it. In addition to disconnecting electrical power, all other sources of power (pneumatic and hydraulic) should be de-energized before working on a machine or process controlled by a controller.
-
Page 21: Power Considerations
If the power source cannot supply this inrush current, the source voltage may sag momentarily. The only effect of limited inrush current and voltage sag on the MicroLogix 1500 is that the power supply capacitors charge more slowly. However, the effect of a voltage sag on other equipment should be considered. -
Page 22: Preventing Excessive Heat
Installing Your Controller Loss of Power Source The power supply is designed to withstand brief power losses without affecting the operation of the system. The time the system is operational during power loss is called “program scan hold-up time after loss of power.” The duration of the power supply hold-up time depends on the type and state of the I/O, but is typically between 10 milliseconds and 3 seconds. -
Page 23: Master Control Relay
Installing Your Controller Master Control Relay A hard-wired master control relay (MCR) provides a reliable means for emergency machine shutdown. Since the master control relay allows the placement of several emergency-stop switches in different locations, its installation is important from a safety standpoint. - Page 24 Installing Your Controller Using Emergency-Stop Switches When using emergency-stop switches, adhere to the following points: • Do not program emergency-stop switches in the controller program. Any emergency-stop switch should turn off all machine power by turning off the master control relay. •...
- Page 25 Installing Your Controller Schematic (Using IEC Symbols) 230V ac Disconnect Fuse 230V ac Circuits Isolation Operation of either ofthese contacts will Transformer remove power from the external I/O circuits, stopping machine motion. 115V ac or 230V ac Emergency-Stop Master Control Relay (MCR) Start Stop Push Button...
- Page 26 2-10 Installing Your Controller Schematic (Using ANSI/CSA Symbols) 230V ac Disconnect Fuse 230V ac Output Circuits Isolation Operation of either ofthese contacts will Transformer remove power from the external I/O 115V ac or 230V ac Emergency-Stop Master Control Relay (MCR) Push Button Start Stop...
-
Page 27: Base Unit Mounting Dimensions
Installing Your Controller 2-11 Base Unit Mounting Dimensions 1764-24AWA 1764-24BWA 1764-28BXB Dimension Height (A) DIN latch open: 138 mm (5.43 in.), DIN latch closed: 118 mm (4.65 in.) Width (B) 168 mm (6.62 in.) Depth (C) 87 mm (3.43 in.) (1) See Controller Dimensions on page A-7 for more dimensional information. -
Page 28: Mounting The Controller
2-12 Installing Your Controller Mounting the Controller Do not remove protective debris strips until after the base and all ATTENTION other equipment in the panel near the base is mounted and wiring is complete. The debris strips are there to prevent drill fragments, wire strands and other dirt from getting into the controller. - Page 29 DIN rail meets the recommended spacing requirements, see Controller Spacing on page 2-11. Refer to the mounting template from the inside back cover of the MicroLogix 1500 Programmable Controller Base Units Installation Instructions, publication 1764-5.1. 2. Hook the top slot over the DIN rail.
- Page 30 2-14 Installing Your Controller To remove your base unit from the DIN rail: 1. Place a flat-blade screwdriver in the DIN rail latch at the bottom of the base unit. 2. Holding the base unit, pry downward on the latch until the latch locks in the open position.
-
Page 31: Installing Controller Components
Installing Your Controller 2-15 Installing Controller Prevent Electrostatic Discharge Components Electrostatic discharge can damage integrated circuits or ATTENTION semiconductors if you touch bus connector pins. Follow these guidelines when you handle any module: • Touch a grounded object to discharge static potential. •... - Page 32 2-16 Installing Your Controller 4. Make sure the actuator is pushed closed. 5. To remove the processor from the base unit, make sure base unit power is off. Push the actuator to the open position until the processor is ejected slightly. Once the processor has been ejected, it can be removed from the base unit.
- Page 33 Installing Your Controller 2-17 Data Access Tool (DAT) 1. Remove cover from processor. 2. Holding the DAT in the proper orientation (as shown), place the DAT onto processor. Align DAT port on the processor with the plug on the DAT. 3.
- Page 34 2-18 Installing Your Controller Memory Module/Real-Time Clock 1. Remove the cover (or DAT if installed) from the processor as shown below. Electrostatic discharge can damage semiconductor devices ATTENTION inside the base and processor units. Do not touch the connector pins or other sensitive areas. 2.
- Page 35 Installing Your Controller 2-19 Compact I/O Attach and Lock Module (Module-to-Controller or Module-to-Module) A Compact I/O module can be attached to the controller or an adjacent I/O module before or after mounting to the panel or DIN rail. The module can be detached and replaced while the system is mounted to a panel or DIN rail.
- Page 36 To attach and lock modules: Remove ESD barrier when attaching I/O modules to a NOTE MicroLogix 1500 base unit. 1. Disconnect power. 2. Check that the bus lever of the module to be installed is in the unlocked (fully right) position.
-
Page 37: Wiring Requirements
Chapter Wiring Your Controller This chapter describes how to wire your controller. Topics include: • wiring requirements • using surge suppressors • grounding guidelines • sinking and sourcing circuits • wiring diagrams, input voltage ranges, and output voltage ranges • minimizing noise Wiring Requirements Wire Type Wiring Torque... - Page 38 Wiring Your Controller Calculate the maximum possible current in each power and ATTENTION common wire. Observe all electrical codes dictating the maximum current allowable for each wire size. Current above the maximum ratings may cause wiring to overheat, which can cause damage.
-
Page 39: Using Surge Suppressors
The diameter of the terminal screw head is 5.5 mm (0.220 in.). The input and output terminals of the MicroLogix 1500 base unit are designed for a 6.35mm (0.25 in.) wide spade (standard for #6 screw for up to 14 AWG) or a 4 mm (metric #4) fork terminal. - Page 40 24V dc common Suitable surge suppression methods for inductive ac load devices include a varistor, an RC network, or an Allen-Bradley surge suppressor, all shown below. These components must be appropriately rated to suppress the switching transient characteristic of the particular inductive device. See the table on page 3-5 for recommended suppressors.
- Page 41 Surge Suppression for Inductive dc Load Devices Output Device Diode (A surge suppressor can also be used.) Recommended Surge Suppressors Use the Allen-Bradley surge suppressors shown in the following table for use with relays, contactors, and starters. Suppressor Device Coil Voltage Catalog Number...
-
Page 42: Grounding The Controller
Wiring Your Controller Grounding the Controller In solid-state control systems, grounding and wire routing helps limit the effects of noise due to electromagnetic interference (EMI). Run the ground connection from the ground screw of the base unit to the electrical panel’s ground bus prior to connecting any devices. -
Page 43: Wiring Diagrams
Wiring Your Controller Wiring Diagrams This section shows the wiring diagrams for the MicroLogix 1500 controllers. Controllers with dc inputs can be wired as either sinking or sourcing configuration. (Sinking and sourcing does not apply to ac inputs.) See pages 3-11 through 3-14 for sinking and sourcing wiring diagrams. - Page 44 Wiring Your Controller Terminal Block Layouts The base unit terminal block layouts are shown below. The shading on the labels indicates how the terminals are grouped. A detail of the groupings is shown in the table following the terminal block layouts. Group 0 Group 1 Group 2...
- Page 45 Wiring Your Controller Terminal Groupings Controller Inputs Input Group Common Terminal Input Terminal 1764-24BWA Group 0 DC COM 0 I/0 through I/3 Group 1 DC COM 1 I/4 through I/7 Group 2 DC COM 2 I/8 through I/11 1764-24AWA Group 0 AC COM 0 I/0 through I/3 Group 1...
-
Page 46: Sinking And Sourcing Circuits
3-10 Wiring Your Controller Sinking and Sourcing Any of the MicroLogix 1500 DC embedded input groups can be configured as sinking or sourcing depending on how the DC COM is wired on the group. See Circuits pages 3-11 through 3-14 for sinking and sourcing wiring diagrams. - Page 47 Wiring Your Controller 3-11 1764-24BWA Sinking Wiring Diagram Input Terminals +24V IN 3 IN 4 IN 6 IN 9 POWER IN 1 IN 11 COM 2 COM 0 COM IN 0 IN 2 IN 5 IN 7 IN 8 IN 10 COM 1 Output Terminals (Lo)
- Page 48 3-12 Wiring Your Controller 1764-24BWA Sourcing Wiring Diagram Input Terminals +24V IN 3 IN 4 IN 6 IN 9 POWER IN 1 IN 11 COM 0 COM 2 COM IN 0 IN 2 IN 5 IN 7 IN 8 IN 10 COM 1 +DC -DC Output Terminals...
- Page 49 Wiring Your Controller 3-13 1764-28BXB Sinking Wiring Diagram Input Terminals IN 1 IN 3 IN 4 IN 6 IN 9 IN 11 IN 13 IN 15 USED COM 0 COM 2 IN 0 IN 2 IN 7 IN 8 IN 14 IN 5 IN 10 IN 12...
- Page 50 3-14 Wiring Your Controller 1764-28BXB Sourcing Wiring Diagram Input Terminals IN 1 IN 3 IN 4 IN 6 IN 9 IN 11 IN 13 IN 15 USED COM 0 COM 2 IN 0 IN 2 IN 7 IN 8 IN 14 IN 5 IN 10 IN 12...
-
Page 51: Controller I/O Wiring
To help reduce the effects of environmental noise, install the MicroLogix 1500 system in a properly rated (i.e. NEMA) enclosure. Make sure that the MicroLogix 1500 system is properly grounded. - Page 52 3-16 Wiring Your Controller Publication 1764-UM001A-US-P...
-
Page 53: Default Communication Configuration
• Communications Toggle Push Button • Connecting to the RS-232 Port • Connecting to a DH-485 Network • Connecting to DeviceNet Default Communication The MicroLogix 1500 has the following default communication configuration. Configuration Table 4.1 DF1 Full-Duplex Configuration Parameters Parameter Default Baud Rate 19.2K... - Page 54 Communication Connections Communications Toggle The Communications Toggle Push Button is located on the processor. You must remove processor door or DAT to access the Communications Toggle Push Button. Push Button Use the Communications Toggle Push Button to change from the user-defined communication configuration to the default communications configuration and back.
- Page 55 Connecting to the Making a DF1 Full-Duplex Point-to-Point Connection RS-232 Port You can connect the MicroLogix 1500 programmable controller to your personal computer using a serial cable from your personal computer’s serial port to the controller, as shown in the illustrations below.
- Page 56 Communication Connections Using a Modem You can use modems to connect a personal computer to one MicroLogix 1500 controller (using DF1 Full-Duplex protocol), or to multiple controllers (using DF1 Half-Duplex protocol), or Modbus Slave RTU protocol, as shown in the following illustration.
- Page 57 Communication Connections Constructing Your Own Modem Cable If you construct your own modem cable, the maximum cable length is 15.24 m (50 ft) with a 25-pin or 9-pin connector. Refer to the following typical pinout for constructing a straight-through cable: AIC+ Optical Isolator Modem or 1764-LRP Channel 1...
- Page 58 Communication Connections Connecting to a DF1 Half-Duplex Network Use this diagram for DF1 Half-Duplex Master-Slave protocol without hardware handshaking. MicroLogix 1500 (DF1 Slave) SLC 5/03 (DF1 Master) 1761-CBL-AM00 or 1761-CBL-HM02 1761-CBL-AP00 or 1761-CBL-PM02 AIC+ AIC+ straight 9-25 straight 9-25 pin cable...
- Page 59 Communication Connections Connecting to a DH-485 The following illustration shows how to connect to a DH-485 network. Network MicroLogix 1500 connection from port 1 or port 2 to MicroLogix Channel 1 Personal Computer 1761-CBL-AP00 or 1761-CBL-PM02 1747-CP3 AIC+ or 1761-CBL-AC00...
- Page 60 Communication Connections DH-485 Communication Cable The communication cable consists of a number of cable segments daisy-chained together. The total length of the cable segments cannot exceed 1219 m (4000 ft). However, two segments can be used to extend the DH-485 network to 2438m (8000 ft).
- Page 61 Communication Connections Multiple Cable Connection When connecting multiple cables to the DH-485 connector, use the following diagram. to Previous Device to Next Device Table 4.3 Connections using Belden #3106A Cable For this Wire/Pair Connect this Wire To this Terminal Shield/Drain Non-jacketed Terminal 2 - Shield Blue...
- Page 62 4-10 Communication Connections Connecting the AIC+ The AIC+, catalog number 1761-NET-AIC, enables a MicroLogix controllers to connect to a DH-485 network. The AIC+ has two isolated RS-232 ports and one RS-485 port. When two MicroLogix controllers are closely positioned, you can connect a controller to each of the RS-232 ports on the AIC+.
- Page 63 Communication Connections 4-11 1761-CBL-HM02 1761-CBL-AM00 Cable Length Connections from to AIC+ External Power Power Selection Supply Required Switch Setting 45cm (17.7 in) MicroLogix 1000 or 1500 port 2 cable 1761-CBL-AM00 2m (6.5 ft) to port 2 on another AIC+ port 2 external 1761-CBL-HM02 (1) External power supply required unless the AIC+ is powered by the device connected to port 2, then the selection switch should be set to cable .
- Page 64 4-12 Communication Connections 1761-CBL-PM02 Series C (or equivalent) Cable Wiring Diagram 1761-CBL-PM02 Series C or later Cable 8-pin Mini Din 9-pin D-shell 6 8 7 Programming Controller Device 9-Pin D-Shell 8-Pin Mini Din Publication 1764-UM001A-US-P...
- Page 65 Communication Connections 4-13 Recommended User-Supplied Components These components can be purchased from your local electronics supplier. Table 4.5 User Supplied Components Component Recommended Model external power supply and chassis power supply rated for 20.4-28.8V dc ground NULL modem adapter standard AT straight 9-25 pin RS-232 cable see table below for port information if making own cables...
- Page 66 Installing and Attaching the AIC+ 1. Take care when installing the AIC+ in an enclosure so that the cable connecting the MicroLogix 1500 controller to the AIC+ does not interfere with the enclosure door. 2. Carefully plug the terminal block into the RS-485 port on the AIC+ you are putting on the network.
- Page 67 Power Options Below are two options for powering the AIC+: • Use the 24V dc user power supply built into the MicroLogix 1500 controller. The AIC+ is powered through a hard-wired connection using a communication cable (1761-CBL-HM02, or equivalent) connected to port 2.
-
Page 68: Connecting To Devicenet
4-16 Communication Connections Connecting to You can connect a MicroLogix 1500 to a DeviceNet network using the DeviceNet Interface (DNI), catalog number 1761-NET-DNI. For additional information on DeviceNet using the DNI, refer to the DeviceNet Interface User Manual, publication 1761-6.5. -
Page 69: Chapter 5 Trim Pot Operation
Chapter Using Trim Pots and the Data Access Tool (DAT) Trim Pot Operation The processor has two trimming potentiometers (trim pots) which allow modification of data within the controller. Adjustments to the trim pots change the value in the corresponding Trim Pot Information (TPI) register. The data value of each trim pot can be used throughout the control program as timer, counter, or analog presets depending upon the requirements of the application. - Page 70 Using Trim Pots and the Data Access Tool (DAT) Trim Pot Information Function File The composition of the Trim Pot Information (TPI) Function File is described in the MicroLogix 1200 and MicroLogix 1500 Instruction Set Reference Manual, publication 1762-RM001B-US-P. Error Conditions...
-
Page 71: Data Access Tool (Dat)
Using Trim Pots and the Data Access Tool (DAT) Data Access Tool (DAT) The DAT is a convenient and simple tool that provides an interface for editing and monitoring data. The DAT has five primary features: • Direct access to 48 bit elements •... - Page 72 DAT configuration is stored in the processor in a specialized configuration file called the DAT Function File. The DAT Function File, which is part of the user’s control program, is described in the MicroLogix 1200 and MicroLogix 1500 Instruction Set Reference Manual, publication 1762-RM001B-US-P.
- Page 73 Using Trim Pots and the Data Access Tool (DAT) Power Save Timeout (PST) Parameter The power save timeout turns off the DAT display after keypad activity has stopped for a user-defined period of time. The power-save (DAT:0.PST) value is set in the DAT Function File.
- Page 74 Using Trim Pots and the Data Access Tool (DAT) PROTECTED ENTER Entering Bit Mode Bit mode allows you to view and modify up to 48 contiguous bit locations in the controller. The DAT enters the bit mode automatically following a successful power-up.
- Page 75 Using Trim Pots and the Data Access Tool (DAT) If the data is protected or undefined, pressing the up/down key NOTE scrolls to the next element in the list. 5. Press ENTER to load the new data. Press ESC or INT/BIT to discard the new data.
- Page 76 Using Trim Pots and the Data Access Tool (DAT) 1200 and MicroLogix 1500 Programmable Controllers Instruction Set Reference Manual, publication 1762-RM001B-US-P, for information on the SVC instruction. Non-Existent Elements When the DAT determines that an element number does not exist in the controller, the element value displays as three dashes.
- Page 77 Using Trim Pots and the Data Access Tool (DAT) Error Conditions When the DAT detects an error in its own operation, it displays the error screen. The error screen consists of “Err” and a two-digit error code, as shown below. PROTECTED ENTER The DAT can experience two different types of errors, internal errors and...
- Page 78 5-10 Using Trim Pots and the Data Access Tool (DAT) Publication 1764-UM001A-US-P...
-
Page 79: Real-Time Clock Operation
If a module is installed while the MicroLogix 1500 is in an executing mode (Run or Remote Run), the module is not recognized until either a power cycle occurs, or until the controller is placed in a non-executing mode (program mode or fault condition). - Page 80 Using Real-Time Clock and Memory Modules Writing Data to the Real-Time Clock When valid data is sent to the real-time clock from the programming device, the new values take effect immediately. The real-time clock does not allow you to write invalid date or time data. RTC Battery Operation The real-time clock has an internal battery that is not replaceable.
-
Page 81: Memory Module Operation
(run or remote run) mode. To enable this feature, set the S:2/9 bit in the system status file. Refer to the MicroLogix 1200 and MicroLogix 1500 Instruction Set Reference Manual for more information. - Page 82 If a memory module is installed while the MicroLogix 1500 is executing, the memory module will not be recognized until either a power cycle occurs, or until the controller is placed in a non-executing mode (program mode or fault condition).
-
Page 83: Controller Specifications
Appendix Specifications Controller Table A.1 General Specifications Specifications Description 1764-24BWA 1764-24AWA 1764-28BXB Number of I/O 12 inputs 12 inputs 16 inputs 12 outputs 12 outputs 12 outputs Line Power 85 to 265V ac 85 to 265V ac 20.4 to 30V dc at 47 to 63 Hz at 47 to 63 Hz Power Supply Usage... - Page 84 Specifications Choosing a Power Supply This section contains information for selecting a power supply for applications using a 1764-28BXB base unit. Use the tables in Appendix F to calculate the total power (Watts) consumed by the system. With that information, use the graphs below to chose a power supply.
- Page 85 Specifications Table A.2 Input Specifications Description 1764-24AWA 1764-24BWA and 1764-28BXB Inputs 0 thru 7 Inputs 8 and Higher On-State Voltage 79 to 132V ac 14 to 30.0V dc at 30°C 10 to 30.0V dc at 30°C Range (86°F) (86°F) 14 to 26.4V dc at 55°C 10 to 26.4V dc at 55°C (131°F) (131°F)
- Page 86 Specifications Table A.4 Response Times for Normal dc Inputs 8 Through 11 (1764-24BWA) and 8 Through 15 (1764-28BXB) Maximum Frequency Filter Minimum Maximum Minimum Maximum at 50% Duty Cycle Setting ON Delay ON Delay OFF Delay OFF Delay (kHz) (ms) (ms) (ms) (ms)
- Page 87 Specifications Table A.7 1764-28BXB FET Output Specifications Specification General Operation High Speed Operation (Outputs 2 thru 7) (Outputs 2 and 3 Only) Surge Current per peak current 4.0A Not Applicable Point maximum surge duration 10 msec Not Applicable maximum rate of once every second Not Applicable repetition at 30°C (86°F)
- Page 88 Specifications Table A.9 Working Voltage (1764-24BWA) Specification 1764-24BWA Power Supply Input to Backplane Verified by one of the following dielectric tests: 1836V Isolation ac for 1 second or 2596V dc for 1 second 265V Working Voltage (IEC Class 2 reinforced insulation) Power Supply User 24V Output to Verified by one of the following dielectric tests: 600V ac Backplane Isolation...
- Page 89 168 mm 35 mm (6.62 in.) (1.37 in.) Expansion Base Unit DIN rail center line. 132 mm 122 mm (5.19 in.) (4.813 in.) 147 mm 38 mm (5.78 in.) (1.49 in.) AB Spares...
-
Page 90: Compact I/O Dimensions
Specifications Compact I/O Dimensions Panel Mounting For more than 2 modules: (number of modules - 1) X 35 mm (1.38 in.) 28.5 Refer to host controller for this dimension. (1.38) (1.12) NOTE: All dimensions (5.197) are in mm (inches). Hole spacing 122.6±0.2 tolerance: ±0.4 mm (4.826±0.008) -
Page 91: Micrologix 1500 Replacement Kits
• a table of MicroLogix 1500 replacement parts • procedure for replacing the lithium battery • illustrations of the MicroLogix 1500 replacement doors and terminal blocks MicroLogix 1500 The table below provides a list of replacement parts and their catalog number. -
Page 92: Lithium Battery (1747-Ba
Replacement Parts Lithium Battery When the processor’s Battery Low indicator is lit, install a IMPORTANT (1747-BA) replacement battery immediately. After the indicator turns on, the battery lasts for at least: • 14 days for the 1764-LSP • 7 days for the 1764-LRP Installing Follow the procedure below to ensure proper replacement battery installation. - Page 93 Replacement Parts Battery Handling Follow the procedure below to ensure proper battery operation and reduce personnel hazards. • Use only for the intended operation. • Do not ship or dispose of cells except according to recommended procedures. • Do not ship on passenger aircraft. •...
-
Page 94: Replacement Terminal Blocks
San Diego, CA 92173 Port Washington, NY 11050 (619) 661-4801 (516) 621-4980 Replacement Terminal This figure illustrates how to replace the MicroLogix 1500 terminal blocks. Blocks Catalog Numbers: • 1764-RPL-TB1: 17-point terminal block • 1764-RPL-TB2: 21-point terminal block Publication 1764-UM001A-US-P... -
Page 95: Replacement Doors
Replacement Parts Replacement Doors The following figures illustrate the procedure for installing the MicroLogix 1500 replacement doors. Base Terminal Door (1764-RPL-TDR1) Processor Access Door (1764-RPL-CDR1) Base Comms Door (included in 1764-RPL-DR) Trim Pots/Mode Switch Cover Door (included in 1764-RPL-DR) AB Spares... - Page 96 Replacement Parts Publication 1764-UM001A-US-P...
-
Page 97: Understanding Controller Leds
Appendix Troubleshooting Your System This chapter describes how to troubleshoot your controller. Topics include: • understanding the controller LED status • controller error recovery model • identifying controller faults • calling Rockwell Automation for assistance Understanding The controller status LEDs provide a mechanism to determine the current status of the controller if a programming device is not present or available. - Page 98 Troubleshooting Your System When Operating Normally The POWER and RUN LEDs are on. If a force condition is active, the FORCE LED turns on and remains on until all forces are removed. When an Error Exists If an error exists within the controller, the controller LEDs operate as described in the following tables.
-
Page 99: Controller Error Recovery Model
Troubleshooting Your System Controller Error Use the following error recovery model to help you diagnose software and hardware problems in the micro controller. The model provides common questions you Recovery Model might ask to help troubleshoot your system. Refer to the recommended pages within the model for further help. -
Page 100: Identifying Controller Faults
S:1/13. The controller then continues in the Run or test mode. The subroutine does not execute for non-user faults. Refer to the MicroLogix 1200 and MicroLogix 1500 Instruction Set Reference Manual for information on creating a user fault subroutine. Fault Messages... -
Page 101: Calling Rockwell Automation For Assistance
Troubleshooting Your System Calling Rockwell If you need to contact Rockwell Automation or local distributor for assistance, it is helpful to obtain the following (prior to calling): Automation for • controller type, series letter, and revision letter of the base unit Assistance •... - Page 102 Troubleshooting Your System Publication 1764-UM001A-US-P...
-
Page 103: Appendix D Preparing For Upgrade
Appendix Upgrading Your Operating System The operating system (OS) can be upgraded through the communication port on the controller. In order to download a new operating system, you must have the following: • ControlFlash™ Upgrade Kit containing the new OS •... -
Page 104: Performing The Upgrade
Upgrading Your Operating System Performing the Upgrade The following steps occur during the upgrade process. 1. Controller mode and communications parameters are checked. 2. Download begins. 3. During the download, the Force, Battery, and Comms LEDs perform a walking bit pattern. 4. -
Page 105: Communication Interface
See Communication Connections on page 4-1 for information about required network devices and accessories. RS-232 Communication The communications port on the MicroLogix 1500 utilizes an RS-232 interface. RS-232 is an Electronics Industries Association (EIA) standard that specifies the Interface electrical characteristics for serial binary communication. It provides you with a variety of system configuration possibilities. - Page 106 Connecting to a PC to Channel 0 We recommend using an Advanced Interface Converter (AIC+), catalog number 1761-NET-AIC, as your optical isolator, as shown below. See page 4-10 for specific AIC+ cabling information. MicroLogix 1500 with 1764-LSP or 1764-LRP processor 1761-CBL-AM00 or 1761-CBL-HM02...
- Page 107 Understanding Communication Protocols Connecting a PC to Channel 1 MicroLogix 1500 Controller Personal Computer with 1764-LRP processor 1747-CP3 Connecting a Modem to Channel 0 We recommend using an AIC+, catalog number 1761-NET-AIC, as your optical isolator. Personal Computer Modem Cable (straight-through) MicroLogix1500 Controller with...
-
Page 108: Df1 Half-Duplex Protocol
(including the master) on the DF1 Half-Duplex link. The MicroLogix 1500 can only act as a slave device. A device that can act as a master is required to “run” the network. Several Allen-Bradley products support DF1 Half-Duplex master protocol. - Page 109 Understanding Communication Protocols When a communication port is configured for DF1 Half-Duplex Slave, available parameters include: Table E.2 DF1 Half-Duplex Configuration Parameters Parameter Options Baud Rate 300, 600, 1200, 2400, 4800, 9600, 19.2K, 38.4K Parity none, even Source ID (Node Address) 0 to 254 decimal Control Line no handshaking, handshaking...
- Page 110 Link When communication is between either your programming software and a MicroLogix Programmable Controller or between two MicroLogix 1500 Programmable Controllers via slave-to-slave communication on a larger multi-drop link, the devices depend on a DF1 Half-Duplex Master to give each of them access in a timely manner.
-
Page 111: Using Modems With Micrologix 1500 Programmable Controllers
Understanding Communication Protocols Using Modems with The types of modems that you can use with MicroLogix 1500 controllers include dial-up phone modems, leased-line modems, radio modems and line drivers. MicroLogix 1500 Programmable For point-to-point Full-Duplex modem connections that do not require any... -
Page 112: Communication Protocol
(up to several miles). Line drivers are available in Full- and Half-Duplex models. Allen-Bradley’s AIC+ Advanced Interface Converter is a Half-Duplex line driver that converts an RS-232 electrical signal into an RS-485 electrical signal, increasing the signal transmission distance from 50 to 4000 feet (8000 feet when bridged). - Page 113 Understanding Communication Protocols DH-485 Token Rotation A node holding the token can send a message onto the network. Each node is allowed a fixed number of transmissions (based on the Token Hold Factor) each time it receives the token. After a node sends a message, it passes the token to the next device.
- Page 114 E-10 Understanding Communication Protocols Devices that Use the DH-485 Network In addition to the MicroLogix 1500 controllers, the devices shown in the following table also support the DH-485 network. Table E.4 Allen-Bradley Devices that Support DH-485 Communication Catalog Number Description...
- Page 115 Understanding Communication Protocols E-11 Important DH-485 Network Planning Considerations Carefully plan your network configuration before installing any hardware. Listed below are some of the factors that can affect system performance: • amount of electrical noise, temperature, and humidity in the network environment •...
- Page 116 E-12 Understanding Communication Protocols Planning Cable Routes Follow these guidelines to help protect the communication cable from electrical interference: • Keep the communication cable at least 1.52m (5 ft) from any electric motors, transformers, rectifiers, generators, arc welders, induction furnaces, or sources of microwave radiation.
- Page 117 The best network performance occurs at the highest baud rate, which is 19200. This is the default baud rate for a MicroLogix 1500 device on the DH-485 network. All devices must be at the same baud rate. This rate is stored in the controller Communications Status file (CS0:5/8 to CS0:5/15).
- Page 118 (AIC+, catalog number 1761-NET-AIC). For more information on the AIC+, see the Advanced Interface Converter and DeviceNet Interface Installation Instructions, Publication 1761-5.11. DH-485 Network with a MicroLogix 1500 Controller MicroLogix 1500 connection from port 1 or port 2 to MicroLogix Channel 1...
- Page 119 Understanding Communication Protocols E-15 Typical 3-Node Network (Channel 0 Connection) PanelView 550 PanelView RJ45 port 1761-CBL-AS09 or 1761-CBL-AS03 TERM MicroLogix 1500 with SHLD CHS GND 1764-LSP or 1764-LRP DC SOURCE CABLE Processor EXTERNAL 1747-CP3 or 1761-CBL-AC00 1761-CBL-AM00 or 1761-CBL-HM02 Typical 3-Node Network (Channel 1 Connection)
- Page 120 SLC 5/04 processor bridge connection. When using this method (as shown in the following illustration): • PLC-5 devices can send read and write commands to MicroLogix 1500 controllers. • MicroLogix 1500 controllers can respond to MSG instructions received.
-
Page 121: Modbus Rtu Slave Communication Protocol (Micrologix 1764-Lsp And 1764-Lrp Series B Processors Only
Read/Write System Status File space Status (S) words 0 to 65 For more information on the MicroLogix 1500 configuration parameters for Modbus Slave RTU (Remote Terminal Unit transmission mode) protocol, refer to the MicroLogix 1200 and 1500 Programmable Controllers Instruction Set Reference Manual, publication 1762-RM001A-US-P. -
Page 122: Ascii Protocol
You can use ASCII protocol by configuring the RS-232 port, channel 0 for ASCII driver (For the 1764-LRP only, you can select either Channel 0 or Channel 1). Refer to Series B Processors the MicroLogix 1200 and MicroLogix 1500 Programmable Controllers Instruction Set only) Reference Manual, publication 1762-RM001B-US-P for detailed configuration information. -
Page 123: System Loading Limitations
5V dc and 24V dc current consumed by controller, expansion I/O, and user supplied equipment. Use the MicroLogix 1500 System Expansion Worksheet - Example on page F-2 to validate your specific configuration. - Page 124 For an electronic version of the worksheet, visit the MicroLogix NOTE web site. On the Internet, go to http://www.ab.com/micrologix. Enter MicroLogix 1500; go to Tools and Tips, Expansion I/O System Qualifier. Catalog Number Device Current Requirements...
- Page 125 System Loading and Heat Dissipation Validating System Loading - Examples 1764-24AWA and 1764-28BXB Base Units Loading Value Total 5V dc Current Consumed Total 24V dc Current Consumed Total Watts Maximum Current 2250 mA 400 mA Calculated Current 650 mA + 670 mA = 1320 mA 120 mA + 250 mA = 370 mA Maximum Power Calculated Power...
- Page 126 A system is valid if the current and power requirements are satisfied. For an electronic version of the worksheet, visit the MicroLogix NOTE web site. On the Internet, go to http://www.ab.com/micrologix. Enter MicroLogix 1500; go to Tools and Tips, Expansion I/O System Qualifier. Catalog Number Device Current Requirements Current Consumed...
- Page 127 System Loading and Heat Dissipation Validating System Loading 1764-24AWA and 1764-28BXB Base Units Loading Value Total 5V dc Current Consumed Total 24V dc Current Consumed Total Watts Maximum Current 2250 mA 400 mA Calculated Current Maximum Power Calculated Power 1764-24BWA Base Units Add any User 24V sensor current for applications with dc input sensors (1764-24BWA base units only).
- Page 128 I/O and user supplied equipment. For an electronic version of the worksheet, visit the MicroLogix NOTE web site. On the Internet, go to http://www.ab.com/micrologix. Enter MicroLogix 1500; go to Tools and Tips, Expansion I/O System Qualifier. Catalog Number of Module Current Requirements...
- Page 129 System Loading and Heat Dissipation Validating System Loading for 1769-PA2 and 1769-PB2 Power Supplies Power Supply Current Capacity Specification 1769-PA2 1769-PB2 Expansion Bus Output Current Capacity 2A at 5V dc and 0.8A at 24V dc 2A at 5V dc and 0.8A at 24Vdc at 0°...
- Page 130 System Loading and Heat Dissipation Figure 6.3 1769-PA2 Current with +24V dc User Load = 0.25A Valid Operating Range 0.2 0.3 0.7 0.8 +24V dc Load (Amps) System Using a 1769-PB2 To validate your system, the total 5V dc current and 24V dc current consumed must be considered.
-
Page 131: Calculating Heat Dissipation
System Loading and Heat Dissipation Calculating Heat Use this procedure when you need to determine the heat dissipation for installation in an enclosure. Use the following table. Dissipation Catalog Number Heat Dissipation Equation or Constant Calculation Subtotal 1764-24AWA 18W + (0.3 x System Loading) 18W + (0.3 x ______ W) 1764-24BWA 20W + (0.3 x System Loading) - Page 132 F-10 System Loading and Heat Dissipation Publication 1764-UM001A-US-P...
-
Page 133: Glossary
Glossary The following terms are used throughout this manual. Refer to the Allen-Bradley Industrial Automation Glossary, Publication Number AG-7.1, for a complete guide to Allen-Bradley technical terms. DGGUHVV A character string that uniquely identifies a memory location. For example, I:1/0 is the memory address for data located in Input file word 1, bit 0. - Page 134 H[SDQVLRQ ,2 Expansion I/O is I/O that is connected to the controller via a bus or cable. MicroLogix 1200 controllers use Bulletin 1762 expansion I/O. MicroLogix 1500 controllers use Bulletin 1769 expansion I/O. For MicroLogix controllers, expansion I/O is all I/O residing at slot 1 and higher.
- Page 135 Glossary ILOH A collection of data or logic organized into groups. IXOOGXSOH[ A mode of communication where data may be transmitted and received simultaneously (contrast with half-duplex). KDOIGXSOH[ A mode of communication where data transmission is limited to one direction at a time.
- Page 136 Glossary ODGGHU ORJLF A graphical programming format resembling a ladder-like diagram. The ladder logic programing language is the most common programmable controller language. OHDVW VLJQLILFDQW ELW /6% The element (or bit) in a binary word that carries the smallest value of weight. /(' /LJKW (PLWWLQJ 'LRGH Used as status indicator for processor functions and inputs and outputs.
- Page 137 Glossary QRU PDOO\ FORVHG Contacts on a relay or switch that are closed when the relay is de-energized or deactivated. They are open when the relay is energized or the switch is activated. QRU PDOO\ RSHQ Contacts on a relay or switch that are open when the relay is de-energized or the switch is deactivated.
- Page 138 Glossary RXWSXW VFDQ The controller turns on, off, or modifies the devices connected to the output terminals. 3&&& Programmable Controller Communications Commands SURFHVVRU A Central Processing Unit. (See CPU.) SURFHVVRU ILOHV The set of program and data files resident in the controller. SURJUDP ILOH Areas within a processor that contain the logic programs.
- Page 139 Glossary 56 An EIA standard that specifies electrical, mechanical, and functional characteristics for serial binary communication circuits. UXQ PRGH An executing mode during which the controller scans or executes the logic program. UXQJ A rung contains input and output instructions. During Run mode, the inputs on a rung are evaluated to be true or false.
- Page 140 Glossary XSORDG Data is transferred from the controller to a programming or storage device. ZDWFKGRJ WLPHU A timer that monitors a cyclical process and is cleared at the conclusion of each cycle. If the watchdog runs past its programmed time period, it causes a fault. ZULWH To send data to another device.
- Page 141 1764-28BXB selection guide for the AIC+ 4-11 features selection guide for the DeviceNet network 4-16 1764-28BXB sinking wiring diagram 3-13 calling Allen-Bradley for assistance 1764-28BXB sourcing wiring diagram 3-14 CE mark 1764-LRP processor certification 1764-LSP processor channel configuration DF1 full-duplex...
- Page 142 Index ControlFlash connecting missing/corrupt OS LED pattern description sequence of operation example system configuration using using a modem controller DF1 halfduplex protocol definition description glossary-1 determining faults DH485 communication protocol fault messages configuration parameters features DH485 network grounding configuration parameters E-13 installation connecting...
- Page 143 Index processor 2-15 installing your base unit F1 Functions on DIN rail 2-13 F1 key using mounting screws 2-14 F2 Functions installion 2-15 F2 key instruction glossary-3 false glossary-2 instruction set fault recovery procedure definition glossary-3 fault routine integer key faults Integer Mode automatically clearing...
- Page 144 Index data file protection output scan glossary-6 program compare output specifications program/data backup 1764-28BXB FET removal/installation under power Memory Module Information File memory module/real-time clock panel mounting installing 2-18 base unit 2-14 mnemonic glossary-4 PCCC glossary-6 Modbus communication protocol E-17 planning considerations for a network E-11 Modbus definition...
- Page 145 Allen-Bradley for assistance safety circuits controller error recovery model safety considerations determining controller faults disconnecting main power identifying controller faults periodic tests of master control relay circuit...
- Page 146 Index wiring recommendation wiring your controller UL certification Working Screen Operation upload glossary-8 working voltage (1764-24AWA) specifications working voltage (1764-24BWA) wire requirements specifications wiring working voltage (1764-28BXB) spade lug specifications wiring diagrams write glossary-8 Publication 1764-UM001A-US-P...
- Page 147 AB Spares...
- Page 148 Back Cover Publication 1764-UM001A-US-P - April 2000 PN 40072-091-01(A) Supersedes Publication 1764-6.1 - February 1999 and 1764-6.1-DU1 - September 1999 © 2000 Rockwell International Corporation. Printed in the U.S.A.
- Page 149 AB Spares...