beautypg.com
Manuals
Brands
JVC Manuals
Projector
DLA-G150CLU
JVC DLA-G150CLU Manuals
Manuals and User Guides for JVC DLA-G150CLU. We have
3
JVC DLA-G150CLU manuals available for free PDF download: Instructions Manual, Operating Instructions Manual
JVC DLA-G150CLU Instructions Manual (160 pages)
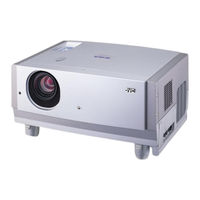
D-ILA Projector
Brand:
JVC
| Category:
Projector
| Size: 5.92 MB
Table of Contents
English
6
About the Installation Place
4
Important Information
4
Important Safeguards
4
Table of Contents
6
Contents
7
Safety Precautions
7
Accessories
7
Controls and Features
8
Front Side / Top Surface / Right Side
8
Left-Hand Side / Rear Side
9
Bottom Surface
10
Control Panel on the Projector
11
Temp Indicator
12
Connector Panel
13
Remote Control Unit
14
Installing Batteries
16
Precautions for Using Batteries
16
Installing the Projector
17
Precautions for Installation
17
Adjusting the Inclination of the Projector
18
Installing the Projector against the Screen
19
Projection Distance and Screen Size
20
Setting the Amount of Lens Shifting
21
Effective Range and Distance of the Remote Control Unit
22
Setting the Position Selecting Screw for Ceiling Mounting
23
When Installing (Adjusting/Setting) the Unit
23
Connecting to Various Devices
24
Signals that Can be Input to the Projector
24
Connecting to Video Devices
26
Connecting to Hi-Vision Devices/DVD Players
27
Connecting to Other Devices
28
Connecting to Devices Which Control the Projector
29
Connecting to Computer Devices
30
Connecting to DVI
31
How to Attach the Ferrite Core
31
Connecting the Power Cord
32
Removing the Lens Cap
32
Basic Operations
33
Turning on the Power
34
Select the Input Source to be Projected
35
Adjust the Screen Size (Zooming)
36
Adjust Focus
36
Setting the Screen Aspect Ratio
36
Turning off Image (HIDE)
37
Removing the Trapezoidal Distortion of the
37
Quick Alignment Function (QUICK ALIGN.)
38
Displaying a Still Picture (FREEZE)
39
Zooming a Part of the Image (DIGITAL ZOOM T/W)
39
Menu Operations
40
Basic Menu Operation
45
Changing the Color System (Video Menu Mode Only)
47
Changing the Language Display
48
Changing the Screen Aspect Ratio/Hdtv Format (Video Menu Mode Only)
48
Adjusting Tracking/Phase
49
(Video Menu Mode Only)
51
Adjusting Picture Quality
51
Adjusting Color Temperature
52
Adjusting the Video Screen/Menu Position
53
Changing the Image Gamma/Aspect Ratio (Video Menu Mode Only)
54
Changing the Image Size - Resize Function (PC Menu Mode Only)
55
Changing the Clamp Pulse Position (PC Menu Mode Only)
55
Setting and Adjusting Other Functions (OPTIONS)
56
Getting Information
58
Replacing the Fuse
59
Replacing the Light-Source Lamp
60
Resetting the Lamp Use Time
64
Cleaning and Replacing the Filter Cover
65
Troubleshooting
66
Warning Indication
68
Warning Messages
69
Specifications
72
Outside Dimensions
74
Pin Assignment (Specifications for Terminals)
75
RS-232C External Control
76
Appendix
78
Informations Importantes
82
Français
84
Table des Matières
85
Accessoires
85
Sécurité
85
Commandes Et Fonctions
86
Face Avant / Dessus / Côté Droit
86
Face Arrière / Côté Gauche
87
Dessous
88
Panneau de Commande du Projecteur
89
Panneau du Connecteur
91
Télécommande
92
Mise en Place des Piles
94
Précautions Pour L'utilisation des Piles
94
Installation du Projecteur
95
Précautions Pour L'inclinaison
95
Réglage de L'inclination du Projecteur
96
Installation du Projecteur Par Rapport À L'écran
97
Objectifs en Option
98
Distance de Projection Et Taille de L'écran
98
Réglage du Décalage de L'objectif
99
Distance de Fonctionnement Effectif de la Télécomande
100
Réglage de la Vis de Sélection de Position Pour un Montage Au Plafond
101
Lors de L'installation (Ajustements/Réglages) de L'appareil
101
Raccordement Avec Différents Appareils
102
Signaux Pouvant Être Entrés Dans Le Projecteur
102
Raccordement À des Appareils VIDéo
104
Raccordement À des Appareils Hi-Vision/Lecteurs DVD
105
Raccordement À D'autres Appareils
106
Raccordement À des Appareils Qui Contrôlent Le Projecteur
107
Raccordement Aux Ordinateurs
108
Raccordement Au DVI (DV-I)
109
Procédure de Fixation du Noyau en Ferrite
109
Branchement du Cordon D'alimentation
110
Dépose du Capuchon D'objectif
110
Fonctionnement de Base
111
Mise Sous Tension
112
Mise Hors Tension
112
Sélection de la Source D'entrée À Projeter
113
Réglage du Format D'écran (Zoom)
114
Ajustement de la Mise Au Point
114
Réglage du Format de L'écran
114
Coupure de L'image (HIDE)
115
Suppression de la Distorsion Trapézoïdale de L'image
115
Fonction D'alignement Rapide (QUICK ALIGN.)
116
Affichage D'une Image Fixe (FREEZE)
117
Zoom Sur Une Partie de L'image (DIGITAL ZOOM T/W)
117
Fonctionnement du Menu
118
Fonctionnement du Menu de Base
123
Changement du Système de Couleur (Mode Menu VIDéo Uniquement)
125
Changement de L'affichage de la Langue
126
Changement du Format D'écran /HDTV (Mode Menu VIDéo Uniquement)
126
Ajustement de L'alignement/Phase
127
Réglage Pour la Visualisation de Logiciel VIDéo (Mode de Menu VIDéo Uniquement)
128
Ajustement de la Qualité de L'image
129
Réglage de la Température de Couleur
130
Ajustement de la Position du Menu/Écran VIDéo
131
Changement de la Tonalité de L'image/Format D'image (Mode Menu VIDéo Uniquement)
132
Changement du Format D'image - Fonction de Redimension (Mode Menu PC Uniquement)
133
Changement de la Position de L'attache D'impulsion (Mode Menu PC Uniquement)
133
Réglage Et Ajustement D'autres Fonctions (OPTIONS)
134
Pour Obtenir des Informations
136
Remplacement du Fusible
137
Remplacement de la Lampe de Projection
138
Nettoyage Et Remplacement du Filtre du Couvercle
143
Dépannage
144
Indication D'avertissement
146
Messages D'avertissement
147
Spécifications
150
Dimensions Extérieures
152
Affectation des Broches (Spécifications Pour Les Prises)
153
Format de Commande
154
Commande Externe RS-232C
154
Annexe
156
JVC DLA-G150CLU Operating Instructions Manual (80 pages)
Brand:
JVC
| Category:
Projector
| Size: 3.16 MB
Table of Contents
Section 1
3
Safety Precautions
2
Table of Contents
3
Accessories
3
Controls and Features
4
Front Side / Top Surface / Right Side
4
Left-Hand Side / Rear Side
4
Bottom Surface
5
Control Panel on the Projector
5
Connector Panel
6
Remote Control Unit
7
Precautions for Using Batteries
8
Installing the Projector
8
Precautions for Installation
8
Installing Batteries
8
Adjusting the Inclination of the Projector
9
Installing the Projector against the Screen
9
Projection Distance and Screen Size
10
Setting the Amount of Lens Shifting
10
When Installing (Adjusting/Setting) the Unit
11
Setting the Position Selecting Screw for Ceiling Mounting
11
Remote Control Unit
11
Signals that Can be Input to the Projector
12
Connecting to Various Devices
12
Connecting to Video Devices
13
Connecting to Hi-Vision Devices/DVD Players
13
Connecting to Other Devices
14
Connecting to Devices Which Control the Projector
14
Connecting to DVI
15
Connecting to Computer Devices
15
How to Attach the Ferrite Core
15
Connecting the Power Cord
16
Removing the Lens Cap
16
Basic Operations
16
Turning on the Power
17
Select the Input Source to be Projected
17
Turning off Image (HIDE)
18
Removing the Trapezoidal Distortion of the Image
18
Adjust the Screen Size (Zooming)
18
Setting the Screen Aspect Ratio
18
Adjust Focus
18
Quick Alignment Function (QUICK ALIGN.)
19
Displaying a Still Picture (FREEZE)
19
Zooming a Part of the Image (DIGITAL ZOOM T/W)
19
Menu Operations
20
Basic Menu Operation
22
Changing the Color System (Video Menu Mode Only)
23
Changing the Language Display
24
Changing the Screen Aspect Ratio/Hdtv Format (Video Menu Mode Only)
24
Adjusting Tracking/Phase
24
(Video Menu Mode Only)
25
Adjusting Picture Quality
25
Adjusting Color Temperature
26
Adjusting the Video Screen/Menu Position
26
Changing the Clamp Pulse Position
27
Changing the Image Gamma/Aspect Ratio (Video Menu Mode Only)
27
(PC Menu Mode Only)
27
Changing the Image Size - Resize Function
27
Setting and Adjusting Other Functions (OPTIONS)
28
Getting Information
29
Replacing the Fuse
29
Replacing the Light-Source Lamp
30
Cleaning and Replacing the Filter Cover
32
Troubleshooting
33
Warning Indication
34
Warning Messages
34
Specifications
36
Outside Dimensions
38
Pin Assignment (Specifications for Terminals)
38
RS-232C External Control
39
Appendix
40
Section 2
43
Accessories
44
Controls and Features
44
Front Side / Top Surface / Right Side
44
Bottom Surface
45
Left-Hand Side / Rear Side
45
Control Panel on the Projector
46
Connector Panel
47
Remote Control Unit
47
Installing Batteries
48
Precautions for Using Batteries
48
Adjusting the Inclination of the Projector
49
Installing the Projector
49
Precautions for Installation
49
Installing the Projector against the Screen
50
Projection Distance and Screen Size
50
Effective Range and Distance of the Remote Control Unit
51
Setting the Amount of Lens Shifting
51
Connecting to Various Devices
52
Setting the Position Selecting Screw for Ceiling Mounting
52
Signals that Can be Input to the Projector
52
When Installing (Adjusting/Setting) the Unit
52
Connecting to Video Devices
53
Connecting to Hi-Vision Devices/DVD Players
54
Connecting to Other Devices
54
Connecting to Computer Devices
55
Connecting to Devices Which Control the Projector
55
Connecting the Power Cord
56
Connecting to DVI
56
How to Attach the Ferrite Core
56
Removing the Lens Cap
56
Basic Operations
57
Turning on the Power
57
Adjust Focus
58
Adjust the Screen Size (Zooming)
58
Select the Input Source to be Projected
58
Setting the Screen Aspect Ratio
58
Quick Alignment Function (QUICK ALIGN.)
59
Removing the Trapezoidal Distortion of the Image
59
Turning off Image (HIDE)
59
Displaying a Still Picture (FREEZE)
60
Zooming a Part of the Image (DIGITAL ZOOM T/W)
60
Menu Operations
61
Basic Menu Operation
63
Changing the Color System (Video Menu Mode Only)
64
Changing the Language Display
64
Changing the Screen Aspect Ratio/Hdtv Format
64
Adjusting Tracking/Phase
65
(Video Menu Mode Only)
66
Adjusting Color Temperature
66
Adjusting Picture Quality
66
Adjusting the Video Screen/Menu Position
67
Changing the Image Gamma/Aspect Ratio
67
Changing the Clamp Pulse Position (PC Menu Mode Only)
68
Changing the Image Size - Resize Function (PC Menu Mode Only)
68
Options
68
Setting and Adjusting Other Functions
68
Getting Information
69
Replacing the Fuse
70
Replacing the Light-Source Lamp
70
Cleaning and Replacing the Filter Cover
73
Troubleshooting
74
Warning Indication
74
Warning Messages
75
Specifications
76
Outside Dimensions
77
Pin Assignment (Specifications for Terminals)
78
RS-232C External Control
78
Appendix
79
JVC DLA-G150CLU Operating Instructions Manual (80 pages)
D-ILA Projector
Brand:
JVC
| Category:
Projector
| Size: 2.93 MB
Related Products
JVC DLA-G150HT - Cineline Projector
JVC DLA-G15U - D-ila Projector, 1500 Ansi Lumens
JVC DLA-G150CL - D-ILA Projector - 100 ANSI Lumens
JVC DLA-G150HTE
JVC DLA-G150CLE
JVC DLA-G150
JVC DLA-G150HTU
JVC DLA-G15U-V - D-ila Cineline Projector
Jvc Professional DLA-G15
JVC DLA-G10E
JVC Categories
Car Receiver
Camcorder
TV
VCR
Stereo System
More JVC Manuals