Table of Contents
Available languages
Available languages
C C
a a
r r
g g
a a
d d
C C
a a
r r
g g
a a
d d
C C
a a
r r
r r
e e
g g
a a
C C
a a
r r
r r
e e
g g
a a
F F
u u
l l
l l
y y
A A
F F
u u
l l
l l
y y
MANUAL DE INSTRUCCIONES
MANUAL DE INSTRUÇÕES
INSTRUCTION MANUAL
ADVERTENCIA: LEASE ESTE INSTRUCTIVO ANTES DE USAR EL PRODUCTO.
ADVERTÊNCIA: LEIA ESTAS INSTRUÇÕES ANTES DE USAR O PRODUTO.
WARNING: READ INSTRUCTION MANUAL BEFORE USING PRODUCT.
o o
r r
d d
e e
B B
a a
t t
e e
o o
r r
d d
e e
B B
a a
t t
e e
d d
o o
r r
d d
e e
B B
a a
t t
d d
o o
r r
d d
e e
B B
a a
t t
u u
t t
o o
m m
a a
t t
i i
c c
E E
A A
u u
t t
o o
m m
a a
t t
i i
c c
Cat. N° BBC10
r r
í í
a a
T T
o o
t t
a a
l l
m m
e e
r r
í í
a a
T T
o o
t t
a a
l l
m m
e e
e e
r r
i i
a a
T T
o o
t t
a a
l l
m m
e e
r r
i i
a a
T T
o o
t t
a a
l l
m m
l l
e e
c c
t t
r r
o o
n n
i i
c c
B B
E E
l l
e e
c c
t t
r r
o o
n n
i i
c c
B B
n n
t t
e e
A A
u u
t t
o o
m m
á á
n n
t t
e e
A A
u u
t t
o o
m m
á á
e e
n n
t t
e e
A A
u u
t t
o o
m m
e e
n n
t t
e e
A A
u u
t t
o o
m m
a a
t t
t t
e e
r r
y y
C C
h h
a a
r r
a a
t t
t t
e e
r r
y y
C C
h h
a a
Español
Português
English
t t
i i
c c
o o
t t
i i
c c
o o
á á
t t
i i
c c
o o
á á
t t
i i
c c
o o
g g
e e
r r
r r
g g
e e
r r
2
11
20
Table of Contents

Related Manuals for Black & Decker BBC10


Summary of Contents for Black & Decker BBC10
- Page 1 á á á á á á MANUAL DE INSTRUCCIONES MANUAL DE INSTRUÇÕES INSTRUCTION MANUAL Cat. N° BBC10 Español Português English ADVERTENCIA: LEASE ESTE INSTRUCTIVO ANTES DE USAR EL PRODUCTO. ADVERTÊNCIA: LEIA ESTAS INSTRUÇÕES ANTES DE USAR O PRODUTO. WARNING: READ INSTRUCTION MANUAL BEFORE USING PRODUCT.
- Page 2 ESPAÑOL LEA LAS INSTRUCCIONES A A D D V V E E R R T T E E N N C C I I A A S S E E I I N N S S T T R R U U C C C C I I O O N N E E S S D D E E S S E E G G U U R R I I D D A A D D G G E E N N E E R R A A L L E E S S P P A A R R A A T T O O D D O O S S L L O O S S A A R R T T E E F F A A C C T T O O S S A A D D V V E E R R T T E E N N C C I I A A : : Lea todas las instrucciones antes de operar el producto.
- Page 3 grueso es el cable. U U S S O O D D E E C C A A B B L L E E S S P P R R O O L L O O N N G G A A D D O O R R E E S S E E N N E E S S P P A A C C I I O O S S A A B B I I E E R R T T O O S S . Cuando utilice la herramienta al aire libre, utilice solamente cables prolongadores diseñados para su uso al aire libre o marcados como tales.
- Page 4 urgencia y que siga las instrucciones con exactitud. • Para reducir el riesgo de explosión de la batería, siga estas instrucciones y las publicadas por el fabricante de la batería y el fabricante de cualquier equipo que tenga la intención de utilizar cerca de la batería. Revise las indicaciones sobre precauciones en estos productos y en el motor.
- Page 5 U U b b i i c c a a c c i i ó ó n n d d e e l l c c a a r r g g a a d d o o r r 1.
-
Page 6: Características
7. Cuando desconecta el cargador, hágalo siempre en la secuencia inversa del procedimiento de conexión y corte la primera conexión estando tan lejos de la batería como resulte posible. N N o o t t a a : : Una batería marina (de bote) se debe retirar y cargar en tierra. Cargarla a bordo exige equipos diseñados especialmente para uso marino. -
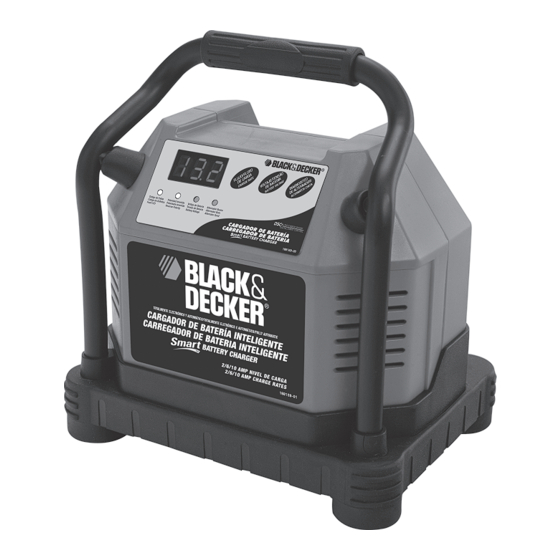
Page 7: Controles And Indicadores
• Un tono único indica cuando se oprime un botón o cuando ocurre un cambio de modo. • El control del alternador puede determinar si la salida del alternador está dentro de una escala típica de voltaje. Controles and indicadores BOTONES DE FUNCIONES (DE DERECHA A IZQUIERDA EN EL SENTIDO DE LAS AGUJAS DEL RELOJ): 2 2 / / 6 6 / / 1 1 0 0 A A M M P P : : permite al usuario seleccionar el nivel de carga según el tamaño de la batería. -
Page 8: Carga De La Batería
de seguridad” en el comienzo de este manual. Carga de la batería 1. Oprima el botón de 2/6/10 A para comenzar a cargar al nivel de 2 A; la unidad emite un sonido y se enciende la luz LED de carga de corriente. El cargador comienza a cargar automáticamente a un nivel de 2 A si no se oprime el botón de 2/6/10 A antes de transcurridos los 3 minutos de la aplicación la energía CA. - Page 9 sistema de carga, incrementando por lo tanto la demanda de corriente desde el alternador. ASEGÚRESE DE QUE EL ALTERNADOR ESTÁ INDICADO PARA SOPORTAR ESTE USO. Este control puede no ser preciso para todas las marcas, fabricantes y modelos de vehículo. Controle solamente TIEMPOS DE CARGA APROXIMADOS sistemas de 12 voltios.
- Page 10 CUIDADO Y MANTENIMIENTO Nunca intente cargar una batería congelada. Con el cuidado apropiado y un mantenimiento mínimo, el cargador de batería Smart™ de 10 amperios totalmente automático brindará años de servicio confiable. Para el rendimiento máximo, el fabricante recomienda: • Después de cada uso, limpie las pinzas del cargador de batería; asegúrese de quitar cualquier fluido de la batería que pueda causar corrosión en las pinzas de cobre.
- Page 11 PORTUGUÊS LEIA TODAS AS INSTRUÇÕES I I N N S S T T R R U U Ç Ç Õ Õ E E S S E E A A V V I I S S O O S S G G E E R R A A I I S S D D E E S S E E G G U U R R A A N N Ç Ç A A P P A A R R A A T T O O D D O O S S O O S S A A P P A A R R E E L L H H O O S S / / I I N N S S T T R R U U M M E E N N T T O O S S A A V V I I S S O O : : Leia todas as instruções antes de operar o produto.
- Page 12 Bitola mínima para cabos de extensão Volts Comprimento total do cabo em pés 127V 0-25 26-50 51-100 101-150 (0-7,6 m) (7,6-15,2 m) (15,2-30,4 m) (30,4-45,7m) 220V 0-50 51-100 101-200 201-300 (0-15,2m) (15,2-30,4m) (30,4-60,9m) (60,9-91,4m) Amperagem Mais de Não mais de Calibre de cabo 10 - 12 - Não é...
- Page 13 • Puxe o cabo pelo plugue e não pelo cabo quando desconectar o adaptador de carregamento de CA de 127 ou 220 volts da unidade e quando desconectar o BBC10 da saída acessória de CC de 12 volts do veículo.
- Page 14 irão corroer e danificar o carregador. 3. NUNCA deixe o ácido da bateria cair sobre o carregador ao ler a gravidade ou encher a bateria. 4. NUNCA opere o carregador em uma área fechada ou com ventilação restrita. 5. Baterias marítimas devem ser removidas e carregadas em terra firme. 6.
- Page 15 bordo, equipamentos especialmente projetados para uso marítimo são necessários. Este NÃO foi projetado para este tipo de uso. • Verifique a unidade periodicamente em busca de desgastes. Leve em um técnico qualificado para substituições peças desgastadas ou com defeito imediatamente. •...
- Page 16 • Um bipe indica que um botão está pressionado ou que uma alteração de modo ocorreu • A verificação do alternador pode determinar se a saída do alternador está dentro de uma faixa de tensão normal Controles e Indicadores BOTÕES DE FUNÇÃO (DA DIREITA PARA A ESQUERDA NO SENTIDO HORÁRIO): 2 2 / / 6 6 / / 1 1 0 0 A A M M P P : : permite que o usuário selecione a taxa de carregamento com base no tamanho da bateria.
- Page 17 Importantes" deste manual. Carregando a Bateria 1. Pressione o botão 2/6/10 AMP para começar a carregar à taxa de 2 amp; a unidade emite um bipe e mostra a corrente de carregamento. O carregador começa carregando a uma taxa de 2 amp automaticamente caso o botão 2/6/10 AMP não estiver pressionado dentro de 3 minutos após aplicar a energia AC.
- Page 18 O LED FAULT poderá acender porque alguém adicionou um número de cargas acessórias no sistema de carga, aumentando, desta forma, a demanda de corrente do alternador. CERTIFIQUE-SE DE QUE A CLASSIFICAÇÃO DO ALTERNADOR SEJA ADEQUADA PARA SUPORTAR A APLICAÇÃO. Esta verificação pode não ser exata para todas as marcas, fabricantes e modelos de veículos. Verifique somente TEMPOS APROXIMADOS DE CARREGAMENTO sistemas de 12 volts.
- Page 19 não pode aceitar uma taxa alta de carga. A taxa inicial de carga será baixa. A taxa de carga aumentará à medida que a CUIDADOS E MANUTENÇÃO bateria se aquece. Nunca tente carregar uma bateria congelada. Com o cuidado adequado e uma manutenção mínima, a Bateria Smart™ de 10 amps fornecerá anos de serviço confiável.
- Page 20 ENGLISH G G E E N N E E R R A A L L S S A A F F E E T T Y Y W W A A R R N N I I N N G G S S A A N N D D I I N N S S T T R R U U C C T T I I O O N N S S F F O O R R A A L L L L A A P P P P L L I I A A N N C C E E S S R R E E A A D D A A L L L L I I N N S S T T R R U U C C T T I I O O N N S S READ ALL INSTRUCTIONS W W A A R R N N I I N N G G : : Read all instructions before operating product.
-
Page 21: Important Safety Instructions
Minimum Gage for Cord Sets Volts Total Length of Cord in Feet 120V 0-25 26-50 51-100 101-150 (0-7,6m) (7,6-15,2m) (15,2-30,4m) (30,4-45,7m) 220V 0-50 51-100 101-200 201-300 (0-15,2m) (15,2-30,4m) (30,4-60,9m) (60,9-91,4m) Ampere Rating More Not more American Wire Gage Than Than 10 - 12 - Not Recommended... - Page 22 C C A A U U T T I I O O N N : : T T O O R R E E D D U U C C E E T T H H E E R R I I S S K K O O F F I I N N J J U U R R Y Y O O R R P P R R O O P P E E R R T T Y Y D D A A M M A A G G E E : : •...
- Page 23 1. Position AC and DC cords away from hood, door, or moving engine parts. 2. Stay clear of fan blades, belts, pulleys, and other parts that can cause injury to persons. 3. Check polarity of battery posts. POSITIVE (POS, P, +) battery post usually has larger diameter than NEGATIVE (NEG, N, –) post.
- Page 24 S S t t a a g g e e T T w w o o — — Absorption Charge maintains the maximum possible charge at a constant, safe, predetermined voltage. During this phase, the charging voltage remains constant, while the actual charging current is reduced to allow for the maximum proper internal chemical energy S S T T A A G G E E O O N N E E transfer.
-
Page 25: Operating Instructions
AC POWER INDICATOR - When connected to an AC outlet, digital display shows circulating pattern to indicate power is on. Disconnect charger after use. FAULT CODES INTERNAL SHORTED CELL BATTERY - Cannot be charged. Have battery OVERHEATED CONDITION - Disconnect charger and allow to checked by certified auto service center. -
Page 26: Approximate Charging Times
A A l l t t e e r r n n a a t t o o r r C C h h e e c c k k P P a a r r t t 1 1 N N o o L L o o a a d d : : (Turn OFF all vehicle’s accessories): The battery must be fully charged before testing the alternator. -
Page 27: Specifications
F04 appears when charging time exceeds 18 hours. You may be using a charge current rate too low for a large battery. Select higher charge rate to charge the battery. F F 0 0 5 5 — — O O v v e e r r h h e e a a t t e e d d C C o o n n d d i i t t i i o o n n The ventilation grill that prevents the air from flowing in and out of the charger may be blocked.