Table of Contents
Operating Instructions
Mo
Tu
We
Th
Fr
Sa
Su
on
h
t1
off
t3
STERI
4
t4
t2
3
loop
2
1
PRINT
SETUP
push
set
card
on
off
PERFECT
Cooled incubator
with Peltier technology
IPP 200-500
Cooled incubator
with refrigeration unit
ICP 400-800
DEFRO
IN 1
°C
°C
MAX
MIN
AUTO
page 1
IN 2
OUT
IN 1
IN 2
OUT
rh
CO
%
2
mb
mb
PERFECT
Table of Contents

Related Manuals for Memmert PERFECT


Summary of Contents for Memmert PERFECT
-
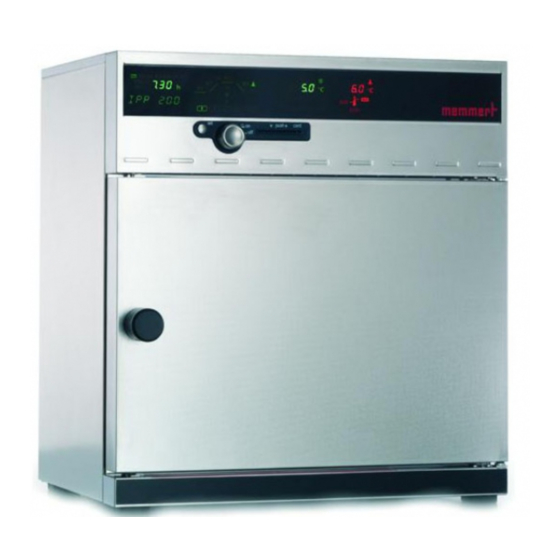
Page 1: Operating Instructions
PERFECT Cooled incubator with Peltier technology IPP 200-500 Cooled incubator with refrigeration unit ICP 400-800 Operating Instructions STERI DEFRO IN 1 IN 2 IN 1 IN 2 °C °C loop AUTO PRINT SETUP push card page 1 PERFECT... -
Page 2: Table Of Contents
..................13 Weekly programmer ..................15 10. Programme operation ................... 17 10.1 Closure commands for ramp segments ..............19 11. Printer ......................23 PRINT 12. Basic oven settings ..................24 SETUP 12.1 Real-time clock ..................... 25 1. Contents PERFECT page 2... - Page 3 21. Cleaning ....................... 41 21.1 Cleaning IPP incubators ..................42 21.2 Cleaning ICP incubators ..................42 22. Error messages ..................... 43 23. Supply failure ....................... 43 24. CE Conformity Declaration ..................44 25. Address ........................ 46 26. Index ........................47 page 3 PERFECT...
-
Page 4: General Notes And Safety Notes
The right to technical modifications is reserved. Dimensional details are not binding. 2.2 Transport Always use gloves! If the oven has to be carried, at least 2 persons are required to transport it. PERFECT page 4... -
Page 5: Initial Start-Up
Please note that the Memmert ovens described here are not explosionproof (they do not conform to the Industrial Association Specification VBG 24) and are therefore not suitable for drying, evaporating and burning-in of paints, enamels or similar materials whose solvents may produce an inflammable mixture with air. -
Page 6: Technical Data
Ambient temperature ICP: 16ºC to 32ºC rH 80% max., no condensation Overvoltage category: II Contamination level: 2 Setpoint temperature 0°C to 60°C range Setting accuracy 0.1°C Working temperature IPP: from 5°C to 60°C range ICP: from 0°C to 60°C PERFECT page 6... -
Page 7: Standard Equipment Of Cooled Incubators
Serial PC232C interface for computer-supported temperature programmes and for reading the internal report memory • MEMMERT software “Celsius 2005“ for remote operation of oven via a PC and for reading the report memory inside the controller • A pre-formatted blank MEMoryCardXL with 32 kB storage capacity, reprogrammable for up to 40 ramp segments and additionally 270 hours report memory at 1 minute intervals •... -
Page 8: Electrical Equipment
Controller protected by a 100 mA fuse (200 mA on 115 V) • When connecting a MEMMERT oven to the electrical supply you have to observe any local regulations which apply (e.g. in Germany DIN VDE 0100 with FI protection circuit) This product is intended to operate on a supply network with a system impedance Zmax at the transfer point (building connection) of 0.292 Ohm max. -
Page 9: Installation Facilities (Accessories)
Model ICP 600-800 is mounted on castors. The front castors pivot and can be locked. In order to ensure the stability of the oven the front castors must always be set facing towards the front. Information on accessories will be found in our leaflet or on our internet page www.memmert.com. Please note the installation instructions for our accessories. -
Page 10: Oven Construction And Operation
Hold down the SET key and set the temperature setpoint with the push/turn control. After the SET key has been released the display briefly flashes the temperature setpoint. The display then changes to the actual current temperature and the controller starts to control to the selected temperature setpoint. PERFECT page 10... -
Page 11: Controls And Indications
The oven is switched on by pressing the push/turn control. Oven switched off. The push/turn control is pushed Oven switched on and can be operated using the in and protected against damage. push/turn control and the SET key. page 11 PERFECT... -
Page 12: Selecting The Operating Mode
After the SET key has been released the newly set value is stored. If the push/turn control or the SET key have not been operated for a period of 30 seconds, the controller automatically returns to the main menu. PERFECT page 12... -
Page 13: Normal Operation
Section „Setting the parameters“: Temperature setpoint Range: 0°C bis 60°C ˚C Fan speed (ICP incubators only) Range: 10 to 100% in 10% steps. Temperature monitor Adjustment range: MIN MAX AUTO (see Section: “Temperature monitor“) °C AUTO page 13 PERFECT... - Page 14 While holding down the SET key, use the push/turn control to set 50% fan speed. 4. Select monitor temperature Turn the push/turn control clockwise until the overtemperature display °C is flashing. Hold down the SET key and use the push/turn control to set the monitor temperature to 55°C. AUTO PERFECT page 14...
-
Page 15: Weekly Programmer
ON time Range: 00:00 to 23:59 hrs OFF time Range: one minute above ON time to 24:00 For safety reasons, always check that an ON time has been programmed only during the required time blocks and days. page 15 PERFECT... - Page 16 10:00. 5. Switch off at 14.00 hrs Sa Using the push/turn control select the symbols “Sa off“. Hold down the SET key and use the push/turn control to set the switch- off time to 14:00. PERFECT page 16...
-
Page 17: Programme Operation
PRINT SETUP Delayed programme start: switch-on time Range: 00:00 to 23:59 If no switch-on day has been selected it is not possible to select a switch-on time, and the programme starts immediately. ( instant start ) page 17 PERFECT... - Page 18 Range: next, spwt, loop, hold, end (see Section: „Closure commands for ramp segments“) °C °C loop PRINT SETUP Exit the programme write mode EDIT Turn the push/turn control clockwise unti EXIT appears on the display, briefly press the SET key to enter. PERFECT page 18...
-
Page 19: Closure Commands For Ramp Segments
4 closure command segment 3 next command ramp spwt (t) ramp segment 2 °C segment 1 next segment 4 spwt (t) closure command ramp segment 5 segment 1 delayed Ramp programme start t=time page 19 PERFECT... - Page 20 Hold down the SET key and turn the push/turn control to set the start day Mo. 4. Select clock time for delayed programme start Using the push/turn control, select the time display. Hold down the SET key and set the time 08:00 using the push/turn control. PERFECT page 20...
- Page 21 Hold down the SET key and set next with the push/turn control. 13. Select duration of third ramp segment Mit dem Drück/Using the push/turn control select the time indication Hold down the SET key and set the time 08:00 using the push/turn control. page 21 PERFECT...
- Page 22 Turn the push/turn control clockwise and set the temperature monitor. (see Section: “Temperature monitor”) AUTO 19. Start programme Turn the push/turn control anticlockwise until the stop symbol flashing. Hold down the SET key and select Start with the push/turn control. PERFECT page 22...
-
Page 23: Printer
PRINT SETUP All PERFECT ovens are fitted as standard with a parallel printer interface, as used on personal computers. This parallel printer interface on the back of the oven is suitable for connecting conventional PCL3- compatible ink jet and laser printers which are provided with a parallel printer interface (e.g. HP Deskjet 5550 or HP Deskjet 9xx). -
Page 24: Basic Oven Settings
Weekday Year Range: from 2000 to 2100 Audible signal at programme end Setting: OFF or ON Audible signal on alarm, e.g. overtemperature Setting: OFF or ON Communication address Range: 0 to 15 PERFECT page 24... -
Page 25: Real-Time Clock
On the graphics print the time axis is marked in real-time. The clock runs with a buffer battery independently of the mains power supply. The built-in lithium battery Type CR 2032 has a life of approx. 10 years. page 25 PERFECT... -
Page 26: Temperature Monitor And Protection Devices
Switch off the oven and allow it to cool down Rectify the fault (e.g. replace temperature probe) and where appropriate contact customer service The oven is again ready for operation only after it has cooled down and after the fault has been rectified PERFECT page 26... -
Page 27: Electronic Temperature Monitor
Note: The temperature monitor can be set independently of the operating mode. During ramp operation the monitor temperature must always be set sufficiently far above the maximum working temperature. page 27 PERFECT... - Page 28 SET key. As a warning the alarm signal is flashing. °C TB approx. 20°C above Tmax heating switched off by TWB 220°C TWB set manually setpoint temperature 150°C controller fault 20°C PERFECT page 28...
-
Page 29: Basic Oven Settings Setup
(in the example 50°C – 5°C). The activation of the automatic temperature monitor is indicated by the bright - symbol. AUTO 60°C 40°C ASF set to +/-10°C in SETUP ASF activated ASF activated ASF activated page 29 PERFECT... - Page 30 The automatic temperature monitor alarm is switched off automatically as soon as the selected tolerance margin of the setpoint (in the example 50°C +/-100°C) is reached again. 60°C 60°C 40°C 40°C ASF set to +/-10°C in SETUP ASF activated ASF activated ASF activated ASF activated ASF-alarm PERFECT page 30...
- Page 31 (see in the example the setpoint is changed from 50°C to 75°C) until the tolerance margin of the new temperature setpoint is reached (see in the example below: the ASF is re-activated at 25°C +/- 10°C). 60°C 60°C 35°C 40°C 40°C 15°C ASF activated ASF activated ASF activated ASF activated ASF activated ASF-alarm page 31 PERFECT...
-
Page 32: Calibration
After the oven has settled down the reference instrument should read 20.0°C. With CAL.1 a further calibration temperature can be programmed below CAL.2 , and with CAL.3 an additional calibration temperature above CAL.2. CAL 3 +0,8°C CAL 1 +0,5°C CAL 2 -0,4°C 5°C 37°C 0°C 20°C PERFECT page 32... - Page 33 Calibration correction Range 10°C above CAL1 to Range –9.9°C to +9.9°C 10°C below CAL3 ˚C ˚C Calibration point 3 Calibration temperature Range Calibration correction 10°C above CAL2 up to nominal Range –9.9°C to +9.9°C temperature ˚C ˚C page 33 PERFECT...
-
Page 34: Communication Interface For The Pc
PC using a screened interface cable. The screen has to be connected to the plug case. If the serial interface is not being used, the cover supplied has to be fitted ! RS 232-C 9-pin serial not used not used not used not used not used not used PERFECT page 34... -
Page 35: Bus Interface Rs485
A maximum of 16 devices can be addressed on the RS485 bus. A termination resistance of 220 Ohm has to be connected to the last device. RS 485 9-pin serial not used not used not used not used not used not used not used Converter RS232 RS485 page 35 PERFECT... -
Page 36: Automatic Defrost On Icp Incubators
16. Automatic defrost on ICP incubators The integral automatic defrost of the refrigeration unit ensures perfect operation of your ICP cooled incubator even with continuous operation at low temperatures. The timing of the automatic defrost are set in the submenu under Defrost. -
Page 37: Report Memory
The GLP data header is automatically included in the print-out: it contains the following information: Printing date Time period of report Running page number Serial number and oven designation page 37 PERFECT... -
Page 38: Memory Card Memorycardxl
PC with “Celsius 2005” without any connection to an oven. It is important to ensure that the MEMoryCardXL has to be inserted with the contact field pointing upwards towards the marking of the read-write unit. PERFECT page 38... -
Page 39: Documentation On Memory Card Memorycardxl
With a programme duration up to 270 hours the documentation of the actual values on the MEMoryCardXL takes place with a 1-minute cycle. With programmes of longer duration the sampling time is extended up to 30 min max. Documentation is started afresh on each programme start; the old report data are overwritten. page 39 PERFECT... -
Page 40: User-Idcard (Available As Optional Extra)
The blockage through the USER-IDcard is indicated by the illuminated key symbol on the control panel. Important: If the oven is blocked through the USER-IDcard, there is no programme operation with the MEMoryCardXL since that card could be removed at any time and reprogrammed externally. PERFECT page 40... -
Page 41: Maintenance
Silicone grease, and to check that the hinge screws are tight. A well-closing door is essential on an oven. On Memmert ovens, tight closure of the door is ensured by a seal on the oven and another one on the door. In continuous operation the flexible sealing material may take a permanent set. -
Page 42: Cleaning Ipp Incubators
Release the screws 2; the front ventilation grill 3 can then be removed so that the condenser can be cleaned. After releasing the screws 4 the rear ventilation grill can also be removed so that the refrigeration unit can be cleaned from both sides if there is a large amount of dirt. PERFECT page 42... -
Page 43: Error Messages
In case there is a fault on the oven, please get in touch with an authorised service organisation or contact the Memmert customer service department. When dealing with the service department always quote the product serial number on the oven label. -
Page 44: Ce Conformity Declaration
24. CE Conformity Declaration E E C Declaration of Conformity Manufacturer´s name and address: MEMMERT GmbH + Co. KG Äußere Rittersbacher Straße 38 D-91126 Schwabach Product: Peltier-Cooled-Incubator Type: IPP ... Sizes: 200 / 300 / 400 / 500 Nominal voltage:... -
Page 45: Ec Declaration Of Conformity
EC Declaration of Conformity Manufacturer´s name and address: MEMMERT GmbH + Co. KG Äußere Rittersbacher Straße 38 D-91126 Schwabach Product: Cooled Incubator Type: ICP … Sizes: 400 / 500 / 600 / 700 / 800 Nominal voltage: AC 230 V 50 Hz... -
Page 46: Address
Standard ovens (UNP / UFP / INP) are safety-approved and bear the test marks: Sterilisers (SFP) are safety-approved and bear the test marks: 1275 25. Address MEMMERT GmbH+Co.KG PO Box 17 20 91107 Schwabach Germany Phone: (+49) (0)9122 / 925-0... -
Page 47: Index
END 19 Protection Class 1 26 error messages 43 Protection Class 2 25, 28 Protection Class 3.1 25, 28 protection devices 26 fan indication 11 fan speed 13 ramp segments 19 refrigeration unit 36 HOLD 19 RS485 35 page 47 PERFECT... - Page 48 03.12.2004 IPP/ICP englisch D09839 PERFECT page 48...