Table of Contents
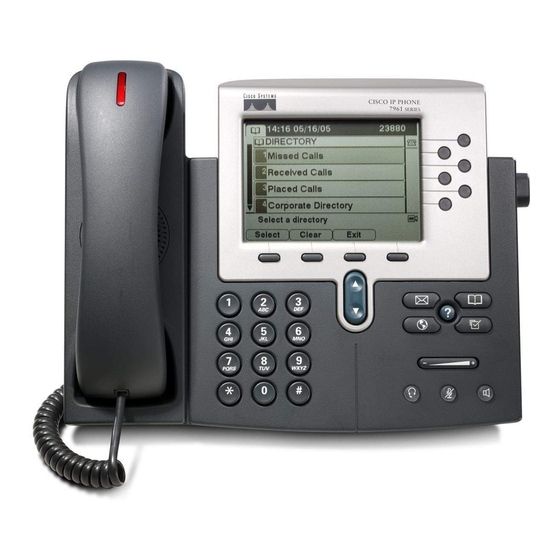
Programmable buttons
1
2
Phone Screen
3
Footstand button
4
Messages button
5
Directories button
6
Help
button
7
Settings button
8
Services button
Volume button
9
10 Speaker button
11 Mute button
12 Headset button
13
Navigation button
14 Keypad
15 Softkey buttons
16 Handset light strip
Cisco IP Phone 7941 and 7961 User Guide
Depending on configuration, programmable buttons provide access to:
•
Phone lines (line buttons)
•
Speed-dial numbers (speed-dial buttons)
The buttons illuminate to indicate phone line status:
Green, steady – Active call on this line (off-hook)
Green, blinking – Call on hold on this line
Amber, steady – Privacy feature enabled (Default, All Phones have Privacy)
Amber, blinking – Incoming call ringing on this line
Red – Shared line, currently in use
○
No color – No call activity on this line (on-hook)
Shows phone features. See the "Phone Screen Features" on next page.
Allows you to adjust the angle of the phone base.
Typically auto-dials your voice message service
Opens/closes the Directories Menu. Use it to access call logs and Corporate
Directory.
Activates the Help menu.
Opens/closes the Settings menu. Use it to control phone screen contrast and ring
sounds.
Opens/closes the Services menu. Provides access to IP Phone Services
Controls the volume and other settings.
Toggles the speakerphone on or off. When the speakerphone is on, the button is lit.
Toggles the mute feature on or off. When mute is on, the button is lit.
Toggles the headset on or off. When the headset is on, the button is lit.
Allows you to scroll through menus and highlight items. Use in conjunction with
softkeys to activate highlighted items.
Allows you to dial phone numbers, enter letters, and choose menu items.
Each button activates a softkey option, displayed on your phone screen.
Indicates an incoming call or new voice message.
Pg. 1
Table of Contents

Related Manuals for Cisco 7941


Summary of Contents for Cisco 7941
- Page 1 Cisco IP Phone 7941 and 7961 User Guide Depending on configuration, programmable buttons provide access to: • Phone lines (line buttons) • Speed-dial numbers (speed-dial buttons) The buttons illuminate to indicate phone line status: Programmable buttons Green, steady – Active call on this line (off-hook) Green, blinking –...
-
Page 2: Understanding Line And Call Icons
Phone Screen Features This is what your main phone screen might look like with an active call. The following table provides a basic overview of phone screen features. Primary phone line Displays the ten digit telephone number sent for caller id. Icons indicate how programmable buttons ○... - Page 3 HANDSET, SPEAKERPHONE AND HEADSET VOLUME 1. To increase or decrease the volume of your handset, speaker or headset during a call or after invoking dial tone, press the up or down Volume) button. The Volume button adjusts the volume for the currently active condition (handset, speaker or headset).
- Page 4 ANSWERING CALLS 1. Lift handset, or press [Answer] softkey, [Speaker] button or [Headset] button. 2. Press line of incoming call to answer call on another line (first call is automatically put on hold), or press [Answer] softkey. 3. Conditions: If you have multiple lines (shared Extension numbers) on your phone, you will need to press the other line key(s) to answer the ringing line (shared extension number).
- Page 5 MAKING A CONFERENCE CALL (6 parties max to a conference call) 1. While on a call, press the [more] softkey, press the [Confrn] softkey. This will place the first call on hold and you will receive dialtone. 2. Place a call to another number. 3.
- Page 6 Access Personal Directory (for PAB and Fast Dial codes) Choose > Personal Directory (exact name can vary). Enter your Cisco Unified Communications Manager user ID and PIN, then press [Submit]. (Note:PSW default: 12345) Search for a PAB entry Access Personal Directory, then choose Personal Address Book.
- Page 7 2. To place a call, press To Use Abbreviated Dial (AbbrDial): 1. Set up Abbreviated Dialing codes (1-99). See “Customizing Your Cisco IP Phone on the Web” user guide. 2. To place a call, dial the abbreviated dialing code and press [AbbrDial] softkey.
- Page 8 Customizing Your Cisco Unified IP Phone On The Web This application allows you to change and update settings on your phone without contacting the helpdesk. Voice over IP telephone users – Click on your web browser (e.g., Internet Explorer) and: Logon to Cisco CallManager at: http://172.19.8.11/ccmuser...
- Page 9 Select from the Drop Down, "User Settings" Privatize your web access password as soon as you logon, since the site password is the same for each station. It is important to use a password that does not have consecutive numbers or repeated numbers to avoid someone hacking into your line and changing your phone settings.
- Page 10 Select from the Drop Down, "Device" For a detailed user guide click on "Download User Guide" just under the decription field. Note: Its in PDF format and is about 80 pages in length Select - Line Settings Pg. 10...
- Page 11 all calls to a different number.(forwarding is enabled for local and internal calls) Forward Instead of using the [CfwdALL] soft key on your phone, you can click on this step from your PC and forward incoming calls on your line(s) to another internal extension. Do not forward any rollover lines (1XXXX). Note1: For inside the internal extension numbers use the 5-digit extension number (e.g., 415XX thru 419XX ) Note2: For local telephone numbers, include “9”...
- Page 12 Pg. 12...
- Page 13 2. Add/Update your Fast Dials Use this page to enter the phone numbers you want associated with each of your Speed Dial buttons or your Abbreviated Dial (Speed Call List). Once you’ve made all your changes make sure you press the Update button, so that the changes are reflected on your phone set Note1: For inside the internal extension numbers use the 5-digit extension number (e.g., 415345234) Note2: For local &...