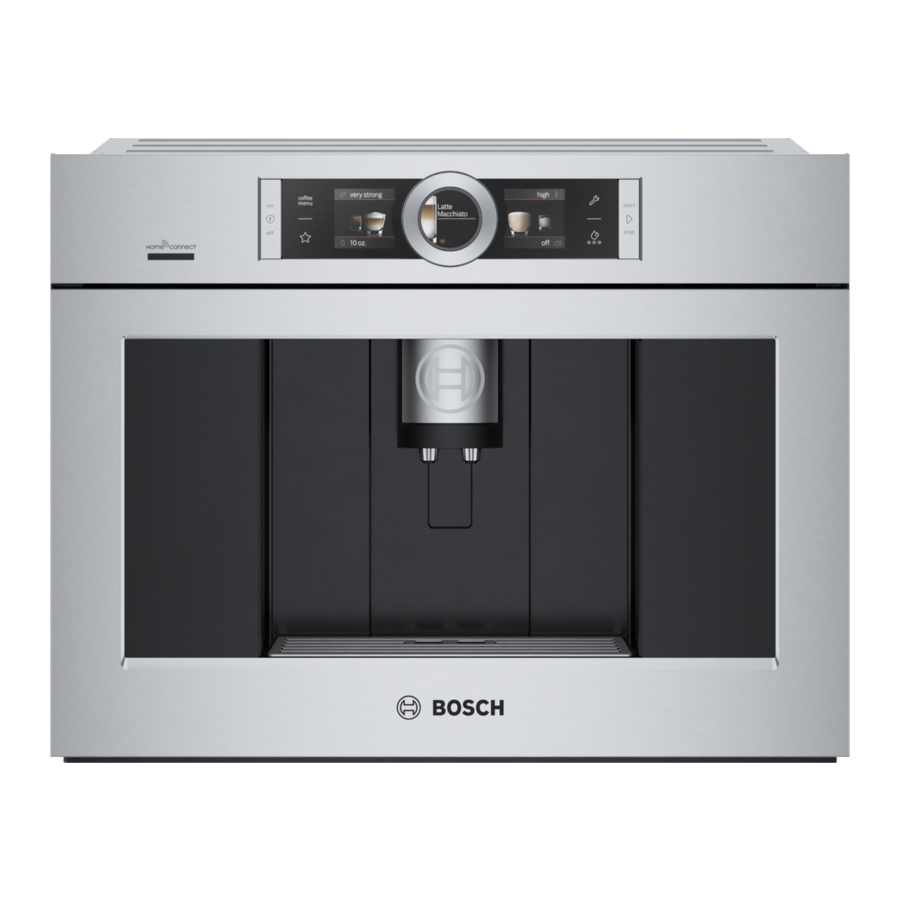
Bosch BCM8450UC - Built-in Coffee Machine Manual
- Use and care manual (116 pages) ,
- Installation instructions manual (16 pages) ,
- Use and care manual (116 pages)
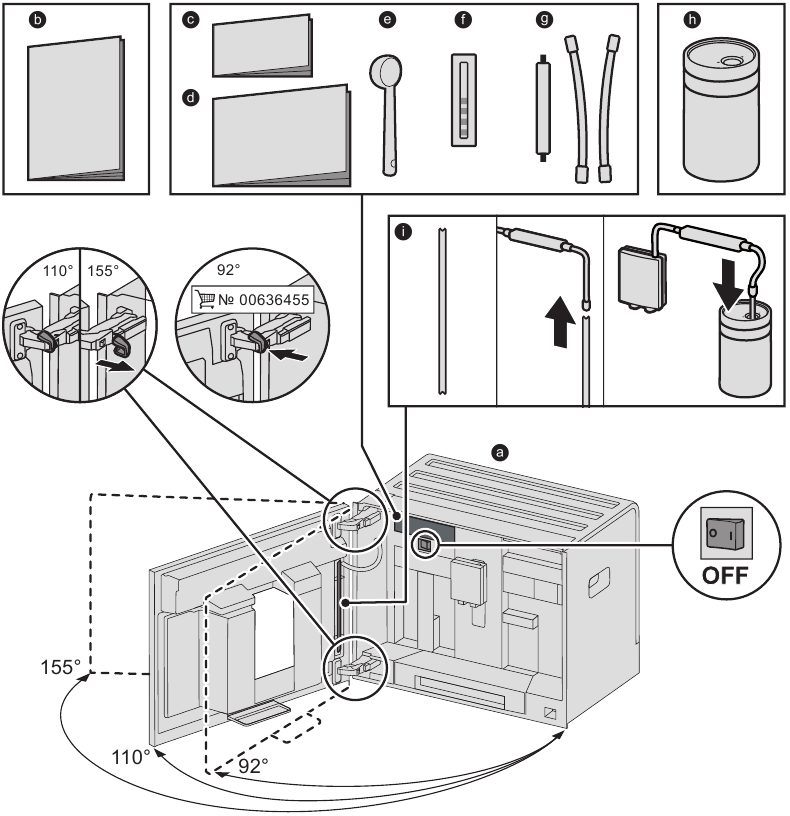
- 1 Included in delivery
- 2 Introduction
- 3 Overview
- 4 Controls
- 5 Initial use
- 6 Control panel
- 7 Preparing drinks
- 8 Preparation using coffee beans
- 9 Preparation using milk
- 10 Preparation using ground coffee
- 11 Dispensing hot water
- 12 Personalized drinks
- 13 Adjusting the grind setting
- 14 Child-proof lock
- 15 Menu
-
16
Home Connect
- 16.1 Setting up
- 16.2 Connect automatically in the Wi-Fi network (home network)
- 16.3 Connect manually in the Wi-Fi network (home network)
- 16.4 Switching Wi-Fi on and off
- 16.5 Disconnecting
- 16.6 Connecting with app
- 16.7 Remote start
- 16.8 Device Info
- 16.9 Remote diagnostics
- 16.10 Information on data protection
- 17 Care and daily cleaning
- 18 Service programs
- 19 Tips on energy saving
- 20 Frost protection
- 21 Storing accessories
- 22 Accessories
- 23 Simple troubleshooting
- 24 Technical specifications
- 25 Safety Definitions
- 26 IMPORTANT SAFETY PRECAUTIONS
- 27 Documents / Resources

Included in delivery
Introduction
You have now acquired a highquality and modern kitchen appliance. It combines innovative technology with a range of functions and is easy to use. It will enable you to prepare a variety of delicious hot drinks quickly and simply – whether you're in the mood for an invigorating espresso, a creamy cappuccino, a smooth latte macchiato or white coffee, or a traditional cup of coffee. At the same time the appliance offers you a wide range of options
Overview

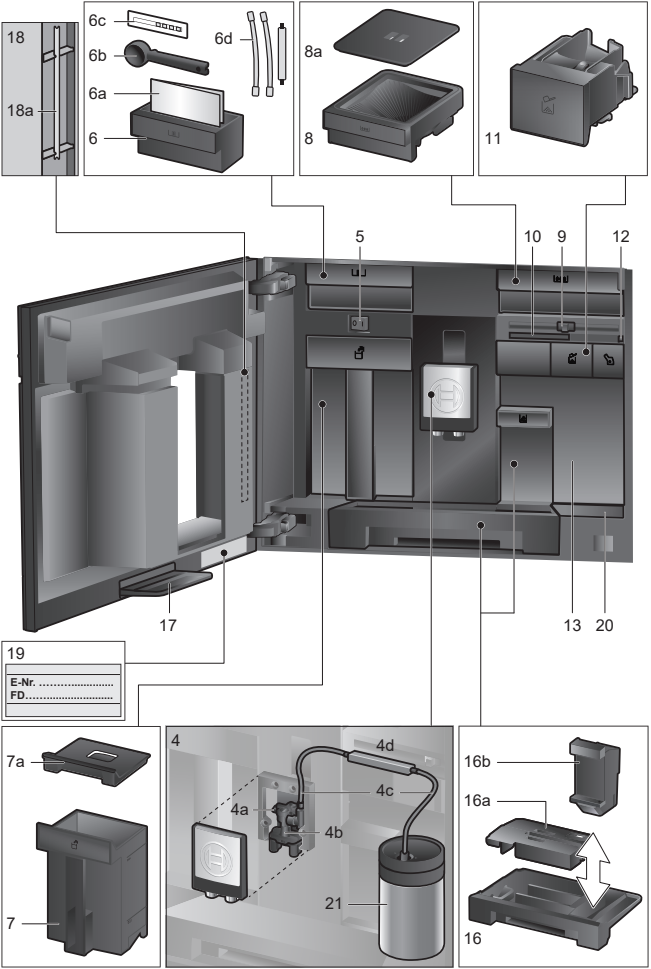

- Appliance door
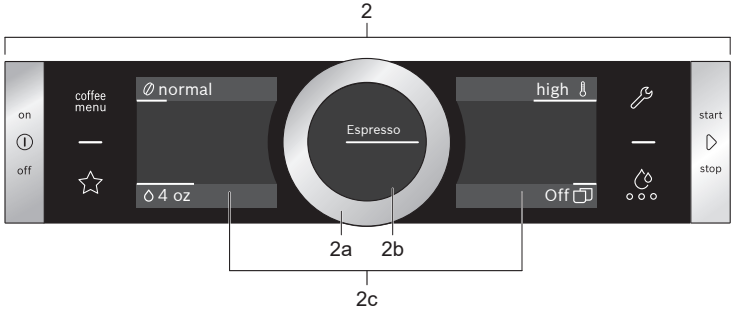
- Control panel (see next page)
- Outlet system (coffee, milk, hot water), height-adjustable
- Milk system
- Accessory drawer (for quick reference guide and accessories)
- Removable water tank
- Removable bean container
- Brewing unit
- Removable drip tray
- Holder (for suction pipe)
- Milk container
Note:
Further information about the appliance, such as how to change the opening angle of the door, can be found in the Installation Instructions.
Controls
The appliance features user-friendly menu navigation to ensure that operation is as easy as possible while at the same time offering a wide range of functions. That means a range of options can be selected with just a few operating steps
Power switch [ O/I ]
The power switch [ O/I ] (with the door open) is used to switch the appliance on, or to switch it off fully (power supply off).
NOTICE:
Do not press the power switch while the appliance is in use. Switch off the appliance only when it is in energy saving mode, so that it can rinse automatically.
Control panel (touch field)
Note:
These operating instructions refer to several models. In some models [  ] and [
  ] are touchscreen elements.
[  ] on/off
Press [  ] to switch on the appliance or put it into energy saving mode. The appliance is rinsed automatically.
The appliance does not rinse if:
- if it is still warm when switched on, or
- if no coffee was dispensed before it was switched off.
The appliance is ready for use as soon as the images for the drinks selection appear on the display.
[  ] start/stop
Press [  ] for either beverage preparation or to launch a service program.
Press [  ] again while the drink is being prepared to prematurely halt dispensing.
There are four menu fields in the control panel which can be activated by pressing.
The active menu field lights up red.
[ coffee menu ]
[ coffee menu ] lights up as soon as the appliance is in operation. Drinks can be selected and dispensed or settings for the drinks can be changed.
[  ] MyCoffee
Press [  ] to open the selection of " Personalized beverage preparation". Personal settings for coffee drinks can be saved and called up (see the section " Personalized drinks").
[  ] Menu
Press [  ] to call up the menu. Settings can be made and information called up (see the section "Menu").
[  ] Service
Press [  ] to open the selection of service programs. Run the desired program as described in the section "Service programs".
Note:
Press [  ], [
], [  ] or [
  ] again to exit the respective menu.
Control ring
Turn the control ring to navigate in the display or to change parameters.
Information display
The round display shows the drink selected, the settings or information.
Touch display (left and right)
Depending on the setting, different fields are shown in both the touch displays. A field is activated when pressed either to enter settings or change values.
Initial use
General
Fill the appropriate container using only pure, cold, uncarbonated water and only roasted beans. Do not use coffee beans that have been glazed, caramelized or treated with other additives containing sugar, since they will block the brewing unit.
Before the appliance can be switched on and used, it must be assembled and connected according to the enclosed assembly instructions.
Setting up the appliance
NOTICE:
Only use the appliance in a frost-free room. If it has been transported or stored at temperatures below 32°F, wait at least 3 hours before initial use.
- Set the power switch to [
![]() ] and close the appliance door.
] and close the appliance door.
The appliance heats up and is rinsed. The control panel is activated. "Language" appears.
- Turn the control ring with your finger to select the desired language and press the [ Water hardness ] field.
Note:
It is important to set the water hardness correctly to enable the appliance to accurately indicate when the descaling program should be run. The preset water hardness is level 4. If a water softener is installed in the house, please set the water hardness to level 3. You can also check the water hardness by asking your local water supplier.
| Level | Water hardness gr/gal (US) |
| 1 | 1.0426 - 7.2985 |
| 2 | 8.3412 - 14.597 |
| 3 | 15.64 - 21.896 |
| 4 | 22.938 - 31.279 |
- Turn the control ring with your finger to set the water hardness determined.
- Press [ Set-up complete ]. The settings are saved.
The appliance is ready to use as soon as the drink images are shown and the [ coffee menu ] lights up.
The integrated fan switches on each time a drink is dispensed and switches off again after a few minutes.
Note:
When the appliance is used for the first time after running a service program, or if it has not been operated for a long period, the first beverage will not have the full aroma.
When the fully automatic coffee machine is first used, a suitable thick and stable "crema" is only achieved after the first few cups have been dispensed.
Switch off appliance
- Press [
![]() ].
].
The appliance rinses and switches to energy saving mode.
Exception: If only hot water is dispensed, the appliance switches off without rinsing.
NOTICE:
Do not press the power switch while the appliance is in use.
Note:
The factory settings of the fully automatic coffee machine are programmed for optimal performance. The appliance switches automatically to the energy saving mode after a specified time and rinses (duration can be set, see "Switch off after" in the section "Menu").
Note:
The appliance is equipped with a sensor. If there is a milk container, this will be correspondingly shown on the display when switching to the energy saving mode. If there is milk in the container, please store in the fridge.
Control panel
Information is shown on the display or settings can be entered by pressing the touchscreen and the control ring.
Display
The control panel shows the selected drinks, settings and setting options, as well as messages about the appliance's operating status.

e.g. Drink selection

e.g. Information
Information disappears after operating the appliance or after a short time.
The information remains, however in the information display in the form of a small symbol.
 | Bean container almost empty |
 | Water tank almost empty |
 | Replace water filter |
 | Cleaning program necessary |
 | Descaling program necessary |
 | Calc'nClean program necessary |
Prompts to take action

Note:
If the action required was carried out, e.g. filling the water tank, the corresponding message and symbol will disappear.
Operation
Press texts or symbols combined with turning the control ring to navigate in the control panel (for an example, see section "Drink adjustment").
An audible signal is heard when pressing the touch display. These audible signals can be switched on or off (see the section "Menu – Key tones").
Preparing drinks
This fully automatic coffee machine can be operated using coffee beans or ground coffee (but not instant coffee). If using coffee beans, they will be freshly ground for each brewing. For optimum quality, store the beans in a cool place in sealed containers.
Note:
Cups should be prewarmed, e.g. with hot water. This applies particularly to small thick-walled espresso cups.
NOTICE:
Fill the water tank with fresh, uncarbonated, cold water every day. The tank should always contain sufficient water for operating the appliance.
Note:
For some settings, coffee is prepared in two stages (see the section "Aroma Double Shot" and "Two cups at once"). Please wait until the process is completely finished.
Beverage selection
Turn the control ring to select different drinks:
The image and the name of the selected drink will appear in the middle of the information display.
The values currently set, e.g. for the coffee strength and temperature are shown on the left and right of the touch display.

The following drinks can be selected:
Ristretto
Espresso
Espresso Macchiato
Coffee Cappuccino
Latte Macchiato
Café Latte
Milk froth
Warm milk
Hot water
The drink selected can be directly prepared with the pre-set values or first adjusted to individual taste.
Drink adjustment
Press one of the fields shown on the touch display, e.g. [  ] to activate the field, [
  ] turns red.
Turn the control ring to change the setting. Press [  ] again to save the setting.
An example:
The values for a cup of Coffee can be changed as follows:
- Turn the control ring and select "Coffee".
![Bosch - BCM8450UC - Drink adjustment - Step 1 - Turn the control ring Drink adjustment - Step 1 - Turn the control ring]()
- Press the field, e.g. [
![]() ] to active, [
] to active, [ ![]() ] lights up red.
] lights up red.
![Bosch - BCM8450UC - Drink adjustment - Step 2 - Press the field Drink adjustment - Step 2 - Press the field]()
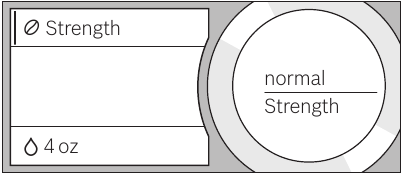
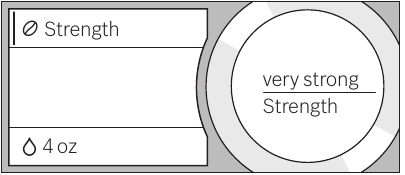
- Turn the control ring and set the desired coffee strength in the middle of the information display, e.g. to "very strong".
![Bosch - BCM8450UC - Drink adjustment - Step 3 - Set coffee strength Drink adjustment - Step 3 - Set coffee strength]()
- Press the field [
![]() ].
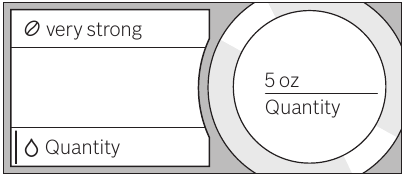
]. - Turn the control ring to set the required amount of coffee, e.g. "5 o z".
![Bosch - BCM8450UC - Drink adjustment - Step 4 - Set amount of coffee Drink adjustment - Step 4 - Set amount of coffee]()
- Press the field [
![]() ].
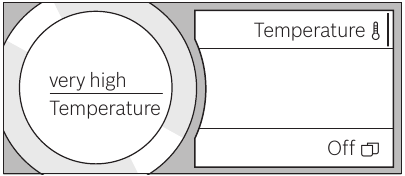
]. - Turn the control ring and set the desired temperature, e.g. "very high".
![Bosch - BCM8450UC - Drink adjustment - Step 5 - Set the temperature Drink adjustment - Step 5 - Set the temperature]()
- Save the settings by pressing the active field or by starting to dispense the drink.
![Bosch - BCM8450UC - Drink adjustment - Step 6 - Save the settings Drink adjustment - Step 6 - Save the settings]()
Note:
There are different setting options depending on the type of drink. For coffee drinks, for example, the strength, temperature and quantity can be set; for milk, only the volume.
The following settings are possible:
Coffee strength
mild
normal
strong very
strong
Double Shot
Double Shot +
Double Shot ++
Note:
Aroma Double Shot
The longer coffee is brewed, the more bitter substances and undesirable aromas are released. This has a negative effect on the taste and makes the coffee less easily digested. For extra strong coffee, the appliance has therefore a special Aroma Double Shot function. When half the quantity has been prepared, it grinds and brews fresh coffee beans so that only the pleasant, aromatic scents are released.
Note:
When the 12 oz (360 ml) or 16 oz (480 ml) volume is selected, the Aroma Double Shot function is not aperable.
Note:
The Aroma Double Shot function is not available for Ristretto, Espresso Macchiato, and when ground coffee is used.
Volume
The volume differs depending on the type of drink and can be set in "oz" or "ml" increments. The factory setting is in "oz" and can be converted to "ml", see chapter "Menu - Volume units".
Note:
The volume dispensed can fluctuate depending on the quality of the milk.
Drinks temperature
Values for coffee drinks:
normal
high
very high
Values for hot water:
The factory setting is in "°F" and can be converted to "°C", see chapter "Menu - Temperature format".
| 160°F (70°C) | White tea |
| 180°F (80°C) | Green tea |
| 200°F (90°C) | Black tea |
| Max | Fruit tea |
Note:
If no controls are activated for approx. 30 seconds, the appliance will automatically exit the settings mode. The settings made will be automatically stored.
Two cups at once
Press [  ] to prepare two cups of the selected drink simultaneously. The setting is shown as text, e.g. "2 x Espresso".
- Press [
![]() ].
].
![Bosch - BCM8450UC - Using Two cups at once function Using Two cups at once function]()
- Press [
![]() ] to start dispensing.
] to start dispensing.
The selected drink is prepared and then dispensed into both cups.
Note:
The drink is prepared in two stages (two grinding operations). Please wait until the process is completely finished, to remove the cup.
Note:
When the 12 oz (360 ml) or 16 oz (480 ml) volume is selected, it is not possible to dispense two cups at once.
Note:
Two cups at once cannot be dispensed for the settings "Aroma Double Shot" or "ground coffee".
Preparation using coffee beans
The appliance must be ready for use.
- Place a cup underneath the beverage outlet.
- Turn the control ring and select " Ristretto", "Espresso" or "Coffee".
The display shows the selected drink along with the preset values for the drink.
![Bosch - BCM8450UC - Preparation using coffee beans Preparation using coffee beans]()
Note:
The settings can be changed as described in the section "Drink adjustment".
- Press [
![]() ] to start dispensing.
] to start dispensing.
The coffee is brewed and then dispensed into the cup.
Press [![]() ] again to prematurely halt dispensing.
] again to prematurely halt dispensing.
Preparation using milk
This fully automatic coffee machine has an integrated beverage outlet. This can be used to prepare coffee drinks with milk or milk froth and warm milk.
The beverage outlet gets very hot. After use, always let it cool down before you touch it.
Milk container
This milk container has been specially designed to use together with this fully automatic coffee machine. It is solely intended for use in the household, and for storing milk in the refrigerator.
NOTICE:
Remove cups or glasses before opening the door to prevent them from falling.
Connecting the milk container or a milk carton:
- Open the appliance door.
- Remove the cover of the beverage outlet towards the front.
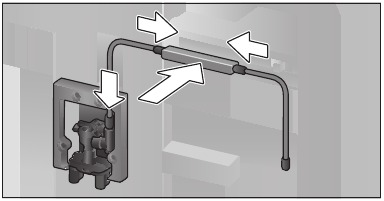
- Connect and fix the milk tubes and connecting elements as illustrated.
![Bosch - BCM8450UC - Connecting the milk container - Step 1 Connecting the milk container - Step 1]()
- Attach the cover firmly from the front on to the beverage outlet.
- Attach the suction pipe and insert into the milk container.
![Bosch - BCM8450UC - Connecting the milk container - Step 2 Connecting the milk container - Step 2]()
- Close the appliance door.
Note:
Dried milk residues are difficult to remove, therefore always clean immediately after use (see the section "Cleaning the milk system").
Coffee drinks with milk
- Turn the control ring and select "Espresso Macchiato", "Cappuccino", "Latte Macchiato" or "Café Latte".
The display shows the selected drink along with the preset values for this drink.
Note:
The settings can be changed as described in the section "Drink adjustment".
Press [  ] to start dispensing.
The milk is dispensed into the cup or glass first. Then the coffee is brewed and runs into the cup or glass.
Press [  ] again to stop the current step of the process prematurely.
Milk froth or warm milk
- Place a cup or glass underneath the beverage outlet.
- Turn the control ring and select "Milk froth" or "Warm milk".
Note:
The settings can be changed as described in the section "Drink adjustment".
- Press [
![]() ] to start dispensing.
] to start dispensing.
Milk froth or warm milk is dispensed from the beverage outlet.
Press [![]() ] again to prematurely halt the dispensing process.
] again to prematurely halt the dispensing process.
Preparation using ground coffee
Note:
When using ground coffee, the setting for the strength of the coffee, dispensing two cups at once and dispensing larger volumes (12 oz/360 ml or 16 oz/480 ml) is not operable. If the message "Double dispensing not possible with ground coffee" appears, please select a volume smaller than 12 oz/360 ml.
NOTICE:
Remove cups or glasses before opening the door to prevent them from falling.
The appliance must be ready for use.
- Open the appliance door.
- Remove the ground coffee drawer. The removable drawer must be dry.
- Put in coffee grounds (maximum 2 level measuring spoons); do not press firmly.
NOTICE:
Do not use whole beans or instant coffee.
- Replace the ground coffee drawer.
- Close the appliance door.
Note:
If coffee is not dispensed within 90 seconds, the brewing chamber empties automatically to avoid an overflow. The appliance is then rinsed.
Place a cup underneath the beverage outlet.
- Turn the control ring and select a coffee drink or a coffee drink with milk.
The display shows the selected drink, a measuring spoon and the preset values for this drink.
Note:
The settings can be changed as described in the section "Drink adjustment".
Note:
For coffee drinks with milk, please observe the instructions in the section "Preparation using milk".
- Press [
![]() ] to start dispensing.
] to start dispensing.
The coffee is brewed and then dispensed into the cup. When selecting coffee drinks with milk, the milk is first dispensed and then the coffee brewed.
Note:
For another drink with ground coffee, repeat the procedure.
Dispensing hot water
The beverage outlet gets very hot. After use, always let it cool down before you touch it.
The appliance must be ready for use.
- Remove the milk tube from the milk container.
- Remove any milk or coffee residue from the outlet.
- Place a cup or glass underneath the beverage outlet.
- Turn the control ring and select "Hot water".
Note: The settings can be changed as described in the section "Drink adjustment".
- Press [
![]() ] to start dispensing.
] to start dispensing. - The message appears "Milk hose separated from milk container and coffee outlet cleaned?".
- If still connected, remove the milk tube and press [ Yes ] on the display.
Hot water flows out of the beverage outlet.
Press [  ] again to prematurely halt the dispensing process.
Personalized drinks
Press [  ] to open the selection for personalized drinks.
Up to 8 storage spaces can be used. Save your favourite drinks that are frequently dispensed here with all their settings.
Note:
Press [  ] to exit the menu without saving at any time.
Entering or changing drinks
- Press [
![]() ].
].
The selection of memory locations appears. - Select [ new ] at an empty memory location or [ Details ] at an occupied memory location.
![Bosch - BCM8450UC - Entering or changing drinks - Saving to a memory Entering or changing drinks - Saving to a memory]()
The menu for adjusting the drinks opens. The last drink dispensed is shown with the last settings selected.
- If you do not wish to save last drink dispensed, turn the control ring and select another drink.
Other setting options appear depending on the selection.
- Press [ Further details | Save ] to enter other settings.
Note:
For milk drinks, the mixing ratio of coffee and milk can be set.
- The settings can be stored under an individual name. Press [ Name ]. The screen for entering the name opens.
![Bosch - BCM8450UC - Entering or changing drinks - Individual name Entering or changing drinks - Individual name]()
- Press [ Save letter ] to confirm the letter selected or [ Delete letter ] to delete it.
- With [ Save ] the entry is saved. The selection menu opens.
- Press [
![]() ] to exit the menu.
] to exit the menu.
Deleting a drink
- Press [
![]() ]
] - Press [ Details ] and [ Further details | Save ].
- Press [ Delete beverage ] and then [ Delete ].The memory location is again free.
Select a personalized drink and dispense
Press [  ]. The selection of memory locations opens.
- Press [
![]() ] to start dispensing.
] to start dispensing.
Adjusting the grind setting
This fully automatic coffee machine has an adjustable grinding unit. This enables the grinding level of the coffee to be individually changed.
- Slide the regulator to select the grinding degree setting between finely ground coffee
![]() and coarsely ground coffee
and coarsely ground coffee ![]() .
.
![Bosch - BCM8450UC - Adjusting the grind setting Adjusting the grind setting]()
Note:
For dark roast coffee beans, choose a finer grind, for lighter beans a coarser grind.
Note:
Make only small changes to the grinding degree setting.
Note:
The new setting will not become apparent until after the second cup of coffee.
Note:
If the display shows the message "Select a coarser degree of grinding", this means that the beans are being ground too finely. Adjust the grinding level to a coarser setting.
Child-proof lock
The appliance can be locked to protect children against scalding and burns.
- Press and hold [
![]() ] for at least 4 seconds. "Child-proof lock activated" briefly appears on the display.
] for at least 4 seconds. "Child-proof lock activated" briefly appears on the display.
No further operation is now possible; only [  ] can be pressed.
- To deactivate the child lock, press and hold A for at least 4 seconds. "Child-proof lock deactivated" briefly appears on the display.
Menu
The menu is used for changing individual settings, accessing information and launching processes.
- Press [
![]() ] to open the menu.
] to open the menu.
The different setting options will appear in the touch display and the current setting in the round information display.
Navigating through the menu:
By pressing e.g. [ Language ] the corresponding setting option is activated and highlighted red.
Turn the control ring to enter the settings, e.g. "English". By pressing [ Continue ], other setting options will appear.

For example:
Set the appliance at 15 minutes to switch off automatically:
- Press [
![]() ]. The menu opens.
]. The menu opens. - Press [ Switch off after ], the field is highlighted red.
- Press [
![]() ]. [ Save ] and [ Do not save ] appears.
]. [ Save ] and [ Do not save ] appears. - Press [ Save ]. The setting is saved. The drink selection appears on the display.
Note:
Press [  ] to exit the menu at any time. If no entry is made within approx. 30 seconds, the menu closes automatically and the settings are not saved.
The following settings can be made:
Language
Set the desired language to show the display texts.
Water hardness
Set this to the local water hardness. Level "1 (soft)" to "4 (very hard)" can be selected. The preset water hardness is "4 (very hard)".
Note:
It is important to set the water hardness correctly to enable the appliance to accurately indicate when the descaling program should be run.
You can check the water hardness using the enclosed test strip or by asking your local water supplier. If a water softening system is installed in the house, please select the "Softening device" setting.
Water filter
If a water filter is inserted, renewed or removed, the setting "Insert", "Replace" or "Remove" must be made in the menu.
Note:
A water filter lowers limescale deposits, reduces impurities in water and improves the coffee taste.
Water filters are available from retail outlets or from Customer Service (see the section "Accessories").
Inserting or renewing a water filter:
A new water filter must be rinsed before it can be used.
- Turn the control ring to select either "Insert" or "Replace".
- Press the water filter firmly into the opening of the water tank.
![Bosch - BCM8450UC - Inserting or renewing a water filter Inserting or renewing a water filter]()
NOTICE:
Do not jam the tube when closing the door.
- Press [
![]() ].
].
Water will now flow through the filter to rinse it.
The appliance is ready for use again.
Note:
Rinsing the filter simultaneously activates the setting for the change filter display.
The filter is no longer effective when the "Replace water filter" display appears, or at the latest after two months. It needs to be replaced for reasons of sanitation and to prevent a build-up of limescale (which could damage the appliance).
- If a new filter is not inserted, select the setting [ Remove ] and press [
![]() ].
].
The message "Remove filter, reinsert water tank, close door" appears.
Note:
If the appliance has not been used for a prolonged period (for example, while you are on vacation), the existing filter should be rinsed before the first time the appliance is used again. To do this, simply dispense a cup of hot water.
Detailed information about the water filter can be found in the manual supplied with the filter.
Temperature Format
Setting option in "°F" or "°C".
Volume units
Setting option in "oz" or "ml".
Switch off after
To set how long the appliance should wait after the last drink was prepared before it automatically rinses and switches itself off. You can specify values from 15 minutes to 12 hours. The factory setting is 30 minutes.
Home Connect
Settings for connection to Wi-Fi network (home network) and mobile devices (see section "Home Connect").
Illumination
Setting the illumination of the beverage outlet. "On", "when in use" or "Off" can be selected.
Brightness illumination
Setting the illumination lightness of the beverage outlet. "Level 1" to "Level 10" can be selected.
Brightness display
Setting the illumination lightness of display.
Key tones
Switch the signal tones on or off.
Clock
Display option for time "Off", "Analog" (on) or "Digital" (on). The setting for this can be changed in the Clock menu option.
Note:
If the appliance is switched off at the power switch or there is a power failure, the settings for the time will be lost.
Time
Setting for the current time.
Clock format
Setting option in "12hr" (American mode) or "24hr" (European mode)
Note:
No difference between am and pm.
Frost protection
Service program to prevent frost damage during transportation and storage.
This program completely empties the appliance.
- Empty the water tank and reinsert.
- If available remove the milk container and close the door.
The appliance automatically empties all its pipes.
Beverage info
Display shows how many drinks have been prepared since its initial use.
Factory settings
Resets your own settings to the condition when delivered.
- Press [ Reset ] or [ Do not reset ] to either confirm or interrupt.
Home Connect
This fully automatic coffee machine is Wi-Fi-capable and can be remotely controlled using a mobile device (e.g. tablet PC, smartphone). The Home Connect App offers additional functions which are a perfect complement to the networked appliance.
If the appliance is not connected to a Wi-Fi network (home network), it can still function as a fully automatic coffee machine and be operated as usual via the display.
The home network router must be operated in the 2.4 GHz frequency range. Please check it and adjust it if necessary.
The availability of the Home Connect function depends on the availability of Home Connect services in your country. Home Connect services are not available in every country. You can find more information on this at www.home-connect.com.
Note:
Please ensure that you follow the safety instructions given at the beginning of this instruction manual and that these are also observed when operating the appliance via the Home Connect app and when away from home. Please also follow the instructions in the Home Connect App.
Note:
Operation of the appliance itself always takes priority, and during this time it is not possible to operate the appliance using the Home Connect App.
Setting up
To implement settings via Home Connect, you must install the Home Connect App on a mobile device (e.g. tablet PC, smartphone). Please observe the supplied Home Connect documents with regard to this feature.
Follow the steps specified by the app to implement the settings.
Login of the appliance in the Wi-Fi network can be carried out on initial set-up of the fully automatic coffee machine either directly or using the menu (first touch [  ] to open the menu):
- Touch[ Home Connect ].
- Touch [ Wi-Fi ] to start the wireless connection. "Wi-Fi Activated" appears in the display.
- Touch [ Connect network ]. The following selection appears: [ Connect automatically ] and [ Manually connect ].
Note:
If the router has WPS functionality, please select [ Connect automatically ].
Connect automatically in the Wi-Fi network (home network)
- Touch [ Connect automatically ]. The display shows [ Network connection automatic ].
- Press the WPS button on the home network router within a few minutes and wait until the display of the fully automatic coffee machine shows "Network connection successful".
- Open the app on the mobile device.
- Touch [ Connect to app ]. The fully automatic coffee machine connects with the app.
- Wait until [ Connect with app successful ] lights up briefly in the display.
- Touch [ Remote start ]. A warning message appears.
- Touch [ Continue ] and read the warning message.
- Touch [ confirm ].
With the mobile device the functions of the fully automatic coffee machine can now be used to their full extent via the app.
Note:
If [Remote start ] - [ Deactivate ] is selected, only the modes of the fully automatic coffee machine are displayed in the Home Connect app. You can specify settings but not start drinks dispensing.
Connect manually in the Wi-Fi network (home network)
- Touch [ Manually connect ]. The fully automatic coffee machine sets up a separate Wi-Fi network which can be accessed with a tablet or smartphone. The display shows the SSID (the name) and the key (the password) of this network.
- Log the mobile device in to the network of the fully automatic coffee machine with the "HomeConnect" SSID and the "HomeConnect" key.
- Start the app on the mobile device and follow the instructions for network login in the app and the supplied Home Connect documents.
The login process is complete when "Network connection successful" lights up briefly in the display of the fully automatic coffee machine.
- Touch [ Connect to app ]. The app must also be opened on the mobile device. The fully automatic coffee machine connects with the app.
- Wait until [ Connect with app successful ] lights up briefly in the display.
- Touch [ Remote start ]. A warning message appears.
- Touch [ Continue ] and read the warning message.
- Touch [ confirm ].
With the mobile device the functions of the fully automatic coffee machine can now be used to their full extent via the app.
Note:
If [Remote start ] - [ Deactivate ] is selected, only the modes of the fully automatic coffee machine are displayed in the Home Connect app. You can specify settings but not start dispense drinks.
Switching Wi-Fi on and off
Wi-Fi can be switched "Activated" or " Deactivated" as required (e.g. when on holiday).
Note:
Network information is retained after the appliance is switched off. After switching on, wait a few seconds until the fully automatic coffee machine has connected to the Wi-Fi network again. In networked standby mode the appliance requires a maximum of 2 W.
- Touch [
![]() ] to open the menu.
] to open the menu. - Touch[ Home Connect ].
- Touch [ Wi-Fi ] to switch the wireless module "Activated" and "Deactivated".
Disconnecting
The fully automatic coffee machine can be disconnected from the Wi-Fi network at any time.
Note:
If the fully automatic coffee machine is disconnected from the Wi-Fi network, it cannot be operated using Home Connect.
- Touch [
![]() ] to open the menu.
] to open the menu. - Touch [ Home Connect ].
- Touch [ Disconnect from network ].
The connection to the network and app is disconnected. Wi-Fi and remote start are switched off.
Note:
Information about the Wi-Fi network is cleared.
Connecting with app
The Home Connect app can be installed on any number of mobile devices, which can then be used to connect to the fully automatic coffee machine.
The fully automatic coffee machine must already be connected to the Wi-Fi network.
- Open the app on the mobile device.
- Touch [
![]() ] to open the menu.
] to open the menu. - Touch [ Home Connect ].
- Touch [ Connect to app ] to connect to the appliance with the app.
Remote start
If you wish e.g. to start dispense drinks on the fully automatic coffee machine via a mobile device, Remote start must be activated.
If an unattended remote start takes place, third parties may be scalded if they reach under the coffee dispenser during drinks dispensing. You should therefore make sure that there is no risk to other people, in particular not to children, or to property in the event of an unattended remote start.
Note:
The [ Remote start ] text field is is only visible if connection with Home Connect has been successfully completed.
Note:
If Remote start is switched off, only the modes of the fully automatic coffee machine are displayed in the Home Connect app.
- Touch [
![]() ] to open the menu.
] to open the menu. - Touch [ Home Connect ].
- Touch [ Remote start ] to switch the function Remote start "Activated" and "Deactivated".
Device Info
Display for network and device information
- Touch [
![]() ] to open the menu.
] to open the menu. - Touch[ Home Connect ].
- Touch [ Device info ]. The SSID, IP, MAC address and serial number of the appliance are displayed for a few seconds.
Remote diagnostics
In the event of faults, Customer Service can use remote diagnostics to access your appliance. Contact Customer Service and ensure that your appliance is connected to the Home Connect server and check that the remote diagnostics service is available in your country.
For more information and to check whether the remote diagnostics service is available in your country, please visit the Help & Support area of the Home Connect website for your country: www.home-connect.com
Information on data protection
When the fully automatic coffee machine is connected for the first time to a Wi-Fi network which is connected to the Internet, the appliance transmits the following categories of data to the Home Connect server (initial registration):
- Unique appliance identification (consisting of appliance codes as well as the MAC address of the installed Wi-Fi communication module).
- Security certificate of the Wi-Fi communication module (to ensure a secure IT connection).
- The current software and hardware version of the fully automatic coffee machine.
- Status of any previous resetting to the factory settings.
This initial registration prepares the Home Connect functions for use and is only required when you want to use these Home Connect functions for the first time.
Note:
Please note that the Home Connect functions can only be used in conjunction with the Home Connect app. Information on data protection can be accessed in the Home Connect app.
2.4 GHz band: 100 mW max.
Care and daily cleaning
Risk of electric shock!
Never immerse the appliance in water. Do not steam-clean the appliance.
Never use harsh chemicals to clean your coffeemaker. Some chloride-containing cleaning products can damage your appliance and may present health hazards. Some chemicals can leave a toxic residue. Use normal dish detergent and water.
- Wipe the outside of the appliance with a soft, damp cloth.
- Use a very mild cleaning agent.
- Clean the control panel using a micro- fibre cloth.
- Do not use any cleaning agents containing alcohol or spirits.
- Do not use abrasive cloths or cleaning agents.
![Bosch - BCM8450UC - Cleaning materials Cleaning materials]()
Note:
New sponge cloths may contain salts. Salts can cause rust film on stainless steel and must therefore be washed out thoroughly before use.
- Open the door and pull the drip tray out forward.
- Remove drip tray cover and coffee grounds container.
- Empty, clean and dry individual parts.
NOTICE:
The drip tray and coffee grounds container should be emptied and cleaned every day in order to prevent deposits.
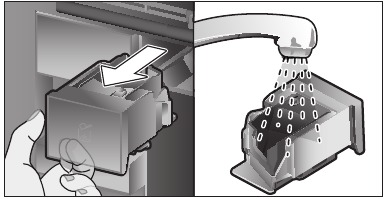
Remove the ground coffee drawer, clean under running water and dry well.
- Wipe and dry the inside of the appliance (support, drip tray and the ground coffee drawer) and collecting tray.
- Replace the dried parts, e.g. the ground coffee drawer.
NOTICE:
Do not put the following parts in the dishwasher:
Accessory drawer, water tank, lid of the water tank, beverage outlet cover, bean container, lid of the bean container, metal connecting element, ground coffee drawer, protective cover of the brewing unit and the milk container.


The following parts may be cleaned in the dishwasher:
Drip plate, collecting tray, drip tray, drip tray cover, coffee grounds container, milk tubes, suction pipes, individual parts of the beverage outlet, measuring spoon and individual parts of the milk container lid.
Note:
If the appliance is cold when switched on, or if it is switched off after dispensing coffee, it rinses automatically. The system is therefore self-cleaning.
NOTICE:
If the appliance is not used for a lengthy period (e.g. while you are on vacation), clean the entire appliance thoroughly, including the milk system, the ground coffee drawer and the brewing unit before use.
Cleaning the milk system
The milk system is automatically cleaned with a short jet of steam directly after preparing a milk drink.
Note:
For particularly thorough cleaning, the milk system can be additionally rinsed with water (see the section "Rinsing the milk system").
NOTICE:
Aditionally clean the milk system manually every week and, if required, also more often (see the section "Cleaning the milk system manually").
The beverage outlet gets very hot. After use, always let it cool down before you touch it.
Rinsing the milk system
- Press [
![]() ].
]. - Press [ Rinse milk system ] to select the program.
- Open door and remove suction pipe from the milk tube.
- Wipe the suction pipe and insert the end of the suction pipe into the hole on the coffee grounds container.
![Bosch - BCM8450UC - Care and daily cleaning - Rinsing the milk system Care and daily cleaning - Rinsing the milk system]()
- Close the door. Be careful not to jam the milk tube.
- Place an empty glass underneath the beverage outlet.
- Press [
![]() ].
].
The milk system is rinsed with water. - Then empty the glass.
- Press [
![]() ] to exit the program.
] to exit the program.
Cleaning the milk system manually
Take the milk system apart to clean it:
- Push the beverage outlet down completely and pull the cover forward to remove.
- Press the snap lever to the left of the beverage outlet downwards and pull the beverage outlet forward.
![Bosch - BCM8450UC - Cleaning the milk system manually - Step 1 Cleaning the milk system manually - Step 1]()
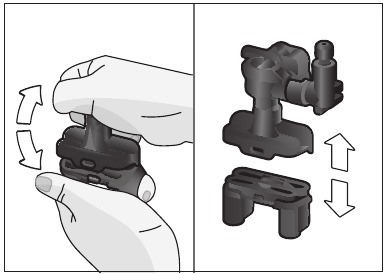
- Remove the milk tube. Dismantle the top and bottom sections of the beverage outlet.
![Bosch - BCM8450UC - Cleaning the milk system manually - Step 2 Cleaning the milk system manually - Step 2]()
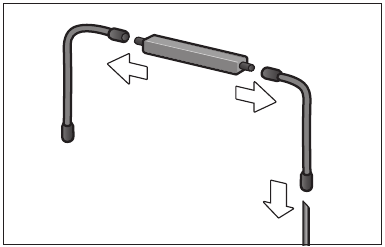
- Separate the milk tubes, connecting element and suction pipe.
![Bosch - BCM8450UC - Cleaning the milk system manually - Step 3 Cleaning the milk system manually - Step 3]()
- Clean the individual parts with a detergent solution and a soft cloth.
- Rinse all parts with clean water and dry them.
- Put the individual parts back together again
![Bosch - BCM8450UC - Cleaning the milk system manually - Step 4 Cleaning the milk system manually - Step 4]()
- Attach the beverage outlet directly from the front firmly to the three connections.
- Replace the cover.
Cleaning the milk container
Clean the milk container after each use. Milk residue can spoil.
For reasons of sanitation, the milk container should be cleaned regularly. Only the individual parts of the lid are suitable for being cleaned in the dishwasher. Clean the stainless steel milk container by hand with a mild detergent.
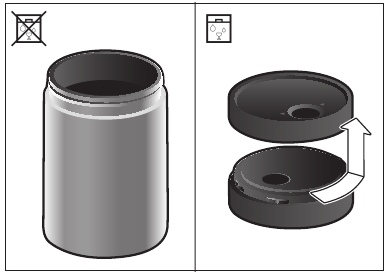
Cleaning the brewing unit
In addition to the automatic cleaning program, the brewing unit should be removed regularly for cleaning.
- Open the appliance door.
- Use the power switch [ O/I ] to switch off the appliance completely.
- Remove the protective cover of the brewing unit.
- Remove the coffee grounds container.
- Slide the red latch on the brewing unit all the way to the left
![]() .
. - Press the eject lever right down. The brewing unit will be released.
- Take hold of the brewing unit by the recessed grips and carefully remove it.
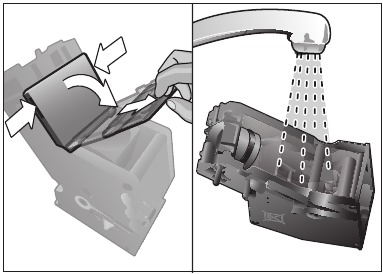
- Remove the cover of the brewing unit and clean thoroughly under running water.
![Bosch - BCM8450UC - Cleaning the brewing unit - Step 1 Cleaning the brewing unit - Step 1]()
- Clean the strainer of the brewing unit thoroughly under the water jet.
![Bosch - BCM8450UC - Cleaning the brewing unit - Step 2 Cleaning the brewing unit - Step 2]()
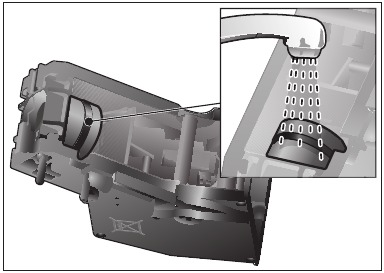
- Thoroughly clean the connecting nozzles of the brewing unit
![Bosch - BCM8450UC - Cleaning the brewing unit - Step 3 Cleaning the brewing unit - Step 3]()
Clean it without using washing-up liquid and do not put it in the dishwasher.

- Clean the inside of the appliance thoroughly with a moist cloth, removing any coffee residues.
- Leave the brewing unit and the inside of the appliance to dry.
- Place the cover back on the brewing unit.
- Push the brewing unit all the way into the appliance and press on the middle until it audibly clicks into place.
NOTICE:
The red latch must be right over at the left at  before replacing (see figure E).
- Press the eject lever up and push the red latch over to the right to k.
- Insert the coffee grounds container.
- Replace the protective cover.
- Close the appliance door.
Service programs
The following messages will appear on the display at certain intervals, either "Cleaning program urgently required!" or "Descaling program urgently required!" or "Calc'nClean program urgently required!".
The unit should immediately be cleaned or descaled using the appropriate program. Alternatively, the two processes Descale and Clean can be carried out together using the Calc'nClean function (see the section "Calc'nClean"). Failure to carry out the service program according to the instructions may damage the appliance.
Note:
If the appliance is not descaled when it is supposed to be, the message "Descaling program is overdue. Device will shortly be locked." will appear. Immediately perform the descaling process in accordance with the instructions. If the appliance is locked, it can only be operated again once the descaling process has been carried out.
To display how many beverages can still be prepared before one of the service programs needs to be run, proceed as follows:
- Press [
![]() ].
].
The service programs appear. The counter, e.g. "Descaling program necessary in 28 cups" provides information on when to perform the respective program next.
NOTICE:
For each of the service programs, use descaling and cleaning agents as described in the instructions and observe the (relevant) safety information. Never interrupt a service program. Never use vinegar, citric acid or any vinegar-based or citric acid-based agents. Never place descaling tablets or other descaling materials in the coffee drawer! Specially developed, suitable descaling and cleaning tablets are available from retail outlets or from Customer Service (see the section "Accessories").
Do not drink or come into contact with cleaning or descaling materials. Keep cleaning materials and descaling tablets out of the reach of children. They may be toxic.
NOTICE:
Before starting each service program (Descale, Clean or Calc'nClean) remove the brewing unit, clean as instructed and replace it. Be careful not to jam the milk tube when closing the door.
After completion of each service program, wipe the appliance immediately with a soft, damp cloth to remove any residues from the descaling and cleaning solution. It is possible for corrosion to form underneath such deposits.
New sponge cloths may contain salts. Salts can cause rust film on stainless steel and must therefore be washed out thoroughly before use.
Clean the beverage outlet, milk tubes and connecting piece thoroughly.
Descaling
Takes about 21 minutes.
- Press [
![]() ].
]. - Press [ Descale ] to select the program.
- The display indicates the progress of the program.
- Empty drip trays and replace.
- Remove the water filter (if there is one) and press [
![]() ]
] - Pour lukewarm water into the empty water tank up to the "0.5 l" mark and then dissolve one Bosch descaling tablet 00311820 in it.
Note:
If there is not enough descaling solution in the water tank, you will be asked to do the following. Refill using uncarbonated water and press [  ] again.
- Remove the suction pipe from milk container, wipe it and insert the end of the suction pipe into the hole on the coffee grounds container.
- Close the appliance door.
- Place a container with a capacity of 17 oz under the beverage outlet.
- Press [
![]() ]. The descaling program will now run for about 19 minutes.
]. The descaling program will now run for about 19 minutes. - Remove the container and press [
![]() ].
]. - Rinse the water tank and (if removed) replace the water filter.
- Replace the water tank and close the door.
- Place the container underneath the beverage outlet again.
- Press [
![]() ]. The descaling program will now run for about 2 minutes and rinse the appliance.
]. The descaling program will now run for about 2 minutes and rinse the appliance. - Remove the container, empty the drip trays, replace and close the appliance door.
- Press [
![]() ]. The appliance has finished descaling and is ready for use again.
]. The appliance has finished descaling and is ready for use again. - Press [
![]() ] to exit the program.
] to exit the program.
Cleaning
Takes about 5 minutes.
- Press [
![]() ].
]. - Press [ Clean ] to select the program.
- The display indicates the progress of the program.
- Clean the beverage outlet and replace, empty the drip trays and replace.
- Open the ground coffee drawer, drop in a cleaning tablet and close the coffee drawer.
- Close the appliance door.
- Place a container with a capacity of 17 oz under the beverage outlet.
- Press [
![]() ]. The cleaning program will now run for about 5 minutes.
]. The cleaning program will now run for about 5 minutes. - Remove the container, empty the drip trays, replace and close the appliance door.
- Press [
![]() ]. The appliance has finished cleaning and is ready for use again.
]. The appliance has finished cleaning and is ready for use again. - Press [
![]() ] to exit the program.
] to exit the program.
Calc'nClean
Takes about 26 minutes.
Calc'nClean combines the functions Descale and Clean. If both programs are due to be carried out close together, the fully automatic coffee machine will automatically suggest this service program.
- Press [
![]() ].
]. - Press [ Calc'nClean ] to select the program.
- The display indicates the progress of the program.
- Clean the beverage outlet and replace, empty the drip trays and replace.
- Open the ground coffee drawer, drop in a cleaning tablet and close the coffee drawer again.
- Remove the water filter (if there is one) and press [
![]() ]
] - Pour lukewarm water into the empty water tank up to the "0.5 l" mark and then dissolve one Bosch descaling tablet 00311820 in it.
Note:
If there is not enough descaling solution in the water tank, you will be asked to do the following. Refill using uncarbonated water and press [  ] again.
- Remove the suction pipe from milk container, wipe it and insert the end of the suction pipe into the hole on the coffee grounds container.
- Close the appliance door.
- Place a container with a capacity of 17 oz under the beverage outlet.
- Press [
![]() ].
].
The program will now run for about 19 minutes.
- Remove the container and press [
![]() ].
]. - Rinse the water tank and (if removed) replace the water filter.
- Fill the tank with fresh water up to the "max" indicator.
- Replace the water tank and close the door.
- Place the container underneath the beverage outlet again.
- Press [
![]() ].
].
The program will now run for about 7 minutes and rinse the appliance.
- Remove the container, empty the drip trays, replace and close the appliance door.
- Press [
![]() ]. The appliance is descaled, cleaned and ready for use again.
]. The appliance is descaled, cleaned and ready for use again. - Press [
![]() ] to exit the program.
] to exit the program.
Special rinsing
NOTICE:
If any of the service programs are ever interrupted, for instance by a power failure, please proceed according to the information on the display:
- Rinse the water tank and refill it with fresh water up to the "max" mark.
- Press [
![]() ]. The program will now run for about 2 minutes and rinse the appliance.
]. The program will now run for about 2 minutes and rinse the appliance. - Empty the drip trays, replace and close the appliance door. The appliance is ready for use again.
- Press [
![]() ] to exit the program.
] to exit the program.
Tips on energy saving
- Press [
![]() ] to switch the appliance to "energy saving mode". The appliance uses very little power when in "energy saving mode", but monitors all safety- relevant functions so as to avoid damage.
] to switch the appliance to "energy saving mode". The appliance uses very little power when in "energy saving mode", but monitors all safety- relevant functions so as to avoid damage. - In the menu under "Switch off after", set the automatic switch off period to 15 minutes.
- Reduce the brightness of the display and the illumination in the menu to save energy.
- If possible, do not interrupt the dispensing of coffee or milk froth. Stopping a process prematurely results in higher energy consumption and the drip tray fills up more quickly.
- Descale the appliance regularly to avoid a build-up of limescale. Limescale residues cause higher energy consumption.
Frost protection
To prevent frost damage during transport and storage, completely empty the appliance beforehand (see the section "Menu – Frost protection").
Storing accessories
The fully automatic coffee machine has a special accessory drawer for storing the accessories in the appliance.
- Put the measuring spoon and the water filter into the accessory drawer.
- Put the Quick Reference Guide into the special support at the front of the accessory drawer.
- The long suction pipe can be stored in the holder on the inside of the door (Figure D).
- The connecting element can be fixed to the magnetic holder above the ground coffee drawer.
Accessories
The following accessories are available from retailers or from customer service:
| Accessories | Order number Customer service |
| Cleaning tablets | 00311823 |
| Descaling tablets | 00311820 |
| Water filter | 12008246 |
| Milk container with "FreshLock" lid | 11005967 |
| Restrictors for opening angle 92° | 00636455 |
Simple troubleshooting
The following table provides solutions for problems that may arise as you use your Bosch machine. If you do not find a solution for your specific problem or the problem persists after troubleshooting, please contact 1-800-944-2904.
| Problem | Cause | Solution |
| Strongly fluctuating coffee or milk froth quality (e.g. fluctuation in quantity or milk froth spraying). | Build-up of limescale in the appliance. | Descale the appliance according to the instructions, see the section "Service programs". |
| The suction pipe is blocked. | Clean the suction pipe. | |
| Drinks cannot be dispensed. | Beverage outlet or one of the 3 connections are blocked. | Clean the beverage outlet and the connections. |
| The drink runs out at the entire outlet during dispensing. | Lower part of the beverage outlet is missing. | Attach the lower part, see the section "Cleaning the milk system". |
| Too little milk froth, none at all, or the milk system is not taking in any milk. | Build-up of limescale in the appliance. | Descale the appliance according to the instructions, see the section "Service programs". |
| Beverage outlet or one of the 3 connections are blocked. | Clean the beverage outlet and the connections. | |
| Milk not suitable for foaming. | Do not use milk that has already been boiled. Use cold milk with a fat content of at least 1.5%. | |
| Beverage outlet or the milk tubes are not correctly assembled. | Moisten the individual parts and put them together again. | |
| The suction pipe is blocked. | Clean the suction pipe. | |
| The personally selected volume is not reached. Coffee dispensing slows to a trickle or stops completely. | Coffee is ground too finely. Preground coffee is too fine. | Adjust the grinding level to a coarser setting. Use a coarser ground coffee. |
| Heavy build-up of limescale in the appliance. | Descale the appliance according to the instructions, see the section "Service programs". | |
| The brewing unit is soiled. | Clean brewing unit, see chapter "Cleaning the brewing unit". | |
| Hot water milky or tastes of coffee. | Milk tube has not been removed. | Remove the milk tube from the milk container. |
| Milk or coffee residue in the beverage outlet. | Clean the beverage outlet. | |
| Coffee has no "crema". | Unsuitable type of coffee. | Use a type of coffee with a higher proportion of robusta beans. |
| The beans are no longer fresh. | Use fresh beans. | |
| The grinding level is not suitable for the beans. | Adjust the grinding unit to a finer setting. | |
| Coffee is too "acidic". | The grinding level is too coarse. Preground coffee is too coarse. | Adjust the grinding unit to a finer setting. Use a finer ground coffee. |
| Unsuitable type of coffee. | Change the type of coffee. | |
| Coffee is too "bitter". | Coffee is ground too finely. Preground coffee is too fine. | Adjust the grinding level to a coarser setting. Use a coarser ground coffee. |
| Unsuitable type of coffee. | Change the type of coffee. | |
| Coffee tastes burnt. | The brewing temperature is too high. | Reduce the temperature, see the section "Drink adjustment". |
| Coffee is ground too finely. Preground coffee is too fine. | Adjust the grinding level to a coarser setting. Use a coarser ground coffee. | |
| Unsuitable type of coffee. | Change the type of coffee. | |
| Coffee is too "weak". | Coffee strength selected is too weak. | Raise the strength of the coffee, see the section "Drink adjustment". |
| Ground coffee jammed in the coffee drawer. | Remove the ground coffee drawer, clean and dry thoroughly. | |
| Ground coffee sticks in the coffee drawer. | Ground coffee sticks together. | Do not press the ground coffee firmly into the coffee drawer. |
| Coffee drawer is damp. | Remove the ground coffee drawer, clean and dry thoroughly. | |
| The water filter does not stay in position in the water tank. | The water filter is not mounted correctly. | Firmly press the water filter straight down into the tank connection. |
| Bean container sticks when inserting. | There are beans in the housing. | Remove the beans. |
| The coffee grounds are not compact and are too wet. | The grinding setting is too fine or too coarse, or not enough ground coffee has been used. | Adjust the grinding unit to a coarser or finer setting, or use 2 level measuring spoons of ground coffee. |
| Grinding level adjustment is stiff. | Too many beans in the grinding unit. | Dispensing a drink from coffee beans. Only make any subsequent changes to the grinding level in small steps. |
| Brewing unit cannot be inserted. | Brewing unit is in the wrong position. | Insert the brewing unit according to the instructions, see the section "Cleaning the brewing unit". |
| Brewing unit is locked. | Unlock the brewing unit, see the section "Cleaning the brewing unit". | |
| Protective cover of the brewing unit cannot be properly attached. | Brewing unit is not locked. | Lock the brewing unit, see the section "Cleaning the brewing unit". |
| There is water under the drip tray. | This water is condensation. | Do not insert drip tray without cover. |
| Display shows "12:00" | Power failure or appliance switched off at power switch. | Re-enter values; do not switch the appliance off at the power switch or select the "Off" option in the Clock menu. |
| Display shows "Milk container connected?" despite connected milk container. | Container is outside the range of the sensor. | Position the container at the right edge. |
| Material e.g. milk carton is not recognised. | Confirm the display request with "Yes" or use the enclosed milk container. | |
| Display shows "Overvoltage or undervoltage" | Voltage too high or too low. | Contact electricity or grid provider. Have the power supply checked by an expert. |
| Display shows "Please allow machine to cool." | Appliance is too hot. | Switch off appliance for 30 minutes. |
| Display shows, for example: "Fault: E0510" | The appliance has a fault. | Proceed according to the display screen. |
| Display shows "Fill bean container" although the container is already full, or the grinder is not grinding any beans. | Beans are not falling into the grinding unit (beans too oily). | Gently tap the bean container. Possibly change the type of coffee. When the bean container is empty, wipe it with a dry cloth. |
| Display shows "Clean brewing unit" | Brewing unit is soiled. | Clean the brewing unit. |
| Too much ground coffee in the brewing unit. | Clean the brewing unit. Do not place more than two level measuring spoons of ground coffee in the drawer. | |
| The mechanism of the brewing unit is stiff. | Clean the brewing unit, see the section "Care and daily cleaning". | |
| Display shows "Refill with still water or remove filter" | Water tank wrongly inserted | Insert water tank correctly |
| Carbonated water in the water tank. | Fill the water tank with fresh tap water. | |
| Float is stuck in the water tank. | Remove the tank and clean thoroughly. | |
| New water filter not rinsed according to instructions, or water filter used or defective. | Rinse the water filter according to the instructions and then switch on, or use a new water filter. | |
| Air in the water filter. | Dip the water filter into water until no more air bubbles escape, replace the filter. | |
| Display shows "Empty drip trays" despite them being empty. | Drip tray is soiled and wet. | Clean and dry the drip tray thoroughly. |
| Emptying is not detected when the appliance is switched off. | When the appliance is switched on, remove and re-insert the drip tray. | |
| Display shows "Insert drip trays" even though drip tray in use. | Inside of appliance (tray holder) dirty. | Clean the inside. |
| The coffee grounds container is not fully inserted. | Push the coffee grounds container all the way in. | |
| Water dripped onto the inner floor of the appliance when the drip tray was removed. | Drip tray was removed too soon. | Wait a few seconds after the last drink was dispensed before removing the drip tray. |
| Display shows "Switch off with power switch, then back on after 30 sec!" | Appliance is too warm. | Leave the appliance to cool down. |
| Dirty brewing unit. | Clean the brewing unit. | |
| Home Connect does not work correctly. | Go to www.home-connect.com |
Technical specifications
| Power connection with transformer type 8001010566 (voltage – frequency) | 120 V AC – 60 Hz |
| Power rating | 1600 W |
| Maximum static pump pressure | 19 bar |
| Maximum water tank capacity (without filter) | 81.15 oz (2.4 l) |
| Maximum capacity of the coffee bean container | 1 lb (17 oz) |
| Length of power cable (Power socket – transformer) | 39' (1 m) |
| Dimensions (appliance without transformer) H x B x D | 17 7/8' x 23 3/8' x 14 3/4" (455 x 594 x 375 mm) |
| Weight, empty (appliance without transformer) | 42-44 lb (19-20 kg) |
| Dimensions (only transformer) H x B x D | 8 1/4' x 6 3/4' x 6 3/4' (210 x 172 x 198 mm) |
| Weight (only transformer) | 27.55 lb (12.5 kg) |
| Type of grinding unit | Ceramic |
Safety Definitions
This indicates that death or serious injuries may occur as a result of non-observance of this warning
This indicates that minor or moderate injuries may occur as a result of non-observance of this warning.
NOTICE:
This indicates that damage to the appliance or property may occur as a result of non-compliance with this advisory.
Note:
This alerts you to important information and/or tips.
IMPORTANT SAFETY PRECAUTIONS
READ AND SAVE THESE INSTRUCTIONS
When using electrical appliances, basic safety precautions should always be followed, including the following:
To protect against fire, electric shock and injury to persons, do not immerse cord, plugs, or body in water or in any other liquid.
The use of accessories attachments not recommended by the appliance manufacturer may result in fire, electric shock or injury to persons.
STATE OF CALIFORNIA PROPOSITION 65 WARNING:
Cancer and reproductive harm - www.P65Warnings.ca.gov
This appliance is designed for domestic and not commercial use.
Use indoors at room temperature only. Protect your Coffeemaker against freezing or it will be damaged.
Supervise children to ensure that they do not play with the appliance.
To reduce risk of fire and electric shock:
Installation
Connect and operate the appliance only according to the rating plate specifications. Use appliance only with transformer which is identified as Type 8001010566.
Do not connect the appliance to or operate it by means of a time switch or remote control socket. The unit must not be operated with an extension cord.
Use the Coffeemaker only if power cord and appliance show no signs of damage. Should a problem occur, pull the plug and disconnect from the power immediately.
Never immerse the appliance or power cable in water or any liquid. Avoid spillage on the connector.
Grounding
This appliance may only be connected to a power supply with 120 Volt AC via a correctly installed receptacle with ground.
Repairs
To avoid potential hazards, repairs must only be carried out by authorized service personnel.
If the power cord of this appliance is damaged, it must be replaced by a original replacement power cord, which can be purchased from our Customer Service Department.
To avoid the risk of scalding:
Please note that the beverages are very hot when dispensed.
Do not use chemically softened water!
Risk of scalding (Home Connect)!
If an unattended remote start takes place, third parties may be scalded if they reach under the coffee dispenser during drinks dispensing. You should therefore make sure that with an unattended remote start that there is no risk to other people, in particular not to children, or to property.
To avoid the risk of suffocation:
Do not allow children to play with packaging material. Store small parts safely as they can be a choke hazard.
To avoid the risk of injury:
Keep descaling tablets out of the reach of children. Keep children away from the appliance and power cable. Do not reach into the grinding unit. Be careful not to pinch your fingers when closing the door. A misuse of the appliance can potentially lead to injury.
To avoid the risk of burns:
The beverage outlet gets very hot. After use, allow to cool down first before touching. After use, the heating element surfaces and warming plate can retain heat. Wait until cool before touching. Freshly prepared beverages are very hot. Leave to cool a little as necessary.
To avoid the risk of influence electronic implants:
The appliance contains permanent magnets that may influence electronic implants such as pacemakers or insulin pumps. Persons wearing electronic implants must maintain a minimum distance of 4' (10 cm) from the front of the appliance and from the following parts upon removal: milk container, milk system, water tank and brewing unit.

Documents / Resources
References
Download manual
Here you can download full pdf version of manual, it may contain additional safety instructions, warranty information, FCC rules, etc.
Thank you! Your question has been received!

 ] and close the appliance door.
 ].
].
 ].
]. 




 and coarsely ground coffee
  .
.


 ].
].



 .
.


Need Assistance?
Do you have a question about the BCM8450UC that isn't answered in the manual? Leave your question here.