Philips NORELCO BT5210 - Beard And Head Trimmer Manual
- Quick start manual (8 pages) ,
- Manual (7 pages)
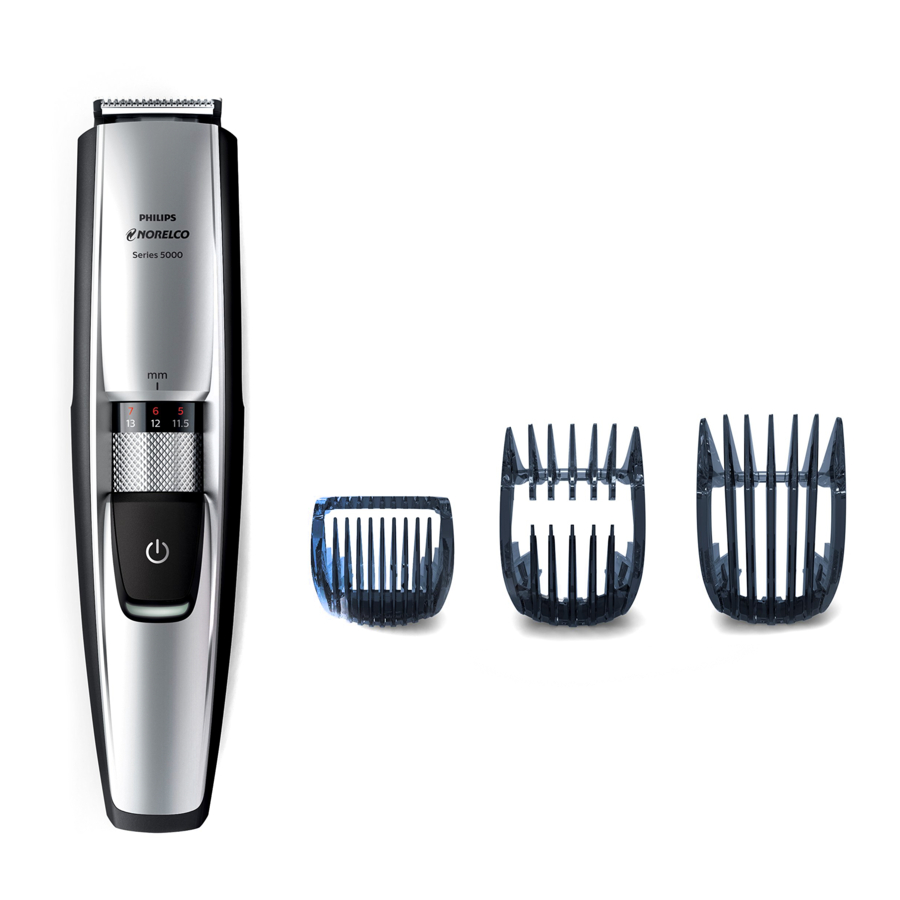
Features

- Click-on Trimmer
- Length Settings
- Zoom Wheel
- On/Off Button
- Battery Charge Indicator
- Beard and Stubble Comb (1/64 – 9/32 in./0.4 – 7mm)
- Short Hair Comb (1/64 – 9/32 in./0.4 – 7mm)
- Long Hair Comb (9/32 – 1/2 in./7 – 13mm)
- Adapter
- Appliance Plug
- Cleaning Brush
Full Two-Year Warranty
45-Day Money-Back Guarantee

This symbol indicates that the Trimmer can be rinsed under running tap water.
Put It To The Test
Like many new products, your Philips Norelco Beard and Head Trimmer may take a little getting used to. If you are using an electric Trimmer for the first time, or if you've been using a different brand, take the time to acquaint yourself with your new Trimmer.
Your Beard and Head Trimmer features a dynamic beard guide system that lifts and guides hairs more effectively for a more efficient cut so you can create the exact look you want every time.
Throw your scissors away and put your new Trimmer to the test. We guarantee precise, professional results or Philips Norelco will refund you the full purchase price as long as the request is received within 45 days of purchase.
Before First Use
Charging
Charge Indications
Low Battery
- When the battery is almost empty, the battery charge indicator blinks orange.
![]()

Charging
- When you start charging, the battery charge indicator blinks white
![]()
- After approximately 5 minutes the battery has enough energy for one cordless trimming session.
- When the battery is fully charged, the battery charge indicator light lights up white continuously. After approximately 30 minutes the battery charge indicator light turns off.
![]()


To Charge/Recharge
- Charging, recharging, or using the Trimmer at temperatures below 40˚F/4,5°C or higher than 95˚F/35°C adversely affects lifespan of the battery.
- If the appliance is subjected to a major change in temperature, pressure or humidity, let the Trimmer acclimatize for 30 minutes before using.
- Continuously recharging Trimmer will reduce lifespan of battery.
- Be certain Trimmer is OFF.
- Insert the appliance plug directly into the Trimmer (1) and plug the adaptor into any 120V AC outlet (2)
Use only the cord provided.
- An adaptor plug may be necessary for cord usage in some foreign countries. Use an attachment plug adaptor of the proper configuration for power outlet.
![]()

Corded Trimming
- Connect cord provided to Trimmer and plug Trimmer into electrical outlet.
- Press the ON/OFF button to begin trimming.
![]()
- Turn Trimmer OFF and unplug.

Cordless Trimming
- Charge according to directions. Unplug Trimmer from outlet and remove cord.
- Press the ON/OFF button to begin trimming.
- If the charge runs out while trimming simply connect cord provided to Trimmer and outlet to continue trimming.
![]()

Beard Trimming
- Use this Trimmer for its intended household use as described in this manual.
- Trimming facial hair is easier when skin and hair are dry.
- Always comb the beard and/or moustache with a fine comb before you start trimming.
- If you are trimming for the first time, be careful. Do not move the Trimmer too fast. Make smooth and gentle movements.
Trimming with the Comb
- Be certain Trimmer is in the OFF position.
- Slide the comb into the guiding grooves on both sides of the Trimmer. You will hear a 'click'.
![]()
- Turn the Zoom Wheel to the desired trimming length setting. The setting selected is shown on the front of the appliance.
![]()


- You can select a length from 1/64 in/0.4mm to 9/32 in/7mm.
- If you are trimming for the first time, start by using the comb at the maximum trimming length setting (9/32 in/7mm) to prevent accidentally trimming hairs too short. As you become familiar with the settings, adjust Zoom Wheel to desired trimming length. Zoom Wheel will "click" into position at each setting.
- Press the ON/OFF button to turn Trimmer ON.
![]()
- To trim in the most effective way, move the Trimmer against the direction of hair growth. Make sure the surface of the comb always stays in contact with the skin.
![]()
NOTE: Since all hairs do not grow in the same direction, you may want to try different trimming positions (i.e., upwards, downwards, or across). Practice is best for optimum results. - If cut hairs have accumulated in the comb, turn Trimmer off, remove the comb and blow and/or shake the hair out of the comb. The selected trimming length setting will not change when you do this.


Trimming Without a Comb
Remove comb if you are:
- Be certain Trimmer is in the OFF position.
- Remove the comb by pulling it off the Trimmer.
![]()

Never pull at the flexible top of the comb. Always pull at the sides.
- Press the ON/OFF button to turn Trimmer ON.
- Make well-controlled movements. Touch the hair lightly with the Trimmer.
TIP: For a comfortable trim close to your skin, place the flat side of the trimming head against your skin and make strokes in the desired direction.

For contouring, hold the Trimmer perpendicular to the skin and move the Trimmer up or down with gentle pressure.

Hair Clipping
- For best results, use the appliance on clean, dry hair.
- Do not use on freshly washed hair.
- Before beginning, comb the hair in the direction of hair growth.
- To achieve optimal clippng results, always move the appliance slowly through the hair against the direction of hair growth.
- Be certain Trimmer is in the OFF position.
- Slide one of the hair combs into the guiding grooves on both sides of the Trimmer. You will hear a 'click'.
![]()
- Turn the Zoom Wheel to the desired hair length setting. The setting selected is shown on the front of the appliance.

- Short Hair Comb: select a length from the red indications at the top, ranging from 1/64 – 9/32 in./0.4mm – 7mm.
![]()
- Long Hair Comb: select a length from the silver indications at the top, ranging from 9/32 – 1/2 in./7 – 13mm.
![]()


- If clipping for the first time, start by using the comb at the maximum length setting to prevent accidently clipping hair too short.
- Press the On/Off button to turn Trimmer ON.
- Move the appliance slowly through the hair making sure the surface of the comb stays in contact with the skin.
![]()
- If cut hairs have accumulated in the comb, turn Trimmer off, remove comb and blow and/or shake the hair out of the comb.

TIP: Write down the settings you have used to create a certain hairstyle as a reminder for future clipping sessions.
Cleaning
- Clean the Trimmer after each use.
- Always switch Trimmer OFF, unplug and remove power supply cord from Trimmer before cleaning.
- Do not use abrasive cleaning agents, scourers, compressed air or aggressive liquids such as alcohol, gasoline or acetone to clean the Trimmer and attachments.
- Never dry the Trimmer with a towel or tissue as this may damage the trimming teeth.
- Never clean, replace or remove Trimmer combs with motor ON.
- Do not apply pressure to cutters.
- Do not touch cutters with hard objects as this may damage them.
- Use a soft, dry cloth to clean Trimmer handle.
During Use
After Each Use
- Make sure the Trimmer is switched OFF. Disconnect Trimmer from the electrical outlet.
- Remove the comb and rinse under warm tap water or clean with the supplied brush.
![]()
- Clean the trimming head under warm tap water or use the brush supplied.
![]()
- Carefully shake off excess water and allow trimming head and comb air dry thoroughly.


NOTE: The Trimmer does not need any lubrication (oil).
Cleaning Trimming Head Connector
- Make sure the Trimmer is switched OFF. Disconnect Trimmer from the electrical outlet.
- Remove the comb.
- Pull trimming head off of the Trimmer.
![]()
- Clean trimming head connector and hair chamber under warm tap water or with the supplied brush.
![]()
- Clean inside of trimming head under warm tap water or with the supplied brush.
![]()
- Carefully shake off excess water and allow both parts to air dry thoroughly.
- Press trimming head back on Trimmer making sure the projection on the back of the trimming head fits exactly onto the notch in the hair chamber.
![]()


This Trimmer has no other user-serviceable parts. For assistance call 1-800-243-3050.
Assistance
For assistance, visit our website:
www.philips.com/support or call toll free 1-800-243-3050
Online information is available 24 hours a day, 7 days a week.
Storage
- Be sure Trimmer is turned OFF. Remove cord from outlet and Trimmer before storing in a safe, dry location where it will not be crushed, banged, or subject to damage.
- Do not wrap cord around Trimmer when storing.
- Store cord in a safe location where it will not be cut or damaged.
- Do not place or store Trimmer where it can fall or be pulled into a tub or sink, water or other liquid.

Documents / Resources
References
Download manual
Here you can download full pdf version of manual, it may contain additional safety instructions, warranty information, FCC rules, etc.
Thank you! Your question has been received!


Need Assistance?
Do you have a question about the NORELCO BT5210 that isn't answered in the manual? Leave your question here.