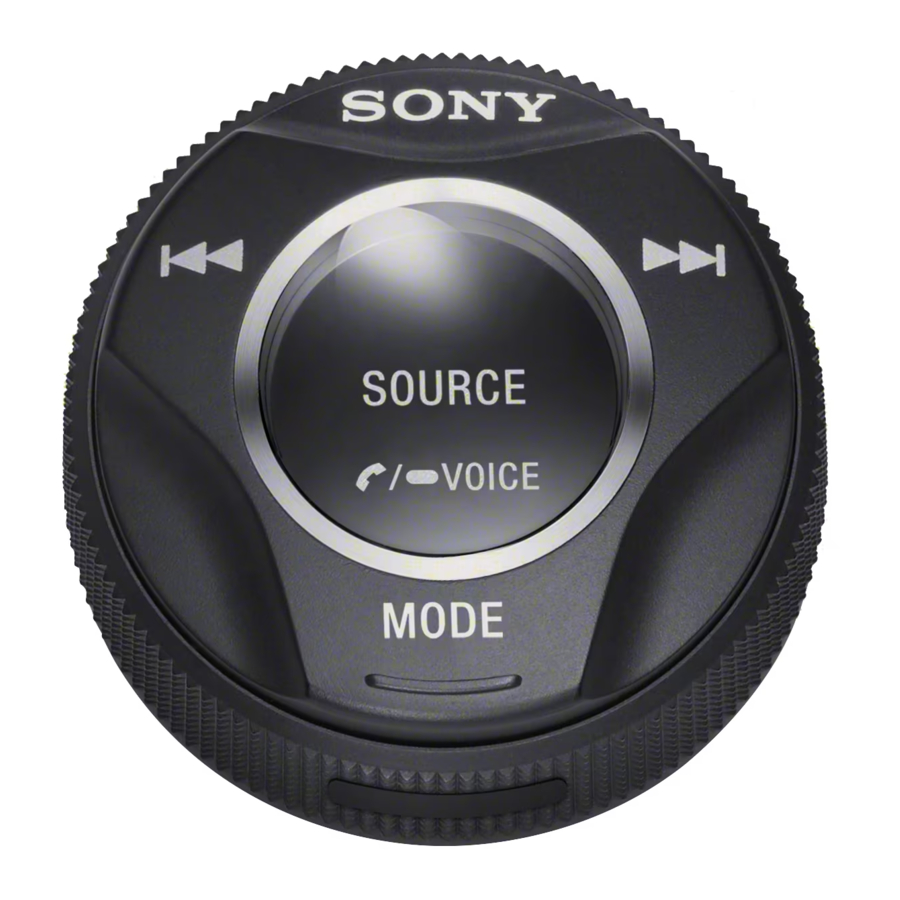
Guide to Parts and Controls
The buttons on the remote commander have the same function as buttons on the head unit. For details, refer to the operating instructions supplied with the head unit.

![]() /
/ ![]() (seek –/+)
(seek –/+)
Switching the mode may be required depending on the head unit. For details, see "About Mode 1 and Mode 2."- SOURCE/
![]() (call)/
(call)/ ![]() VOICE
VOICE
The following operations are available depending on the head unit.- When making a call:
- When receiving a call:
- When talking:
- When making a call:
- MODE (mode/enter)
Depending on the head unit, this button can enter the selected item when selecting the source. - Emitter of infrared rays
- Volume +/–
- Holder release button
- Holder
About Mode 1 and Mode 2
This remote commander corresponds to 2 modes, [Mode 1] and [Mode 2]. The default setting is [Mode 1]. If the seek function does not work when pressing and holding  /
/ , switch the mode as follows:
- While pressing SOURCE, press
![]() ,
, ![]() , and MODE in that order, then press and hold
, and MODE in that order, then press and hold ![]() for 2 seconds. The mode is switched to [Mode 2].
for 2 seconds. The mode is switched to [Mode 2]. - Be sure to reverse/forward a track properly when pressing
![]() /
/![]() .
.
To return the mode to [Mode 1], operate as follows:
- While pressing SOURCE, press
![]() ,
, ![]() , and MODE in that order, then press and hold
, and MODE in that order, then press and hold ![]() for 2 seconds.
for 2 seconds.
Installation
Installing the lithium battery
- Open the cover on the bottom of remote commander with a coin, etc.
![]()
- Install the supplied lithium battery to the remote commander.
![SONY - RM-X8S - Installing the lithium battery Installing the lithium battery]()
To replace the lithium battery
Under normal conditions, the battery will last approximately 1 year. (The service life may be shorter, depending on the conditions of use.)
When the battery becomes weak, the range of the remote commander becomes shorter.
Danger of explosion if battery is incorrectly replaced. Replaced only with the same or equivalent type.
Notes on the lithium battery
Installing the remote commander
Before installing
- Make sure that the angle of slant at the holder or the direction of remote commander is suitable for the installation site. There are 4 grooves on the remote commander and 2 hooks on the holder, and depending on the situation, you can install the remote commander four different ways.
![SONY - RM-X8S - Before installing the remote commander Before installing the remote commander]()
Note
Be careful to do not damage cables and other items in the car when making a hole on the car or tightening the screw.
- Make a hole with a diameter of 2 mm on the installation site of your car.
- Peel the tape on the bottom of the holder and attach it on the installation site.
Fix the hole of the holder on the hole of the car.
![SONY - RM-X8S - Installing the remote commander - Step 1 Installing the remote commander - Step 1]()
- Install the supplied screw to the hole of the holder and secure it to the installation site.
![SONY - RM-X8S - Installing the remote commander - Step 2 Installing the remote commander - Step 2]()
- Set the remote commander with the lithium battery to the holder.
Insert the groove of the remote commander in the hook of the holder, and push the remote commander until it clicks.
![SONY - RM-X8S - Installing the remote commander - Step 3 Installing the remote commander - Step 3]()
To remove the remote commander
- Pull the remote commander while pressing holder release buttons on both sides of the holder at the same to remove from the holder.
![SONY - RM-X8S - Remove the remote commander Remove the remote commander]()
Specifications
| Dimensions | Approx. ø 54 mm × 34 mm (ø 2 1/4 in × 1 3/8 in) |
| Mass | Approx. 42 g (2 oz) |
| Package contents | Remote commander (1) CR2032 lithium battery (1) Parts for installation and connections (1 set) |
Design and specifications are subject to change without notice.
Troubleshooting
The following checklist will help you remedy problems you may encounter with your remote commander.
Before going through the checklist below, check the connection and operating procedures.
If the problem is not solved, visit the support site.
The head unit does not work.
©2017 Sony Corporation
Printed in China
http://www.sony.net/

Documents / Resources
References
Download manual
Here you can download full pdf version of manual, it may contain additional safety instructions, warranty information, FCC rules, etc.
 (call)/
  VOICE
VOICE


