
Related Manuals for 3TEMP Hipster 1GRP


Summary of Contents for 3TEMP Hipster 1GRP
- Page 1 Rev.100319-02-v1 Hipster 1GRP/2GRP UC User manual Hipster 1GRP 300303 Hioster 2GRP 300304 Made in Sweden...
- Page 2 Rev.100319-02-v1 Hipster 1GRP/2GRPUC...
-
Page 3: Preface
The fresh water system and the recipe parameters makes a huge impact on the taste and a tiny impact on the environment as it consumes barely 7 watts when not brewing. We hope that you will enjoy your new Hipster brewer. With best wishes Copyright 2019 All rights reserved 3TEMP/PLAE2TECH Hipster 1GRP/2GRPUC... - Page 4 Rev.100319-02-v1 Hipster 1GRP/2GRPUC...
-
Page 5: Table Of Contents
4. Product Description Hipster Brewer ......10 4.1 Description ..................10 4.2 The life cycle of The Hipster taste-profiling ....11 5. Technical data ................12 5.1 HIPSTER 1GRP UC ................12 5.2 HIPSTER 2GRP UC ................13 5.3 Wiring diagram HeatCase ............14 6. Unpacking................15 7. -
Page 6: Safety Information
Do not use this appliance for anything other than intended use. Any maintenance other than cleaning should be performed by authorised person. Do not install the machine in environments in which the temperature is 0 C or less. Do not use outdoors. Hipster 1GRP/2GRPUC... -
Page 7: Capacity Of The Machine
We reserve the right for any errors in text or images and any nec- essary changes made to technical data. In the event of technical problems or any questions. Please contact our [email protected] The appliance is only to be installed in locations where it can be overseen by trained personnel. - Page 8 Only use original spare parts. The use of spare parts not approved by the manufacturer could lead to fires, electric shocks or personal injury. Do not place on top of any other appliance. Appliance must not be cleaned by a water jet. Hipster 1GRP/2GRPUC...
-
Page 9: Disposal
Danger! Do not immerse power cord, power plug for appliance in water or any other liquid. Do not clean any of the parts or accessories in the dishwasher. Accept dish try. Important to clean the product propertly. Important! Ensure that you have removed all parts and accessories before discarding the packaging. Hipster 1GRP/2GRPUC... -
Page 10: Product Description Hipster Brewer
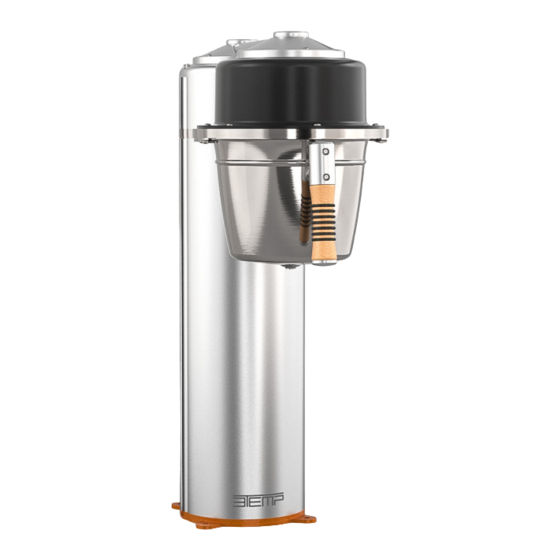
Rev.100319-02-v1 4. Product Description Hipster Brewer 4.1 Description Brewer hat Brew basket Button controller Thermos 3,8 l Thermos 2,5 l Level tube Coffee tap Hipster 1GRP/2GRPUC... -
Page 11: The Life Cycle Of The Hipster Taste-Profiling
Rev.100319-02-v1 4.2 The life cycle of The Hipster taste-profiling Pre-brew phase End phase Target ”Regular” brewer Time + Blooming Pre-brew phase End phase End phase Hipster 1GRP/2GRPUC... -
Page 12: Technical Data
Rev.100319-02-v1 5. Technical data 5.1 HIPSTER 1GRP UC Including touch controller, router, cupstand and single brew. The machine is installed onto the counter and the water units fits under the counter. Capacity: 1x3,8 lit 200 cups/h. Dimensions: W220mm/D435mm/H585mm. Weight: 10 + 6 kg. -
Page 13: Hipster 2Grp Uc
10 + 6 kg. Max power hot: 230V 1x2400W. + 230V 1x2400W Max power cold: 2x38W. Max power idle: 19,2 W. HeatCase mounted in Base cabinet 181.5 Vent Power Inlet Water outlet HeatCase 1 HeatCase 2 Water inlet Hipster 1GRP/2GRPUC... -
Page 14: Wiring Diagram Heatcase
Rev.100319-02-v1 5.3 Wiring diagram HeatCase 220 - 240 VAC 2400W (2GRP has two units) Hipster 1GRP/2GRPUC... -
Page 15: Unpacking
6. Unpacking Main Unit Hipster UC Router Brew basket stainless Brew filter wire insert Single brew filter wire insert Coffee filter 1x 25. 110/330 Inlet hose Button controller Button controller panel with two straps and two M4 socket screws Hipster 1GRP/2GRPUC... -
Page 16: Installation Instructions
Important ! Templet is an extra material in this manual. original size. Hipster UC Template for drilling main body 50mm Example Caution! Make sure the brewer is in level, or it will not extract evenly in the filter-basket. Use a spirit-level. Hipster 1GRP/2GRPUC... -
Page 17: Installation Button Controller 1 And 2Grp Uc
Straps Button controller panel Button controller 7.3 Installation Heat Case Fasten the Hot water hose to the Hot water out connector. Connect the hoses and the cords in to the HeatCase. Hot water hose Button Controller Hat Valve Hipster 1GRP/2GRPUC... -
Page 18: Connect The Water Filter System
Fasten the cords from below Power inlet Warning! Close the lid properly in front of the connections. Tighten the screw in the middle; if not, the warranty will expire. 7.4 Connect the water filter system. Note! See manual with the filter set. Hipster 1GRP/2GRPUC... -
Page 19: Connect The Network-Cable (Rj45) White Cable
Red fast blink grams of coffee Note! For 3TEMP to be able to support you in the best possible way, please connect your Hipster to the internet via LAN, WLAN or GSM. Use tethering on the router and connect to your existing Wi-Fi. -
Page 20: User Instructions
Place the thermos under the brewer hat. Add filter to the brew basket. Add coffee into the filter. Note! Make sure the coffee is spread Note! Make sure the filter fits correct. evenly and the surface is flat. Use 3TEMP coffee filter paper. Hipster 1GRP/2GRPUC... -
Page 21: Select Recipe
Rev.100319-02-v1 Reinstall the brew basket. Ready to brew. 8.2 Select Recipe Press and select a recipe. Adjust grams or milliliter. HIPSTER HIPSTER recipe start/stop recipe start/stop grams of coffee grams of coffee setup setup thermos thermos Hipster 1GRP/2GRPUC... - Page 22 Brewing is in progres a blue lamp is When the brew is finished, the indicator blinking. light turns green and a beep is heard. HIPSTER HIPSTER recipe start/stop recipe start/stop grams of coffee grams of coffee thermos setup thermos setup Hipster 1GRP/2GRPUC...
-
Page 23: Thermos Detachable Serving Base
Rev.100319-02-v1 8.3 Thermos detachable serving base Place the thermos and place it on Place the cup on the white spot. the detachable serving base. Click! Press for coffee. Press Warning! Hot coffee. Hipster 1GRP/2GRPUC... -
Page 24: Recipe Settings With Button Controller
(Disabled recipe is still in the machine but does not show when pushing “Recipe 1-8” in normal mode). Button 3: Step Down/Back/Previous item (-) in every menu. Button 4: Step Up/Forward/Next item (+) in every menu. Button 5: Previous menu/Back/Cancel Button 6: Next Menu/OK Hipster 1GRP/2GRPUC... - Page 25 . Repeat step 6 and 7 until “Confirm Save” appears. Confirm by pressing . Menu is now back in “Edit recipe”. Select another slot by using repeating steps 2-9 or leave “Programming mode” by pressing Note! Button always moves back to previous selection. Hipster 1GRP/2GRPUC...
- Page 26 Enabled/Disabled status of slot. 3. Press to enter “Confirm Enable/Disable”. 4. Press to confirm Enable/Disable slot. Note! Button always moves back to previous selection. HIPSTER recipe start/stop grams of coffee thermos setup Hipster 1GRP/2GRPUC...
-
Page 27: Care And Maintenance After Use
Use a soft cloth to clean the drip tray. Important! Keep the coffee machine clean. Caution! Do not use liquids other than water. Danger! Appliance must not be cleaned by a water jet. Hipster 1GRP/2GRPUC... -
Page 28: Cleaning Thermos
10.2 Cleaning thermos Remove the brew basket from Clear any object free from the brew basket. the brewer hat. Make sure the thermos is empty. Cleaning Tablet (Part Nr :100204) Protect your eyes. Caution! Warning! Keep away from children. Hipster 1GRP/2GRPUC... - Page 29 Rev.100319-02-v1 Reinstall the brew basket and the thermos. Choose suitable recipe. 3TEMP recommend 2,5 lit. HIPSTER recipe start/stop grams of coffee thermos setup Press Start. Wait for the brew process to finish; Press STOP to interrupt the brewing process. HIPSTER...
- Page 30 1 -2 hour in the thermos. Warning! Hot water Protect your eyes. Clean it with a dish brush. Rinse out several times! Caution! Make sure that No cleaning fluid is left in the thermos. Rinse out properly. Hipster 1GRP/2GRPUC...
-
Page 31: Cleaning Water Strainer
Protect your eyes. Clean water strainer using the dissolved Reassemble shower screen. cleaning solution prepared in step 1. Caution! Tighten all screws evenly and make sure water strainer is in level. Do not overtighten. You could damage the water strainer. Hipster 1GRP/2GRPUC... -
Page 32: Single Brew
A. At the upper bracket. B. At the base of the Hipster UC e base of the Hipster UC by using a bolt. by using a bolt. Start a recipe for single brew. Note! To set a recipe see page 24. Hipster 1GRP/2GRPUC... -
Page 33: Spare Parts
Water filter installation kit typ 1 500243 typ 2. 500249 Wire insert 500913 Wire insert for single brew 500953 Wi-fi router and tablet 600919 230 3G 600920 UK 4G 600920 240 4G 600920 US 4G Non-return valve 550038 Hipster 1GRP/2GRPUC... -
Page 34: Extra Additions
Since there is no boiler with preheated water you can also brew with the cold water that comes into the brewer from your water mains. Your new Hipster is pre-loaded with 30 free cold brews for you to test. To order the cold brew function; contact [email protected]. Hipster 1GRP/2GRPUC... -
Page 35: Declaration Of Conformity
Manufacturer: PLAE2TECH AB Brand: 3TEMP Equipment Type: Professional Coffee Brewers for institutional catering Object of declaration: Hipster series: Hipster 1GRP, Hipster 1GRP UC, Hipster PULS, Hipster KOBRA Product Name: Hipster HIPSTER 1GRP/2GRP Category: Specialty Coffee Recipe Brewer/Profile Brewer. Safety; Standards to which Conformity is Declared:... -
Page 36: Warranty
This warranty covers faults occurring during the warranty period, which have been notified to the reseller or verified by 3TEMP (warrantor) or a representative of the warrantor, and which concern design, manufacturing or material defects and consequential damages occurring on the product itself. -
Page 37: Notes
Rev.100319-02-v1 16. Notes Hipster 1GRP/2GRPUC... - Page 38 Rev.100319-02-v1 Hipster 1GRP/2GRPUC...
- Page 39 Rev.100319-02-v1 3TEMP can not accept any responsibility for possible errors in catalogues, broschures and other printed material provided that such alterations can be made without sub sequential changes being necessary in specifications 3TEMP. All rights reserved 2019. Hipster 1GRP/2GRPUC...
- Page 40 Rev.100319-02-v1 ‘‘The details create the big picture’’ Web: 3temp.com Mail: 3TEMP Verkstadsgatan 21 671 34 Arvika Email: [email protected] Hipster 1GRP/2GRPUC...