
Related Manuals for Dell EGW-3200


Summary of Contents for Dell EGW-3200
- Page 1 Dell EMC Edge Gateway 3200 Software User's Guide Regulatory Model: EGW-3200 Regulatory Type: EGW-3200-NA August 2022 Rev. A00...
- Page 2 A WARNING indicates a potential for property damage, personal injury, or death. © 2022 Dell Inc. or its subsidiaries. All rights reserved. Dell Technologies, Dell, and other trademarks are trademarks of Dell Inc. or its subsidiaries. Other trademarks may be trademarks of their respective owners.
-
Page 3: Table Of Contents
Contents Chapter 1: Introduction......................... 6 Chapter 2: Setting Up the Windows 10 Operating System............. 8 Boot up and log in................................8 Factory reset..................................9 System restore and backup recovery..........................9 Create a recovery drive..............................9 Create a system image..............................9 Recover from system image............................11 Security Baseline settings.............................. - Page 4 EApiBoardGetValue..............................33 int EApiBoardGetValue (int parameter)......................... 33 EApiUnInitialize................................33 Humidity and temperature sensor setup........................33 Build the sample application............................33 Create the MSIX package............................36 Import the certificate..............................38 Install the application..............................41 Run the temperature sensor application........................43 Pressure sensor setup..............................44 Run the pressure sensor application........................44 Accelerometer sensor setup............................45 Run the accelerometer sensor application......................
- Page 5 Connect to the serial port............................78 Connect to the Canbus.............................. 79 Mount USB storage..............................79 Configure watchdog..............................80 Configure GPIO................................81 TPM tasks..................................82 Wake events................................. 84 Isolated Canbus uFM expansion module........................85 EMP2-X2S1 card with isolated RS-232 uFM expansion module................86 EMP2-X4S2 card with isolated RS-422/485 uFM expansion module..............
-
Page 6: Chapter 1: Introduction
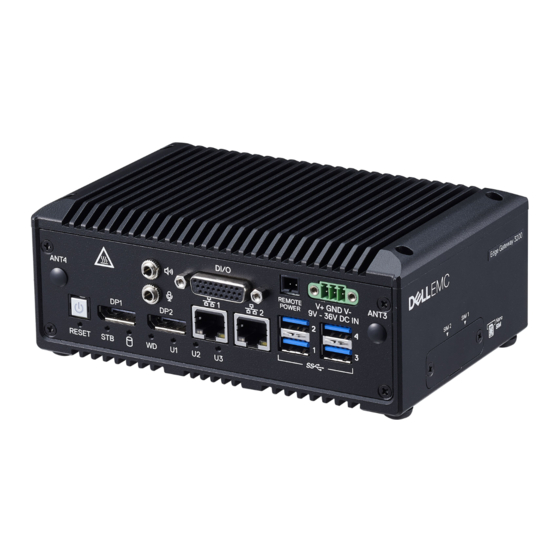
Introduction The Dell EMC Edge Gateway 3200 supports Windows 10 IoT Enterprise 2019 and Ubuntu 20.04 LTS. The setup procedures for each of these operating systems are detailed in the following chapters. Figure 1. System block diagram The following table defines the acronyms and abbreviations used throughout this document. - Page 7 Table 1. Acronyms and abbreviations (continued) Acronym or abbreviation Definition Peripheral Component Interconnect Universal Serial Bus WatchDog Timer Introduction...
-
Page 8: Chapter 2: Setting Up The Windows 10 Operating System
Setting Up the Windows 10 Operating System This chapter serves as a guide to install and use the Windows 10 IoT Enterprise 2019 operating system on the EGW-3200 hardware. For more information on the Windows 10 operating system, see https://support.microsoft.com. -
Page 9: Factory Reset
About this task Users can perform a factory reset of the Windows 10 IoT Enterprise 2019 LTSC on the EGW-3200 using the recovery operating system image on the boot partition. This resets the run-time image back to the standard Windows system, which does not contain any ODM-installed drivers. - Page 10 Figure 2. Create a system image 3. Windows looks for a backup destination on a hard drive, DVD, or network location. Choose an appropriate destination. Click Next. NOTE: In the following screenshot, a second SSD storage is used to create the backup. Figure 3.
-
Page 11: Recover From System Image
Figure 4. Confirm backup Results Windows creates the system image file. Figure 5. Backup completed successfully Recover from system image Steps 1. Connect the USB storage device that was created in Create a recovery drive on page 9. 2. Connect the hard drive or SSD that was used in Create a system image on page 9. -
Page 12: Security Baseline Settings
Security Baseline settings The security settings in the image for the EGW-3200 default to those in the standard Windows 10 IoT Enterprise release. However, it is recommended to install Microsoft-provided security policies on top of this to enhance the security features in the device. -
Page 13: System Shutdown And Restart
Table 3. I2C and GPIO names and pin mappings (continued) S No. Peripheral detail Hardware signal name Name/Number to use Comments with RHProxy GPIO Pin 6 User LED 1 GPIO Pin 7 User LED 2 GPIO Pin 8 User LED 3 I2C0 (CN43) interrupt pin GPIO Pin 9 GPIO Pin 10... -
Page 14: Optional Expansion Modules
Optional expansion modules The EGW-3200 supports several expansion modules, in mini PCI express (mPCIe), M.2, and I2C formats. The required Windows software package is already installed in the Windows image for the following modules. Refer to the website of the manufacturer for more details. -
Page 15: Cellular Network Configuration
5G module firmware update procedure Download Firmware Selector Tool and driver Steps 1. Download the Firmware Selector Tool from the EGW-3200 page of the Dell Technologies Support Site. 2. Unzip the files and open the unzipped folder. Figure 7. Firmware tool and driver file 3. -
Page 16: Remove Old And Install New Drivers
Figure 9. Firmware Selector Tool Remove old and install new drivers About this task MV31-W modules require the (20200804_V007) WIN10 driver. However, this driver must be installed after removing old USB drivers that were automatically installed by WIN10 PC. Steps 1. -
Page 17: Update 5G Firmware In Windows
Figure 11. Uninstall Cinterion devices 3. Open the driver package folder (SDX55_Thales_USB_x64_20220208_V023_WHQL_INF_Injection) and run install_Thales.cmd as administrator. Figure 12. Run driver command Update 5G firmware in Windows About this task After all the required drivers have been updated, use the Firmware Selector Tool provided by Thales DIS AIS to update the firmware. - Page 18 Figure 13. Firmware Selector Tool 2. The tool will automatically select the ATT T99W175 firmware version to update. Figure 14. Firmware to update 3. Wait for the firmware download to finish. Setting Up the Windows 10 Operating System...
- Page 19 Figure 15. Firmware download status bar 4. Once complete, the Firmware upgrade success message will appear. Click OK. Setting Up the Windows 10 Operating System...
-
Page 20: 4G Module Firmware Update Procedure
Figure 16. Firmware upgrade success 4G module firmware update procedure Steps 1. Download the firmware update tool (.exe) from the Sierra website at: https://source.sierrawireless.com/resources/ airprime/minicard/75xx/em_mc75xx-approved-fw-packages/#sthash.nOT5xBmR.a4H4BqL8.dpbs. Setting Up the Windows 10 Operating System... -
Page 21: Bmc Firmware Update Procedure
Figure 17. 4G firmware update tool 2. Right-click the .exe file and run as administrator. The firmware update runs automatically. BMC firmware update procedure Steps 1. Confirm that the Intel Serial IO - I2C and GPIO drivers are installed. If the I2C driver is not installed, there will be a yellow triangle with an exclamation point over the menu icon in System devices >... - Page 22 Figure 18. I2C controller not found If this is the case, perform the following steps: a. Download both drivers from the EGW-3200 page of the Dell Technologies Support Site. b. Install the drivers. When all the required drivers are installed, there is no yellow triangle with an exclamation point over the icon in the device manager.
- Page 23 Figure 19. Drivers installed c. When prompted, reboot the system. Figure 20. Reboot system 2. Execute ad-litbmc-fwupd.exe in command prompt to show usage of the tool. Setting Up the Windows 10 Operating System...
-
Page 24
Figure 21. Show usage 3. Update the firmware version by using the ad-litbmc-fwupd.exe -u
command. After the update, a message shows that it is mandatory to reboot the system for changes to take affect. The tool also prints this message. Figure 22. -
Page 25: Accessing And Updating The Bios
In addition, the BIOS also contains codes for various advanced features applied to the EGW-3200. The BIOS setup program includes menus for configuring settings and enabling features of the EGW-3200. Most users do not need to use the BIOS setup program, as the EGW-3200 ships with default settings that work well for most configurations. -
Page 26: Superio Function Library
SuperIO Function Library This section describes use of the SuperIO (SIO) function library for the EGW-3200. The SIO function library includes the watchdog timer function and the hardware monitor function. The watchdog timer is a hardware mechanism provided to reset the system if the operating system or an application stalls. -
Page 27: Windows Sio Api
Windows SIO API The SIO API library files and a demo program (including source code) are part of the board support package for the EGW-3200 (BSP/Sample_App_Source/SuperIO) and can be downloaded from the Dell Technologies Support Site. SIO_WDT_Set Sets the timeout value of the watchdog timer. SIO_WDT_Stop should be called before the expiration of watchdog timer, or the system will reset. -
Page 28: Build The Sio Sample Application
3. Under the Build menu, select Build Solution. Execute the SIO sample application About this task The EGW-3200 Windows image includes pre-installed sample application binaries. Steps 1. Open the command prompt in administrator mode. Setting Up the Windows 10 Operating System... -
Page 29: Digital Input/Output Function Of The Intel Pch Controller
BIOS. For a sample program, the below Microsoft supplied source code can be used. https://github.com/microsoft/Windows-iotcore-samples/tree/develop/BusTools/GpioTestTool The EGW-3200 has six DI pins, six DO pins, and three user LEDs. For the pin details and pin numbers to be used for the sample application, refer the table in RHProxy driver - I2C and GPIO on page 12. -
Page 30: Execute The Gpio Sample Application
Use the help command for detailed usage. Digital Input/Output Function from PCA9535 GPIO Users can opt to connect a PCA9535 GPIO expander module to one of the I2C buses of the EGW-3200. PCA9535 GPIO Expander API The PCA9535 GPIO module’s API library files and a demo program (including source code) are included in the board support package for the EGW-3200. -
Page 31: Build The Pca9535 Sample Application
Negative errno if failed. DioSetLevel Sets the GPIO level for output pins. int DioSetLevel (unsigned char data, unsigned char mask) Parameters data—The new GPIO level to be set for the output pins. mask—GPIO output pins are changed only for those corresponding to the bits that are set to 1 in the mask. -
Page 32: Execute The Pca9535 Sample Application
read > Pca9535App.exe i2c 0 read 0xff Hardware monitor API The EGW-3200 has various hardware monitor features which can be retrieved by using the following function parameters. Setting Up the Windows 10 Operating System... -
Page 33: Eapilibinitialize
For details, go to https://docs.microsoft.com/en-us/uwp/api/windows.devices.sensors.custom? view=winrt-22000. About this task The HDC1010 humidity and temperature sensor is connected to I2C bus 2 of the EGW-3200. This sensor is detected as a custom sensor and follows Windows sensor framework. Build the sample application Prerequisites Visual Studio 2019 is required for this task. - Page 34 3. Select Desktop development with C++ workload. 4. Select UWP. 5. Select Individual components, and under Complier, build tools, and runtimes, make sure that the following boxes are checked: a. MSVC v142 -VS 2019 C++ x64/x86 buildtools (latest) is checked. b.
- Page 35 Figure 30. Properties - Platform Toolset 5. Select Build > Build Solution to build the project. Figure 31. Build Solution Setting Up the Windows 10 Operating System...
-
Page 36: Create The Msix Package
Create the MSIX package Steps 1. Place the Assets folder in the current directory (Path: x64/Release/ilc/in). 2. Right-click on the project and Select Publish > Create App Packages. 3. Enable Side-loading in the first page of the wizard and then click Next. 4. - Page 37 Figure 33. Certificate Trust 5. In Select and configure packages wizard, select the Architecture as x64 and Solution Configuration as Release (x64) and click Next. 6. Provide the path for the Installer location (where the app is published) and select Create. Results The project builds and App bundle is created.
-
Page 38: Import The Certificate
Figure 34. Finished creating package Import the certificate Steps 1. Unzip the folder Sensor Applications.7z containing the MSIX bundle. 2. Locate the certificate files for this application in folder HDC1010. 3. Go to Start > Manage computer certificates. On the left pane of the certIm wizard, select Trusted People. 4. - Page 39 Figure 35. Import Certificate 5. Include the path where the certificate is located. Click Next. 6. The certificate is imported. Click Finish. Setting Up the Windows 10 Operating System...
- Page 40 Figure 36. Completing the Certificate Import Wizard 7. The imported certificate is added in the Certificates directory under Trusted People. If not, select Action > Refresh, and the certificate is added. Setting Up the Windows 10 Operating System...
-
Page 41: Install The Application
Figure 37. Certificates Install the application About this task The example referred to in the following steps is for the HDC1010 humidity sensor application. The same steps are applicable for other two sensors. Steps 1. Install the App Installer from the Microsoft store. To do this, open the POWERSHELL in ADMINISTRATOR Mode and execute the following command: Get-AppXPackage*WindowsStore* -AllUsers| Foreach {Add-AppxPackage-DisableDevelopmentMode-Register... - Page 42 Figure 38. Install prompt The application is installed and the UWP application appears. 3. Click Start. The application name appears. Figure 39. Application name in Start Menu Setting Up the Windows 10 Operating System...
-
Page 43: Run The Temperature Sensor Application
Run the temperature sensor application About this task Two events are registered for the application: DataEvents and Polling. Steps 1. Select DataEvents > Enable. Temperature and Relative Humidity values are displayed. 2. Select DataEvents > Disable and follow Step 1 to obtain the next set of readings. Figure 40. -
Page 44: Pressure Sensor Setup
For details, go to https://docs.microsoft.com/en-us/uwp/api/windows.devices.sensors.custom? view=winrt-22000. About this task The DPS310 pressure sensor is connected to I2C bus 2 of the EGW-3200. This sensor is detected as a barometer sensor and follows Windows sensor framework. See the Humidity and temperature sensor setup on page 33 section for the following tasks: ●... -
Page 45: Accelerometer Sensor Setup
For details, go to https://docs.microsoft.com/en-us/uwp/api/windows.devices.sensors.custom? view=winrt-22000. About this task The ADXL345 accelerometer sensor is connected to I2C bus 2 of the EGW-3200. This sensor is detected as a accelerometer sensor and follows Windows sensor framework. See the Humidity and temperature sensor setup on page 33 section for the following tasks: ●... - Page 46 Figure 44. Choose accelerometer 2. Data Events: Click Enable. The corresponding x, y, and z values are displayed as you change the position of the sensor. Figure 45. Data Events 3. Polling: Click Enable. Acceleration values at a particular time interval are displayed. Setting Up the Windows 10 Operating System...
-
Page 47: Intel Oob
Figure 46. Polling 4. OrientationChanged: Click Enable to display the accelerometer readings with and without the transformation. Figure 47. OrientationChanged Intel OOB Out-of-Band (OOB) is the service that is performed if the processor platform runs on the ARM Cortex-M7 processor that is independent of the system’s main CPU complex and host OS. -
Page 48: Perform Changes In The Bios
NOTE: We have used Ubuntu version 20.04 LTS. Target setup The Dell EMC Edge Gateway 3200 with the Elkhart Lake Platform and with Windows 10 Enterprise LTSC 2019 installed. Perform changes in the BIOS Steps 1. At the BIOS menu, select Chipset > PCH-IO Configuration > PSE Configuration > OOB [Enabled]. - Page 49 Set up Azure IoT Central for device management About this task Intel provides the connectivity reference implementation for the Microsoft Azure device management solution. Steps 1. Create an Azure account and an Azure IoT Central application for the device to connect to its intended portal customers. Refer to the instructions on the Azure website to create an Azure account.
- Page 50 Figure 50. Create a new device 5. Copy the connectivity credentials for the device to connect back to the portal. Copy the connection credentials by clicking the Connect button. The following screen appears. Setting Up the Windows 10 Operating System...
- Page 51 Figure 51. Device connection 6. Keep a copy of the following data. Use these data to create credentials for the target device to connect to the portal over the MQTT protocol. Intel provides a sample script that gives the credentials by invoking the Azure IoT Hub Device Provisioning Service (DPS).
- Page 52 4. Copy all files from the pse-dev-code-base/tools/capsule_script folder to the scripts folder of the FBU tool. This ensures that you have all of the files needed to generate the MAC and OOB credentials capsules in the correct location: cp ~/intelpse/pse_sdk/code/pse-dev-code-base/tools/capsule_scripts/* ~/intelpse/fbu/ siiptool/scripts/ 5.
-
Page 53: Oob Service Provisioning
Enabled, as shown in the following figure. Figure 53. BIOS menu Activate OOB commands using Azure Prerequisites A device management cloud account is created and the EGW-3200 is successfully provisioned with the OOB credentials to connect to the cloud. Setting Up the Windows 10 Operating System... - Page 54 About this task In this task, the user sends an OOB command from the Azure IoT Central portal. Steps 1. After provisioning and connecting the device to the Azure IoT Central portal, the device status changes to provisioned. 2. Click on the device and then navigate to the following for more information: a.
- Page 55 Figure 55. Commands 4. The user can view the device events and responses under the Events View or Raw data tabs. Figure 56. Events View Setting Up the Windows 10 Operating System...
-
Page 56: Com Port And Ethernet Names For Mini Pcie Cards
Figure 57. Raw data COM Port and Ethernet Names for Mini PCIe Cards Table 6. Mini PCIe card details S.No mPCie module Isolated COM A Isolated COM B Remarks (port type) (port type) EMP2-X4S2 RS422/RS485 RS422/RS485 Total of four COM ports are detected in the Device Manager. -
Page 57: Sensor Apis
Get the Ethernet name from Control Panel > Network and Internet > Network Connections, based on the MAC address of the Ethernet ports. Sensor APIs The sensors of the EGW-3200 use Microsoft default sensor APIs. This section serves as a programming reference of the Win32 API. For more detail, see https://docs.microsoft.com/en-us/windows/win32/api/sensorsapi/. Table 7. Console application APIs for ADXL345/HDC1010/DPS310 S.No... - Page 58 Table 8. UWP application APIs for ADXL345/HDC1010/DPS310 S.No UWP application APIs Description Supported/not supported FromIdAsync Asynchronously obtains the sensor from its identifier. Supported GetCurrentReading Gets the current sensor reading. GetDefault Returns the default sensor type. GetDeviceSelector(Guid Gets the device selector. interfaceId) Table 9.
-
Page 59: Chapter 3: Setting Up The Ubuntu Operating System
Setting Up the Ubuntu Operating System This chapter serves as a guide to install and use the Ubuntu 20.04 LTS operating system on the EGW-3200 hardware. For more information on the Ubuntu 20.04 LTS operating system, see https://releases.ubuntu.com/20.04/. Topics: •... -
Page 60: Back Up And Restore Ubuntu 20.04 Lts
Back up and restore Ubuntu 20.04 LTS Steps 1. Prepare two USB sticks as follows: a. Prepare one USB stick to store the target Ubuntu image. Use the following command to back up your SSD data as an image on the USB stick: $ sudo dd if=/dev/sdx of=/meida/ubuntu// ... -
Page 61: Update Bios Capsule
Ubuntu OTA update: $ sudo apt update; sudo apt upgrade Steps 1. Download the BIOS capsule file from the Dell Technologies Support Site and save it to the USB disk. 2. Boot to Ubuntu and open the terminal. Enter the following command and press y to restart the system after update. -
Page 62: Update 4G Module Firmware
2. Download the LiteBMC firmware file from the Dell Technologies Support Site and then update. This includes a firmware (.bin) and a public key (.pem): $ sudo litebmc-fwupd -uUpdate 4G module firmware Prerequisites Download the driver and tool from the Dell Technologies... - Page 63 Figure 60. MOK management 5. Select Enroll MOK and follow the menus to finish the enrolling process. Figure 61. Enroll MOK Figure 62. Enroll MOK Continue Setting Up the Ubuntu Operating System...
-
Page 64
Figure 63. Enroll the keys 6. The MOK Management screen prompts for the password that was provided when running mokutil, and then saves the key. Once complete, reboot again. Figure 64. MOK management Reboot 7. Upgrade the firmware: $ sudo systemctl stop ModemManager $ cd SampleApps/lite-fw-download/bin $ sudo ./fwdwl-litehostx86_64 -d /dev/ttyUSB0 -p /dev/cdc-wdm0 -f
... -
Page 65: Update 5G Module Firmware
$ at!band? Confirm the disabled bands: Update 5G module firmware Steps 1. Firmware update: a. Download the mbimcli tool and firmware file from the Dell Technologies Support Site: $ sudo systemctl stop ModemManager $ tar Jxvf mbimcli.tar.xz $ cd mbimcli $ sudo ./mbimcli -d /dev/cdc-wdm0 --qdu-ota-update=ota.bin... - Page 66 a. Run the following command: $ sudo apt install minicom $ sudo minicom -D /dev/ttyUSB0 b. Check the profile list: $ at^mcfg=? c. Select your target, then the modem will auto reset. For example, select T-mobile. $ at^mcfg=0 $ at^mcfg? 3.
-
Page 67: Ubuntu 20.04 Lts Basic Functions
Ubuntu 20.04 LTS basic functions System shutdown and restart Steps 1. Shutdown command: $ sudo shutdown -h now 2. Reboot command: $ sudo shutdown -r now Ubuntu OTA update About this task OTA update command: $ sudo apt update $ sudo apt upgrade List installed packages About this task List installed packages command:... -
Page 68: Root User Credential
Root user credential About this task Root user credential command: $ sudo su - Create new user About this task Add user command: $ sudo adduserSelect language Steps 1. Use the following command to select your preferred language, then select . $ sudo dpkg-reconfigure locales Figure 65. -
Page 69: Display
The humidity and pressure sensors require a kernel version 5.13.0-1011-intel or later. NOTE: The accelerometer sensor requires a kernel version 5.13.0-1014-intel or later. NOTE: The x.x.x-10xx-intel kernel is only for the Ubuntu-specific version released by Dell. Setting Up the Ubuntu Operating System... - Page 70 Steps 1. To upgrade the kernel, use the following command: $ sudo apt update $ sudo apt upgrade $ reboot 2. After rebooting, use the following command to confirm the kernel version: $ uname -r 3. Use libiio-utils to fetch sensor data: $ sudo apt install libiio-utils 4.
-
Page 71: Configure Ethernet
Figure 70. Humidity sensor example Configure Ethernet Steps 1. The Ethernet cards function in DHCP client mode by default. Use the $ip addr command to confirm. NOTE: The Ethernet card names for port1, port2, and port3 are enp3s0, enp0s29f1, and enp0s29f2, respectively. 2. -
Page 72: Configure The Wifi Network
NOTE: The Ubuntu Linux LED behavior requires a kernel version 5.13.0-1014-intel or later. NOTE: The x.x.x-10xx-intel kernel is only for the Ubuntu-specific version released by Dell. Configure the WiFi network About this task Use the following commands to connect an AP using a WiFi interface (wlp2s0). -
Page 73: Configure Bluetooth
2. Create a connection to the target SSID. If the AP requires a password, add a password parameter: $ sudo nmcli dev wifi connect$ sudo nmcli dev wifi connect password " " 3. To disconnect from the target SSID: $ sudo nmcli con down ... -
Page 74: Connect 4G Or 5G Wwan
4. Trust target device by MAC address: $ trust5. Pair with target device by MAC address: $ pair 6. Connect target device by MAC address: $ connect 7. Disconnect target device by MAC address: $ disconnect 8. -
Page 75: Access Gps
● The CONNECTION NAME is assigned by the user. ● The APN NAME must be provided by your USIM card ISP owner. If the Telecom provider is emome: $ sudo nmcli c add type gsm ifname cdc-wdm0 con-name cdc-wdm0 apn emome 4. -
Page 76: Remote Login
The SSH server runs by default on port 22. Use your PC/NB to open a SSH connection (using terminal tools such as PuTTY or MobaXterm) to the EGW-3200. The PC/NB and EGW-3200 share a network connection under a local network. - Page 77 Figure 75. $ sudo lshw 2. Confirm that the target disk is not frozen. To check: $ sudo hdparm -I /dev/sdx Figure 76. Example: target disk is frozen If the target disk is frozen, a. Use the following commands to enter the system into standby mode: $ sudo su - $ echo -n mem >...
-
Page 78: Connect To The Serial Port
4. Run the security-erase command with the password: $ sudo hdparm --user-master u --security-erase/dev/sdx Figure 79. Security erase Results When the security-erase is finished, all data on the /dev/sdx disk is swiped (0x00). Connect to the serial port Steps 1. -
Page 79: Connect To The Canbus
Connect to the Canbus Steps 1. Install the tool: $ sudo apt install can-utils 2. Enable the Canbus interfaces: $ sudo ip link set can0 type can bitrate 500000 $ sudo ip link set up can0 $ sudo ip link set can1 type can bitrate 500000 3. -
Page 80: Configure Watchdog
3. Mount storage on /tmp/storage: $ sudo mount /dev/sdb1 /tmp/storage $ sudo umount /tmp/storage Figure 81. Mount USB storage Configure watchdog Steps 1. Install watchdog service: $ sudo apt update $ sudo apt install watchdog 2. Edit /etc/default/watchdog: $ sudo vim /etc/default/watchdog Edit watchdog_module parameter as below: #load module before starting watchdog watchdog_module="w83627hf_wdt"... -
Page 81: Configure Gpio
The system hangs and watchdog reboots the system after 20 seconds (if watchdog-timeout = 20). Configure GPIO About this task The EGW-3200 is equipped with six Digital in and six Digital out. To access the registers to read and write to them, perform the following steps. Steps 1. -
Page 82: Tpm Tasks
3. Check the GPIO direction and value using the following commands: $ cat /sys/class/gpio/gpio369/direction $ cat /sys/class/gpio/gpio369/value 4. Set the GPIO value using the following command: $ echo {0 or 1} > /sys/class/gpio/gpio369/value Figure 86. Set GPIO value Results The low level triggers the USER_LEDs. When the value is 0, the USER_LED is illuminated, as shown in the following figure. Figure 87. -
Page 83
Get hash by TPM About this task Use the following command: sudo tpm2_hash -g
-o -
Page 84: Wake Events
Wake events Trigger Ubuntu OS to enter S3 status Steps 1. Use the following command: $ sudo su 2. Use the following command: $ echo mem > /sys/power/state 3. Use a USB keyboard to enter any key to wake up the Ubuntu OS. NOTE: Use a physical keyboafd to wake up the system. -
Page 85: Isolated Canbus Ufm Expansion Module
2. If WoWLAN is disabled, use the following command to enable it: $ sudo iw phy0 wowlan enable magic-packet 3. Use the ifconfig command to make sure your WiFi card (wlp6s0) is connected on a SSID to get an IP address. Record the IP and WiFi MAC address. -
Page 86: Emp2-X2S1 Card With Isolated Rs-232 Ufm Expansion Module
Table 14. Setup.ini settings Parameter Settings Log file Log.txt is used for saving the test result. 5. Before starting the test, prepare a special port cable that can jump each pin. Connect cable-A and cable-B as below: Cable-A-pin2 and cable-B-pin2 are connected using a cable. Cable-A-pin7 and cable-B-pin7 are connected using a cable. -
Page 87: Emp2-X4S2 Card With Isolated Rs-422/485 Ufm Expansion Module
RX– TX– D– Steps 1. Download the latest driver (EMP2-X4S2_Linux_driver_.zip) from the Dell Technologies Support Site. Unzip the file and copy the driver package on your platform with the Ubuntu environment. 2. Use the following cd commands in the driver directory. - Page 88 b. Use the menus to finish the enrolling process. c. Use the same password used when running mokutil. d. Save the key. e. Reboot again. 5. For RS-422, use RS-422 cables with the EMP2-X4S2 card. For the RS-422 port-to-port test, connect the RS-422-A and RS-422-B as detailed in the following: ●...