Quick Links
Wired Controller
Operation & Installation Manual
YR-E17A
CONTENT
Parts and Functions............................................................ 1
Operation ............................................................................ 6
Wired Controller Wiring Instruction ................................... 34
Ver: B
• Please read this operation manual before using the wired controller.
• Please keep this manual carefully and safely.

Related Manuals for Haier YR-E17A


Summary of Contents for Haier YR-E17A
- Page 1 Wired Controller Operation & Installation Manual YR-E17A CONTENT Parts and Functions............1 Operation ................6 Wired Controller Wiring Instruction ........34 Ver: B • Please read this operation manual before using the wired controller. • Please keep this manual carefully and safely.
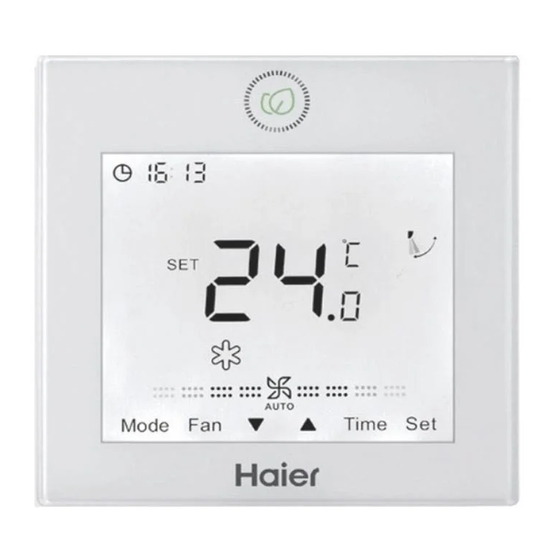
- Page 2 Parts and Functions Interface Display...
- Page 3 Parts and Functions On/Off key. Mode key: Press this key to execute mode switch. Fan key: Press this key to adjust fan speed. Up/Down key: Press this key to adjust temperature in the main Interface and other parameter value in other interface. And the key is also used for function switching.
- Page 4 Parts and Functions ROOM/SET humidity display Error icon Four-sided air deflector display ( Only valid for part of models) Up/Down Swing Left/Right Swing (Only valid for part of models) Set icon Auto mode Cooling mode Heating mode Fan mode Dry mode Turbo: This icon will be displayed only when turbo function is set. Quiet: This icon will be displayed only when quiet function is set.
- Page 5 Parts and Functions Sleeping: This icon is displayed when sleeping is set, and remaining time of sleeping is displayed by Health : This icon will be displayed only when health function is set. HRV (Heat Reclaim Ventilation): This icon will be displayed only when HRV function is set. Energy Saving: This icon will be displayed only when energy saving function is set Static Pressure: This icon will be displayed only...
- Page 6 Parts and Functions (1) fan speed( only valid for part models) Breeze Fan Speed Low Fan Speed Medium Fan Speed High Fan Speed Super Fan Speed Auto Fan Speed (2) fan speed( only valid for part models) Seven gear Sixth gear Fifth gear Fourth gear Third gear Second gear First gear Auto...
- Page 7 Operation Basic function description Basic function Method of operation Press the key to switch on/off the ON/OFF wired controller. In the state of on, press the key Mode control MODE to change mode. In the state of on, press the key Adjusting temperature to adjust temperature.
- Page 8 Operation Initialization (1) The wired controller will display all the icons after be powered on or reset, then it gets into the initializing process. The controller will display in sequence as follows : (the top-left corner) → → (the bottom-right corner) → (the top-left corner), the green LED (ON/OFF key) flashes all the time until the initialization ends. (2) If the wired controller can’t communicate with the indoor unit PCB normally after powering on, the initialization will be finished in 4 minutes, and then the communication malfunction ...
- Page 9 Operation Note: When controlling Fresh Air unit, the controller’s main interface will not display keys in normal state. If you need to adjust the backlight time, please press MENU key to display keys. And then long press TIME and keys for 5 seconds to set backlight time. Clock (1) The controller uses 24-hour clock. The default is 12:00 ...
- Page 10 Operation Timer (1) Timer function includes Timer on, Timer off and Timer on/ off. (2) Press TIME key to enter timer setting, then you can use TIME key to switch parameters, the timer function circulation is as follows: (ON and the hour position are flashing) → (ON and the minute position are flashing) → (OFF and the hour position are flashing) → (OFF and the minute position are flashing) → (ON and the hour position are flashing) → (ON and the minute position are flashing) → (OFF and the hour position are flashing) → (OFF and the minute position are flashing) → the timer icon disappears (cancel timer function).
- Page 11 Operation (3) When the hour or minute position is flashing, press key to adjust the parameter value, and long press to speed up the adjustment. Then you need to press MENU key to confirm the setting. (4) The timer function will be canceled when you press TIME key multiple times until the timer icon disappears. Function circulation Press MENU key (if it is the 4-way/Round-way Cassette model, you need press MENU key for 5 seconds) to enter function circulation, use key to switch between different functions. ...
- Page 12 Operation (Humidity setting) → (Up/Down swing) → (Left/Right swing) → (Turbo function) → (Indoor unit quiet) → (Outdoor unit quiet) → (Sleeping) → (Health) → (HRV) → (Energy saving) → (Static pressure) → (Filter cleaning) → (Follow) → (Evade) → (Perception) → 10 (10°C heating) → (Health airflow up) → (Health airflow down) → CL (Self- cleaning). When you select a function, the corresponding icon flashes, then you can use MENU key to set/cancel function or enter the corresponding function setting interface. Humidity setting (only valid for part of models) ...
- Page 13 Operation Swing (1) Press MENU key, you will enter function circulation, use key to switch between different functions. Switch to the Up/Down swing or Left/Right swing, then press MENU key again to enter the setting of swing angle (only valid for part of models). At this time you can use key to adjust the swing angle. After adjustment, press MENU key to exit the setting. (2) After adjustment, if there is no operation within 10 seconds or press MODE / FAN key, it will quit swing setting interface and previous changes are valid.
- Page 14 Operation Health airflow up/down function (only valid for part of models) (1) Press MENU key, you will enter function circulation, use key to switch between different functions. Switch to (health airflow up) or (health airflow down) function, then press MENU key again to set the function. When the function is successfully set, the corresponding icon will be displayed on the main interface. (2) Health airflow up/down function cannot be set at the same time. When the latter function is set, the former will be automatically canceled.
- Page 15 Operation Sleeping (1) Press MENU key, you will enter function circulation, use key to switch between different functions. Switch to function, the sleeping time will display by the which is on the top-left corner. Press TIME key to enter sleeping time setting, use key to adjust the sleeping time by 0.5h once, the range of sleeping time is from 0.5h to 72h, press MENU key to confirm. (2) When the sleeping time is up, the controller will turn off. (3) If the state of the sleeping function is on, when you switch to the sleeping function in the function circulation, pressing MENU key to turn it off.
- Page 16 Operation (2) When the HRV function is turned on, if you want to turn it off, please enter function circulation and switch to icon, then press MENU key , and the function will be turned off. Switch between Fahrenheit and Celsius (1) If the current temperature is displayed in Celsius, adjust temperature in each mode to 30°C(when energy saving function is set currently, the parameter in heating mode will be the highest limit value). Then press key for 15s to switch to Fahrenheit, the interface will display 86°F (when energy saving function is set, its highest limit value of Fahrenheit will be displayed).
- Page 17 Operation Energy saving (1) Press MENU key, you will enter function circulation, use key to switch between different functions. Switch to function, then press MENU key again, energy saving function will be turned on. If the function is turned on, icon will be displayed in the main interface. When the energy saving function is set, press MENU key to enter function circulation and choose , then press MENU key to exit energy saving function.
- Page 18 Operation ② In heating mode, set temperature to 16°C, long press FAN key for 5 seconds to enter energy saving parameter of heating mode setting, the parameter will be displayed in the top-left corner. You can use key to adjust parameter, and the parameter adjustment range is from 16 to 30. After adjustment, press MENU key to confirm changes.
- Page 19 Operation (4) In the state of 10°C heating function, if you change modes or adjust temperature setpoint, you will exit the 10°C heating function. Four-sided air deflector (only valid for part of models) (1) For 4-way/Round-way Cassette, the icon and the icon will be displayed in the main interface. (2) Press MENU key to select the air deflector to be set (By pressing MENU key, you can switch between the air deflector 1,2,3,4 as well as the simultaneous control.), and which air deflector flashing indicates that it is selected. When selecting a certain air deflector, you can use key to adjust its swing angle. (3) After adjustment, you can press MODE / FAN / TIME key or wait 10 seconds to exit the settings.
- Page 20 Operation Motion sensing (only valid for part of models) (1) Motion sensing function includes (Follow): Swing direction follows people. (Evade): Swing direction Evades people. (Perception): If no one is perceived for half an hour(the time is depends on the indoor unit or the setting of move eye), the indoor unit will be off. (2) Press MENU key, you will enter function circulation, use key to switch between different functions. Switch to function, then press MENU key again, function will be turned on. If the function is turned on, icon will be displayed in the main interface. In the state where the function is turned on, if you want to turn it off, please enter function circulation and ...
- Page 21 Operation Mode setting (only valid for part of models) (1) When controller is turned off, and the backlight is lit up, long press MODE key for 5 seconds to enter mode setting interface. The parameter is displayed in the top-left corner, and you can use key to switch it between 00/01/02/03/04/06/07. After adjustment, you need to press MENU key to confirm changes. (2) The correspondence between parameters and mode combinations is as follows: 00------------ [Auto] [Cooling] [Dry] [Fan] [Heating] 01------------ [Heating] [Cooling] [Dry] [Fan] 02------------ [Fan] [Cooling] [Dry]...
- Page 22 Operation Malfunction Display (1) If there is a malfunction, the main interface will display icon. (2) When backlight is on, long press TIME key for 10 seconds to enter malfunction display interface. The malfunction code is displayed in the top-left corner, and the left side of the colon is the current malfunction, and the right side of the colon is the historical malfunction.
- Page 23 Operation Parameter inquiry (1) Keep pressing MENU key for 5 seconds (if it is the 4-way/ Round-way Cassette model, the time is 10 seconds) to enter parameter inquiry interface. The parameter value is displayed in the upper left corner, and middle area displays parameter type (use key to switch it), and the unit number is displayed in the lower right corner ( use TIME key to switch it).
- Page 24 Operation (2) If the communication address flashes, you can change it with key, and the adjustment range is 0~3F. After adjustment, you need to press MENU key to confirm changes. If the communication address is static displayed, it cannot be changed. Child lock (1) Press and MENU keys for 5 seconds to set / cancel child lock. If child lock function is set, icon will be displayed in the main interface.
- Page 25 Operation (2) The slave controller cannot set the static pressure function. (3) You can also use this function by function circulation. Self-cleaning Note: Only valid for the units with self-cleaning function. (1) Press MENU key, you will enter function circulation, use key to switch between different functions. When it switches to the “CL” function, “CL” will flash in the temperature area. Press MENU key to confirm, and the static display of “CL” indicates that the function is turned on. (2) If the state of the “CL” function is on, when you switch to the “CL” function in the function circulation, pressing MENU key to turn it off. (3) When the “CL” function is set, if you switch modes or switch ON/OFF, the “CL” function will be exit. (4) If you set timer or sleeping function, “CL” function does not ...
- Page 26 Operation Outdoor unit quiet (1) Press MENU key, you will enter function circulation, use key to switch between different functions. When it switches to the outdoor unit quiet function, “OUt” will display in the temperature area and icon flashes. The time parameter of the function on/off is displayed in the upper left corner. You can use TIME key to switch between “OFF → Hours of turn- on time → Minutes of turn-on time → Hours of turn-off time → Minutes of turn-off time → OFF”, use key to adjust parameters. After adjustment, you need to press MENU key to confirm changes. (2) When the turn-on time you set is up, the outdoor unit quiet ...
- Page 27 Operation Low temperature dehumidification (1) Long press MENU and keys for 5 seconds to enter advanced settings. The unit number is displayed in the lower right corner. Parameter is displayed in the upper left corner. middle area displays function code. Press key to switch to A38, and then press MENU key to enter parameter adjustment, use key to adjust parameter to 1(turn on ...
- Page 28 Operation Light strip function (only valid for part of models) (1) Long press FAN key for 3 seconds to turn on light strip, the middle area briefly displays “PP” to indicate that the function is set. (2) If the function is turned on, long press FAN key for 3 seconds to turn off light strip, the middle area briefly displays “CC” to indicate that the function is off. Communication with central controller (1) After the controller receives the command from the centralized controller. It displays the icon. At this time, all the keys except the ON/OFF key are invalid. (2) After the controller receives the lock command, it displays icon. At this time, all keys are invalid. (3) In central or lock state, backlight is valid, press any keys to ...
- Page 29 Operation Temperature compensation (1) This function is used to compensate for ambient temperature. In the state of off, and the backlight is lit up, long press FAN key for 5 seconds to enter temperature compensation interface. You can adjust the parameters with key. After adjustment, you need to press MENU key to confirm change. (2) When it is Celsius, the range of parameter adjustment is -4 ~ 4. When it is Fahrenheit, the range of parameter adjustment is -8 ~ 8.
- Page 30 Operation (3) All keys are invalid except ON/OFF key under forced cooling/heating mode. (4) when the forced cooling/heating is set, press ON/OFF key to exit this function. dFg ( Only valid for part of models) (1) Setting method: Press MENU key, you will enter function circulation, use key to switch between different functions. When it switch to the dFg icon and off icon flashes. press MENU key to change, meanwhile return to the main interface. (2) Cancellation method: Press MENU key, you will enter function circulation, use key to switch between different functions. When it switch to the dFg icon and on icon flashes. press MENU key to change, meanwhile return to the main interface.
- Page 31 Operation VIP ( Only valid for part of models) (1) Setting method: Keep pressing the MENU key + key for 5 seconds to enter the advanced settings, the unit number is displayed in the lower right corner, and the decimal display area of the temperature flashes to display the function classification. Switch to H by clicking the FAN key. The function code is displayed in the integer area of the temperature zone. At this time, press keys to switch function code to 05.
- Page 32 Operation (5) When switching between VIP and non-VIP, you need to exit the current Settings and enter again. Difference between the function of the Master wired controller and Slave wired controller Comparison Master wired Slave wired controller item controller Only the following operations can be performed: (1) ON/OFF, Mode, Fan speed, All functions Temperature setting, Swing, Function are available Energy saving, Clock function...
- Page 33 Operation Dip switch Default Function switch 2 setting station Slave wired controller Master wired controller Display ambient temperature Not display ambient temperature Collect ambient temperature from PCB of indoor unit Collect ambient temperature from wired controller Non-volatile memory invalid Non-volatile memory valid Old protocol Self-adaption Reserved...
- Page 34 Operation Default Function setting switch 1 station Reserved Reserved Not display ambient humidity Display ambient humidity Reserved Reserved Reserved Reserved...
- Page 35 Wired Controller Wiring Instruction Wiring Connections of Wire Controller Indoor 1 Indoor 2 Indoor N Indoor 15 Indoor 16 (master unit) Wire controller Wire controller Wire controller Wire controller Wire controller Control wiring of wire controller, polar. Wire controller Indoor 1 Indoor 1 Wire controller Wire controller Polar wire...
- Page 36 Wired Controller Wiring Instruction There are four methods to connect wired controller to the indoor units: 1. Group control shown as Figure A and D: One wired controller can control up to 16 indoor units. 3 pieces of polar wire must be used to connect the wired controller and the master unit (the indoor unit connected with wire controller ...
- Page 37 Wired Controller Wiring Instruction Communication wiring Communication wiring length (m/ft) Dimensions of wiring 0.3mm x3-core shielded < 100m/328ft wire (22AWG,3wire) 0.5mm x3-core shielded ≥100m/328ft and <200m/656ft wire (20AWG,3wire) 0.75mm x3-core shielded ≥200m/656ft and <300m/984ft wire (18AWG,3wire) Note: • One side of the shielded sheet of communication wire must be earthed. • ...
- Page 38 Wired Controller Wiring Instruction Controller Installation 1. First, put communication wire through the hole in the back cover. Press this button to open the back cover of the wired controller. 2. Fix back cover to the holder. After that, connect communication wire to CON1 port of wired controller. Finally put the front cover of wired controller to back cover to complete the installation.
- Page 39 Wired Controller Wiring Instruction CON1...
- Page 40 Qingdao Haier Air Conditioner Electric Co.,Ltd. Haier Industrial Park,Qianwangang Road,Eco-Tech Development Zone,Qingdao 266555,Shandong,P.R.C.