
Related Manuals for Emerson MS9923TT


Summary of Contents for Emerson MS9923TT
- Page 1 HOME AUDIO SYSTEM with 5 CD CHANGER and 3 SPEED TURNTABLE OWNER'S MANUAL MS9923TT Visit our web site at www.emersonradio.com MS9923TT_ib_0416.p65 16/4/2002, 14:18...
-
Page 2: Important Safety Instructions
TO PREVENT FIRE OR SHOCK HAZARD, DO NOT USE THIS PLUG WITH AN EXTENSION CORD, RECEPTACLE OR OTHER OUTLET UNLESS THE BLADES CAN BE FULLY INSERTED TO PRESENT BLADE EXPOSURE. TO PREVENT FIRE OR SHOCK HAZARD, DO NOT EXPOSE THIS APPLIANCE TO RAIN OR MOISTURE. The lightning flash with arrow- CAUTION: TO REDUCE THE head symbol, within an equi-... -
Page 3: Class 1 Laser Product
Welcome to the world of Emerson sound. The product you have purchased has been carefully engineered and manufactured to give you dependable operation. Read this manual before operating the unit to become more familiar with it and obtain the performance that will bring you continued enjoyment for many years. -
Page 4: Fcc Information
FCC INFORMATION This equipment has been tested and found to comply with the limits for a Class B digital device, pursuant to Part 15 of the FCC Rules. These limits are designed to provide reasonable protection against harmful interference in a residential installation. -
Page 5: Location Of Controls And Indicators
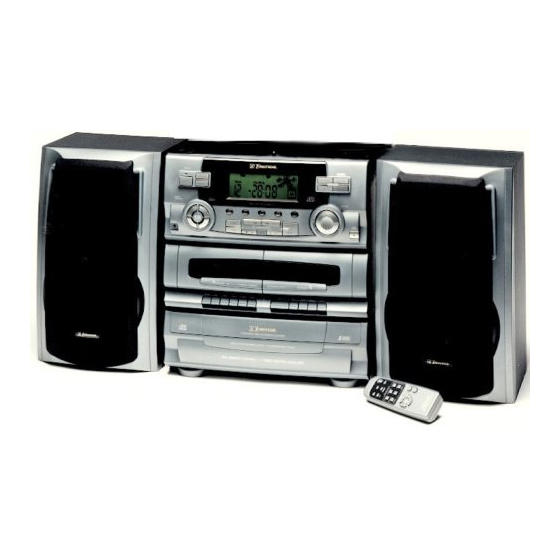
LOCATION OF CONTROLS AND INDICATORS MS9923TT_ib_0416.p65 16/4/2002, 14:17... - Page 6 1.) FM ST.- MONO / HI-SPEED DUBBING Button. 2.) BBS (Bass Boost) Indicator. 3.) REMOTE SENSOR. 4.) MULTI FUNCTION LCD DISPLAY. 5.) TURNTABLE. 6.) AUX / PHONO Button. 7.) CD / DISC SKIP Button. 8.) TUNER / BAND Button. 9.) TAPE Button. 10.) VOLUME Up / Down 11.) CD DISC 1, 2, 3, 4, 5 Select Buttons.
-
Page 7: Loading The Batteries Into The Remote Control
REMOTE CONTROL 1.) TAPE Button. 2.) TUNER / BAND Button. 3.) MEMORY Button. 4.) REPEAT / MEMORY UP Button. 5.) INTRO Button. 6.) STOP / MEMORY DOWN Button. 7.) TUNING / CD Button. 8.) PLAY / PAUSE Button. 9.) TUNING / CD Button. -
Page 8: Preparation For Use
PREPARATION FOR USE SPEAKER CONNECTION Connect each speaker to the corresponding speaker terminals on the back panel of the main unit. Make sure that the left speaker is connected to the left pair of speaker terminals and the right speaker to the right pair of speaker terminals. Also make sure that the speaker wires are correctly connected: that the red wires are connected to the red terminals and the black wires to the black terminals. -
Page 9: Bass Boost System
PRESET ELECTRONIC EQUALIZER When the unit is switched ‘ On’ for the first time, the Equalizer will be in the “FLAT” setting (FLAT Indicator ‘ On’ ). Press “CLASSIC”, “POP”, or “ROCK” buttons to change the sound effect to suit your taste. The appropriate EQ Indicator lights to confirm your selection. -
Page 10: Listening To The Radio
OPERATING INSTRUCTIONS LISTENING TO THE RADIO RADIO OPERATION • Press the “POWER” button to turn the system ‘ On’ . • Press the “TUNER/BAND” button to select the ‘ Radio’ mode. • Select the Radio Band (AM/FM) by pressing the “TUNER/BAND” button. •... -
Page 11: Antenna Information
After you have entered up to 40 stations in the preset memories, you can select any one of the memorized stations quickly and easily by simply pressing the “MEM. UP” or “MEM.DOWN” buttons until the desired memory number and station frequency appear in the display. - Page 12 TO BEGIN CD PLAYBACK After you have loaded up the 5 CDs in the changer: 1.) Press the PLAY/PAUSE for the first available disc in the tray and will begin playback from Track 1 on the first disc.The number of the disc being played flashes on the display. It will continue playing until it has played all of the discs in the tray and then stops automatically.
- Page 13 FORWARD AND BACKWARD SKIP/SEARCH BUTTONS To skip forward or backward to the beginning of a particular track during playback, press the Skip buttons repeatedly until the desired track number appears on the display. Playback will begin on the desired track. To search for a particular passage on a track during playback, press and hold the Search buttons.
-
Page 14: Programmed Cd Playback
PROGRAMMED CD PLAYBACK You can program the CD changer to play up to a total of 40 tracks on all 5 discs in any desired order. NOTE: You can not program the CD changer during playback. If a disc is playing press the STOP button first and then follow the instructions. -
Page 15: Programmed Playback
After all your desired tracks are programmed you may press the “MEMORY” button to reconfirm that the information has been stored correctly. The display will show you which disc and track number you have entered into program memory Number 1. Each time you push the “MEMORY” button the display will show you which disc number and track number is stored in each successive memory location. - Page 16 2.) ONE DISC REPEAT • Press the “REPEAT” button until the display. Press the “CD/DISC SKIP” button to select the disc you wish to play. • Press the PLAY/PAUSE with Track 1. When the final track on the disc has been played, it will automatically begin playing again starting with Track 1.
-
Page 17: Intro Scan
• Press the “REPEAT” button until the • Press the PLAY/PAUSE track and continue until the last programmed track (up to a maximum of 40 tracks). When the last track has been played, playback will begin again with the first programmed track. This sequence will continue indefinitely until Programmed Repeat Playback is cancelled. -
Page 18: Cassette Operation
CASSETTE OPERATION This Emerson Audio System features a dual cassette mechanism which allows you to play pre-recorded cassette tapes in either Deck A or Deck B. You may also load tapes in both decks for continuous automatic playback of two cassettes. You... -
Page 19: Pause Button
FAST FORWARD AND REWIND BUTTONS Press either “F.FWD” or “REWIND” key at any time to move the tape rapidly forward or back to any specific point. When you reach the desired point press the “PLAY” key again to resume normal playback at that point. Note : The Automatic Stop System does not function in the Fast Forward or Rewind modes. - Page 20 P L AY I N G P H O N O R E C O R D S 1.) Raise the turntable dust cover. 2.) Release the Tonearm Clamp, and remove the stylus protector. 3.) Press the AUX/PHONO button to select the Phono mode. 4.) Place a record on the turntable, over the central spindle.
-
Page 21: Cassette Recording
AU X I L I AR Y I N P U T C O N N E C T I O N Sound from other Audio or Video equipment can be reproduced by connecting the audio output of the equipment to the “AUX IN” jacks of this audio system. Connect the left/right Auxiliary output, Line output, or Record output jacks of the external equipment to the left/right “AUX IN”... -
Page 22: Important Notes
T o r e c o r d f r o m t h e T u r n t a b l e : 1.) Press the FUNCTION Selector to the “AUX/PHONO” mode. 2.) Select the part of the record for recording. 3.) Press the RECORD Key on Tape Deck A to start recording. -
Page 23: Care And Maintenance
CARE AND MAINTENANCE ABOUT CASSETTE TAPES Whenever you record on a cassette any previously recorded material is erased as the new material is recorded. To prevent you from accidentally erasing material which you wish to save, blank cassettes are equipped with erase prevention tabs for each side of the tape. -
Page 24: Head Cleaning
• If the cassette feels “tight” while performing operation shown (see Fig. 2), the tape may be jamming due to “ridges” formed in the winding of the tape (visible through the center window). These may be removed, in most cases, by fast winding of the cassette from one end to the other and back again. -
Page 25: Compact Disc Care
COMPACT DISC CARE • To remove a disc from its storage case, press down on the center of the case and lift the disc out, holding it carefully by the edges. • Fingerprints and dust should be carefully wiped off the disc’ s recorded surface with a soft cloth. -
Page 26: Reset Button
Farmers Branch, TX 75234. MS9923TT_ib_0416.p65 RIGHT AUX IN TO FIND THE LOCATION AND PHONE NUMBER OF YOUR NEAREST SERVICE CENTER PERMITTED TO PERFORM WARRANTY... 1-800-695-0098 PLEASE CALL: 1-800-898-9020 Emerson Radio Corp. Consumer Affairs Dept. 1901 Diplomat Drive, 16/4/2002, 14:18 RESET LEFT PIN HOLE... - Page 27 EMERSON RADIO CORP. LIMITED WARRANTY What does this warranty cover ? Any manufacturing defects in original material, including original parts and workmanship, under normal use and conditions. For how long? For a period of ninety (90) days from the date of original purchase in the U.S.
- Page 28 EMERSON RADIO CORP. EMERSON PART NO. : 16-2862 204-01 PRINTED IN CHINA MS9923TT_ib_0416.p65 16/4/2002, 14:18...