Honeywell Dolphin CN80 Series User Manual
Hide thumbs
Also See for Dolphin CN80 Series:
- Quick start manual (21 pages) ,
- Quick start manuals (17 pages)
Table of Contents
Quick Links
Table of Contents

Related Manuals for Honeywell Dolphin CN80 Series


Summary of Contents for Honeywell Dolphin CN80 Series
- Page 1 Dolphin™ CN80 Series Mobile Computer powered by Android™ User Guide...
- Page 2 Disclaimer Honeywell International Inc. (“HII”) reserves the right to make changes in specifications and other information contained in this document without prior notice, and the reader should in all cases consult HII to determine whether any such changes have been made. The information in this publication does not represent a commitment on the part of HII.
-
Page 3: Customer Support
For our latest contact information, see www.honeywellaidc.com/locations. Product Service and Repair Honeywell International Inc. provides service for all of its products through service centers throughout the world. To find your service center, go to www.honeywellaidc.com and select Support. - Page 4 Dolphin CN80 Mobile Computer...
-
Page 5: Table Of Contents
TABLE OF CONTENTS Customer Support ......................... 3 Technical Assistance ......................3 Product Service and Repair ....................3 Limited Warranty ........................3 Chapter 1 - About the Computer Features........... 1 About the Dolphin CN80 Mobile Computer Series............1 Model Overview ........................2 Features of the CN80 Mobile Computer ................ - Page 6 Change the Screen Lock to Protect the Computer............17 Assured Radio Deactivation.....................17 Disabling Ethernet Bridging (In-Dock Communications) .....................18 About Batch Configuration......................18 Select a Touch Screen Profile to Optimize Performance ..........18 Configure the Screen Backlight .....................19 About the Scan Status LED .....................19 About the Keypad.........................20 Keypad LEDs ...........................20 About the Color-Coded Keys.....................20...
- Page 7 Customize the Favorites Tray....................39 Use Google™ Search......................39 About Screen Gestures......................40 Set the Time Zone ........................40 About Honeywell Applications ....................41 Applications You Can Download to the Mobile Computer ..........42 Unlock Developer Options......................43 About GMS............................43 Chapter 3 - Use the Image Engine ...............45 About the Image Engine......................45...
- Page 8 Answer the Phone........................63 Switch Apps During a Phone Call ...................63 Make an Emergency Phone Call....................64 Configure Phone Settings......................64 Chapter 5 - Use the Camera................65 About the Color Camera......................65 How to Zoom ...........................65 Take a Photo...........................65 Change Camera Settings......................66 Record a Video ..........................67 Change Video Settings ......................67 Use the Camera as a Flashlight .....................67 Chapter 6 - Configure the Computer............
- Page 9 About Software Updates ......................89 About Transferring Files via USB Connection............89 Install Software Updates with AutoInstall................90 Optional microSD Card Method ..................90 About the Honeywell Upgrader ....................91 How to View the Installed OTA Version .................91 Install OTA Updates ......................92 Reboot (Restart) the Computer ....................93 About Enterprise Data Reset ....................93...
- Page 10 viii Dolphin CN80 Mobile Computer...
-
Page 11: Chapter 1 - About The Computer Features
EX20 Near/Far (1D/2D), high performance 2D imager for long range scanning applications up to 15.2 m (50 ft). Honeywell offers heater-equipped cold storage CN80 versions to extend the use of the mobile computer in cold storage and freezer environments as well as Non- incendive (NI) CN80 versions for use in hazardous environments. -
Page 12: Model Overview
• 23-key numeric function keypad N6603ER (1D/2D) high performance Honeywell imager EX20 Near/Far (1D/2D), high performance 2D Honeywell imager for long range scanning applications; 0.15 m to 15.2 m (6 in to 50 ft). WLAN IEEE 802.11a/b/g/n/ac radio; Wi-Fi certified Bluetooth™... -
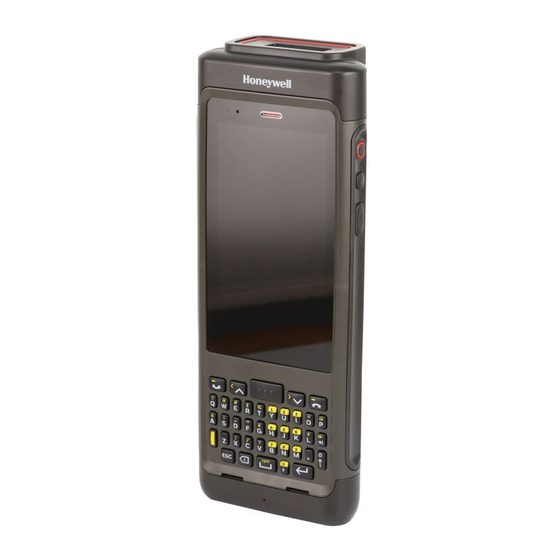
Page 13: Features Of The Cn80 Mobile Computer
Features of the CN80 Mobile Computer CN80 Model with N6603ER Imager Battery Status /Notification LED Speaker Microphone Power Button Aux Button Scan Status LED Scan Button Touch Panel Scan Button Keyboard (model dependent) Speakers Microphone I/O Connector Dolphin CN80 Mobile Computer... - Page 14 Microphone Imager Window (LED/Laser Aperture) Pressure Sensor Laser Safety Label Location Camera Lens and Flash Volume Buttons microSIM/microSD Card Door Scan Button IMEI Label Location on Model CN80L1N Battery Latch Stylus Battery Hand Strap Dolphin CN80 Mobile Computer...
- Page 15 CN80 Model with EX20 Near/Far Imager Note: The EX20 Near/Far Imager is only available for CN80L0N models. Battery Status/Notification LED Speaker Microphone Power Button Aux Button Scan Status LED Scan Button Touch Panel Scan Button Keyboard (model dependent) Speakers Microphone I/O Connector Dolphin CN80 Mobile Computer...
- Page 16 Microphone Imager Window (LED/Laser Aperture) Laser Safety Label Location Camera Lens and Flash Volume Buttons microSIM/microSD Card Door Scan Button Battery Latch Stylus Battery Hand Strap Dolphin CN80 Mobile Computer...
-
Page 17: About The Battery
The battery has a 22.3 watt hour capacity. Several factors determine the life of your battery, such as display brightness, display timeout, input device, extreme temperature, and usage. Honeywell recommends that you keep the battery charged at all times to prevent data loss. -
Page 18: Unlock The Dust Cover
(CN80-L0N-xxxxx1F, CN80-L1N-xxxxx1F, CN80G-L0N-xxxxx1F, and CN80G-L1N-xxxxx1F) Warning: Explosion Hazard - Batteries must only be changed or charged in an area known to be non-hazardous. use ONLY Honeywell battery part number CX80-BAT-EXT-WRLS1 for CN80 NI Models or CX80G-BAT-EXT-WRLS for CN80G models. Avertissement: Risqued’explosion-Les batteries doivent uniquement être remplacées ou rechargées dans un endroit non dangereux. -
Page 19: Charge The Battery Before Use
A fully discharged battery charges in approximately 4 hours. Note: Honeywell recommends using Honeywell accessories and power adapters. Using non-Honeywell accessories or power adapters may cause damage not covered by the warranty. Warning: Ensure all components are dry prior to mating the computers and batteries with peripheral devices. - Page 20 4. Release one end of the hand strap. 5. Slide the battery latch to the right. 6. Lift up on the edge of the battery and remove it from the computer. Dolphin CN80 Mobile Computer...
- Page 21 7. Insert the charged battery into the computer. 8. Press down on the edge of the battery to engage the lock. 9. Attach the hand strap. Snap 10. Press the Power button. Dolphin CN80 Mobile Computer...
-
Page 22: About The Battery Status
The computer is connected to external power and the battery is charging. There is a battery error. Install another battery. If the problem persists, contact Honeywell Technical Support. The Battery status LED appears in the upper right corner of the touch screen. -
Page 23: About The Battery Status Led Setting
You can change the behavior of the Battery status LED if the out-of-box behavior for a charging battery (blinking green) is not acceptable to your environment. You can choose one of three options: • Honeywell Battery LED (factory default, out-of-box configuration) • Default Battery LED (optional Android OS configuration) •... -
Page 24: Check The Battery Level And Usage
Check the Battery Level and Usage In addition to the Battery status icon and LED, you can monitor the battery status from the Settings app. 1. Swipe up from the bottom of the Home screen to access all apps. 2. Tap Settings >... -
Page 25: Power On The Computer
• Avoid dropping the battery or computer. If you suspect that the battery or computer is damaged, send it to a Honeywell service center for inspection. • Replace the battery only with another CW-BAT model battery. This battery has been tested in accordance with applicable safety standards. -
Page 26: Welcome Screen
Welcome Screen The first time you power on the computer, a Welcome screen appears. You can either scan a configuration bar code or use the Wizard to manually set up the computer. To learn more about how to Scan Bar Codes, see page During the manual setup process, follow the prompts on the screen as the wizard... -
Page 27: Change The Screen Lock To Protect The Computer
Change the Screen Lock to Protect the Computer After you start using the computer, you should change the screen lock to prevent unauthorized persons from accessing the computer after the screen lock activates unless they input the correct password, pin, or pattern. The recommended setting for the Screen lock is to enable a Password lock. -
Page 28: Disabling Ethernet Bridging (In-Dock Communications)
Honeywell representative. About Batch Configuration Honeywell Batch mobile computers are manufactured without RF transmission capabilities. Once a device is manufactured as a Batch device it has no capability of any RF transmission. There is no firmware or software that can be added to the device that will allow it to transmit an RF signal. -
Page 29: Configure The Screen Backlight
Configure the Screen Backlight The display has an ambient light sensor that automatically adjusts the backlight intensity to conserve power and ensure the display is readable. You can also manually set the backlight intensity if you do not want to use the automated adaptive brightness feature. -
Page 30: About The Keypad
About the Keypad The Dolphin CN80 is available in two keypad configurations. 40-Key QWERTY Keypad 23-Key Numeric Keypad Keypad LEDs Special characters and alternate functions are entered by pressing color-coded key sequences. Keypad LEDs indicate when a color-coded modifier key is active or when caps lock is turned On. - Page 31 Enter Characters on the QWERTY Keypad Computer models with a QWERTY keypad include a yellow modifier key for typing alternate numbers and symbols. A caps lock/shift key is also included for uppercase character input. To type an alphabetical character: • Press the relevant character key.
-
Page 32: About The Audio Features
• Press the relevant number key. To type an alphabetical character: 1. Press the blue modifier key. 2. Press the key one to three times in rapid succession depending on the position of the character illustrated on the key. Example: Press and then to type “c”. -
Page 33: Enable Vibrate Mode
Enable Vibrate Mode You can use the Volume down button to quickly enable Vibrate mode so the computer vibrates instead of emitting sound for notifications and rings. If you still want to hear alarms, turn On the Alarms only feature. Note: The Vibrate mode varies by OS version. -
Page 34: About The Cn80 Cold Storage Model Heater
Setting Description Shortcut to prevent ringing Set Press Power & Volume Up together. Options include Vibrate, Mute, and Do Nothing. Phone ringtone Select a default ringtone. Default notification ringtone Select a notification sound. Advanced Select to expand the settings menu. Default alarm ringtone Select a alarm sound. -
Page 35: How Automatic Mode Works
• Manual mode This mode is disabled by default. When enabled, heater activation is controlled solely by the user. No temperature monitoring and timers are used to control the heaters. The user must manually turn the heaters On or Off. Use the Settings app to configure the Heater feature. -
Page 36: How Manual Mode Works
• If you enabled Preemptive Heating, the heater Preemptive delay time stops when the icons are used to turn the heater On or Off. How Manual Mode Works Manual mode gives you full control over turning the heaters On or Off. When Manual mode is enabled, automatic cold storage enter/exit detection is no longer used to control the heater behavior. - Page 37 Heater Setting Description Duration: Heater Set the length of time (minutes) the heaters stay On at full power (100%) once the computer detects a quick rise in temperature (DeltaT value, see above). The default value is 5 minutes. Note: The heaters may turn Off before the timer has expired if a temperature reading indicates the computer is warm enough or you manually turn Off the heaters by tapping the heater icon once.
-
Page 38: Insert A Microsd Card
Insert a microSD Card You can use a microSD card to increase file storage capacity or to install software. Honeywell recommends the use of Single Level Cell (SLC) industrial grade microSD or microSDHC memory cards with the computer for maximum performance and durability. - Page 39 6. Lift up on the edge of the battery and remove it from the computer Dolphin CN80 Mobile Computer...
- Page 40 7. Loosen the screws securing the card access door closed. Use the tab to lift the edge of the door. 8. Press down gently and slide the card holder away from the open access door. Lift the edge of the holder up. Dolphin CN80 Mobile Computer...
-
Page 41: How To Transfer Files
9. Insert the microSD card into the card holder with the contacts facing out. 10. Close the holder with the card inserted. Press down gently on the card holder and slide it into the locked position. 11. Close the card access door and tighten the screws. 12. -
Page 42: Configure Usb Connection And Transfer Files
Configure USB Connection and Transfer Files Note: The CN80 supports Hi-Speed USB communications (USB 2.0) with a maximum data transfer rate of 480 Mbps. 1. Connect the CN80 to your workstation. 2. On the CN80, swipe down from the top of the screen to see the notifications. 3. - Page 43 Accessory Description Wired Vehicle Dock Use the wired vehicle dock to hold and charge the computer in a (Model CX80-VD/ vehicle environment. Provides hard-wired 3-pin power jack and USB PN CN80-VD-SRH) host (DB15) receptacle (5V/500 mAh DC) for powering peripherals. Charges mobile computer battery in 4 hours or less.
- Page 44 Dolphin CN80 Mobile Computer...
-
Page 45: Chapter 2 - About The User Interface And Applications
ABOUT THE USER INTERFACE AND APPLICATIONS Use this chapter to learn about the user interface and how to interact with the screen. You can also use this chapter to learn about the Honeywell applications on the computer. About the User Interface The Android 8 operating system provides a touch-friendly and easy- to-navigate user interface. -
Page 46: Navigation And Function Buttons
Home Screen Features Item Description Notifications panel / Status icons to the left tell you when an app has sent notifications, such Status bar as an arriving message. System icons to the right display the current wireless and network connection state and battery level. Search bar Search the Internet or the computer using Google™. -
Page 47: About Status Bar Icons
You can change the default function of the physical buttons and keys. 1. Swipe up from the bottom of the Home screen to access all apps. 2. Tap Settings > Honeywell Settings > Key Remap. 3. Tap the plus sign (+). 4. Press the button or key you want to remap. -
Page 48: Restore Default Button Action
1. Swipe up from the bottom of the Home screen to access all apps. 2. Tap Settings > Honeywell Settings > Key remap. 3. Tap the clean icon 4. Choose the remapped button(s) you want restored to the default setting. -
Page 49: Customize The Home Screen
Customize the Home Screen You can add application icons to any Home screen for easier access. 1. Swipe up from the bottom of the Home screen to access all apps. 2. Tap and hold the app you want to add. The computer vibrates, and then switches to a smaller view of the Home screen panels. -
Page 50: About Screen Gestures
About Screen Gestures Use your fingers or the stylus to manipulate icons, buttons, menus, the on-screen keyboard, and other items on the screen. • Tap to select something, toggle a setting On or Off, or activate a field for text entry. -
Page 51: About Honeywell Applications
Honeywell applications help you troubleshoot and connect your computer to other devices and networks. Some of the applications in this table are located in the Power Tools app. To learn more about Honeywell Power Tools, go to www.honeywellaidc.com to download the Dolphin Power Tools User Guide. -
Page 52: Applications You Can Download To The Mobile Computer
IP address is working. Applications You Can Download to the Mobile Computer You can download Honeywell applications to extend the capabilities of the computer. You may need to purchase a license to run some applications. To learn... -
Page 53: Unlock Developer Options
You can also use Honeywell Launcher together with Honeywell Enterprise Browser to create a single-purpose device configuration. If Launcher is not included on your computer model, you can download a trial version of the software for evaluation. - Page 54 Dolphin CN80 Mobile Computer...
-
Page 55: Chapter 3 - Use The Image Engine
You can modify the Default Profile or create new profiles for custom applications from the Settings >Honeywell Settings > Scanning. Use the imager as a camera to capture black and white images, such as signatures or pictures of damaged inventory. -
Page 56: Change The Scanner Settings
Changes you make to the Default profile apply to all applications with no profile assigned. 1. Swipe up from the bottom of the Home screen to access all apps. 2. Tap Settings > Honeywell Settings > Scanning. 3. Tap Internal Scanner > Default Profile. 4. Select from the following: •... -
Page 57: Default Scan Settings
1. Open the Default profile. 2. Tap in the upper right corner of any of the scan settings screens for the profile. 3. Tap Restore all defaults. Default Scan Settings Use the following sections to understand the scan settings available for scanner profiles. - Page 58 ‘//’ ACTION '$' extra-data Where: ACTION and extra-data are any string of characters. Launches an application listening for the intent. Intent action: “com.honeywell.scantointent.intent.action.” + ACTION Intent extra: “com.honeywell.scantointent.intent.extra.DATA” contains the remainder of the bar code data after the first ‘$’ character.
- Page 59 Tap the check box to toggle the feature On or Off. • Select Center Decode to adjust the Window dimensions. Honeywell recommends leaving the settings at 50 (default) to define the “center” area for the bar code. Configurable parameters: •...
- Page 60 Setting Description Default Region of Set the ROI for decoding. Options include: Disabled Interest • Disable ROI is disabled and the entire original image is sent to the decoder. • Standard Use the aimer position to weight activity. Activity calculated on the row and the column in the middle of each cell.
-
Page 61: Add A Scan Setting Profile
To create a scan setting profile for a custom app on the computer: 1. Swipe up from the bottom of the Home screen to access all apps. 2. Tap Settings > Honeywell Settings > Scanning > Internal Scanner. 3. Tap in the upper right corner of the app screen. -
Page 62: About The Optional Digital Scan Button
1. Swipe up from the bottom of the Home screen to access all apps. 2. Tap Settings > Honeywell Settings > Digital Scan Button. 3. Tap Enable Digital Scan Button to turn the feature on. A preview of the button appears at the bottom of the screen. -
Page 63: Scan Bar Codes
(360°) bar code scanning and an aiming beam is provided to help assist with targeting bar codes. Before you start scanning bar codes, go into Settings > Honeywell Settings > Scanning > Internal Scanner and modify the scan profile to enable only the bar code symbologies that you need. -
Page 64: Use The Scan Demo App
Use the Scan Demo App Use the Scan Demo app to read bar codes, or to test your symbology decode settings. 1. Swipe up from the bottom of the Home screen to access all apps. 2. Tap Demos. 3. Swipe left or right on the screen until Scan Demo appears under the turntable. Tap the center of the box image to open the app. -
Page 65: Use The Imager As A Flashlight
Use the Imager as a Flashlight To use the imager as a flashlight. 1. Open Quick Settings (see page 38). 2. Tap the Flashlight icon to turn the flashlight on. 3. Select the icon again to turn the flashlight off. Dolphin CN80 Mobile Computer... - Page 66 Dolphin CN80 Mobile Computer...
-
Page 67: Chapter 4 - Use The Phone
CHAPTER USE THE PHONE You can use the phone feature to make and receive phone calls as well as transmit data through wireless wide-area networks (WWANs). Note: Phone features are only supported on CN80 WWAN models (CN80L1N). About the Phone Phone features on the computer include a speaker and a microphone. -
Page 68: Add Or Switch Between Network Carriers
Add or Switch Between Network Carriers The SDR radio and dual SIM card slots in the CN80 WWAN model make it easy for you to add carriers and switch between them as needed. Use the Carrier Selection app to quickly change your WWAN radio network carrier. 1. -
Page 69: Activate The Phone
6. Select a cellular carrier. 7. Tap Apply and then OK to verify the change. 8. Tap OK again when the “Settings are saved” message appears. Under Current Config the active SIM slot appears with the carrier setting you selected. Activate the Phone You use a SIM card to activate the phone on your CN80 WWAN model computer (CN80L1N). - Page 70 7. Lift up on the edge of the battery and remove it from the computer Dolphin CN80 Mobile Computer...
- Page 71 8. Loosen the screws securing the card access door closed. Use the tab to lift the edge of the door. 9. Press down gently and slide the card holder away from the open access door. Lift the edge of the holder up. When using a UICC card for NFC Secure Element NFC link encryption, install the card in SIM slot 1.
-
Page 72: Make A Phone Call
10. Insert the microSD card into the card holder with the contacts facing out. SIM 1 SIM 2 11. Close the holder with the card inserted. Press down gently on the card holder and slide it into the locked position. SIM 1 SIM 2 12. -
Page 73: Answer The Phone
• Select a number from the recent calls list 3. Tap call 4. To end the call, tap on the screen or keypad. Answer the Phone When you receive a phone call, the Incoming Call screen opens. If the caller tele- phone number is available, it appears on the screen. -
Page 74: Make An Emergency Phone Call
Make an Emergency Phone Call You can use the phone to make an emergency phone call even if the SIM card is missing from your phone. The phone shows no service but the call still goes through if you dial certain emergency numbers (e.g., 112, 911, 000, 08, 118, 119, and 999). -
Page 75: Chapter 5 - Use The Camera
CHAPTER USE THE CAMERA Use this chapter to learn how to take pictures and record videos with the color camera. About the Color Camera The CN80 comes equipped with a 13-megapixel color camera, 4K video with image stabilization, and advanced software features for enhanced exposure control for taking pictures and videos. -
Page 76: Change Camera Settings
3. The camera automatically adjusts the focus but you can tap the screen to modify the focal point. By default, the camera senses the lighting in the environment and turns the flash on, if needed. 4. Tap to take a photo. •... -
Page 77: Record A Video
Record a Video This section explains how to record video with the camera in the computer. 1. Tap the Snapdragon Camera icon in the favorites tray. 2. Tap mode selection in the bottom right corner of the app. 3. Tap to select video. - Page 78 Dolphin CN80 Mobile Computer...
-
Page 79: Chapter 6 - Configure The Computer
CHAPTER CONFIGURE THE COMPUTER Use this chapter to learn about the available methods for configuring your mobile computer. You can also use this chapter to learn how to configure network communications and wireless security. How to Configure the Computer You can configure many parameters on the computer such as the bar code symbologies the integrated scanner decodes, or the network settings. - Page 80 When you open the Setting app, suggestions appear at the top of the list. • to expand or collapse the suggestion list. • Tap a suggestion to open the settings screen or app relevant to the suggestion. • Tap the , and then Remove to dismiss the suggestion.
- Page 81 Description Setting Pair a new device • Connect to a Bluetooth Device • Lists Bluetooth enabled devices in range when the radio is turned On • View and rename the computer • View the computer Bluetooth address Previously View previously connected devices. connected devices Connection Preferences Bluetooth...
- Page 82 Battery Note: Some settings in previous ODS versions can be found in Display. Setting Description Battery View current battery charge or charging status. Battery saver turn the Battery saver feature On or Off and set when the feature automatically activates. •...
- Page 83 Sound In the Settings app, select Sound to modify the audio settings. Storage In the Settings app, select Storage to view statistics on available and used storage space on the device and on any portable storage cards installed. Security & Location In the Settings app, select Security &...
- Page 84 Turn auto-sync On or Off for accounts. Turning the feature On allows data apps to refresh data automatically. Honeywell Settings In the Settings app, select Honeywell Settings to access the settings below. Setting Description Battery LED Configures the battery LED behavior. To learn more see,...
- Page 85 Options include: Keep awake on motion, Wake on motion, Face down suspend. Staging Hub Agent Use this agent and settings to connect the computer to the Honeywell Staging Hub Foundation software platform; a centralized software platform IT integrators and administrators can use as a solution for managing, monitoring and deploying Honeywell devices in a connected workspace environment.
- Page 86 Accessibility In the Settings app, select Accessibility to access screen readers, display settings, interaction controls, and audio & on-screen text features to improve accessibility levels. Setting Description Select to Speak When turned on, you can tap specific items on the screen to hear them read aloud.
-
Page 87: About Network Communications
Setting Description Language & input • Set the Device Language • Set and mange the Virtual and Physical keyboard input methods • Configure auto-typing features such as capitalization, punctuation, spell check, and the personal directory • Set text-to-speech output • Adjust the pointer speed Gestures •... -
Page 88: Connect To A Wi-Fi Network
• Bluetooth communications. • USB and serial communications. Connect to a Wi-Fi Network The computer contains an 802.11 a/b/g/n/ac radio to transfer data using wireless communications. Before you connect to a Wi-Fi network, you need to know about your network security protocol and its required credentials. By default, the 802.11 radio is disabled. -
Page 89: Connect To An Ethernet Network
Configure Proxy Settings for a Wi-Fi Network If you need to connect to network resources through a proxy server, you can configure settings for the proxy server for each Wi-Fi network you add. By default, the Wi-Fi networks you add are not configured to connect through a proxy server. Note: Proxy settings apply only to the Wi-Fi network you modify. -
Page 90: How To Connect To Virtual Private Networks
The Ethernet connection screen shows the current Ethernet connection. By default, the computer assumes a DHCP connection, and that your network has assigned an IP address automatically. If DHCP is working, the Ethernet base should indicate that communication with the network is occurring. 6. -
Page 91: About Wireless Security
Wi-Fi Protected Access (WPA) • 802.1x Honeywell recommends WPA2 security with PSK (Personal) or 802.1x (Enterprise) key management. Before you set security, you need to enable the radio, set the date, and set the SSID on your computer. To use 802.1x security, you need to load a root certificate on your computer. - Page 92 Load a Certificate To use a certificate, you must install it in the trusted credential storage on the computer. Note: Apps such as email and browsers that support certificates allow you to install certificates directly from within the app. For more information, see the help that comes with the app.
-
Page 93: About Bluetooth Communications
About Bluetooth Communications Your mobile computer is equipped to communicate with other devices using Bluetooth technology. The Bluetooth radio must be turned On to discover, pair and connect to other Bluetooth devices. System bar icons indicate Bluetooth radio status. Connect a Bluetooth Device To connect to a Bluetooth device, you must turn On the Bluetooth radio and then select the device from a list of discovered devices. -
Page 94: Rename, Share, Or Unpair A Paired Device
2. Tap Scanner Edge 3. Tap the menu icon and then tap Pair BT Scanner. 4. For Honeywell branded scanners tap Honeywell or for Intermec branded scanners tap Intermec. 5. Scan the Scan to connect barcode displayed on screen. Dolphin CN80 Mobile Computer... -
Page 95: About Serial And Usb Communications
Vehicle dock • Home Base • Ethernet Home Base • USB snap-on adapter USB Troubleshooting • If you have a problem with your workstation computer recognizing the USB device, try downloading and installing the Honeywell-aidc-usb-driver. The Dolphin CN80 Mobile Computer... -
Page 96: How To Share Your Mobile Data Connection
driver is part of the Honeywell_Mobility SDK_Android software.zip file. To learn where to get the software, see Developer Information on page 87. • Check to make sure you have enabled the USB for file transfer. To learn more, see Configure USB Connection and Transfer Files on page 32 How to Share Your Mobile Data Connection You can share the mobile data connection through USB tethering or Bluetooth... -
Page 97: Developer Information
Note: When using a Universal Integrated Circuit (UICC) card for NFC Secure Element NFC link encryption, install the card in SIM slot 1. Developer Information To download the Honeywell Mobility SDK for Android and EZConfig for Mobility: 1. Go to www.honeywellaidc.com. 2. Select Get Resources > Software. -
Page 98: About Provisioning Mode
Configuration bar codes do not scan and process. • \honeywell\autoinstall folders are inaccessible. Note: To learn more about network and security for Honeywell mobile computers with Android operating systems, go to www.honeywellaidc.com. Enable or Disable Provisioning Mode 1. Swipe up from the bottom of the Home screen to access all apps. -
Page 99: Chapter 7 - Manage And Maintain The Computer
4. Create an account if you have not already created one. You must login to download the software. 5. Install the Honeywell Download Manager tool on your workstation (e.g., laptop or desktop computer) prior to trying to download any files. -
Page 100: Install Software Updates With Autoinstall
1. Swipe up from the bottom of the Home screen to access all apps. 2. Tap Settings > Provisioning mode under Honeywell Settings. 3. Tap the toggle button to turn Provisioning mode On. 4. Save the upgrade file (*.zip or *.apk) in one of the following folders on the CN80 mobile computer: •... -
Page 101: About The Honeywell Upgrader
9. Once installation is complete, turn Provisioning mode Off. About the Honeywell Upgrader Use the Honeywell Upgrader app (HUpgrader) to check for and install OTA updates or view the current OTA version installed on the computer. How to View the Installed OTA Version 1. -
Page 102: Install Ota Updates
1. Swipe up from the bottom of the Home screen to access all apps. 2. Tap Settings > Provisioning mode under Honeywell Settings. 3. Tap the toggle button to turn Provisioning mode On. 4. Save the OTA file (*.zip) in the following folder on the CN80 computer: •... -
Page 103: Reboot (Restart) The Computer
Reboot (Restart) the Computer You may need to reboot the computer to correct conditions where an application stops responding to the system. 1. Save your files and close any open applications. 2. Press and hold the Power button until the options screen appears. 3. -
Page 104: Enterprise Data Reset The Computer
Enterprise Data Reset the Computer 1. Swipe up from the bottom of the Home screen to access all apps. 2. Select Settings > Advanced > Backup & reset. 3. Tap Enterprise data reset. 4. Tap Reset Phone. 5. If prompted, type your screen lock security pattern, PIN, or password and tap next ( 6. -
Page 105: Full Factory Reset The Computer
Full Factory Reset the Computer 1. Swipe up from the bottom of the Home screen to access all apps. 2. Select Settings > Advanced > Backup & reset. 3. Tap Full factory reset. 4. Tap Reset Phone. 5. If prompted, type your screen lock security pattern, PIN, or password and tap next ( 6. - Page 106 Dolphin CN80 Mobile Computer...
-
Page 107: Computer Agency Information
APPENDIX SPECIFICATIONS Computer Agency Information Dolphin CN80 mobile computers meet or exceed the requirements of all applicable standards organizations for safe operation. The best way to ensure safe operation is to use the mobile computer according to the agency guidelines on the product regulatory sheet, quick start guide and in this user guide. -
Page 108: Physical And Environmental Specifications
Physical and Environmental Specifications 1. Go to www.honeywellaidc.com. 2. Type CN80 in the Search box and then press Enter. 3. Select the Products tab. 4. Click the red arrow under the Dolphin CN80 Handheld Computer description. 5. Select one of the following: •... -
Page 109: N6603Er Imager Engine Reading Distances
1D Symbologies 2D Symbologies Postal Codes Default Default Default UPC/EAN Disabled UPC-A Enabled UPC-E Enabled UPC-E1 Disabled Note: To learn about changing the symbology settings, see Change the Scanner Settings page 46. N6603ER Imager Engine Reading Distances The depth of field measurements were taken using these parameters: •... -
Page 110: Ex20 Near/Far Image Engine Reading Distances
EX20 Near/Far Image Engine Reading Distances The depth of field measurements were taken using these parameters: • Distances are measured from the front of the engine. • +23 °C (+73 °F), 0 lux • Photographic quality codes Note: Time to Read and Depth of Field are impacted if the bar code symbol is at the edge of the image. - Page 112 Honeywell 9680 Old Bailes Road Fort Mill, SC 29707 www.honeywellaidc.com ™ CN80-A-EN-UG-01 Rev B 2/20...