
Related Manuals for Parmco FS 600-CER


Summary of Contents for Parmco FS 600-CER
- Page 1 Installation and Operating Instructions Models: FS 600-CER FS 600-BKC FS 600-WHC AR 900-CER For your convenience, we recommend to attach the serial number label HERE. 727626032017...
-
Page 2: Warranty
• Normal or scheduled maintenance including blocked filters or ducting. Please retain this Warranty card together with receipt or other proof of purchase date when seeking service during the warranty period • Consumable items such as light bulbs. • Any damage to hobs caused by spills when cooking. • Any breakage or damage of glass items. • Any damage caused by non recommended product used for cleaning, Please contact Parmco at 09 573 5678 if your maintaining, lubricating or similar. appliance needs servicing under warranty. Please • Any aspect relating to the installation of the product, or damage caused have your model number and proof of purchase ready. during installation including blocked access for repair. Warranty repairs must be authorized by Parmco. • Any third party (including reseller) or consequential loss or damage (direct or indirect) however arising. Subject to updates without prior notice, please visit www.parmco.co.nz for E & O.E. 727626032017 the latest version. - Page 3 Dear Valued Customer, Thank you and congratulations on purchasing your new Parmco appliance. All Parmco products are made to the highest quality and design standards. We are sure you will enjoy your new appliance. As a note, please read through these instructions carefully. These will assist you in gaining a complete understanding of the functions and features o ered by your appliance.
-
Page 4: Product Registration
Requirements with particular reference to the New Zealand Electrical and Gas Installation Standards. Any attempt to install this or any other Parmco product without an authorized person could result in damage to the product and a possible health hazard. Not having an authorized person install this appliance may result in all associated warranties from Parmco Appliances being null and void. -
Page 5: Important Safety Information
IMPORTANT SAFETY INFORMATION For best performance and to extend the life of your appliance, we recommend that you read the instructions in this owner's manual thoroughly before using your new appliance. It will provide you with all the information you need to ensure its safe installation, proper use and maintenance. Keep this owner's manual for future reference. - Page 6 • Do not spray aerosols in the vicinity of this appliance while it is in operation. • DO NOT USE OR STORE FLAMMABLE MATERIALS IN THE APPLIANCE OR NEAR THIS APPLIANCE. For any enquiries please contact Parmco Appliances (09) 573 5678.
- Page 7 USE AND CARE USE AND CARE How to use your oven We recommend that you read the instructions in this owner's manual carefully before use. It will provide you with all the instructions you require to ensure safe installation, use and maintenance. Always keep this owner's manual close to hand since you may need to refer to it in the future.
-
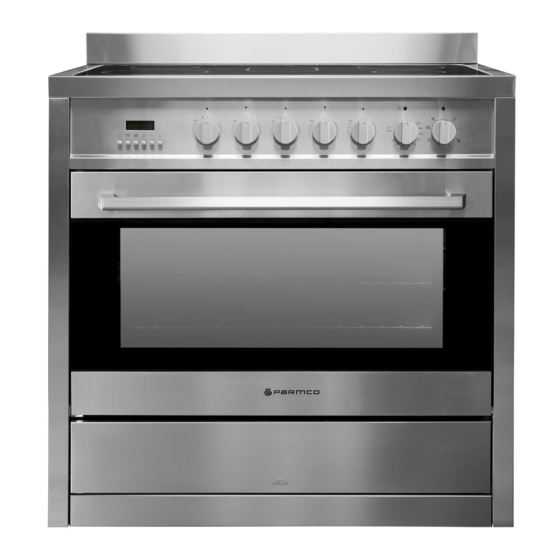
Page 8: Product Description
PRODUCT DESCRIPTION Description of appliance AR 900 ceramics 900mm FS 600 ceramics... - Page 9 1. Electronic clock 7. Large cooktop element 2. Control knobs (cooktop burners) 8. Oval cooktop element 3. Cooking temperature selection knob 9. Power & residual heat indicators 4. Cooking mode selection knob 5. Small cooktop element 6. Medium cooktop element Oven and Accessories The appliance is supplied with easy clean shelf supports which offer a range of shelf heights.
- Page 10 Controls...
-
Page 11: Using The Cooktop
USING THE COOKTOP Choosing the right Cookware Do not use cookware with jagged edges or a curved base. Make sure that the base of your pan is smooth, sits flat against the glass, and is the same size as the cooking zone. Always centre your pan on the cooking zone. Always lift pans off the ceramic hob –... - Page 12 Single cooking zones Turn the control knob to the desired position (low to high). Adjustment is continuous so the cooking zone will operate at any intermediate knob setting between low and high. Once the cooking zone is hot, the LED corresponding to the zone illuminates. You can switch off the cooking zone by turning the knob, in either direction, to the off position.
-
Page 13: Using The Oven
USING THE OVEN This multi-function oven combines the advantages of traditional conventional ovens with a modern fan assisted oven, all in a single appliance. It is extremely versatile, and allows you to choose easily and safely between different modes. The various cooking modes are selected using the cooking mode selection knob, located on the control panel. -
Page 14: Electronic Timer
ELECTRONIC TIMER NOTE: The clock must be set in order for the oven to operate. 6 BUTTON DIGITAL CLOCK (only available on certain models) This appliance has a digital display 24 hour clock with six control buttons. When the power is connected, the screen displays 3 flashing numbers and “AUTO”. - Page 15 For Example: If cooking time takes 45 minutes and you want it to finish at 14:00: 1. Press button, set the cooking time to 45 minutes with the + and – buttons. 2. Press button, set finish time to 14:00 with + and – buttons. 3.
- Page 16 The Oven Light Set the cooking mode selection knob to switch on the oven light/s. The oven light/s will stay on while the oven is operating. Cooling / Ventilation In order to keep the exterior of the appliance cool, the appliance is fitted with a cooling fan that operates automatically.
-
Page 17: Cooking Modes
COOKING MODES Symbol Function description Defrost: When Defrost is selected, the fan located at the back of the oven circulates room temperature air around the oven. This is recommended for defrosting all types of food, but is particularly effective at defrosting delicate food items. It is possible to accelerate the defrosting process by selecting a multi-cooking mode and setting the temperature between C and 100 Conventional Bake: When set to Conventional mode, the top and bottom heating elements... -
Page 18: Practical Cooking Advice
Please note that baking results will vary between different brands of stoves/ovens and your usual baking style may need adjusting in order to get the best results out of your Parmco oven. Recipes may state the use of certain cooking functions and temperatures, but due to the variance in cooking ingredients worldwide it is in your best interests to adapt the recipe if results were not as expected by trialling different functions and temperatures. -
Page 19: Cooking Guide
COOKING GUIDE Selector Knob Food to be Cooked Level from below Temperature Time in Minutes Setting Conventional Bake First Courses Lasagne 2 - 3 210 - 230 Oven Baked Pasta 2 - 3 210 - 230 Meat Roast Veal 175 - 200 30 –... -
Page 20: Care And Maintenance
There is a seal surrounding the oven opening which guarantees its optimum performance. Check the condition of this seal on a regular basis. Should it become damaged, please contact Parmco Appliances. This may or may not be covered under warranty. - Page 21 Cleaning the Front Panels To clean the front panels, use hot soapy water. Use of abrasive cleaners, powders, pads, etc will remove the printed graphics prematurely. How to Remove the Oven door For a more thorough clean, you can remove the oven door. Proceed as follows: ·...
- Page 22 • Wattage: 25W • Type: E14 Replacement lamps are available from Parmco Appliances Disposal Parmco has a commitment to being environmentally responsible. To avoid potential negative impacts on the environment, please ensure that this appliance is disposed of correctly. This...
-
Page 23: Important Note
Requirements with particular reference to the New Zealand Electrical and Gas Standards. Any attempt to install this or any other Parmco products without an authorized person could result in damage to the product and possible health hazards. Not having an authorized person install this appliance may result in all associated warranties from Parmco Appliances being made null and void. -
Page 24: Installation Instructions
If a combustible bench top is within 200mm of any burner, then the appliance top should be a minimum of 10mm above the bench top. Any ventilation product supplied by Parmco Appliances should be a minimum of 650mm above this appliance. - Page 25 It is possible to install the FS 600-CER and AR 900-CER units on a “plinth” if required. Special ventilation is required in this application. Please refer to the diagram below. • The appliance should be placed on a plinth constructed of material suitable to carry the full weight of the appliance.
-
Page 26: Catalytic Liners
Catalytic Liners NOTE: If your oven does not have catalytic liners and you wish to purchase them, they are available from your retailer or Parmco. Operation The catalytic liners are coated with a specially formulated enamel coating, over a base of regular enamel. - Page 27 CATALYTIC LINER INSTALLATION Remove the side racks and fitting side catalytic liners Unclip the bottom of the side rack from the lug. Lift the side rack up to disengage the hooks. The side rack should now be free to be pulled in towards the centre of the oven. Repeat process for the other side.
-
Page 28: Electrical Connection
This appliance is not intended to be operated by means of an external timer of separate remote- control system. It is essential that this unit is operated in conjunction with some form of ventilation/extraction system. Parmco has a wide range of kitchen ventilation solutions available. -
Page 29: Technical Data
TECHNICAL DATA Product Code Max power consumption FS 600-CER, FS 600-WHC, FS 600-BKC 10.7KW AR 900-CER 12.45KW This appliance must be installed in accordance with New Zealand’s electrical installation rules and regulations by a suitably qualified and authorized person. Electricity supply...