D-Link VoiceCenter DPH-125MS User Manual
D-link voicecenter dph-125ms: user guide
Hide thumbs
Also See for VoiceCenter DPH-125MS:
- Quick install manual (12 pages) ,
- Specifications (3 pages) ,
- User manual (162 pages)
Table of Contents
Table of Contents

Related Manuals for D-Link VoiceCenter DPH-125MS


Summary of Contents for D-Link VoiceCenter DPH-125MS
-
Page 2: Table Of Contents
Advanced ... 31 QoS Settings ... 31 NAT Traversal Settings ... 32 Voice Settings ... 34 Phone ... 35 D-Link DPH-15MS User Manual Table of Contents Phone Settings ... 35 Call Tracing Log ... 37 Speed Dial ... 38 Virtual Operator Settings ... 39 Reboot ... -
Page 3: Product Overview
• D-Link DPH-125MS IP Phone • Power Adapter • CAT5 Ethernet Cable • CD-ROM with User Manual, and QIG Note: Using a power supply with a different voltage rating than the one included with the DPH-125MS will cause damage and void the warranty for this product. -
Page 4: Introduction
*Requires a third party local phone service plan. D-Link Systems, Inc. is not a Telephone Service Provider or VoIP Phone Service Provider. D-Link DPH-15MS User Manual... -
Page 5: Features
• View Call History on the LCD Display • Connect a Phone and Computer Using a Single Ethernet Connection From a Network. • Auto Phone Discovery Feature Makes Installing Hardware Quick and Easy. D-Link DPH-15MS User Manual Features Response Point Phone System - Up to 50. -
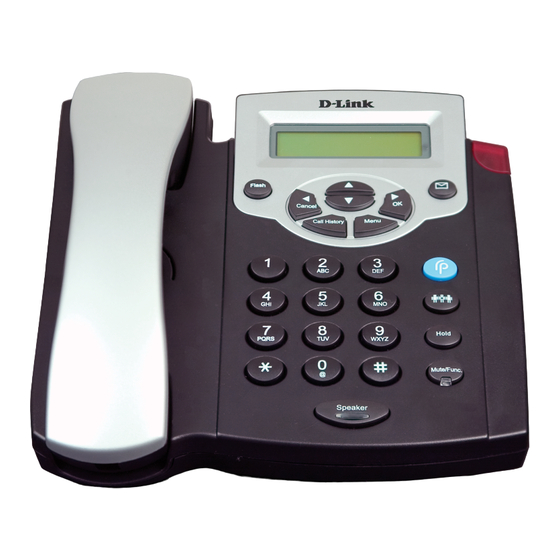
Page 6: Hardware Overview
Disable the phone’s microphone so the person on the other line can not hear anything, access the language selection, access the time format. (15) Speaker Phone Enables you to use the phone without using the handset. D-Link DPH-15MS User Manual Hardware Overview Front... -
Page 7: Rear
PC Port Used to connect the IP Phone through Ethernet cable to your D-Link DPH-15MS User Manual Rear Power Receptor Receptor for the supplied power adapter. LAN Port Used to connect the IP Phone through Ethernet cable to your Local Area Network. -
Page 8: Installation
2. Plug the power adapter into an AC outlet or power strip and plug the other in into the phone’s AC input. The Power LEDs will light up to indicate proper operation. Once you have connected the IP Phone to your network, it should look like the diagram below. D-Link DPH-15MS User Manual Installation... -
Page 9: Setup Using Microsoft Response Point Administrator
Section - Installation Setup Using Microsoft Response Point Administrator This section will show you how to configure your new D-Link DPH-125MS IP Phone. Use the following steps to configure the IP Phone using Microsoft Response Point Administrator. ® ™... - Page 10 Select the check box confirming the IP Phone is connected and plugged in. Click Next to continue. Click Next Select the D-Link DPH-125MS IP Phone you just connected and click Next to continue. Click Next D-Link DPH-15MS User Manual...
- Page 11 You should specify nicknames and titles if you think callers will use them when asking for this user. In the Extension number box, change the extension number if desired and click OK to continue. Click OK D-Link DPH-15MS User Manual...
- Page 12 You can assign up to 3 additional users to this phone or click Next to continue. Click Next The owner and phone name have automatically been created for you. Click Finish to continue. Click Finish D-Link DPH-15MS User Manual...
- Page 13 Section - Installation The IP Phone has been successfully added to the phone system. Click Close to exit the configuration wizard. Click Close D-Link DPH-15MS User Manual...
-
Page 14: Setting Up The Ip Phone Manually
• Press the Down-Arrow key • Use the Right-Arrow key to select Enable Setup ADSL ID • Press the Down-Arrow key • Enter the ADSL ID Setup ADSL Password • Press the Down-Arrow key • Enter the ADSL Password D-Link DPH-15MS User Manual... - Page 15 • Use the Right-Arrow or Left-Arrow key to select Disable • Press the Down-Arrow key • Enter in the IP Address • Press the Down-Arrow key • Enter in the Subnet Mask • Press the Down-Arrow key • Enter the router’s IP Address D-Link DPH-15MS User Manual...
-
Page 16: Dns Server Ip
Enable CD Unconditional to forward all the incoming calls to another number. Otherwise set to disable. You will need to use a web-browser to input the forwarded phone number. • Press the Down-Arrow key • Use the Right-Arrow or Left-Arrow key to select “Enable” or “Disable” D-Link DPH-15MS User Manual... -
Page 17: Anonymous Call
• Use the Right-Arrow or Left-Arrow key to select “Enable” or “Disable” Anoy Call Rej. (Anonymous Call Rejection) Reject any anonymous incoming calls. • Press the Down-Arrow key • Use the Right-Arrow or Left-Arrow key to select “Enable” or “Disable” D-Link DPH-15MS User Manual... -
Page 18: Ringing Type
Language Selection The DHP-125MS IP Phone supports 4 languages: English, German, Italian and Spanish. • Press the Mute/Func. followed by the number 1 key • Use the UP or Down arrows to select the preferred language. D-Link DPH-15MS User Manual... -
Page 19: Time Format
• Press the Up-Arrow key to increase the volume and the Down-Arrow key to decrease the volume. Handset Volume • Pick up the handset and press the Up-Arrow key to increase the volume, or press the Down-Arrow key to decrease the volume. D-Link DPH-15MS User Manual... -
Page 20: Operating The Ip Phone
• When the phone rings, lift the handset or press the Speaker key to begin the conversation. Switching to another Line • While your in a conversation on one line, press Hold to switch to another line. D-Link DPH-15MS User Manual Operating the IP Phone... -
Page 21: Call Transfer
• After Person A answers the phone, press the Hold key to place Person A on hold. • Dial the extension or phone number of Person B and wait until Person B picks up the phone. • Press the Conference key to begin a 3-way conference call. D-Link DPH-15MS User Manual... - Page 22 Check Voice Messages • Press the Voice Message key • Enter the extension in which you want to check for voice messages D-Link DPH-15MS User Manual...
-
Page 23: Configuration
Section - Configuration Configuration This section will show you how to configure your new D-Link DPH-125MS IP Phone using the web-based configuration utility. Although this device has a built-in Web Interface, it is suggested that you do not make any changes manually. -
Page 24: Network
(atomic clock or time server). It is good practice to have all your networked computers synchronized with one server. Time Zone: Select your time zone. If there is daylight savings in your area, click the check box. D-Link DPH-15MS User Manual... -
Page 25: Network
Section - Configuration Network Network Settings DHCP DHCP: Dynamic Host Configuration Protocol (DHCP) Server address. The IP address information is obtained automatically from your ISP. DNS Server: DNS address is provided by your ISP. D-Link DPH-15MS User Manual... - Page 26 Choose PPPoE if your ISP uses PPPoE. (Most DSL users use PPPoE). PPPoE ID: Enter the PPPoE ID/username provided by your ISP. PPPoE Password: Enter a PPPoE password. DNS Server: Enter the DNS address provided by your ISP. D-Link DPH-15MS User Manual PPPoE...
- Page 27 Enter in the router’s IP address. Subnet Mask: Enter the Subnet mask address. DNS Server: Enter in the DNS server address provided by your ISP. Submit: Click Submit for the new settings to take effect. D-Link DPH-15MS User Manual Static...
-
Page 28: Voip
Enter the outbound proxy port number. Outbound Proxy Port Number: Send messages via You can Enable or Disable this option. Outbound Proxy: MWI Message Enter the message server domain name or IP address. Server Domain Name/IP Address: D-Link DPH-15MS User Manual VoIP SIP Settings... - Page 29 Session Timer Select the SIP request method. Default method is Invite. Method: UDP/TCP: Select the SIP signal transmission method. Default method is UDP. Register With Enable or disable Register with Proxy. Proxy: D-Link DPH-15MS User Manual...
-
Page 30: Sip Account Settings
User name to log into the SIP server. Username: Authentication Password to log into the SIP server. Password: Register Status: Displays if the current phone is registered or unregistered with the SIP server. D-Link DPH-15MS User Manual SIP Account Settings... -
Page 31: Advanced
Section - Configuration Advanced QoS Settings Voice TOS: Sets the type of service for this Internet datagram. SIP TOS: Sets the type of service for this higher priority of signaling packet. D-Link DPH-15MS User Manual... -
Page 32: Nat Traversal Settings
Displays the External SIP port number. External Media Displays the External media port number. Port: UPnP: Enable or disable universal plug and play devices. Some NAT supports UPnP so STUN is not required and must be disabled. D-Link DPH-15MS User Manual NAT Traversal Settings... - Page 33 Section - Configuration Always send Choose to Enable or disable Always Send KeepAlive Packets. KeepAlive Packet: KeepAlive Time: The time interval that the IP phone always sends the keep alive packet in order to ensure NAT works properly. D-Link DPH-15MS User Manual...
-
Page 34: Voice Settings
Select from the most used codec to the least used codec. RTP Packet Length: Real-Time Transfer Protocol (RTP) packet length. DTMF Method: Enable or disable VAD. Payload Type: Select the tone method for IP phone. D-Link DPH-15MS User Manual Voice Settings... -
Page 35: Phone
2. Click Busy to enable call forward to another number when user is busy on the phone. 3. Click Unconditional to transfer all incoming calls to another number. Enter the call forward number on the text box. D-Link DPH-15MS User Manual Phone Phone Settings... -
Page 36
Conference Call: Pound Key Dial: Enable or disable Pound key Dial. Pound Key ( # ) can be defined as a
key. Miss Call Display: Enable or disable the miss call which display on the LCD. D-Link DPH-15MS User Manual... -
Page 37: Call Tracing Log
Section - Configuration Call Tracing Log Call Tracing Log keeps a record of all the phone activities. This log can be used to troubleshoot hardware problems. D-Link DPH-15MS User Manual... -
Page 38: Speed Dial
Section - Configuration Speed Dial Speed dial numbers can be accessed from the IP phone. D-Link DPH-15MS User Manual... -
Page 39: Virtual Operator Settings
Section - Configuration Virtual Operator Settings Telephone Enter the phone number for the Virtual Operator. Number: D-Link DPH-15MS User Manual... -
Page 40: Reboot
Section - Configuration Reboot Restart System Restart: Click Restart to update all the settings and reboot the system. D-Link DPH-15MS User Manual... -
Page 41: Restore Factory Setting
Section - Configuration Restore Factory Setting Restore: Click Restore to restore the Gateway to it’s factory default settings. D-Link DPH-15MS User Manual... -
Page 42: Troubleshooting
Why do I get “Can’t Upgrade Now” screen when I click Submit in the configuration menu? • Make sure you exit setting mode (phone book, menu, speed dial…) before you click Submit in the configuration menu. D-Link DPH-15MS User Manual Troubleshooting... -
Page 43: Networking Basics
Check your IP address After you install your new D-Link adapter, by default, the TCP/IP settings should be set to obtain an IP address from a DHCP server (i.e. wireless router) automatically. To verify your IP address, please follow the steps below. -
Page 44: Statically Assign An Ip Address
2000 - From the desktop, right-click My Network Places > Properties. ® Step 2 Right-click on the Local Area Connection which represents your D-Link network adapter and select Properties. Step 3 Highlight Internet Protocol (TCP/IP) and click Properties. Step 4 Click Use the following IP address and enter an IP address that is on the same subnet as your network or the LAN IP address on your router. -
Page 45: Technical Specifications
• 3-way Conference • Redial Codec • G711u-law • G711a-law • G729a/b D-Link DPH-15MS User Manual Phone Functions • Multi-user (4 SIP Accounts) • Speakerphone Communication • Pre-dial Before Sending • Handset / Speakerphone Volume Adjustment • Speed-dial (10 records) •... - Page 46 *1-Year Limited Warranty available only in the USA and Canada. ©00-00. D-Link Corporation/D-Link Systems, Inc. All rights reserved. D-Link, the D-Link logo, and the VoiceCenter logo are trademarks or registered trademarks of D-Link Corporation or its subsidiaries in the United States and/or other countries. Microsoft Response Point is either a registered trademark or trademark of Microsoft Corporation in the United States and/or other countries.
-
Page 47: Contacting Technical Support
• Hardware Revision (located on the label on the bottom of the phone (e.g. rev A1)) • Serial Number (s/n number located on the label on the bottom of the phone). Please check the D-Link support site below for the latest product information including FAQ’s, known issues, and other product-related updates. -
Page 48: Warranty
Any repair or replacement will be rendered by D-Link at an Authorized D-Link Service Office. The replacement hardware need not be new or have an identical make, model or part. D-Link may, at its option, replace the defective Hardware or any part thereof with any reconditioned product that D-Link reasonably determines is substantially equivalent (or superior) in all material respects to the defective Hardware. - Page 49 Warranty Period and is subject to the same limitations and exclusions. If a material non-conformance is incapable of correction, or if D-Link determines in its sole discretion that it is not practical to replace the non-conforming Software, the price paid by the original licensee for the non-conforming Software will be refunded by D-Link;...
- Page 50 • The customer is responsible for all in-bound shipping charges to D-Link. No Cash on Delivery (“COD”) is allowed. Products sent COD will either be rejected by D-Link or become the property of D-Link. Products shall be fully insured by the customer and shipped to D-Link Systems, Inc., 17595 Mt.
-
Page 51: Limitation Of Liability
RESULTING FROM THE USE OF THE PRODUCT, RELATING TO WARRANTY SERVICE, OR ARISING OUT OF ANY BREACH OF THIS LIMITED WARRANTY, EVEN IF D-LINK HAS BEEN ADVISED OF THE POSSIBILITY OF SUCH DAMAGES. THE SOLE REMEDY FOR A BREACH OF THE FOREGOING LIMITED WARRANTY IS REPAIR, REPLACEMENT OR REFUND OF THE DEFECTIVE OR NONCONFORMING PRODUCT. -
Page 52: Fcc Statement
The firmware setting is not accessible by the end user. For detailed warranty information applicable to products purchased outside the United States, please contact the corresponding local D-Link office. This class B digital apparatus complies with Canada ICE-003 D-Link DPH-15MS User Manual... -
Page 53: Registration
Appendix F - Registration Registration Product registration is entirely voluntary and failure to complete or return this form will not diminish your warranty rights. Version 1.2 October 16, 2008 D-Link DPH-15MS User Manual...