Table of Contents
Quick Links
Table of Contents

Related Manuals for Emerson Cooper-Atkins 20900


Summary of Contents for Emerson Cooper-Atkins 20900
- Page 1 Cooper-Atkins Cooking Oil Tester Model No. 20900 Instruction Guide...
-
Page 2: Table Of Contents
Contents Safety....................iii I. Overview ..................1 1.1. Overview ......................1 1.2. Use conditions of instrument ................2 2. Instrument appearance and working principle ......3 2.1 Instrument appearance ..................3 2.2 Working principle ....................3 3. Main performance ...............4 3.1 Technical indicators ................... 4 3.2 Technical Specifications .................. - Page 3 6. Analysis and elimination of failure ........10-11 7. Daily maintenance of the instrument ........12-13 7.1 Cleaning probe ....................12 7.2 Cleaning the outer casing ................. 12 7.3 Calibration instrument ..................13 8. Storage and transportation ............13 9. Out of factory instructions ............14 10.
-
Page 4: Safety
Warning: The instrument should be used within the specified range. It is easy to damage the instrument if it is out of range. Note: If the instrument fails, do not use it, contact Emerson customer service. Note: Emerson Cooper-Atkins recommends the use of original spare parts. -
Page 5: Overview
1. Overview 1.1. Overview This Cooking Oil Tester is a portable measuring instrument designed to quickly detect the aging of frying oil. The TPM value (total polar component) reflects the deterioration of edible oil due to high temperature during frying process. The sensor uses the change in capacitance value to determine the total polar component content by unit of %. -
Page 6: Use Conditions Of Instrument
Calibration You have the following options: 1. Return to Emerson for calibration. 2. The user calibrates himself during frying process. We recommend that you measure the unexpanded edible oil after it is heated to 50°C when first using a new instrument. It is best to perform multiple measurements in succession and repeat, and record the TPM value for each measurement. -
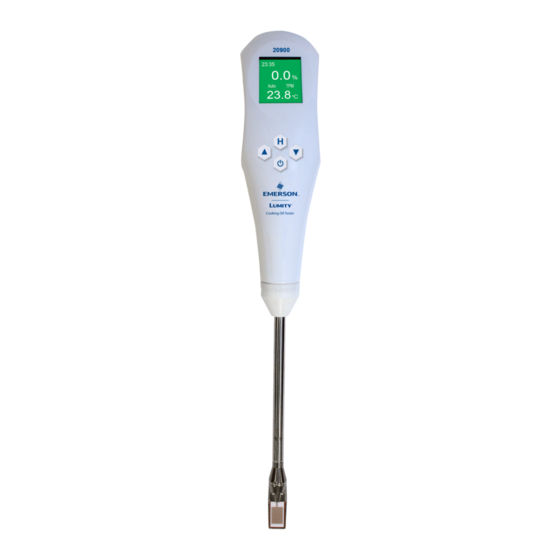
Page 7: Instrument Appearance And Working Principle
2. Instrument Appearance And Working Principle 2.1 Instrument appearance Charging Indicator Display Control Button Probe Rod Maximum immersion depth Minimum immersion depth Oil quality (% TPM) and temperature probe 2.2 Working principle {HOLD} key, manually save reading data/ configure {DOWN} key, set the adjustment value and option of menu {POWER} key, power switch of instrument {UP} key, used to set up the adjustment value of... -
Page 8: Main Performance
4.1 Unpacking inspection After the instrument is unpacked, check all the complete machines and accessories according to the packing list attached, and check if there is any damage. If there is any damage, please contact Emerson Cooper-Atkins. (Please keep the damaged parts). -
Page 9: Installation Conditions
After unpacking, main components confirm contents: 1. Cooking Oil Tester 2.Micro USB cable. 3. Instruction manual. 4. Probe cover. 4.2 Installation conditions 1. This instrument should not be installed in places where it is exposed to direct sunlight and cold, excessive heat or humidity. Generally, the indoor temperature should be kept between 10°C and 28°C (50°... -
Page 10: Instrument Settings
5.3 Instrument Settings After the instrument is turned on, it automatically enters the measurement interface. The contents of the measurement interface and its meaning are explained as follows: 12:00 System time, indicating the current time. Bluetooth function, when the display indicates that the Bluetooth function is on. Wi-Fi function indicates Wi-Fi function is enabled. - Page 11 Return Select “return” to save the menu setting. Exit, and return to the measurement interface. Auto Automatic holding setting, [ON] for start up and [OFF] for shutdown. Wi-Fi Wi-Fi settings, [ON], [OFF] Bluetooth Bluetooth settings, [OFF], [Printer], [Data Communication]. Data storage Measured data storage function, [ON] for startup and [OFF] for shutdown.
-
Page 12: Sample Test
Under the measurement interface, press and hold [Hold] key (> 3 seconds) to enter the menu setting interface, adjust the setting contents by [Up] key and [Down] key, then press [Hold] key (<1 second) ) and select the menu mode. After adjusting the menu to be modified by [Up] and [Down] key, press [Hold] key (<1 seconds) to save and exit the menu. -
Page 13: Shutdown Operation
7. When the automatic hold function is turned on, immerse the probe in the frying oil, pay attention to the immersion depth! If the temperature is within the allowable measurement range (0° - 200° C / 32° to 392° F), wait until Auto Hold appears on the screen. -
Page 14: Analysis And Elimination Of Failure
6. Analysis and Elimination of Failure Serial Fault Cause Analysis Method of exclusion Remarks number phenomenon 1. The lithium 1. Use the instrument after Press the power battery is low in charging it; key, the screen power; does not appear 2. - Page 15 Serial Fault Cause Analysis Method of exclusion Remarks number phenomenon The data is When the abnormal temperature is when the too low, it will After heating the edible oil edible oil in low cause the edible to 50°C (122°F,) stop heat temperature is oil to crystallize and re-measure it.
-
Page 16: Daily Maintenance Of The Instrument
7. Daily Maintenance of the Instrument 7.1 Cleaning probe 1. Do not touch the hot parts of instrument. 2. Allow the instrument to cool sufficiently before cleaning. 3. Use a weak detergent, clean it with water or soapy water. 4. Gently clean the probe with a soft tissue or rinse it by clean water. 5. -
Page 17: Calibration Instrument
7.3 Calibration instrument We recommend unused edible oil for calibration. The instrument should be calibrated regularly with calibration oil. We recommend that you calibrate it every 3 months to ensure accuracy and quality. The calibration steps are as follows: 1. Clean the probe before calibration, see the cleaning instructions section of the probe. 2. -
Page 18: Out Of Factory Instructions
The following conditions are not covered by the repair: 1. Exceeding the warranty period; 2. Damage caused by improper use; 3. Damage caused by disassembly without the permission of Emerson Cooper-Atkins; 4. Damage caused by improper transportation and storage. -
Page 19: Consumables And Spare Parts
This electronic device cannot be discarded together with unsorted general waste. Improper handling can harm the environment and human health. Please refer to local regulations for collection and disposal equipment of waste disposal. Emerson Commercial & Residential Solutions 356 Chisholm Road Auburn NSW 2144, Australia...