Table of Contents
Quick Links
Table of Contents

Related Manuals for D-Link DWR-956M


Summary of Contents for D-Link DWR-956M
- Page 1 LTE / FIBRE Wi-Fi AC1200 Dual Band Gigabit Router DWR-956M...
-
Page 2: Preface
Preface D-Link reserves the right to revise this publication and to make changes in the content hereof without obligation to notify any person or organization of such revisions or changes. Manual Revisions Revision Date Description 1.10 June 1, 2020 Final Release Trademarks D-Link and the D-Link logo are trademarks or registered trademarks of D-Link Corporation or its subsidiaries in the United States or other countries. -
Page 3: Table Of Contents
Preface ......................2 Ethernet ..................27 Product Overview ..................7 3G/4G .................... 27 Package Contents ..................7 LAN ....................28 System Requirements ................8 Network ..................28 Introduction .................... 9 Ethernet ..................28 Features ....................10 WLAN ..................... 29 Hardware Overview ................11 DHCP Client ................... - Page 4 Wireless Basic Configuration 5GHz ........... 49 ALG Settings ..................64 Wireless Security Setting ..............50 Security ....................65 Advanced Setup ..................51 IP Filtering ..................65 WAN ....................51 Port Filter Rule Settings ..............66 WAN - Ethernet Mode Configuration ........... 51 MAC Filter..................
- Page 5 Classification Traffic Base .............. 78 UPnP ....................88 Classification Traffic Base Settings ............ 79 Multicast ....................89 QoS TCP Flags ................80 IGMP Settings ..................89 Bandwidth Limit ................80 MLD Settings ..................90 Port Bandwidth Limit Configuration ..........80 SNMP ....................
- Page 6 LTE BAND Settings ................106 Logs ....................110 Management ................... 106 Service Control ................110 Reboot ....................106 Access Control -- IP Address Configuration ........111 Settings....................106 Internet Time................... 112 Backup ..................... 106 Tools ....................113 DHCP Option 66 Files ..............107 Ping ....................
-
Page 7: Product Overview
Quick Install Guide If any of the above items are missing or damaged, please contact your reseller. Note: Using a power supply other than the one included with the DWR-956M may cause damage and void the warranty for this product. -
Page 8: System Requirements
System Requirements Network Requirements • An active account with an Internet Service Provider using one of the following connection types: • A Mobile connection using a SIM card • A broadband device connected using the WAN port Web-based Configuration Utility Requirements Computer with the following: •... -
Page 9: Introduction
Introduction The D-Link DWR-956M FIBRE / LTE WI-FI AC1200 DUAL BAND ROUTER with VOIP share your internet connection over blazing-fast Wireless AC. Equiped with advanced AC beamforming technology to maximize the speed and range of your wireless signal to significantly outperform 802.11n and other older, non-beamforming capable 802.11ac devices. -
Page 10: Features
Features Faster Wireless Networking -The DWR-956M is dual-band capable and equipped with four antennas to provide wireless speeds of up to 1200 Mbps* for your wireless devices. It operates on both the 2.4 GHz and 5GHz bands to allow separation of traffic so users can participate in high-bandwidth activities, such as video streaming, online gaming, and real-time audio, without affecting low-priority traffic like email and web surfing. -
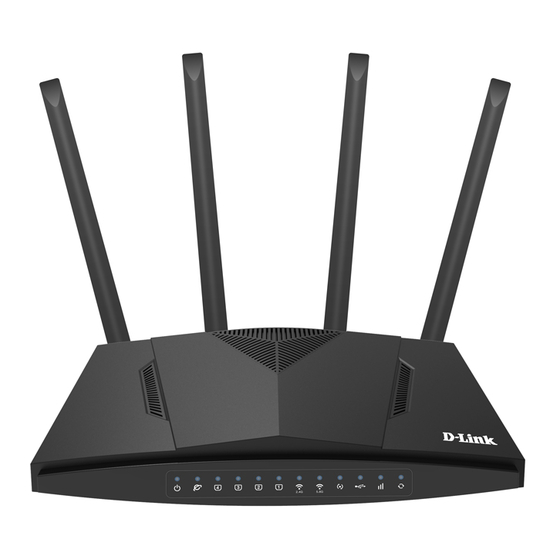
Page 11: Hardware Overview
Hardware Overview Back Panel Power Button Press to switch router ON/OFF Power Connector Connector for the supplied power adapter. Ethernet Ports Connects to Ethernet devices such as computers. WAN Port Connects to Ethernet WAN devices. FXS VoIP port Connects to an analogue telephone. -
Page 12: Side Panel
USB 3.0 Port Connect to USB Storage Device Reset Button Press and Hold the Reset button for 25 seconds to reset the DWR-956M WPS Button Press to start the WPS process and automatically create an encrypted connection to a WPS client. -
Page 13: Leds
Hardware Overview LEDs Power Solid Blue Device is powered on. Solid Blue The WAN is properly connected. Blinking Blue The WAN is properly connected and data is being transmitted. No connection or Cable not connected properly. LAN 1,2,3,4 Solid Blue A device is connected to the Ethernet port. - Page 14 WiFi 2.4Ghz/5Ghz Blinking Blue Enabled and data is being transmitted. Solid Blue Enabled and no data is being transmitted. WiFi is turned OFF Blinking Blue WPS pairing mode active. Solid Blue WPS enabled, paired with WPS client WPS disabled. Solid Blue USB storage device connected No USB device connected or USB not detected.
-
Page 15: Installation
Note: This installation section is written for users who are setting up their home Internet service with the DWR-956M FIBRE / LTE WI-FI AC1200 DUAL BAND ROUTER with VOIP for the first time. If you are replacing an existing modem and/or router, you may need to modify these steps. -
Page 16: Wireless Installation Considerations
The key to maximizing wireless range is to follow these basic guidelines: 1. Keep the number of walls and ceilings between the D-Link router and other network devices to a minimum - each wall or ceiling can reduce your adapter’s range from 3-90 feet (1-30 meters.) Position your devices so that the number of walls or ceilings is minimized. -
Page 17: Manual Setup
Manual Setup Hardware Installation... -
Page 18: Getting Started
Quick Setup Step 1 The Quick Setup menu is used to set up the Internet connection on the DWR-956M. This is the first step in the Quick Setup tool and allows you to choose the connection type. Step 1: Select Interface Type: Please select which WAN interface to use: 3G/4G or ETH. - Page 19 For SIM card: please verify sim card connectivity (whether the SIM card is active and inserted correctly) For Fibre: please verify that your fibre is active and the cable from the ONT device is pluged into the blue port at the back of the DWR-956M...
- Page 20 Step 3 IF PPPoE Passed then user will need to enter the Username and Password as provided by the Internet Service Provider (ISP). IF DHCP passed device will automatically skip to step 5. Username: Enter your Username here. (usually looks like an email address like [email protected]) Password: Enter your Password here.
- Page 21 Step 5 On Step 5 the user will be able to modify the WiFi SSID and Preshare Key to their requirements. SSID 2.4GHz: The name of the Wi-Fi network operating on 2.4GHz. Preshare key: The password for the Wi-Fi network operating on 2.4GHz. SSID 5GHz: The name of the Wi-Fi network operating on 5GHz.
- Page 22 Step 7 In this step you can enter the Site Username, Site Password, Confirm Site Password and Site LAN IP/Netmask to connect to Telkom VPN lite Site Username: The site username. Site Password: Enter the site password here. Confirm Site Password: Enter the site password again to confirm. Site LAN IP/ Netmask: Enter the LAN IP or Netmask for the site here.
-
Page 23: Configuration
To access the web interface, open a web browser and enter the IP address of the router (by default this is 10.0.0.2) into the address bar. When the login page of the DWR-956M is displayed, enter the username and password you set on step 6 of the setup wizard. By default the login details are admin for the username and admin for the password if you chose to not change the details on the wizard. -
Page 24: Status
Status Device Information The Status menu is used to display statistics from different functions from the router. This displays basic system information and the uptime of the router. Device Information Product Type: The model number of the router. Device ID: The device ID of the router. Hardware Version: The hardware version of the router. -
Page 25: Wan
Network This displays Network status information. IPv4 / IPv6 WAN Connection Status Connection Name: The name of the WAN connection. Type: The WAN connection type. IP Address/Mask: The IP address and subnet mask of the WAN connection. Default Gateway: The default gateway of the WAN connection. Primary DNS: The primary DNS of the WAN connection. - Page 26 DS-Lite Status Connection Name: The name of the DS-Lite connection. Type: The DS-Lite connection type. Mode: The DS-Lite mode of the DS-Lite connection. AFTR Address: The AFTP address of the DS-Lite connection. Status: The status of the DS-Lite connection. L2TP LAC Status Connection Name: The name of the DS-Lite connection.
-
Page 27: Ethernet
Status: The status of the 3G/4G connection. Provider: Shows the Netowork Provider for the SIM connection. Network Type: The connection type Signal: The signal strength for the connection Cell id: IMEI number for the DWR-956M Click Refresh to refresh the page. -
Page 28: Lan
Network This displays Network status information. LAN Host IP Address: The IP address of the LAN connection. IPv6 LAN Host IP Address: The IPv6 address of the LAN connection. The LAN menu is used to display status information for the LAN interfaces on the router. Ethernet This displays Ethernet status information. -
Page 29: Wlan
WLAN This displays WLAN status information. SSID Index: The index number of the Service Set Identifier (SSID). SSID: The name of the SSID. BSSID: The name of the Basic Service Set Identifier (BSSID). Status: The status of the SSID. Authentication Mode: The authentication modes supported by the SSID. Encryption Mode: The encryption modes supported by the SSID. -
Page 30: Statistics
Statistics The Statistics menu is used to display statistics for the different interfaces on the router. This displays the WAN statistics. Interface: The name of the WAN interface. Received: The number of bytes and packets received, and the number of errors and discarded packets on the WAN connection. -
Page 31: Wlan
WLAN This displays WLAN statistics. Port: The name of the WLAN port. Received: The number of bytes and packets received, and the number of errors and discarded packets on the WLAN port. Transmitted: The number of bytes and packets sent, and the number of errors and discarded packets on the WLAN port. -
Page 32: Route
Route This page will show you the current router for the router. Destination: The Destination route address Gateway: Gateway to the Destination route Subnet Mask: Subnet for the Destination router Flag: Flag for the rule. Metric: Metric for the route Name: Wan Connection used for the Route Interface: Interface type for the route VoIP... -
Page 33: Basic Setup
PPPoE_WAN_ETH, LTE. Interface: The mode of the connection type. This can be, ETH or USB. Mode: This is the mode that the DWR-956M will operate in. This can be DHCP, Static, PPPoE, Bridge or Con-Bridge. IP Protocol Type: The IP protocol version used by the WAN connection. This can be IPv4, IPv6 or IPv4&6. - Page 34 Interface: ETH Mode: DHCP Connection Name: Assign a name for the connection here. Enable: Tick this to enable this connection. MTU: The Maximum Transmission Unit (MTU) of the WAN connection. This is set to 1492 bytes by default. IP Protocol Type: The IP protocol version used by the WAN connection. This can be IPv4, IPv6 or IPv4&6.
- Page 35 Click Advanced Settings to reveal more settings. Mode: DHCP (Advanced Settings) DHCP Option 60 Setting: Whether to enable or disable DHCP Option 60 when receiving DHCP information on the WAN connection. Choosing this option displays other options on the page, and each of these is documented below. DHCP Option 66: Whether to enable or disable DHCP Option 66 when receiving DHCP information on the WAN connection.
- Page 36 Interface: ETH Mode: Static Connection Name: Assign a name for the connection here. Enable: Tick this to enable this connection. MTU: The Maximum Transmission Unit (MTU) of the WAN connection. This is set to 1492 bytes by default. IP Protocol Type: The IP protocol version used by the WAN connection. This can be IPv4, IPv6 or IPv4&6.
- Page 37 Service Type: The service type for the WAN connection. This can be INTERNET, TR069, TR069_INTERNET, VOIP, INTERNET_ VOIP, TR069_VOIP, TR069_INTERNET_VOIP, or Other. Choosing the INTERNET, TR069_INTERNET, INTERNET_VOIP, or TR069_INTERNET_VOIP option displays other options on the page, and each of these is documented below. Click Advanced Settings to reveal more settings Mode: Static (Advanced Settings) Bound Ports: These are the ports that are bound and that can share...
- Page 38 Interface: ETH Mode: PPPoE Connection Name: Assign a name for the connection here. Enable: Tick this to enable this connection. MTU: The Maximum Transmission Unit (MTU) of the WAN connection. This is set to 1492 bytes by default. IP Protocol Type: The IP protocol version used by the WAN connection. This can be IPv4, IPv6 or IPv4&6.
- Page 39 Authentication Type: The authentication type for the WAN connection. This can be AUTO, PAP or CHAP. This should be supplied to you by your ISP. Dial Mode: This is the method that is used to connect to the PPPoE session. This can be Automatically, Dial on Demand and Manual connect.
- Page 40 Ticking the box displays other options on the page, and these are documented below. PPPoE PassThrough: Whether to enable or disable PPPoE passthrough. This allows a PPPoEenabled device connected to the DWR-956M to connect to the PPPoE session supplied by the ISP. Tick this to enable PPPoE passthrough.
- Page 41 INTERNET, TR069, TR069_INTERNET, VOIP, INTERNET_ VOIP, TR069_VOIP, TR069_INTERNET_VOIP, or Other. Choosing the INTERNET, TR069_INTERNET, INTERNET_VOIP, or TR069_INTERNET_VOIP option displays other options on the page, and each of these is documented below. Click Advanced Settings to reveal more settings. Mode: Bridge (Advanced Settings) VLAN PassThrough: Whether to enable or disable passing VLANs through from the WAN connection.
- Page 42 Interface: ETH Mode: Con-bridge Connection Name: Assign a name for the connection here. Enable: Tick this to enable this connection. Enable VLAN: Whether to enable or disable VLAN settings on the WAN connection. Choosing this option displays other options on the page, and each of these is documented below.
- Page 43 Interface: 3G/4G Mode: Dhcp Connection Name: Assign a name for the connection here. Enable: Tick this to enable this connection. MTU: The Maximum Transmission Unit (MTU) of the WAN connection. This is set to 1500 bytes by default. IP Protocol Type: The IP protocol version used by the WAN connection. This can be IPv4, IPv6 or IPv4&6.
- Page 44 Click Advanced Settings to reveal more settings. Pin: Enter the pin code for the sim card if enabled APN: Select APN for your mobile provider Dial Number: default is set to *99# Dial UserName: Enter username if required by ISP Dial Password: Enter the password provided by your ISP Network: Select your mobile network connection, default is set to Auto DHCP Option 60 Setting:...
-
Page 45: Lan
IPv4 Configuration The LAN menu is used to set IPv4/v6 Local Area Network settings on the DWR-956M. This allows you to set the IP address settings and DHCP options for IPv4. IPv4 Configuration IP Address: The IP address of the router. -
Page 46: Reserved Ip Address Settings
Reserved IP Address Settings This allows you to reserve IP addresses in the DHCP scope for IPv4. Reserved IP Address Settings MAC Address: The mac address of the machine you want to reserve the IP for. IP Address: The IP address to recerve with the mac address. Description: Enter a description for the rule. -
Page 47: Ipv6 Configuration
IPv6 Configuration This allows you to set the IP address settings and DHCP options for IPv6. RA Period Settings Max Period: The maximum period between Router Advertisement (RA) messages. The default is 15 seconds. Min Period: The minimum period between Router Advertisement (RA) messages. The default is 10 seconds. -
Page 48: Wireless
Wireless Wireless Basic Configuration 2.4GHz The Wireless menu is used to set 2.4 Ghz, 5 Ghz, and wireless security settings on the DWR-956M. This allows you to set the wireless network settings for the 2.4 GHz band. Wireless Basic Configuration 2.4GHz Enable Wireless: Whether to use enable or disable the 2.4GHz Wi-Fi. -
Page 49: Wireless Basic Configuration 5Ghz
Wireless Basic Configuration 5GHz This allows you to set the wireless network settings for the 5 GHz band. Wireless Basic Configuration 5GHz Enable Wireless: Whether to use enable or disable the 2.4GHz Wi-Fi. Tick this to enable wireless. This default is ticked. Choose SSID: The SSID that you wish to modify. -
Page 50: Wireless Security Setting
Wireless Security Setting This allows you to set the security settings for the wireless network. Wireless Security Setting Choose SSID: The SSID that you wish to modify. This can be from SSID1 to SSID8. SSID 1-4 is for 2.4GHz and SSID 5-8 is for 5GHz. Authentication: The authentication type to use with the SSID. -
Page 51: Advanced Setup
Duplex: The duplex of the port. This can be Auto, Half Duplex or Full Duplex. The duplex depends on the speed chosen. Click Apply to apply the settings and click Refresh to refresh the page. The WAN menu is used to set advanced LAN settings on the DWR-956M. LAN - Ethernet Mode Configuration This allows you to set Ethernet settings for the LAN connections. -
Page 52: Wireless
Wireless The WAN menu is used to set advanced wireless settings on the DWR-956M. Wireless Advanced Configuration 2.4GHz This allows you to set wireless settings for the 2.4 GHz wireless band. Wireless Advanced Configuration 2.4GHz Mode: The wireless mode. This can be 802.11b, 802.11g, 802.11b/g, 802.11n, 802.11n/g, or 802.11b/g/n. - Page 53 Beacon Interval: The interval between SSID beacon broadcasts. The default is 100. RTS Threshold: The Request To Send (RTS) packet size threshold. The default is 2347. Fragment Threshold: The maximum packet size a client can send. The default is 2346. DTIM Interval: The interval between Delivery Traffic Indication Messages (DTIM).
-
Page 54: Wireless Advanced Configuration 5Ghz
Wireless Advanced Configuration 5GHz This allows you to set wireless settings for the 5 GHz wireless band. Wireless Advanced Configuration 5GHz Mode: The wireless mode. This can be 802.11a/n/ac, 802.11ac, 802.11n, or 802.11a. Choosing the 802.11a/n/ac, 802.11ac, or 802.11n option displays other options on the page, and these are documented below. - Page 55 Beacon Interval: The interval between SSID beacon broadcasts. The default is 100. RTS Threshold: The Request To Send (RTS) packet size threshold. The default is 2347. Fragment Threshold: The maximum size of packet a client can send. The default is 2346. DTIM Interval: The interval between Delivery Traffic Indication Messages (DTIM).
-
Page 56: Wireless Mac Filter
Wireless MAC Filter Wireless MAC filter will allow you to block or allow certain devices on your WiFi. Select SSID: Select the SSID you for the rule MAC Restrict Mode: Allow or Deny. Disabled is selected by default. To add a Mac Address, click the Add button. Mac address: Mac address of device you want block or allow Description: Give the rule a name. -
Page 57: Wps Settings 2.4Ghz
WPS Settings 2.4GHz This allows you to set Wi-Fi Protected Setup (WPS) settings for the 2.4 GHz wireless band. WPS Settings 2.4GHz Enable WPS: Whether to enable or disable WPS for the 2.4 GHz wireless band. Tick this to enable WPS. The default is ticked. Choosing this option displays other options on the page, and these are documented below. -
Page 58: Wps Settings 5Ghz
VAP (Virtual Access Point) Information WPS Status: A status of Configured indicates WPS is enabled. SSID: The name of the SSID. Authentication Mode: The authentication type to use with the SSID. This can be None, WEP, WPA-PSK, WPA2-PSK, WPA-PSK/WPA2-PSK MIXED, or 802.1X. Choosing the WEP, WPA-PSK, WPA2-PSK, WPA-PSK/WPA2-PSK MIXED, or 802.1X option displays other options on the page, and these are documented below. -
Page 59: Wds Settings
VAP (Virtual Access Point) Information WPS Status: A status of Configured indicates WPS is enabled. SSID: The name of the SSID. Authentication Mode: The authentication type to use with the SSID. This can be None, WEP, WPA-PSK, WPA2-PSK, WPA-PSK/WPA2-PSK MIXED, or 802.1X. Choosing the WEP, WPA-PSK, WPA2-PSK, WPA-PSK/ WPA2-PSK MIXED, or 802.1X option displays other options on the page, and these are documented below. -
Page 60: Channel Information
The Network Address Translation (NAT) menu is used to set advanced NAT settings on the DWR-956M. Virtual Server This allows you to set up NAT rules on the DWR-956M. Virtual Server WAN Connection: The WAN connection to apply the NAT rules to. Click Add to add a NAT rule to the WAN connection. -
Page 61: Virtual Server Settings
Virtual Server Settings This allows you to enable and disable NAT rules on the DWR-956M. Enable: Whether to enable or disable the NAT rule. Tick this to enable the NAT rule. The default is un-ticked. Description: The description for the NAT rule. -
Page 62: Port Triggering
Click Add to add a port triggering rule to the WAN connection. Port Triggering Setting This allows you to set up automatic port triggering rules on the DWR-956M. Enable: Whether to enable or disable the port triggering rule. Tick this to enable the port triggering rule. -
Page 63: Multi-Nat
Multi-NAT This allows you to set up one-to-one and many-to-one NAT rules on the DWR-956M. Click Add to add a multi-NAT rule to the WAN connection. Multi-NAT Edit This allows you to set up one-to-one and many-to-one NAT rules on the DWR-956M. -
Page 64: Dmz Settings
Click Apply to apply the settings and click Refresh to refresh the page. ALG Settings This allows you to set the Application Level Gateway (ALG) options on the DWR-956M. ALG Settings TFTP Passthrough: Whether to enable or disable TFTP passthrough. -
Page 65: Security
Security The security menu is used to set advanced security settings on the DWR-956M. IP Filtering This allows you to set up packet-filtering rules. IP Filtering Firewall Enable: Whether to enable or disable packet filtering. Tick this to enable packet filtering. The default is ticked. -
Page 66: Port Filter Rule Settings
Click Back to go back to the previous page, click Apply to apply the settings and click Refresh to refresh the page. MAC Filter This allows you to set up MAC-filtering rules on the DWR-956M. MAC Filter Enable: Whether to enable or disable MAC filtering. Tick this to enable MAC filtering. -
Page 67: Ddos Protection
DDoS Protection This allows you to set up Denial of Service (DoS) prevention rules on the DWR-956M. Attack Potection Settings Enable: Whether to enable or disable attack protection. Tick this to enable attack protection. The default is ticked. Attack Logs: Whether to enable or disable attack logs. Tick this to enable attack logs. - Page 68 Prevent Illegal Packets TCP Flags: Set "SYN FIN": Whether to enable or disable preventing illegal packets by setting SYN FIN. TCP Flags: Set "SYN RST": Whether to enable or disable preventing illegal packets by setting SYN RST. TCP Flags: Set "FIN RST": Whether to enable or disable preventing illegal packets by setting FIN RST.
-
Page 69: Parental Control
Parental Control The parental control menu is used to set parental control features on the DWR-956M. Access Time Restriction This allows you to set up access rules to block hosts from accessing the network, based on the time of day. -
Page 70: Url & Ip Filter
URL & IP Filter This allows you to set up access rules to either block or allow access to a URL, based on the time of day. URL & IP Filter Enable: Whether to enable or disable URL filters. Tick this to enable URL filters. The default is un-ticked. -
Page 71: Access Time Restriction Configuration
Click Back to go to back to the previous page and click Apply to apply the settings. Routing The routing menu is used to set routing information on the DWR-956M. Default Route Default gateway interface list can have multiple WAN interfaces served as... -
Page 72: Static Route
Static Route This allows you to set up static routes to define how to route traffic for remote networks. Click Add to add a new static route. Static Route Setting This allows you to set up static routes to define how to route traffic for remote networks. Static Route Setting Connection Name: The connection name for the static route. -
Page 73: Dynamic Route
Dynamic Route This allows you to set up dynamic routes to define how to route traffic for remote networks. Click Add to add a new dynamic route. Dynamic Route Setting This allows you to set up dynamic routes to define how to route traffic for remote networks. Dynamic Route Setting Connection Name: The connection name for the static route. -
Page 74: Ipv6 Static Route Setting
IPv6 Static Route Setting This allows you to set up static IPv6 routes to define how to route traffic for remote networks. Static Route Setting Connection Name: The connection name for the static route. Enable: Whether to enable or disable the static route. Tick this to enable the static route. The default is un-ticked. -
Page 75: Quality Of Service
Quality of Service The Quality of Service (QoS) menu is used to set QoS information for traffic passing through the DWR-956M. QoS Queue This allows you to set QoS information based on traffic type. QoS Global Settings Enable QoS Profile: The QoS profile to enable. Choose one of the pre-configured profiles or select Custom Profile to create a new profile. - Page 76 TCP Connection Number Limit: Whether to enable or disable the TCP connection number limit. Tick this to enable the TCP connection number limit. The default is un-ticked. Choosing this options displays other options on the page, and these are documented below. Scheduling Policy: SP Number: The QoS level for the Strict Priority (SP) scheduling method.
-
Page 77: Classification List
Classification List This allows you to classify traffic based on the traffic type. Click Add Traffic Type to add a traffic type and click Add Flow to add a traffic flow. -
Page 78: Classification Traffic Base
Classification Traffic Base This allows you to classify traffic based on the traffic type. Classification Traffic Base Enable: Whether to enable or disable the traffic base. Tick this to enable the traffic base. Service Name: The service name for the traffic base. Classification Match Result Queue: The queue number for the match result. -
Page 79: Classification Traffic Base Settings
Classification Traffic Base Settings Here you can set the different mac address ot interface for the QoS to use as well as the DSCP, IP Protocal and 802.1P. IP Version: Select IPv4 or IPv6 LAN interface: Choose LAN1 – LAN4 WAN Connection: Choose the WAN connection to use Source MAC: enter the Mac address connected to the LAN interface Destination MAC: enter the Destination MAC address... -
Page 80: Qos Tcp Flags
Click Apply to apply the settings and return to the previous page. Bandwidth Limit The bandwidth limit menu is used to limit the bandwidth of traffic passing through the DWR-956M. Port Bandwidth Limit Configuration This allows you to limit bandwidth based on port. -
Page 81: Ip Bandwidth Limit Configuration
IP Bandwidth Limit Configuration This allows you to limit bandwidth based on IP address. IP Bandwidth Limit Configuration Enable: Whether to enable or disable the IP bandwidth limit. Tick this to enable the IP bandwidth limit, and un-tick it to disable it. IPs: The range of IP addresses to apply the IP bandwidth limit to. -
Page 82: Generic Routing Encapsulation
Note: Currently only IPv6 Rapid Deployment (6rd) is supported. Associated WAN Interface: The WAN interface associated with the 6 in 4 tunnel. Choose Manual to enter the 6 in 4 tunnel information manually, and choose Automatic to input it manually. 6 in 4 tunnel information automatically. -
Page 83: Gre Setting
GRE Setting This allows you to create a Generic Routing Encapsulation (GRE) tunnel that can tunnel multiple traffic types. Connection Name: The connection name for the GRE tunnel. Tunnel Name: The tunnel name for the GRE tunnel. Note: this must start with "gre-". Interface IP Address: The interface IP address to use with the GRE tunnel. -
Page 84: Applications
Applications Storage Service The Applications menu is used to set application settings on the DWR-956M. Storage Device Info This displays information about any attached external USB storage devices. Storage Service - File Sharing Service Setup This is used to enable or disable the Samba file sharing service. -
Page 85: Storage Service - Ftp Client Settings
Storage Service - FTP Client Settings This is used to set FTP client settings. Storage Service - FTP Service Setup User Name: The username to connect to the remote FTP server with. Password: The password to connect to the remote FTP server with. Download URL: The URL to the file on the remote FTP server that you wish to download. -
Page 86: Printer Service Setup
Printer Service Setup This is used to enable or disable the printer service. Printer Service Setup Enable Printer Service: Whether to enable or disable the printer service. Tick this to enable the printer service. Queue Name: The printer queue name. Click Apply to apply the settings and click Refresh to refresh the page. -
Page 87: Dns
The DNS menu is used to set dynamic DNS settings on the DWR-956M. DDNS Settings This is used to set dynamic DNS settings, so that the router can automatically update an external service with its current IP address. DDNS Settings Enable: Whether to enable or disable the DDNS settings. -
Page 88: Upnp
UPnP This is used to set Universal Plug and Play (UPnP) settings, so that devices on the LAN can automatically open ports on the router firewall. Enable UPnP IGD: Whether to enable or disable the Internet Gateway Device (IGD) Protocol. Tick this to enable the IGD Protocol. WAN Connection: The WAN connection to use with the IGD Protocol. -
Page 89: Multicast
Multicast The multicast menu is used to set multicast settings on the DWR-956M. IGMP Settings This is used to set Internet Group Management Protocol (IGMP) settings. Default Version: The default version of IGMP to use on the router. This can be IGMPv2 or IGMPv3. The default is IGMPv2. -
Page 90: Mld Settings
MLD Settings This is used to set Multicast Listener Discovery (MLD) settings. Default Version: The default version of MLD to use on the router. This can be MLDv1 or MLDv2. The default is MLDv2. Query Interval(s): The query interval for MLD. The default is 125 seconds. Query Response Interval(1/10s): The query response interval for MLD. -
Page 91: Snmp
Trap Address: The SNMP trap server IP address. Click Apply to apply the settings and click Refresh to refresh the page. VOIP The VOIP menu is used to set VOIP settings on the DWR-956M. Voice Mode This allows you to set the Voice mode for the device:... -
Page 92: Basic Setup
Basic Setup Port: The port to use for VOIP service. Register Server: Address of the register server. Proxy: Address of the proxy. Outbound Server: Address of the outbound server. Port: Port for to use for the outbound server. Backup Register Server: Backup address of the register server. -
Page 93: Advance Voip Setup
Advance VoIP Setup DTMF Settings: Select between RFC2833 or inbound. DTMF Relay PT: Enter the RTP port Relay number for the connection. Default is 97 Begin RTP Port: Enter the RTP port begin number for the connection. Default is 4000 Jitter Buffer: Select between Auto or Fixup Min: Enter the minimum jitter time in miliseconds Max: Enter the maximum jitter time in miliseconds... -
Page 94: Media Settings
Media Settings Here you can select which codec to use for voice calls and the priotity in which it should work. By default G711A and G729 is used. Click Apply to apply the settings and click Refresh to refresh the page. Fax Settings Here you can enable to disable the Fax Protocol for the Device. -
Page 95: Voice Service
Voice Service Here you can select the VoIP number configured to modify call settings. Tel: Select the number of the register VoIP services Call Forward Unconditional: Tick to enabe Uncontitional forwarding of registered VoIP number To: Enter the Destination number for unconditional call forwarding. Call Forward On Busy: Tick to enable call forwarding when line is busy. -
Page 96: Line Settings
If you whish to use a certain patern to dial out you can do it here. Please Input Number Table Number Table: Enter or modify the dialing patern for the DWR-956M Click Apply to apply the settings and click Refresh to refresh the page. -
Page 97: Basic Call Control
Basic Call Control Here youcan modify the timers for the DWR-956M incoming and outgoing calls. Short Timer: Modify the short timer value for pre-dialing timeout. Long Timer: Modify the long timer value for post-dialing timeout. Dial Tone Timer: Modify the dail tone timer before timeout. -
Page 98: Cdr
Show you the call history for the calls made on this router. Info: Shows you the call history Note: before this can work you would need to use a USB flash drive connected to the the router. Click Apply to apply the settings and click Refresh to refresh the page. -
Page 99: Vpn
The VPN menu is used to set IPSec and L2TP tunnel settings on the DWR-956M. IPSec This is used to set basic IPSec settings. IPSec Tunnel Mode Connections IPSec Hardware Accelerate: Whether to enable or disable IPSec hardware acceleration. Tick this to enable IPSec hardware acceleration, and un-tick it to disable it. - Page 100 IPSec Settings This is used to set basic IPSec tunnel settings. IPSec Connection Name: The connection name for the IPSec tunnel. Tunnel Mode: The tunnel mode for the IPSec tunnel. This can be Encapsulating Security Payload (ESP) or Authentication Header (AH). WAN Connection: The WAN connection to use with the IPSec tunnel.
- Page 101 Key Exchange Method: The key exchange method for the IPSec tunnel. This can be Auto(IKE) or Manual. The default is Auto(IKE). Choosing these options displays other options on the page, and these are documented below. Authentication Method: The authentication method for the IPSec tunnel. This can be Pre-Shared Key or Certificate (X.509).
- Page 102 Integrity Algorithm: The authentication algorithm to use with the IPSec tunnel. This can be MD5 or SHA1. The default is MD5. Diffie-Hellman Group: The Diffie-Hellman Group key size to use with the IPSec tunnel. This can be 768bit, 1024bit, 1536bit or 2048bit. The default is 1024bit. Key Life Time: The key lifetime for the IPSec tunnel.
-
Page 103: L2Tp
L2TP This is used to set basic L2TP settings. L2TP LAC Tunnel Setting This is used to set basic L2TP tunnel settings. L2TP LAC Tunnel Settings Connection Name: The connection name for the L2TP tunnel. Enable: Whether to enable or disable the L2TP tunnel. Tick this to enable the L2TP tunnel. -
Page 104: L2Tp Lns Tunnel Settings
L2TP LNS Tunnel Settings Connection Name: The connection name for the L2TP tunnel. Enable: Whether to enable or disable the L2TP tunnel. Tick this to enable the L2TP tunnel. The default is un-ticked. Tunnel Name: The tunnel name for the L2TP tunnel. Tunnel Interface IP: The IP address to listen on for the L2TP tunnel. -
Page 105: Vpn Lite
VPN Lite VPN Lite Configuration Connection Name: The connection name for the L2TP tunnel. Enable: Whether to enable or disable VPN Lite. Tick this to enable the VPN Lite. The default is un-ticked. User Name: The user name for the VPN Lite Configuration. Password: The password for the VPN Lite Configuration. -
Page 106: Lte Band Settings
Here you can deselect or select the LTE bands you want the router to connect to when using LTE connection. Management The Management menu is used to perform maintenance tasks on the DWR-956M. Reboot This is used to reboot the router. -
Page 107: Dhcp Option 66 Files
DHCP Option 66 Files This is used to download the DHCP Option 66 files to store on a TFTP server. Click Global to download all DHCP Option 66 files on the router to your PC. Click Specific MAC to download the DHCP Option 66 file for a specific MAC address to your PC. -
Page 108: Update Software
Update Software This is used to update the router firmware. Click Browse... to select a router firmware image file on your PC. Click Update Software to upgrade the router firmware. LTE Fota This allows you to update the LTE software firmware. Account Management - Passwords This is used to change user passwords. -
Page 109: Logs
Logs Log Level This is used to set logging settings. Account Management – Log Level Enable Log: Whether to enable or disable logging. Tick this to enable logging. The default is un-ticked. Log Level: The logging level to report logs for. This can be Emergency, Alert, Critical, Error, Warning, Notice, Informational, or Debug. -
Page 110: Logs
Logs This is used to view the router logs. Account Management – Logs Show Log Level: The logging level to show the logs for. This can be Emergency, Alert, Critical, Error, Warning, Notice, Informational, or Debug. The default is Critical. Click Clear Log File to clear the router log file, click Download Log File to download the router log file, and click Refresh to refresh the page. -
Page 111: Access Control -- Ip Address Configuration
Access Control -- IP Address Configuration This is used to add a firewall rule. Protocol: The protocol for the firewall rule. This can be HTTP, TELNET, FTP, SAMBA, ICMP, TFTP, SNMP, SSH, TCP or UDP. Choosing the HTTP, TELNET, FTP, TFTP, SSH, TCP or UDP options displays other options on the page, and these are documented below. -
Page 112: Internet Time
Internet Time This is used to set Internet time settings, for synchronizing the router with an Internet time source. Time Settings Current Time: The current router date and time, including the timezone. Time Service Enable: Whether to enable or disable the time service. Tick this to enable the time service. The default is un-ticked. -
Page 113: Tools
Tools Ping The Tools menu is used to perform connectivity tests on the DWR-956M. This is used to perform ping tests. The results are displayed below the ping test options. Host: The host to send the ICMP message to. Repeat Number: The number of times to repeat the ping test. -
Page 114: Connect A Wireless Client To Your Router
Blu-ray DVD players, wireless printers and cameras will have a WPS button (or a software utility with WPS) that you can press to connect to the DWR-956M router. Please refer to your user manual for the wireless device you want to connect to make sure you understand how to enable WPS. - Page 115 Windows® 10 When connecting to the DWR-956M wirelessly for the first time, you will need to input the wireless network name (SSID) and Wi-Fi password (security key) of the device you are connecting to. If your product has a Wi-Fi configuration card, you can find the default network name and Wi-Fi password here.
- Page 116 Windows® 8 It is recommended that you enable wireless security (WPA/WPA2) on your wireless router or access point before configuring your wireless adapter. If you are joining an existing network, you will need to know the security key (Wi-Fi password) being used. 1.
- Page 117 Windows® 7 It is recommended that you enable wireless security (WPA/WPA2) on your wireless router or access point before configuring your wireless adapter. If you are joining an existing network, you will need to know the security key or passphrase being used. 1.
- Page 118 The WPS feature of the DWR-956M can be configured using WindowsR 7. Carry out the following steps to use WindowsR 7 to configure the WPS feature: 1. Click the Start button and select Computer from the Start menu. 2. Click Network on the left side.
- Page 119 4. Input the WPS PIN number (on the router label) in the Setup > Wireless Setup menu in the Router’s Web UI) and click Next. 5. Type a name to identify the network. 6. To configure advanced settings, click the Arrow icon. Click Next to continue.
- Page 120 7. The following window appears while the DWR-956M is being configured. Wait for the configuration to complete. 8. The following window informs you that WPS on the DWR-956M has beenset up successfully. Make a note of the security key as you may need to provide this security key if adding an older wireless device to the network in the future.
-
Page 121: Troubleshooting
1. Why can’t I access the web-based configuration utility? When entering the IP address of the D-Link router (10.0.0.2 for example), make sure you are not connected to a website, you don’t have to be connected to the Internet. The device has the utility built-in to a ROM chip in the device itself. Your computer must be on the same IP subnet to connect to the web-based utility. - Page 122 Access the web management. Open your web browser and enter the IP address of your D-Link router in the address bar. This should open the login page for your web management. If you still cannot access the configuration, unplug the power to the router for 10 seconds and plug back in. Wait about 30 seconds and try accessing the configuration.
- Page 123 You should start at 1472 and work your way down by 10 each time. Once you get a reply, go up by 2 until you get a fragmented packet. Take that value and add 28 to the value to account for the various TCP/IP headers. For example, let’s say that 1452 was the proper value, the actual MTU size would be 1480, which is the optimum for the network we’re working with (1452+28=1480).
-
Page 124: Wireless Basics
D-Link wireless products are based on industry standards to provide easy-to-use and compatible high-speed wireless connectivity within your home, business, or public access wireless networks. Strictly adhering to the IEEE standard, the D-Link wireless family of products will allow you to access the data you want, when, and where you want it. - Page 125 PDAs, headphones, laptops, speakers, and other devices that operate on batteries. Who uses wireless? Wireless technology as become so popular in recent years that almost everyone is using it, whether it’s for home, office, business, D-Link has a wireless solution for it.
- Page 126 The wireless connection in public places is usually called hotspots”. Using a D-Link USB adapter with your laptop, you can access the hotspot to connect to the Internet from remote locations like: airports, hotels, coffee shops, libraries, restaurants, and convention centers.
- Page 127 Ad-hoc – Directly connecting to another computer for peer-to-peer communication using wireless network adapters on each computer, such as two or more DWR-956M wireless network USB adapters. An Infrastructure network contains an access point or wireless router. All the wireless devices, or clients, will connect to the wireless router or access point.
- Page 128 Networking Basics After you install your new D-Link adapter, by default, the TCP/IP settings should be set to obtain an IP address from a DHCP server (i.e. wireless router) automatically. To verify your IP address, please follow the steps below.
- Page 129 Statically Assign an IP address If you are not using a DHCP capable gateway/router, or you need to assign a static IP address, please follow the steps below: Step 1 Windows® 7- Click on Start > Control Panel > Network and Internet > Network and Sharing Center > Change Adaptor Options Windows®...
- Page 130 Wireless Security This section will show you the different levels of encryption you can use to help protect your data from intruders. The DWR-956M offers the following types of security: WPA2 (Wi-Fi Protected Access 2) WPA2-PSK (Pre-Shared Key) ...
- Page 131 Technical Specifications Device Interfaces Wi-Fi Encryption 4 x RJ-45 Gigabit Ethernet LAN ports WPA™ - Personal/Enterprise 1 x FXS RJ-11 ports WPA2™ - Personal/Enterprise 1 x RJ-45 Gigabit Ethernet WAN port Wi-Fi Protected Setup (WPS) PIN/PBC ...
- Page 132 Regulatory Information CE EMI Class A Warning This equipment is compliant with Class A of CISPR 32. In a residential environment this equipment may cause radio interference. Frequency Band(s) Max. Output Power (EIRP) Frequenzband Max. Output Power Fréquence bande(s) Consommation d’énergie max. Bandas de Frecuencia Potencia máxima de Salida Frequenza/e...