Table of Contents
Available languages
Available languages
Quick Links
Operating Instructions/Mode d'emploi/
Instrucciones de funcionamiento
Memory Card Drive/Lecteur de carte mémoire/
Unidad de transferencia de tarjeta de memoria
Before operating this product, please read the instructions carefully and save
this manual for future use.
Before using this product, be sure to read "Read this first!" (pages E-2 to E-6).
Avant d'utiliser l'appareil, lire attentivement ce mode d'emploi, et le conserver
à des fins de référence ultérieure.
Avant d'utiliser cet appareil, assurez-vous de lire la section "Lire ces
informations en premier !" (pages F-1 à F-2).
Antes de utilizar este producto, lea cuidadosamente las instrucciones y guarde
este manual por si tiene que utilizarlo en el futuro.
Antes de usar este producto, asegúrese de leer "Lea esto primero!" (páginas S-1 a S-3).
PJ EJ ED
SS0317FA0 -PB
Printed in Japan
AU-XPD3
Model No.
DVQX1174ZA
Chapters
Table of Contents

Related Manuals for Panasonic AU-XPD3P


Summary of Contents for Panasonic AU-XPD3P
- Page 1 Operating Instructions/Mode d’emploi/ Instrucciones de funcionamiento Memory Card Drive/Lecteur de carte mémoire/ Unidad de transferencia de tarjeta de memoria AU-XPD3 Model No. Before operating this product, please read the instructions carefully and save this manual for future use. Before using this product, be sure to read “Read this first!” (pages E-2 to E-6). Avant d’utiliser l’appareil, lire attentivement ce mode d’emploi, et le conserver à...
- Page 2 Pre najnovšie bezpečnostné informácie a dôležité oznámenia súvisiace s Slovensky produktom navštívte túto webovú stránku. Za najnovejše varnostne informacije in pomembna obvestila v zvezi z Slovenščina izdelkom obiščite naslednje spletno mesto. Besök följande webbplats för senaste säkerhetsinformation och viktiga Svenska meddelanden om produkten. http://pro-av.panasonic.net/en/manual/index.html...
- Page 3 Read this first! WARNING: This equipment must be earthed. To ensure safe operation, the three-pin plug must be inserted only into a standard three-pin power point which is effectively earthed through the normal household wiring. Extension cords used with the equipment must have three cores and be correctly wired to provide connection to the earth.
- Page 4 Voltages other than 120 V are not intended for U.S.A. and Canada. Operation at a voltage other than 120 V AC may require the use of a different AC plug. Please contact either a local or foreign Panasonic authorized service center for assistance in selecting an alternate AC plug.
- Page 5 Declaration of Conformity Model Number: AU-XPD3 Trade Name: Panasonic Responsible Party: Panasonic Corporation of North America Two Riverfront Plaza, Newark, NJ 07102 Support contact: 1-800-524-1448 This device complies with Part 15 of the FCC Rules. Operation is subject to the following two conditions: (1)This device may not cause harmful interference, and (2) this device must accept any interference received, including interference that may cause undesired operation.
- Page 6 Stand-by mode. Notice (U.S.A. only): Disposal may be regulated in your community due to Environmental considerations. For disposal or recycling information, please visit Panasonic website: http://www.panasonic.com/environmental or call 1-888-769-0149. The rating plate is on the underside of the unit.
- Page 7 5. полібромбіфеноли (PBB) – не перевищує 0,1% ваги речовини або в концентрації до 1000 частин на мільйон; 6. полібромдефенілові ефіри (PBDE) – не перевищує 0,1 % ваги речовини або в концентрації до 1000 частин на мільйон. Інформація для покупця Виробник: Panasonic Corporation Панасонік Корпорейшн Адреса виробника: Kadoma, Osaka, Japan Кадома, Осака, Японія Країна походження: Japan Японія...
-
Page 8: Table Of Contents
Table of Contents Read this first!.................... E-2 Before Use ....................E-8 Overview ..................... E-8 Features ...................... E-8 Operating Environment Required for Installation ........E-9 Supplied Accessories ................E-9 Parts and their Functions ............... E-10 Connecting the P2 Drive to a Personal Computer.........E-11 Removing the P2 Drive from a Personal Computer ...... -
Page 9: Before Use
Refer to the installation manual on the website for information on how to install the drivers. For the latest information on drivers, visit the “Service and Support” page on the following website. http://pro-av.panasonic.net/ • The P2 drive (AU-XPD3) may become warm during use, but this is not a malfunction. Overview The AU-XPD3 (referred to as “P2 drive”... -
Page 10: Operating Environment Required For Installation
Up to six P2 drives can be connected to a single computer. Supplied Accessories Thunderbolt 3 Cable AC adaptor (Passive 40G) Power cable For AU-XPD3P For AU-XPD3ED For AU-XPD3E For AU-XPD3E (continental Europe, etc.) (U.K.) • Be sure to appropriately dispose of the packing material when you have... -
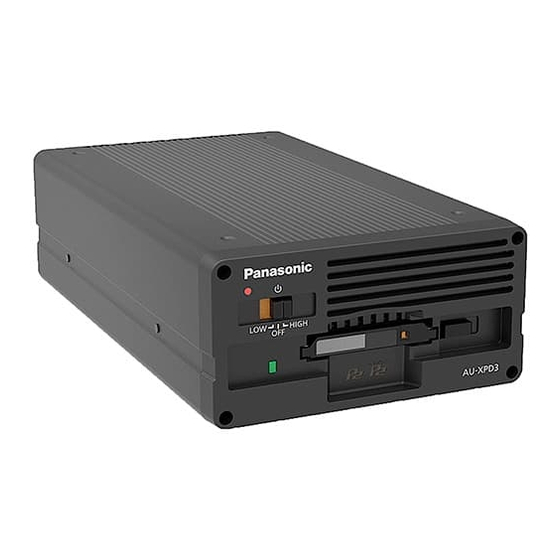
Page 11: Parts And Their Functions
Parts and their Functions Power LED This indicator lights up in green when the device is running. Power switch Use this switch to turn the P2 drive ON ( ) and OFF ( ). Access indicator Lights green during P2 card access. When the P2 card is removed from the P2 drive, processing by the driver takes some time, and the indicator lights orange until the P2 drive is again in a state in which a P2 card can be inserted. -
Page 12: Connecting The P2 Drive To A Personal Computer
Connecting the P2 Drive to a Personal Computer Start the personal computer. Plug the AC adaptor supplied with the P2 drive into the DC IN 16 V socket on the device. Set the power switch to ON. After startup, the power LED will light up green. Connect the supplied Thunderbolt 3 cable to the Thunderbolt 3 port of the P2 drive. -
Page 13: Removing The P2 Drive From A Personal Computer
n Daisy chain connection • The P2 drive can be connected to a single personal computer in a daisy chain of up to 6 devices. • To connect the P2 drive in a daisy chain with another Thunderbolt 3-compatible device, use the Thunderbolt 3 cable supplied with the other device. -
Page 14: Inserting A P2 Card
Inserting a P2 Card Insert a P2 card in the P2 card slot. Press in the card until the EJECT button pops up. u NOTE: • Be sure to insert the P2 card horizontally. Forcing the card in at an angle may damage it. •... -
Page 15: Removing A P2 Card
Removing a P2 Card First confirm that the P2 card is not being accessed, and then flip up the EJECT button in the direction of the arrow. u NOTE: • To remove a P2 card on a Mac, drag the P2 card icon to the Trash. -
Page 16: Write-Protecting A P2 Card
Refer to “When Using Mac” in the installation manual on the website for information on how to install the Thunderbolt driver for Mac. For the latest information on drivers, visit the “Service and Support” page on the following website. http://pro-av.panasonic.net/ E-15... -
Page 17: Q & A
Q & A n Cards other than P2 cards cannot be used. Î The P2 drive is designed for P2 cards and does not support cards other than P2 cards. n P2 cards cannot be accessed after resume from sleep or hibernation. Î... -
Page 18: Specifications
Specifications [Card slot] Rated voltage: 16 V DC PC card slot (1) (CardBus/PCI Rated current consumption: 3.1 A Express Base Specification) indicates safety information. [AC adaptor] External dimensions (W × H × D) Rated input AC 100 V - 240 V 126 mm ×... - Page 19 Lire ces informations en premier ! AVERTISSEMENT: Cet appareil doit être relié à la terre. Pour assurer un fonctionnement en toute sécurité, la fiche trois broches ne doit être insérée que dans une prise trois broches standard qui est reliée à la terre efficacement par le système électrique domestique normal.
- Page 20 Canada ou aux États-Unis d’Amérique. L’utilisation d’une tension de secteur autre que à 120 V C.A. peut exiger une fiche différente. Consulter un centre de service Panasonic authrisé local ou à l’etranger pour le choix de l’adaptateur approprié. NOTIFICATION (Canada) CAN ICES-3 (B)/NMB-3(B) Pour l’AU-XPD3EJ...
- Page 21 Table des matières Lire ces informations en premier ! ............F-1 Avant l’utilisation ..................F-4 Présentation ....................F-4 Fonctions.....................F-4 Configuration requise pour l’installation ..........F-5 Accessoires fournis ...................F-5 Pièces et leurs fonctions ................F-6 Raccordement du lecteur P2 à un ordinateur personnel ......F-7 Retrait du lecteur P2 d’un ordinateur personnel ........F-8 Insertion d’une carte P2 ................F-9 Retrait d’une carte P2 ................F-10 Protection d’une carte P2 contre l’écriture ..........F-11...
-
Page 22: Avant L'utilisation
Pour obtenir les informations les plus récentes sur les pilotes, visitez la page “Service and Support” sur le site Web suivant. http://pro-av.panasonic.net/ • Le lecteur P2 (AU-XPD3) pourrait chauffer pendant l’utilisation, mais cela n’est pas un dysfonctionnement. -
Page 23: Configuration Requise Pour L'installation
Jusqu’à six lecteurs P2 peuvent être raccordés à un seul ordinateur. Accessoires fournis Câble Thunderbolt 3 Adaptateur courant alternatif (Passif 40G) Câble d’alimentation Pour l’AU-XPD3P Pour l’AU-XPD3ED Pour l’AU-XPD3E Pour l’AU-XPD3E (Europe continentale, etc.) (R.U.) • Veiller à mettre l’emballage au rebut de manière appropriée, une fois le produit... -
Page 24: Pièces Et Leurs Fonctions
Pièces et leurs fonctions DEL d’alimentation Cet indicateur s’allume en vert lorsque l’appareil fonctionne. Commutateur d’alimentation Utilisez ce commutateur pour allumer ( ) et éteindre ( ) le lecteur P2. Indicateur d’accès S’allume en vert pendant l’accès à la carte P2. Lorsque la carte P2 est retirée du lecteur P2, le traitement par le pilote prend du temps, et l’indicateur s’allume en orange jusqu’à... -
Page 25: Raccordement Du Lecteur P2 À Un Ordinateur Personnel
Raccordement du lecteur P2 à un ordinateur personnel Démarrez l’ordinateur personnel. Branchez l’adaptateur CA accompagnant le lecteur P2 dans la prise DC IN 16 V sur l’appareil. Placez le commutateur d’alimentation sur Après le démarrage, la DEL d’alimentation s’allume en vert. Raccordez le câble Thunderbolt 3 fourni au port Thunderbolt 3 du lecteur P2. -
Page 26: Retrait Du Lecteur P2 D'un Ordinateur Personnel
n Raccordement en guirlande • Le lecteur P2 peut être connecté à un seul ordinateur personnel dans une configuration en guirlande de 6 appareils maximum. • Pour raccorder le lecteur P2 en guirlande avec un autre appareil compatible Thunderbolt 3, utilisez le câble Thunderbolt 3 fourni avec l’autre appareil. •... -
Page 27: Insertion D'une Carte P2
Insertion d’une carte P2 Insérez une carte P2 dans l’emplacement pour carte P2. Appuyez sur la carte jusqu’à ce que le bouton EJECT ressorte. u REMARQUE : • Assurez-vous d’insérer la carte P2 horizontalement. Le fait de forcer pour faire entrer Bouton EJECT la carte en biais pourrait l’endommager. -
Page 28: Retrait D'une Carte P2
Retrait d’une carte P2 Confirmez d’abord que la carte P2 n’est pas en cours d’accès, puis déployez le bouton EJECT dans le sens de la flèche. u REMARQUE : • Pour retirer une carte P2 sur un Mac, faites glisser l’icône de carte P2 dans la Corbeille. Vérifiez ensuite que l’icône a disparu et que Bouton EJECT l’indicateur d’accès sur lelecteur P2 est éteint... -
Page 29: Protection D'une Carte P2 Contre L'écriture
Reportez-vous à “When Using Mac” dans le manuel d’installation contenu sur le site Web pour plus d’informations sur la façon d’installer le pilote Thunderbolt pour Mac. Pour obtenir les informations les plus récentes sur les pilotes, visitez la page “Service and Support” sur le site Web suivant. http://pro-av.panasonic.net/ F-11... -
Page 30: Questions/Réponses
Questions/réponses n Les cartes autres que les cartes P2 ne peuvent pas être utilisées. Î Le lecteur P2 est conçu pour les cartes P2 et ne prend pas en charge les cartes autres que les cartes P2. n Il n’est pas possible d’accéder aux cartes P2 lorsque l’ordinateur quitte le mode de veille ou de veille prolongée. -
Page 31: Spécifications
Spécifications [Emplacement pour carte] Tension nominale : 16 V CC Emplacement pour carte PC (1) Consommation électrique nominale : (Spécifications de base pour 3,1 A CardBus/PCI Express) Informations concernant la [Adaptateur CA] sécurité. Entrée nomina CA 100 V - 240 V Dimensions externes 50 - 60 Hz (largeur ×... - Page 32 L’élimination des équipements usagés Applicable uniquement dans les pays membres de l’Union européenne et les pays disposant de systèmes de recyclage. Apposé sur le produit lui-même, sur son emballage, ou figurant dans la documentation qui l’accompagne, ce pictogramme indique que appareils électriques et électroniques usagés, doivent être séparées des ordures ménagères.
-
Page 33: Lea Esto Primero
Lea esto primero! ADVERTENCIA: Este aparato deberá ser conectado a tierra. Para garantizar un funcionamiento seguro, la clavija de tres contactos deberá introducirse solamente en una toma de corriente para tres contactos estándar que se encuentre conectada a tierra mediante el cableado normal de la casa. Los cables prolongadores utilizados con el aparato deberán tener tres conductores y estar cableados correctamente para proporcionar la conexión a tierra adecuada. - Page 34 El funcionamiento con una tensión diferente de 120 V CA puede requerir la utilización de una clavija de CA diferente. Póngase en contacto con un centro de servicio autorizado por Panasonic, bien sea local o del extranjero, para que le ayude en la selección de una clavija de CA alternativa.
- Page 35 Electronic Industries Alliance: http://www.eiae.org. La placa indicadora esta en la parte inferior de la unidad. Fabricado por: Panasonic Corporation, Osaka, Japón Nombre y dirección del importador conforme a las normas de la UE: Panasonic Testing Centre Panasonic Marketing Europe GmbH...
- Page 36 Índice Lea esto primero!..................S-1 Antes del uso ..................... S-5 Descripción general .................. S-5 Características ................... S-5 Entorno operativo necesario para la instalación........S-6 Accesorios suministrados ................ S-6 Partes y sus funciones................S-7 Cómo conectar la unidad P2 a un PC ............S-8 Cómo extraer la unidad P2 de un PC ............
-
Page 37: Antes Del Uso
Para obtener la información más reciente acerca de los controladores, visite la página “Service and Support” en el siguiente sitio web. http://pro-av.panasonic.net/ • La unidad P2 (AU-XPD3) podría calentarse durante el uso, pero esto no indica un fallo en el funcionamiento. -
Page 38: Entorno Operativo Necesario Para La Instalación
Puerto Thunderbolt 3 (uno o más): Se pueden conectar hasta seis unidades P2 a un único ordenador. Accesorios suministrados Cable Thunderbolt 3 Adaptador de CA (40G pasivos) Cable de alimentación Para AU-XPD3P Para AU-XPD3ED Para AU-XPD3E Para AU-XPD3E (Para Europa (Para Inglaterra) continental,etc) •... -
Page 39: Partes Y Sus Funciones
Partes y sus funciones LED de alimentación Este indicador se ilumina en color verde cuando el dispositivo está en funcionamiento. Interruptor de alimentación Utilice este interruptor para encender ( ) y apagar ( ) la unidad P2. Indicador de acceso Se ilumina en color verde durante el acceso a una tarjeta P2. -
Page 40: Cómo Conectar La Unidad P2 A Un Pc
Cómo conectar la unidad P2 a un PC Inicie el ordenador personal. Enchufe el adaptador de CA suministrado con la unidad P2 en la toma de red DC IN 16 V del dispositivo. Ajuste el interruptor de alimentación en Después del inicio, el LED de alimentación se iluminará... -
Page 41: Cómo Extraer La Unidad P2 De Un Pc
n Conexión en cadena margarita • La unidad P2 puede conectarse a un único ordenador personal en una cadena margarita de hasta 6 dispositivos. • Para conectar la unidad P2 en cadena margarita a otro dispositivo compatible con Thunderbolt 3, utilice el cable Thunderbolt 3 suministrado con el otro dispositivo. -
Page 42: Cómo Introducir Una Tarjeta P2
Cómo introducir una tarjeta P2 Introduzca una tarjeta P2 en la ranura para tarjetas P2. Introduzca la tarjeta hasta que el botón de expulsión (EJECT) salga hacia afuera. u NOTA: • Asegúrese de introducir la tarjeta P2 en horizontal. Si fuerza la tarjeta con alguna Botón de expulsión (EJECT) inclinación podría dañarla. -
Page 43: Cómo Extraer Una Tarjeta P2
Cómo extraer una tarjeta P2 Primero compruebe que no se está accediendo a la tarjeta P2, y luego desplace el botón de expulsión (EJECT) en la dirección de la flecha. u NOTA: • Para extraer una tarjeta P2 en un Mac, arrastre el icono de la tarjeta hasta la Papelera. -
Page 44: Protección Contra Escritura De La Tarjeta P2
Consulte el apartado “When Using Mac” en el manual de instalación del sitio web para obtener información sobre cómo instalar el controlador Thunderbolt en Mac. Para obtener la información más reciente acerca de los controladores, visite la página “Service and Support” en el siguiente sitio web. http://pro-av.panasonic.net/ S-12... -
Page 45: Preguntas Y Respuestas
Preguntas y respuestas n No se pueden utilizar tarjetas que no sean de tipo P2. Î La unidad P2 está diseñada para tarjetas P2 y no funciona con otras tarjetas que no sean de tipo P2. n No se puede acceder a la tarjeta P2 tras volver del estado de suspensión o hibernación. -
Page 46: Especificacione
Especificacione [Ranura para tarjetas] Voltaje nominal: CC de 16 V Ranura para tarjetas PC (1) Consumo de corriente nominal: (especificación base de CardBus/PCI 3,1 A Express) indica información de seguridad. [Adaptador de CA] Dimensiones externas Entrada nominal CA 100 V - 240 V (anchura ×... - Page 47 Eliminación de Aparatos Viejos Solamente para la Unión Europea y países con sistemas de reciclado. Este símbolo en los productos, su embalaje o en los documentos que los acompañen significa que los productos eléctricos y electrónicos usadas no deben mezclarse con los residuos domésticos. Para el adecuado tratamiento, recuperación y reciclaje de los productos viejos llévelos a los puntos de recogida de acuerdo con su legislación nacional.
- Page 48 Web Site: http://www.panasonic.com © Panasonic Corporation 2017...