Samsung HT-P1200 Instruction Manual
Slim digital home cinema system
Hide thumbs
Also See for HT-P1200:
- Instruction manual (45 pages) ,
- Manual de instrucciones (35 pages) ,
- Firmware update manual (6 pages)

Related Manuals for Samsung HT-P1200


Summary of Contents for Samsung HT-P1200
- Page 1 SLIM DIGITAL HOME CINEMA SYSTEM HT-P1200 THIS APPLIANCE IS MANUFACTURED BY: Instruction Manual COMPACT COMPACT DIGITAL VIDEO DIGITAL AUDIO AH68-01720B...
-
Page 2: Safety Warnings
Safety Warnings Use of controls, adjustments or performance of procedures other CLASS 1 LASER PRODUCT than those specified herein may result in hazardous radiation KLASSE 1 LASER PRODUKT exposure. LUOKAN 1 LASER LAITE KLASS 1 LASER APPARAT PRODUCTO LASER CLASE 1 CAUTION-INVISIBLE LASER RADIATION WHEN OPEN AND INTERLOCKS DEFEATED, AVOID EXPO- SURE TO BEAM. -
Page 3: Table Of Contents
Features Multi-Disc Playback & FM Tuner The HT-P1200 combines the convenience of multi-disc playback capability, including DVD-AUDIO, DVD-VIDEO, VCD, SACD, CD, MP3-CD, WMA-CD, DivX, CD-R/RW, and DVD-R/RW, with a sophisticated FM tuner, all in a single player. DVD-Audio compatible Experience the super high-quality audio performance of DVD-Audio. The on-board 24-bit/192kHz DAC enables this player to deliver exceptional sound quality in terms of dynamic range, low-level resolution and high-frequency detail. -
Page 4: Notes On Discs
Notes on Discs DVD (Digital Versatile Disc) offers fantastic audio and video, thanks to Dolby Digital surround sound and MPEG-2 video compression technology. Now you can enjoy these realistic effects in the home, as if you were in a movie theater or concert hall. DVD players and the discs are coded by region. -
Page 5: Description
Description —Front Panel— Power ( ) button Function button Tuning Down & Skip ( ) button Display PRO LOGIC II indicator DOLBY DIGITAL indicator STEREO indicator TUNER indicator GROUP indicator TITLE indicator ASC indicator LINEAR PCM indicator HDMI indicator —Rear Panel— Stop ( ) button Play/Pause (... -
Page 6: Remote Control
Description —Remote Control— TV indicator TV, DVD POWER button MODE button SLEEP button RDS Selection buttons Number(0~9) buttons REMAIN button MUTE button VOLUME button MENU button SUB TITLE button RETURN button MOVIE button MUSIC button EZ VIEW, NT/PAL button STEP button HDMI AUDIO SELECT button PL II MODE button REPEAT button... -
Page 7: Installing The Dvd Player
Installing the DVD player Combine the round board and the stand with the screws (4). Insert two screws in the top holes, but only screw them in 1/2 way. Align the stand with the two screws. Fully tighten the screws to secure the stand to the DVD player. -
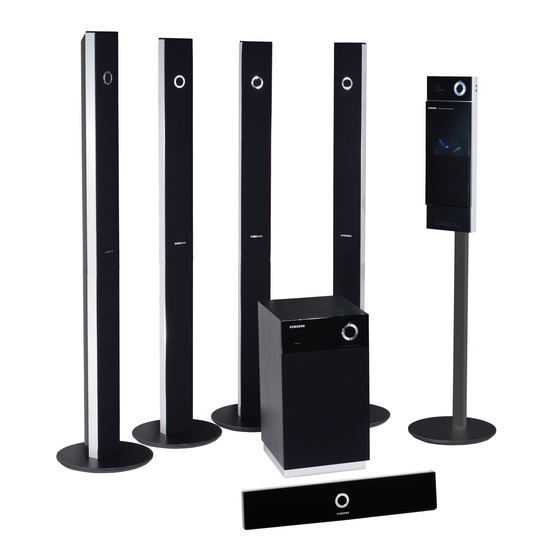
Page 8: Installing Speakers
Installing Speakers Please confirm that all the following contents are Speaker Packages included in the package. Front/Rear Stand (4EA) Front/Rear Speaker (4EA) Speaker Accessories Center Speaker Subwoofer Speaker Speaker Cable (5EA) Assembling the Speakers Set the front speaker on the front stand. -
Page 9: Connecting The Speakers
Connecting the Speakers Before moving or installing the product, be sure to turn off the power and disconnect the power cord. Position of the DVD Player Selecting the Listening Position • Place it on a stand or cabinet shelf, or under The listening position should be located about 2.5 to 3 the TV stand. -
Page 10: Connecting The Video Out To Tv
Connecting the Speakers Connecting the Main Unit and Sub Woofer Connect the DIN Audio Out of the main unit and the DIN Audio In of the sub woofer with the DIN audio cable. Press the power button of the sub woofer to turn it Sub Woofer Functions Subwoofer: With the built-in, dedicated 150W amplifier, the subwoofer generates rich bass sounds. -
Page 11: Hdmi Function
HDMI Function What is HDMI (High Definition Multimedia Interface)? This device transmits DVD video signal digitally without the process of converting to analog. You can get sharper digital pictures by connecting the video to your TV using an HDMI connection cable. HDMI Audio ON/OFF function •... -
Page 12: Connecting External Components
Connecting External Components Connecting an External Digital, Analog Component Example: Digital signal components such as a Set-top Box or CD Recorder. Analog signal components such as a VCR or TV. Optical Cable (not supplied) External Digital Component Connect the Digital In 1 or 2 (OPTICAL) on the main unit to the Digital Output on the external digital component. -
Page 13: Before Using Your Home Theater
Buttons Enabled for TV Operation: POWER, CHANNEL, VOLUME, TV/VIDEO, and Numeric (0-9) buttons. • By default, the remote control is set to work with Samsung TVs. See page 75 for more information on the operation of the remote control. Press POWER button to turn on... -
Page 14: Disc Playback
Disc Playback Press OPEN/CLOSE button to open the disc tray. Insert the disc so that the printed side faces out. Press OPEN/CLOSE button to close the disc window. • The disc plays automatically when the disc window is closed. • The disc menu may appear differently depending on the disc. -
Page 15: Sacd (Super Audio Cd) Playback
SACD (Super Audio CD) Playback You can listen to the high quality original sound of multi-channels that produces sound exceeding the limit of human sense. When the play is Open the disk stopped, select a tray by using the OPEN/ CLOSE track using the button and press button and then... -
Page 16: Jpeg File Playback
JPEG File Playback Images captured with a digital camera or camcorder, or JPEG files on a PC can be stored on a CD and then played back with this DVD player. Press the OPEN/CLOSE button to open the disc windows, and then load the JPEG disc. -
Page 17: Divx Playback
DivX Playback Skip Forward/Back During playback, press the button. • Goes to the next file whenever you press button, if there are over 2 files in the disk. • Goes to the previous file whenever you press button, if there are over 2 files in the disk. -
Page 18: Playing Media Files Using The Usb Host Feature
Playing Media Files using the USB HOST feature You can enjoy media files such as pictures, movies and music saved in an MP3 player, USB memory or digital camera in high quality video with 5.1 channel home theater sound by connecting the storage device to the USB port of the home theater. -
Page 19: Displaying Disc Information
Displaying Disc Information You can view disc playback information on the TV screen. Press INFO button. • Each time the button is pressed, the display changes as follows: Display disappears • appears on the TV screen! If this symbol appears on the TV screen while buttons are being operated, that operation is not possible with the disc currently being played. -
Page 20: Repeat Playback
Repeat Playback Repeat playback allows you to repeatedly play a chapter, title, track (song), or directory (MP3 file). SACD JPEG Press REPEAT button. • Each time the button is pressed during playback, the repeat playback mode changes as follows: DVD- DVD- VIDEO AUDIO... -
Page 21: Step Function
Step Function Press STEP button. • The picture moves forward one frame each time the button is pressed during playback. • During fast playback of a SACD, CD or MP3-CD, sound is heard only at 2x Note speed, and not at 4x, 8x, and 32x speeds. •... -
Page 22: Audio Language Selection Function
Bonus Group / Navigating Pages Bonus Group DVD- AUDIO Some DVD-Audio discs have an extra ‘bonus’ group that requires a 4-digit key number to access. See the disc packaging for details and the-key number. When you play a DVD-Audio disc that has a bonus group, the key number input screen appears automatically. -
Page 23: Moving Directly To A Scene/Song
Moving Directly to a Scene/Song SACD Moving to a Title/Track Press Cursor , buttons or numeric buttons to select Press INFO button. the desired title/track and then press ENTER button. 01/05 001/040 0:00:37 03/05 001/002 0:00:01 Moving to a Chapter Moving to a Specific Time Press Cursor Press Cursor ,... -
Page 24: Setting The Language
Setting the Language OSD (On-Screen Display) language is set to English by default. In Stop mode, press MENU button. Note • To select another language, select OTHER and enter the language code of your country. (See page 80 for language codes) AUDIO, SUB TITLE and DISC MENU language can be selected. -
Page 25: Setting Tv Screen Type
Setting TV Screen type Depending on your TV type (Wide Screen or conventional 4:3), you can select the TV's aspect ratio. In Stop mode, press MENU button. Press Cursor button to move to ‘TV DISPLAY’ and then press ENTER button. Press RETURN button to return to the previous level. -
Page 26: Setting Parental Controls (Rating Level)
Setting Parental Controls (Rating Level) Use this to restrict playback of adult or violent DVDs you do not want children to view. In Stop mode, press MENU button. Press Cursor Press Cursor , button button to move to to select the desired rating ‘PARENTAL’... -
Page 27: Setting The Wallpaper
You can select up to 3 wallpaper settings. Select this to set the Select this to set the desired Samsung Logo image as image as your wallpaper. your wallpaper. JPEG To select one of the 3 wallpaper settings you've made... -
Page 28: Dvd Audio Disc Playback Mode
DVD Audio Disc Playback Mode Some DVD-Audio discs contain DVD-Video as well as DVD-Audio. To play back the DVD-Video portion of the DVD-Audio disc, set the unit to DVD-Video mode. Press the MENU button while the disc tray is open. Press Cursor button to move to ‘DVD TYPE’... -
Page 29: Setting The Speaker Mode
Setting the Speaker Mode Signal outputs and frequency responses from the speakers will automatically be adjusted according to your speaker configuration and whether certain speakers are used or not. Press Cursor In Stop mode, button to move to press MENU ‘Audio’... -
Page 30: Setting The Delay Time
Setting the Delay Time If the speakers cannot be placed at equal distances from the listening position, you can adjust the delay time of the audio signals from the center and rear speakers. In Stop mode, press MENU button. Setting up the Speaker Delay Time When 5.1CH Surround Sound is played, you can enjoy the best sound if the distance between you and each speaker is the same. -
Page 31: Setting The Audio Quality
Setting the Audio Quality You can adjust the balance and level for each speaker. When adjusting the audio quality using the setup screen Method 1 In Stop mode, press MENU button. Press Cursor button to move to ‘SOUND EDIT’ and then press ENTER button. -
Page 32: Setting The Drc (Dynamic Range Compression)
Setting the DRC (Dynamic Range Compression) You can use this function to enjoy Dolby Digital sound when watching movies at low volume at night. Press Cursor In Stop mode, button to move to press MENU ‘Audio’ and then button. press ENTER button. Press Cursor Press Cursor button to move to... -
Page 33: Dolby Pro Logic Ii Mode
Dolby Pro Logic II Mode You can select the desired Dolby Pro Logic II audio mode. Press PL II MODE button. • Each time the button is pressed, the mode changes as follows. PRO LOGIC II • MUSIC: When listening to music, you can experience sound effects as if you are listening to the actual performance. -
Page 34: Auto Sound Calibration Setup
Auto Sound Calibration Setup * This function is available only for DVD/CD playback. Auto Sound Calibration By setting the auto sound calibration function just once when you relocate or install the unit, you can have the unit automatically recognize the distance between speakers, levels between channels, and frequency characteristics to create a 5.1-channel sound field optimized for the listener's environment. -
Page 35: Live Surround Mode
Live Surround Mode SUPER 5.1 MUSIC You can reproduce a 2-channel sound source, such If you press the MUSIC button when listening to a 2-channel sound source, it will be reproduced in as CD, and radio broadcast, in 5.1-channel 4.1-channel surround sound so that you can enjoy a surround sound. -
Page 36: Listening To Radio
Listening to Radio Remote Control Unit Press TUNER Tune in to the button. desired station. Automatic Tuning 1 When is pressed, a preset broadcast station is selected. Press and hold TUNING/CH Automatic Tuning 2 to automatically search for active broadcasting stations. Manual Tuning Briefly press TUNING/CH to increase or decrease the... -
Page 37: About Rds Broadcasting
About RDS broadcasting Using the RDS (Radio Data System) to receive FM stations RDS allows FM stations to send an additional signal along with their regular program signals. For example,the stations send their station names,as well as information about what type of program they broadcast, such as sports or music,etc. -
Page 38: Convenient Functions
Convenient Functions Sleep Timer Function You can set the time that the DVD player will shut itself off. Press SLEEP button. • "SLEEP" will be displayed. Each time the button is pressed the preset time changes as follows: 10 TITLE CHAP PRGM RDS RT To confirm the sleep timer setting, press SLEEP button. -
Page 39: Operating A Tv With The Remote Control
TV. • If you do not set the remote control with the code for your brand of TV, the remote control will work on a Samsung TV by default. TV Brand Code List Brand... -
Page 40: Before Calling For Service
Refer to the chart below when this unit does not function properly. If the problem you are experiencing is not listed below or if the instruction below does not help, turn off the unit, disconnect the power cord, and contact the nearest authorized dealer or Samsung Electronics Service Center. Symptom Check/Remedy Disc tray does not open. -
Page 41: Cautions On Handling And Storing Discs
Cautions on Handling and Storing Discs Small scratches on the disc may reduce sound and picture quality or cause skipping. Be especially careful not to scratch discs when handling them. Handling discs Do not touch the playback side of the disc. Hold the disc by the edges so that fingerprints will not get on the surface. -
Page 42: Usb Host Feature Supported Products
FLEX DRIVE Pentax Digital Camera AnyDrive Pentax Digital Camera XTICK Pentax Digital Camera Micro Mini Pentax Digital Camera iFlash Samsung Digital Camera Samsung Digital Camera RiDATA Samsung Digital Camera Sanyo Digital Camera MP3 Player Sony Digital Camera Sony Digital Camera... -
Page 43: Specifications
Specifications MAIN UNIT : 30W Power Consumption SUBWOOFER : 100W MAIN UNIT : 2.8kg Weight VERTICAL STAND : 8.0kg MAIN UNIT : 183 x 500 x 82 mm Dimensions (W x H x D) WITH STAND : 328 x 1200 x 328 mm Operating Temperature Range 5°C ~ 35°C Operating Humidity Range...