Table of Contents
Quick Links
Table of Contents

Related Manuals for Honeywell PC43K


Summary of Contents for Honeywell PC43K
- Page 1 PC43K Integrated Print/Scan Solution powered by Android™ User Guide...
- Page 2 Disclaimer Honeywell International Inc. (“HII”) reserves the right to make changes in specifications and other information contained in this document without prior notice, and the reader should in all cases consult HII to determine whether any such changes have been made. The information in this publication does not represent a commitment on the part of HII.
-
Page 3: Table Of Contents
Printer Features........................5 Tablet Features ......................... 5 About Home Screen ......................6 Navigation Buttons ......................6 PC43K Applications......................7 Scan Features..........................7 Chapter 2 - Set Up the Kiosk ................9 Loading the Media......................... 9 Open Printer Media Lid for Media Loading ..............9 Load Media for Tear-off Printing.................. - Page 4 Kiosk Applications ........................21 PC43K-Demo Application....................21 Register at an Event.......................22 Return an Item .........................22 Ship a Package ........................23 PC43K- Firmware Updater for Printer................24 How to Update Firmware .....................24 Honeywell App Lock......................25 Enable App Lock ......................25 How to Use.........................26 Change Account Password ..................29 Chapter 4 - USB Connectivity ..............
- Page 5 Appendix A - Specifications ................43 Kiosk Specification ........................43 Printer Supported Command Languages ..............43 Media Sensors ........................43 Scanner Specifications .......................44 Supported Symbologies ....................44 N3680 Scan Engine Reading Distances ...............44 Dimension Illustration .......................45 PC43K Width ...........................45 PC43K Length and Height....................45 Wall Mount Bracket........................46 PC43K User Guide...
- Page 6 PC43K User Guide...
-
Page 7: Customer Support
For our latest contact information, see www.honeywellaidc.com/locations. Product Service and Repair Honeywell International Inc. provides service for all of its products through service centers throughout the world. To find your service center, go to www.honeywellaidc.com and select Support. -
Page 8: Limited Warranty
5. Lower the swing arms to front. 6. Use the original packing materials to secure and protect the kiosk in the box. 7. Securely seal the shipment. Note: Honeywell is not responsible for any damage caused during shipment/transit. Limited Warranty For warranty information, go to www.honeywellaidc.com... -
Page 9: Caution Statements
Caution: The load for each peripheral connected through USB port should not exceed 500mA. Caution: Do not store the kiosk without using it for a long period of time. If storing for over 6 months, make sure to charge by turning on the kiosk. PC43K User Guide... - Page 10 PC43K User Guide...
-
Page 11: Chapter 1 - Get Started
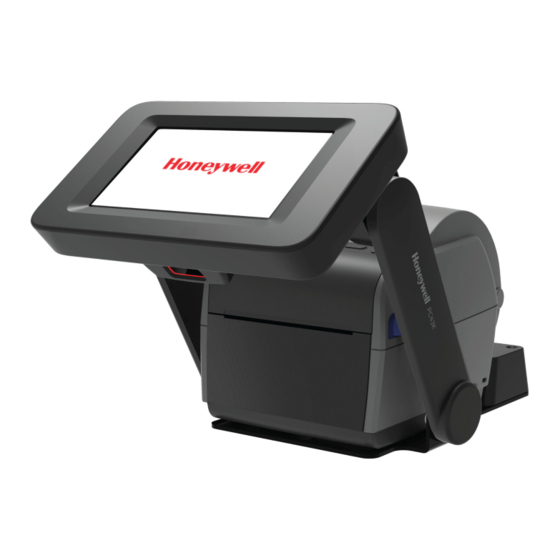
Integrated with Honeywell’s compact printer, Android enabled Honeywell tablet, and a versatile Honeywell scanner, the PC43K comes with fully articulated swing arms for easy user access. Honeywell provides demo applications and Power Tool applications that make the PC43K user-friendly and easy to deploy. -
Page 12: Kiosk Front View
Kiosk Front View Multi-Touch Panel Swing Arm Scanner Swing Arm Printer Back View (Power Port) Tablet Power Button AC Power Jack Power LED PC43K User Guide... -
Page 13: Side View
Side View Printer Latch USB Hub Printer Lid Open View Printer Switch PC43K User Guide... -
Page 14: Swing Arms Movement Range
Swing Arms Movement Range ° ° Tablet Movement Range PC43K User Guide... -
Page 15: Printer Features
Printer Features The PC43K has an integrated direct thermal (DT) printer that delivers: • Print speeds of up to 8 ips (203 dpi printhead) or 6 ips (300 dpi printhead) Note: For efficient power management, Honeywell recommends printing at a default speed of 4 ips. -
Page 16: About Home Screen
Tap to return to previous screen. Home Tap to return to Home screen. Recent Apps Tap to view and switch between recently accessed applications. Note: The ScanPal EDA71 built-in scanner is disabled. The N3680 scanner is integrated with the kiosk. PC43K User Guide... -
Page 17: Pc43K Applications
To configure app restrictions for kiosk applications. Scan Features PC43K comes equipped with N3680 scan engine. The N3680 barcode scan engine is fully decoded 2D imager that utilizes Honeywell decoding and imaging technology. The scanner supports wide variety of symbologies including 1D and 2D barcodes, composite code, and postcode. - Page 18 PC43K User Guide...
-
Page 19: Chapter 2 - Set Up The Kiosk
Open Printer Media Lid for Media Loading Media can be loaded in the printer by opening the printer lid. 1. Push the swing arms to the rear of the kiosk and pull one or both the printer latches forward. PC43K User Guide... -
Page 20: Load Media For Tear-Off Printing
Self-adhesive continuous stock with liner • Self-adhesive labels with liner • Tickets with black marks, with or without perforations Warning: The tear bar contains sharp edges. Keep your fingers and other body parts away from the tear bar. PC43K User Guide... - Page 21 2. To adjust the media holders of different media size: a. Pull the locking tab up. b. Slide the media holders to adjust the distance between them and place the media roll between the holders. PC43K User Guide...
- Page 22 Make sure the media holders are snug against the sides of the media roll and press the tab down to lock the media holders in place. 3. If you are using notched or black mark stock, slide the label stop sensor so the notches or marks pass over the sensor. PC43K User Guide...
-
Page 23: Load Media For Cut-Off Printing
You can also use self-adhesive labels with a liner making sure to cut only the liner. Follow steps 1-2 from Load Media for Tear-off Printing, then: 1. Thread the media under the tip guides on the media holders. PC43K User Guide... -
Page 24: Load Media For Label Dispenser
Follow steps 1-3 from Load Media for Tear-off Printing, then: 1. Thread the media under the tip guides on the holders. 2. Open the label dispenser front door. 3. Remove the label closest to the end of the liner. PC43K User Guide... - Page 25 Note: Do not pull on the media to take up the slack. 5. Close the front door. 6. Close the printer lid until it snaps shut. 7. Use the tablet and respective application to print on the label. PC43K User Guide...
-
Page 26: Load External Media
2. Feed the media into the printer through the external media feed slot. External media feed slot 3. Thread the media through the media holders or media guides as you would for media installed inside the printer. PC43K User Guide... -
Page 27: Power On The Kiosk
1. Connect one end of the power adapter cord to the back of the kiosk and the other end to AC power. Warning: Installing the kiosk requires the power cord to be connected to a socket-outlet with a grounded connection. 2. The kiosk boots up and displays the lock screen. PC43K User Guide... -
Page 28: Print A Test Label
Print a Test Label You can access the PC43K-Demo application to print a test label. 1. Connect the kiosk to power and turn on the kiosk. 2. Make sure to load direct thermal media (4 in x 6 in) and adjust the media holder. -
Page 29: About Scan Engine
Scan a Code You can access the PC43K-Demo application to scan a test code. 1. Open PC43K-Demo, select Register at an Event. 2. Place the code under the scan window. A beep sound confirms a successful scan. - Page 30 PC43K User Guide...
-
Page 31: Chapter 3 - Using The Kiosk
CHAPTER USING THE KIOSK This section contains information about the kiosk application and its use cases. Kiosk Applications The kiosk application details all the use cases of the PC43K. The kiosk comes with three main applications. • PC43K-Demo • PC43K-FW Update •... -
Page 32: Register At An Event
Scan a code and print • Event registration and generate code Return an Item The Return an item function in the demo application demonstrates the following features of the application. • Scan a receipt • Enter barcode value PC43K User Guide... -
Page 33: Ship A Package
Ship a Package You can enter the user details where the item is to be shipped and print the shipping label. PC43K User Guide... -
Page 34: Pc43K- Firmware Updater For Printer
Download the latest firmware file to your PC and copy to your thumb drive. Software downloads can be accessed through the Technical Support Downloads Portal (https://hsmftp.honeywell.com). For PC43K firmware file, navigate through Softwares > Printers > Desktop > PC23PC43PD43 > Current > Firmware. -
Page 35: Honeywell App Lock
App Lock is an Android application that can be used to lock unwanted applications and restrict users from accessing them. The functions of the Honeywell App lock include: 1. Locks the Home page to prevent users from accessing contents unrelated to work;... -
Page 36: How To Use
• Enable MTP: Enable for media file transfer. • Export configurations: Exports user account configuration information in .json file (Downloads > IPSM Card > Honeywell > applock). Copy the .json file to other devices to export configuration. Note: To view and copy the .json file, you may need to turn on Provisioning mode. To learn how to turn on Provisioning mode, refer to ScanPal EDA71 User Guide. - Page 37 OK. Upon successful addition of a user, a Whitelist apps configuration page is displayed. d. All the available apps are displayed with a checkbox, select the application that must be accessible for the new user and tap Next. PC43K User Guide...
- Page 38 You may choose the user settings in the Select user settings page and tap Finish. g. At this point, the user will remain in the administrator’s account and may continue to add other new accounts. 4. Access Manage users to view the list of accounts currently entered in the device. PC43K User Guide...
-
Page 39: Change Account Password
5. Tap Logout to come out of the administrator’s account. 6. Enter user details to log in to the user account. 7. To disable Honeywell App Lock, a. Logout from the user account and login to administrator’s account. b. Go to Settings and turn off the AppLock switch. Tap OK. - Page 40 PC43K User Guide...
-
Page 41: Chapter 4 - Usb Connectivity
The USB Type B connector from the printer is connected to the USB port of the USB Hub. • The tablet is connected to the micro USB port of the USB hub. • The scanner unit is connected to the micro USB port of the USB hub. PC43K User Guide... -
Page 42: Installing Customized Applications
The customized application must be designed to suit the Android environment and the file must be in .apk format. Copy the customized application to a USB thumb drive, and: 1. Pull the kiosk swing arms forward. 2. Remove the USB hub casing. PC43K User Guide... - Page 43 5. The folder will display the files available in the USB thumb drive. 6. Tap on the .apk file from the folder. 7. Tap Install on the bottom right-hand corner of the screen. 8. Tap Done when prompted. 9. The customized application icon will appear on the home screen. PC43K User Guide...
-
Page 44: Deleting Customized Applications
1. Tap Settings > Apps & notifications. It will display a list of applications in the kiosk. 2. Tap on the application that needs to be removed. Tap Uninstall. 3. Tap OK, to confirm uninstall. 4. The application is removed from the kiosk. PC43K User Guide... -
Page 45: Chapter 5 - Troubleshooting
The AC power connection to the kiosk might be loose or removed. Check for loose connection. • Make sure the printer switch is turned on. Note: For printer and tablet related troubleshooting procedures, refer to the PC43d User Guide and ScanPal EDA71 User Guide, respectively. PC43K User Guide... -
Page 46: Troubleshoot Kiosk Problems And Find Solutions
The barcode might not be supported by the scan engine. Check the supported barcode. • Make sure the barcode size is supported by the scan engine. Note: Users are refrained from upgrading the kiosk to a lower version of current Android software. PC43K User Guide... -
Page 47: Kiosk Default Settings
The following lists the disabled features of the PC43d printer. • Ethernet Connection • LCD/Icon interface The following lists the disabled features of the tablet. • Internal Scanner • Camera feature • Phone feature (for example, calls, messages, etc.) • Sim Card access • Micro SD PC43K User Guide... - Page 48 PC43K User Guide...
-
Page 49: Chapter 6 - Maintenance
Caution: Use only the cleaning agents specified in this section. Honeywell is not responsible for damage caused by any other cleaning materials used on this kiosk. Caution: Isopropyl alcohol is a highly flammable, moderately toxic, and mildly irritating substance. -
Page 50: Clean The Touch Panel And Scanner Window
Warning: The printhead/motor may be hot. Allow the printhead/motor to cool. 1. Turn the kiosk off and disconnect the kiosk from power. 2. Open the printer lid and remove the media. 3. Insert most of the cleaning card under the printhead, and then lower the printhead. PC43K User Guide... -
Page 51: Clean The Platen Roller
Clean the Platen Roller Follow this procedure to remove, clean, and replace the platen roller as part of standard maintenance for the kiosk. Honeywell recommends that you check the platen roller for debris and clean it each time you replace the media. -
Page 52: Clean The Exterior Of The Kiosk
Move the arm of the kiosk to clean in between the gaps. Use a soft cloth moistened with water or a mild detergent when cleaning the kiosk exterior. Keep the surface surrounding the kiosk clean as well. PC43K User Guide... -
Page 53: Appendix A - Specifications
APPENDIX SPECIFICATIONS Kiosk Specification 1. Go to www.honeywellaidc.com 2. Navigate to the PC43K product page. 3. Locate Products tab. 4. Click on your kiosk model. 5. Select one of the following tabs: • Specifications: Kiosk specifications are listed here. •... -
Page 54: Scanner Specifications
20 MIL CODE 3 6.0 [2.4] 38.0 [15.0] 32.0 [12.6] 6.7 MIL PDF417 6.0 [2.4] 12.5 [4.9] 6.5 [2.5] 10 MIL DATA MATRIX 6.0 [2.4] 13.0 [5.1] 7.0 [2.7] 20 MIL QR 5.0 [2.0] 23.0 [9.0] 18.0 [7.0] PC43K User Guide... -
Page 55: Dimension Illustration
Dimension Illustration PC43K Width 245 mm (9.64 in) PC43K Length and Height 248 mm (9.76 in) 178 mm (7.00 in) 408 mm (16.06 in) PC43K User Guide... -
Page 56: Wall Mount Bracket
6 to 8m (0.24 in to 0.33 in). • Honeywell recommends using pan-head or flathead screws with appropriate anchors for drywall, cement, concrete block, or plasterboard walls. Use wood screws only for wooden surfaces, and ensure the screw is long enough to be sunk to a depth of at least 15mm (0.59 in). - Page 58 Honeywell 9680 Old Bailes Road Fort Mill, SC 29707 www.honeywellaidc.com ™ PC43K-A-EN-UG-01 Rev A 02/20...