Table of Contents
Available languages
Available languages
Quick Links
Chapters
Table of Contents

Related Manuals for Cylinda IBU 92 V


Summary of Contents for Cylinda IBU 92 V
- Page 1 IBU 92 RFS IBU 92 V...
- Page 2 SVENSKA . . . . . . . . . . . . . . . . . . . . . . . . . . . . . . . . . . . . . . . . . .3 ENGLISH .
-
Page 3: Table Of Contents
SVENSKA MILJÖ OCH SÄKERHET, ANVÄNDNING OCH SKÖTSEL och INSTALLATIONSANVISNINGAR Innehållsförteckning Hälsa och säkerhet SÄKERHETSFÖRESKRIFTER . . . . . . . . . . . . . . . . . . . . . . . . . . . . . . . . . . . . . . . . . . . . . . . . . . . . . . . . . . . . . . . . . . . . . . . . . . . . . . . 4 Användning och skötsel BESKRIVNING AV PRODUKTEN . -
Page 4: Säkerhetsföreskrifter
. förstår vilka faror det innebär . Barn skall inte leka Kontakta din återförsäljare eller närmaste Cylinda- med apparaten . Rengöring och användarunderhåll kundservice om du upptäcker något problem . - Page 5 Electrical and Electronic Equipment, WEEE) . Genom att säkerställa att Om du behöver byta ut elsladden, kontakta ett denna produkt bortskaffas på ett korrekt sätt hjälper du till att förhindra auktoriserat Cylinda-center . negativa konsekvenser på miljön och människors hälsa . RENGÖRING OCH UNDERHÅLL Symbolen på...
-
Page 6: Användning Och Skötsel
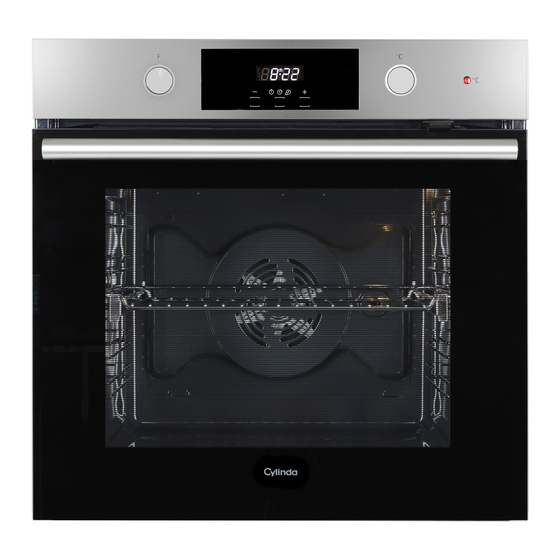
Användning och skötsel BESKRIVNING AV PRODUKTEN 1. Kontrollpanel 2. Fläkt och runt värmeelement (dolt) 3. Sidostegar (nivån anges på ugnens framsida) 4. Lucka 5. Övre värmeelement/ grillelement 6. Lampa 7. Identifieringsskylt (ska inte tas bort) 8. Nedre värmeelement (dolt) Observera: Under tillagning kan kylfläkten slås på... -
Page 7: Tillbehör
TILLBEHÖR GALLERHYLLA LÅNGPANNA BAKPLÅT UTDRAGBARA SKENOR Används för att tillaga Används som ugnsplåt Används för att baka bröd Dessa gör det lättare att mat eller som stöd till för tillagning av kött, fisk, och bakverk, men även för sätta in och ta ut tillbehören ugnsformar, bakformar och grönsaker, tunnbröd etc. -
Page 8: Ta Bort Och Sätta Tillbaka Sidostegarna
TA BORT OCH SÄTTA TILLBAKA SIDOSTEGARNA Sidostegarna kan vara försedda med två För att montera tillbaka sidostegarna, passa först fästskruvar för bättre stabilitet . in dem i deras övre fäste . Ta bort skruvarna på båda sidorna med hjälp av Fortsätt att hålla dem uppe medan du skjuter in ett mynt eller ett verktyg . -
Page 9: Montering Av Utdragbara Skenor
MONTERING AV UTDRAGBARA SKENOR Observera: Det kan hända att de utdragbara skenorna Upprepa dessa steg på den andra sidostegen på redan är monterade på sidostegarna: För att ta bort dem, samma nivå . De rörliga skenorna kan monteras på alla frigör först den nedre klämman och dra sedan ut dem. -
Page 10: Ibruktagning
IBRUKTAGNING 1. STÄLLA IN TID OCH LJUD 2. BRÄNNA UR UGNEN Du måste ställa in tiden när du startar apparaten En ny ugn kan frigöra lukter som har lämnats kvar första gången: ”AUTO” och ”0 .00” lyser på displayen . under tillverkningen . - Page 11 ** Vänd maten efter två tredjedelar av tiden (vid behov). Tillbehör som visas: Gallerhylla UPPTINING Tårtform på galler För att tina frysta matvaror snabbare . Placera Långpanna/bakplåt maten på den mittersta ugnsfalsen . Låt maten Tårtform på galler eller långpanna / bakplåt ligga kvar i förpackningen .
- Page 12 HELAUTOMATISKT PROGRAM / FÖRDRÖJD START kan fördröja starten av funktionen genom att programmera dess sluttid . Efter att du ställt in längden, tryck på time-knappen tills display visar END (7) . Tryck på knapparna för att välja den önskade tillagningstiden . Efter några sekunder visar displayen tiden medan symbolen släcks och AUTO fortsätter att lysa för bekräfta inställningen (8) .
-
Page 13: Goda Råd
GODA RÅD HUR DU SKA LÄSA TILLAGNINGSTABELLEN PIZZA Tabellen listar den bästa funktionen, tillbehören och Smörj bakplåtarna en aning för att pizzan ska få en nivån som ska användas för att laga olika typer av knaprig botten . mat . Sprid ut mozzarellaost över pizzan då... -
Page 14: Rengöring
RENGÖRING Använd inte Åtgärderna ska utföras med kall Använd inte stålull, slipsvampar ångrengöringsutrustning. ugn. eller slipande/frätande rengöringsmedel, eftersom Använd skyddshandskar när Koppla bort ugnen från elnätet. dessa kan skada apparatens ytor. detta görs. INRE OCH YTTRE YTOR • Rengör ytorna med en fuktig trasa av mikrofiber . Om •... -
Page 15: Underhåll
UNDERHÅLL Använd skyddshandskar när Åtgärderna ska utföras med kall Koppla bort ugnen från elnätet. detta görs. ugn. DEMONTERA UGNSLUCKAN Öppna ugnsluckan helt . Ta ett fast tag i dörren med båda händerna - håll inte i handtaget . Ta helt enkelt av luckan genom att fortsätta att stänga den samtidigt som du drar den uppåt tills den lossnar från fästet . -
Page 16: Montera Ugnsluckan
MONTERA UGNSLUCKAN Flytta luckan mot ugnen medan gångjärnens Tryck försiktigt för att kontrollera att hakarna är i krokar ställs i höjd med deras fästen . rätt läge . “CLICK” Testa att stänga luckan och kontrollera att den är i Säkra den övre delen i dess fäste . linje med kontrollpanelen . -
Page 17: Att Byta Glödlampa
ATT BYTA GLÖDLAMPA Koppla bort ugnen från elnätet . Observera: Använd endast halogenlampor av typ 20-40 W/230 V, typ G9, T300 °C. Skruva av locket från lampan, byt ut glödlampan och skruva tillbaka locket på lampan . Glödlampan som används i produkten är särskilt utformad för hushållsapparater och lämpar sig inte för allmän rumsbelysning i hemmet (EG-förordning 244/2009). -
Page 18: Felsökning
FELSÖKNING Eventuella problem som inträffar eller fel som uppstår kan oftast lösas på ett enkelt sätt . Innan du kontaktar kundservice, läs i tabellen nedan för att se om du kan lösa problemet själv . Om problemet kvarstår, kontakta närmaste kundservice . Läs säkerhetsinstruktionerna noggrant innan någon av åtgärderna nedan utförs PROBLEM MÖJLIG ORSAK... -
Page 19: Produktblad
PRODUKTBLAD Produktens fullständiga specifikationer, inklusive energieffektivitetskvoten för denna ugn, kan läsas och laddas ner från vår webbplats www.cylinda.se KUNDSERVICE FÖRE DU KONTAKTAR VÅR CYLINDA-SERVICE: Kontrollera om problemet kan lösas på egen hand med de åtgärder som beskrivs i tabellen Felsökning . - Page 20 ENGLISH HEALTH & SAFETY, USE & CARE and INSTALLATION GUIDE Index Health and Safety guide SAFETY INSTRUCTIONS . . . . . . . . . . . . . . . . . . . . . . . . . . . . . . . . . . . . . . . . . . . . . . . . . . . . . . . . . . . . . . . . . . . . . . . . . . . . . . . . . . 21 Use and Care guide PRODUCT DESCRIPTION .
-
Page 21: Safety Instructions
. Children must not play with the Cylinda Service . Once installed, packaging waste appliance . Cleaning and user maintenance must (plastic, styrofoam parts etc .) must be stored not be carried out by children without supervision . - Page 22 In case of replacement of power cable, contact For further information on the treatment, recovery and recycling of an authorized Cylinda center . household electrical appliances, contact your local authority, the collection service for household waste or the store where you purchased CLEANING AND MAINTENANCE the appliance .
-
Page 23: Use And Care Guide
Use and Care guide PRODUCT DESCRIPTION 1. Control panel 2. Fan and circular heating element (non-visible) 3. Shelf guides (the level is indicated on the front of the oven) 4. Door 5. Upper heating element/grill 6. Lamp 7. Identification plate (do not remove) 8. -
Page 24: Accessories
ACCESSORIES WIRE SHELF DRIP TRAY BAKING TRAY SLIDING RUNNERS Use to cook food or as a Use as an oven tray Use for cooking all bread These make it easier to place support for pans, cake tins for cooking meat, fish, and pastry products, but accessories in and remove and other oven proof items... -
Page 25: Remove And Reinstall The Shelf Guides
REMOVE AND REINSTALL THE SHELF GUIDES The shelf guides can be equipped with two fixing To refit the shelf guides, first fit them back into screws for optimum stability . their upper seating . Remove the screws on both sides with the aid of a Keeping them held up, slide them into the cooking coin or a tool . -
Page 26: Fitting The Sliding Runners
FITTING THE SLIDING RUNNERS Please note: The sliding runners can be already mounted Repeat these steps on the other shelf guide on the same level . The sliding runners can be fitted on any on the shelf guides: to remove them, pull outward, releasing first the lower clip. -
Page 27: First Time Use
FIRST TIME USE 1. SETTING THE TIME AND THE TONE 2. HEAT THE OVEN You will need to set the time of the day when you A new oven may release odours that have been left switch on the appliance for the first time: “AUTO” and behind during manufacturing: this is completely “0 .00”... - Page 28 Accessories showed: Wire Shelf Cake tin on wire shelf Roast chicken 1-1,3 kg — 55 - 70 * Drip tray / baking tray Roast beef rare 1 kg — 35 - 45 ** Cake tin on wire shelf or drip tray / baking tray Tray with water Roast potatoes —...
- Page 29 FULLY AUTOMATIC PROGRAM / DELAYED START ou can delay the start of the function by programming its end time . After setting the duration, press the time button until the display shows END (7) . Press the buttons to select the desired cooking end time .
-
Page 30: Useful Tips
USEFUL TIPS HOW TO READ THE COOKING TABLE PIZZA The table lists the best function, accessories and level Lightly grease the baking plates to ensure the pizza to use when cooking different types of food . has a crispy base . Cooking times start from the moment food is placed Scatter the mozzarella over the pizza two-thirds of in the oven, excluding preheating (where required) . -
Page 31: Cleaning
CLEANING Do not use steam cleaning Carry out the required Do not use wire wool, abrasive equipment. operations with the oven cold. scourers or abrasive/corrosive cleaning agents, as these could Use protective gloves during all Disconnect the oven from the damage the surfaces of the operations. -
Page 32: Maintenance
MAINTENANCE Use protective gloves during all Carry out the required Disconnect the oven from the operations. operations with the oven cold. power supply. REMOVING THE DOOR Open the door fully . Take a firm hold of the door with both hands – do not hold it by the handle . -
Page 33: Refitting The Door
REFITTING THE DOOR Move the door towards the oven, aligning the Apply gentle pressure to check that the catches hooks of the hinges with their seating . are in the correct position . “CLICK” Try closing the door and check to make sure that it Secure the upper part into its seating . -
Page 34: Replacing The Light
REPLACING THE LIGHT Disconnect the oven from the power supply . Please note: Only use 20-40 W/230 V type G9, T300 °C halogen bulbs. Unscrew the cover from the light, replace the bulb and screw the cover back on the light . The bulb used in the product is specifically designed for domestic appliances and is not suitable for general room lighting within the home (EC Regulation 244/2009). -
Page 35: Troubleshooting
TROUBLESHOOTING Any problems that arise or faults that occur can often be resolved easily . Before contacting the After-sales Service, check the following table to see whether you can resolve the problem yourself . If the problem persists, contact your nearest After-sales Service Centre . Read the safety instructions carefully before carrying out any of the following work PROBLEM POSSIBLE CAUSE... -
Page 36: Product Fiche
PRODUCT FICHE A complete product specification, including the energy efficiency ratings for this oven, can be read and downloaded from our website www.cylinda.se AFTER-SALES SERVICE BEFORE CONTACTING OUR CYLINDA SERVICE: check whether you can resolve the problem yourself using any of the measures described in the Troubleshooting table;... - Page 37 90°C 89° max min 550 min 550 min 500 min 560 min 500 min 560 583 + 2...
- Page 40 • Vi har service i hela landet / Nationwide service • Maskintyp / Model code • Problembeskrivning / Problem description • Gå in på www.cylinda.se / Visit www.cylinda.se • Serienummer / Serial number • Namn och adress / Name and address •...