
Related Manuals for Honeywell HEIPTZ-2201W-IR


Summary of Contents for Honeywell HEIPTZ-2201W-IR
- Page 1 Honeywell HEIPTZ-2201W-IR 1080p HD Network Explosion-proof PTZ Camera with IR LED User Manual Document 800-21584 Rev. A...
-
Page 2: Table Of Contents
Honeywell Contents 1. Preface ........................................1 Product Symbol ....................................1 General Description ..................................... 1 Special Symbols ....................................2 Notes ........................................2 2. Product Introduction .................................... 3 Features ....................................... 3 Explosion-proof Structure ..................................3 IP Specifications ....................................4 Installation Environment ..................................4 System Requirements .................................. - Page 3 Honeywell LAN ......................................46 Internet ......................................48 Frequently asked questions ................................52...
-
Page 4: Safety Precautions
Honeywell Please read through the warning and notice before installation and operation of the PTZ: Warning:Do not open the enclosure or rear cover in case of electric shock. The product does not contain any parts for maintenance. Please contact maintenance professionals for relevant services. - Page 6 Honeywell Please read this user manual carefully and operate the device in accordance with the instructions. This user manual serves as a reference for various models. The operational instructions for each model are not specified in detail in this manual. .If you have any...
-
Page 8: Preface
Ⅱ2GD Ex dⅡC T6 Gb, Ex t ⅢC T80℃ Db 0470 General Description HEIPTZ-2201W-IR 1080p HD Network Explosion-proof PTZ Camera with IR LED (hereafter referred to as PTZ), which the explosion-proof performance should be in accordance with the following standards: ... -
Page 9: Special Symbols
The content of this manual has been checked and verified. Should there be any problem or controversy in regard to this manual, Honeywell Security is entitled to final explanations. Honeywell shall not be held responsible for any damage caused by... -
Page 10: Product Introduction
Honeywell 2. Product Introduction This section introduces the product’s features, specifications, panel keys and interface. Features 360° continuous pan rotation with no obstruction. Tilt range of -90 to 90° . Pan speed (manual) from 0.01° to 30° per second. -
Page 11: Ip Specifications
Product Introduction IP Specifications Built-in Web Server fully supports Internet Explorer for browsing, configuration and upgrade. Support both CBR and VBR UPNP function. Support DDNS. Support PPPOE protocol. Support snapshot, remote recording and playback. ... -
Page 12: Packing List
Honeywell Packing List Unpack the product to check to ensure the packing is intact. Then check the accessories according to the following table. Items Remarks User manual and application software are included. M4*8 socket head cap screw Φ4 flat washer Used to fasten the sun shields on both sides Φ4 spring washer... -
Page 13: Outlook And Dimension
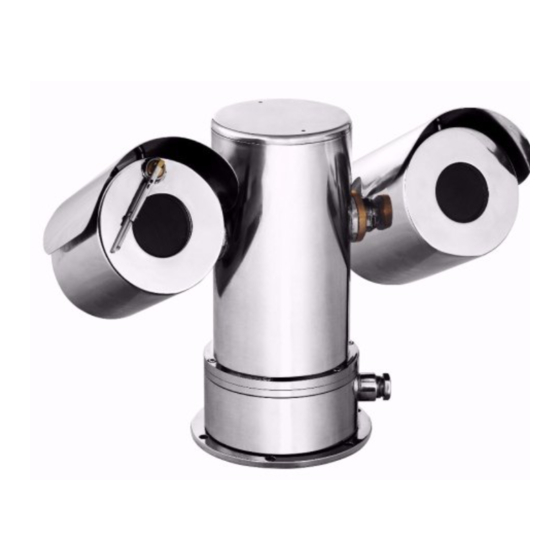
Product Introduction Outlook and Dimension Product Outlook DO NOT OPEN WHEN ENERGIZED Honeywell Security (China) Co.,Ltd. 1. Wiper 2. Left shield (camera) 3. Camera body 4. External entry device of the PTZ 5. Sun shield 6. Viewing window 7. Right shield (illuminator) 8. -
Page 14: Base Dimension
Honeywell Base Dimension: unit:mm... -
Page 15: Installation And Connection
Honeywell 3. Installation and Connection This section focuses on the installation and connection of the PTZ. In order to keep the safety of the personnel and the equipment, do not attempt to open or disassemble the product. Make sure that the PTZ is properly grounded! Installation Notes Check the following items one by one before installation. - Page 16 Honeywell Align the Washing Nozzle Bracket mounting hole with the base 3 mounting hole without Jamming with the composite cable coming from the camera housing. Match the 6 screw holes in PTZ base with the 6 screw holes in the sun shield. Put the M6*30 socket head cap screws through the screw holes and fasten the screws via Φ6...
- Page 17 Installation and Connection Shield composite cable with explosion-proof flexible tube, and then enter the junction box for wire harness connection, the overall effect is as follows: PTZ EXPLOTION CAMERA SET EXPLOTION POLE CABLE CONDUIT EXPLOTION JUNCTION BOX HEWJ400 WASHING SYSTEM EXPLOTION CABLE CONDUIT CEMENT BASE...
-
Page 18: Cable Connection
Honeywell The explosion-proof junction box and explosion-proof flexible tube for the company selected parts, shield wire hole and explosion-proof junction box outlet hole thread is G3/4 '' pipe thread explosion-proof junction box mounting flange size: unit:mm Make sure no person is standing beneath the installation location in the process of installation to avoid injuries caused by a falling object. - Page 19 Installation and Connection Through the high temperature adhesive tape to buckle the prominent part of wrap, prevent mobile and other things Wire harness connection after check and confirm the guard securely installed, check the wiring harness is connected correctly, check the power supply, and confirm the good ground; confirm the live parts of terminals or more exposed no short circuit or short circuit to ground;...
-
Page 20: Operation
Honeywell 4. Operation This section introduces the basic operation and setup of the PTZ.Search IP Camera. Search IP Camera Find camera IP addresses via search tool. After the NVS software is installed, a search tool shortcut icon that looks like will be created on the desktop. - Page 21 Operation Download the ActiveX. Enter the IP camera’s IP address (default address http://192.168.1.188.) in the address bar of the Internet Explorer browser to enter the login page (see Figure 4-2). When prompted “Downloading Activex Control”, click the icon to install the Activex control, as shown in the follow figure 4-2: Figure 4-2 A file download dialog will pop out, click “Next”...
- Page 22 Honeywell Figure 4-4 Click “ Install” to enter into the next dialog. As figure 4-5. Figure 4-5 Click “Finish” to complete the ActiveX installation. As figure 4-6.
-
Page 23: Login
Operation Figure 4-6 Login Reopen Internet Explorer after ActiveX installation completes, input IP address ( http://192.168.1.188,) of the Network High Speed Dome to turn to login page, enter username (default setting is admin) and password (default setting is123456), click login to enter into main interface(see Figure 4-7): Figure 4-7 Please refresh the page and login again if the operation process in case of power cuts... -
Page 24: Live View
Honeywell Live view Live preview interface as figure 4-8. Figure 4-8 In the Live view interface, users can do operations such as SNAP,full-screen preview, video record, alarm information check, PTZ and lens control, brightness, contrast, preset setting, cruise, track setting, linear, scan, idle ope , IR light, wiper, spray setting, etc. - Page 25 Operation Alarm Info: Warns light flashing when camera device inform alarm. Support kinds of alarms record, and setup or remove the alarm setting,clear the alarm information. Zoom-in: Use the mouse to do local zoom for the video display area by scrolling the mouse wheel. ...
- Page 26 Honeywell Spray Pos: Set PTZ spray preset played in Auto spray mode, take the PTZ rotate to spray position, then click the Set to add a new position or click Del to cancel. Spray Mode:Select Auto/ Manual spray mode optional.
-
Page 27: System Specification Setting
Operation Figure 4-11 System specification setting Device Info Network High Speed Dome “Device Info” interface as figure 4-12... -
Page 28: Ptz Setting
Honeywell Figure 4-12 Device Name: Edit the camera name Device Sn: Display the device Sn Device Type: Display the device type Serial No. : Display the product serial No. Master Version: Display the software version date ... -
Page 29: Display Settings
Operation Figure 4-13 Protocol: Pelco D supported only Address: 0-255 adjustable, default is 1 Baud Rate: Baud rate 9600 supported only Operation method: Connect analog high speed dome at the Network High Speed Dome AB port, set the protocol and baud rate, and control the high speed dome through IPC preview interface After all parameters setting completed, click “Save”... -
Page 30: Encoding
Honeywell Figure 4-14 Name:Modify the appointed channel name Main Straem OSD:12pt/18pt/24pt/36pt/48pt settable Sub Stream OSD:12pt/18pt/24pt settable Time Format: Select different time display mode for the appointed channel Date Format: Select different date display mode for the appointed channel ... -
Page 31: Camera Set
Operation Figure 4-15 Compress type: Main Stream(Normal)/ Sub Stream selectable Stream: Including complex stream/ video stream two types Resolution: According to the front camera supported, how the camera resolution type supported, the corresponding resolution will selectable Frame Rate: Select different frame rate in the drop-down list, ... - Page 32 Honeywell Figure 4-16 Exposure mode: Exposure mode include Full-automatic/ Shutter Priority/ Anti-Flicker, default is Full- automatic. When select Full-automatic or Anti-Flicker, the shuttle value can not be setted, and when select Shutter Priority, the shuttle value can be setted.
-
Page 33: Motion Detection
Operation Day-Night Mode:Auto/Color/Black White selectable,default is Auto.According to the IP camera type and using actual scene, user can select day & night switch mode optional. After all parameters setting completed, click “Save” and the it comes into effect immediately. Motion Detection Network High Speed Dome “Motion Detection”... -
Page 34: Video Tampering
Honeywell Video Tampering Network High Speed Dome “Video Tampering” setting interface as figure 4-18 Figure 4-18 Enable: Set whether open the video tempering Alarm Schedule: Set the alarm schedule from Monday to Sunday. Drawing: Click Drawing, then set the video tampering area. -
Page 35: Platform Management
Operation Figure 4-19 IPV4: IP protocol version No. is 4 IPV6: IP protocol version No. is 6 Static IP: The device IP address is permanent DHCP: Click DHCP, when turn on the router’s DHCP, the camera will get the IP address from router automatically ... -
Page 36: Multicase Config
Honeywell Figure 4-20 User can open,close,edit,delete the protocol. Multicase Config Network High Speed Dome “Multicast Config” interface as figure 4-21. -
Page 37: Ddns Setting
Operation Figure 4-21 Default disabling for multicast config. After click"Enable Multicast", users can set the IP address/ port/ TTL of primary stream video/audio and sub stream video/audio. DDNS Setting DDNS is implemented through a dynamic domain resolution server. It requires a PC with fixed IP address on the Internet, on which the dynamic domain resolution server runs. -
Page 38: Ntp Settings
Honeywell Figure 4-22 Enable DDNS: Click to determine whether to use Dynamic Domain Name Server Server Type: Select DDNS server type (There are Dyndns/ PeanutHull/ NO-IP/ 3322/ DnsDynamic five types selectable) Server Name: Input server name, for example, member.3322.org ... -
Page 39: Email Settings
Operation Figure 4-23 Enable NTP: Click to determine whether to use NTP Server Address: Input NTP server IP address NTP Port: default is 123 Adjust time interval: Input the interval time Select Time Zone: Different area time format selectable ... -
Page 40: Ftp Settings
Honeywell Figure 4-24 (sent)Email Address: Input the address of the outbox Password: Input the the password of the outbox Confirm pwd: Input the password again to confirm it (sent)SMTP Server: Input the smtp server address of the outbox ... - Page 41 Operation Figure 4-25 Enable: Click to determine whether to use FTP Server Address: Input the upload server address Port: Input the server port, default is 21 Username: Input the upload username Password: Input the upload password ...
-
Page 42: Exception Settings
Honeywell Exception Settings Network High Speed Dome “Exception Settings” interface as figure 4-26. Figure 4-26 Exception Type: Disk full/ disk fault/ network broken/ IP address conflict/ Illegal access/ video signal exception types selectable Record: Click Record, it will do video record as any exception type triggered the alarm output ... -
Page 43: User Info
Operation User Info Network High Speed Dome “User Info” setting interface as below, admin is the administrator (default), default indicates general users, booth and login with permissions authorized to default users(default). Figure 4-27 Modify:The admin user can modify the login password, the default guest user can modify the login password and user type. -
Page 44: System Update
Honeywell System Update Network High Speed Dome “System Update” setting interface as figure 4-28. Figure 4-28 File: Click Browse to find and select the upgrade kit, then click Update. Non-technician should not try to operate system upgrade, do not turn off the power during upgrade process. -
Page 45: Storage Management
Operation Storage Management Network High Speed Dome “Storage Management” setting interface as below, you can check current HDD capacity/ spare capacity/ status, and do HDD formatting. Note: Turn off the power supply when insert or take out the TF card Figure 4-29... -
Page 46: Restore
Honeywell Restore Network High Speed Dome “Restore” setting interface as figure 4-30. Figure 4-30 Restore: Restore to factory setting Reboot: Reboot the devices... -
Page 47: Local Setting
Operation Local Setting Network High Speed Dome “Local Setting” interface as figure 4-31. Figure 4-31 Window Mode: Set the preview window mode(Full/ 4:3/ 16:9 ) Preview Capture: Select the preview capture file storage path File Download: Select the download file storage path ... -
Page 48: File Management
Honeywell File management Network High Speed Dome “File management” setting interface as figure 4-32. Figure 4-32 Search: Select the search start time, click button, the video record and snap image file will display( Double click the file to check details) ... -
Page 49: Log Search
Operation Log search Network High Speed Dome “Log” setting interface as figure 4-33. Figure 4-33 Main Type: There are All/ Alarm/ Exception Settings/ Operation/ Additional Information four types selectable Start Time: Set the start time End Time: Set the end time ... -
Page 50: Appendix
Honeywell 5. Appendix Specifications Model HEIPTZ-2201W-IR Video 1/2.8'' Progressive Scan CMOS Image Sensor 1920(H) x 1080(V) Effective Pixels Minimum Illumination Color: 0.1lx(F1.6 AGC ON) , B/W: 0.001lx(F1.6 AGC ON) Day/Night S/N Ratio >=50db 1 - 1/10000sec Shutter Speed Focal Length f=4.5 - 135mm... - Page 51 Connector Environmental IP68(2m/1h) Protection Class Operating -40° C ~ 55° C Temperature 95%RH(+25℃) Operating Humidity Viewing System IE 8.0 or above Browser VLC, Quick Time, Real Player Video Player Software Honeywell HUS Platform Operating Platform Regulatory CE,ATEX, IECEx, CNEX Certification...
-
Page 52: Network Interface Of Network High Speed Dome
Honeywell Network Interface of Network High Speed Dome The default network ports of Network High Speed Dome are: Web port Communication port, audio/video data transmission port, 5050 talkback data transmission port 5050 Audio/video data transmission port Multi-cast port 28080 [Main stream] 28081 [Sub stream]... -
Page 53: Visit Network High Speed Dome Under Different Network Environments
Appendix Network High Speed Dome DDNS analytical process Visit Network High Speed Dome under different network environments Users visit the Network High Speed Dome through LAN/ WAN. The following directions will tell you how to operate the Network High Speed Dome through LAN/ WAN. There two ways to connect Network High Speed Dome: Static IP/ Dynamic IP Static IP Static IP means the webmaster distribute a LAN inner IP address to the Network High Speed Dome. - Page 54 Honeywell Setting procedure: 1. Log in Network High Speed Dome via the IE browser (the default IP is 192.168.1.188) 2. Switch to the page “ Network Setting” interface, input the IP address. Default is 192.168.1.50 3. Fill in subnet mask, the default is 255.255.255.0 4.
-
Page 55: Internet
Appendix Log in Network High Speed Dome via IE browser. Then turn to “ Network Setting” interface, click DHCP” After setting all the parameters, click save and restart to make the parameters valid. Internet There are three ways to connect Network High Speed Dome to the Internet. 1. - Page 56 Honeywell Setting steps: Log in Network High Speed Dome via crossover cable direct connection.(For details, please refer to “Hardware Installation”) 1. Switch to the page network settings, fill in the device IP address requested from network service provider in to Basic Parameters, such as 218.84.31.168 2.
- Page 57 Appendix DDNS setting procedure: 1. Login DDNS server ( Such as http://www.no-ip.com), register accounts and password. 2. Click DDNS ( It is selectable when server provider is blank) 3. Select DDNS server provider, such as no-ip 4. Input the DDNS login username 5.
- Page 58 Honeywell Open “Forwarding”, select “Virtual Servers” as below picture shows: Select “Add New Items”, enter the IP address of the Network High Speed Dome (e.g.192.168.1.100 ), port (e.g. 85), status (valid) and other information, click save, see below picture: After save successfully, below screen appears:...
-
Page 59: Frequently Asked Questions
Appendix If DDNS is successfully set in “Network Settings” of Network High Speed Dome, direct visit to the Network High Speed Dome can be realized via entering http://test.mvddns.net:85 into IE browser. PPPOE dial-up access For Network High Speed Dome dial-up access, see below picture for the network topology: Setup steps: Log in Network High Speed Dome via crossover cable direct connection.(For details, please refer to Hardware Installation) - Page 60 Honeywell 3.The images do not flow. Possible reason 1: The frame rate of Network High Speed Dome is too low. Solution: Increase the video frame rate Possible reason 2: Too many users are viewing the images. Solution: Block some clients or reduce the video frame rate.
- Page 61 Appendix Possible Reason 1: System issue, DirectX function is disabled, which will cause slow display of images and abnormal color. Possible Reason 2: Hardware issue, graphics card doesn’t support image acceleration and hardware zooming functions.(For hardware issue, the only solution is to replace graphics card) Solution: Install DirectX image drive, then StartRuninput “Dxdiag”order.
- Page 62 Email: [email protected] India office https://www.asia.security.honeywell.com Honeywell Security Unitech Trade Center, 5th Floor, Sector 43, Block Taiwan office C, Sushant Lok Phase - 1, Gurgaon - 122 002 10F, 168 Lien Cheng Road, Chung Ho City, Taipei, Taiwan R.O.C. Tel: (91) 124 4975000...