
Related Manuals for Extech Instruments CL500


Summary of Contents for Extech Instruments CL500
- Page 1 USER GUIDE Free and Total Chlorine Tester Patent Pending Model CL500 800.561.8187 [email protected] www. .com...
-
Page 2: Meter Description
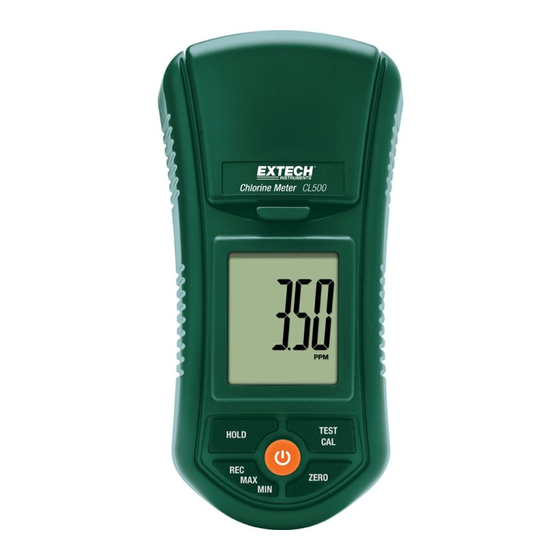
Meter Description CL500 Front Panel Description 1. Test Bottle Chamber 2. Test Bottle Chamber latch 3. LCD display 4. POWER button 5. HOLD button 6. REC‐MAX‐MIN button 7. ZERO button 8. TEST‐CAL button 9. Test bottle CL500-en-GB_V1.2 8/15 800.561.8187 [email protected] www. .com... -
Page 3: Getting Started
Getting Started Equipment Required A chlorine test requires a 10ml sample bottle, reagent powder for testing Free and Total chlorine, and the CL500 meter. Measurement Procedure Calibration considerations Ensure that the meter has been calibrated prior to use. Refer to the calibration section for this procedure. Test sample “Zero” measurement Note: Prior to testing, set the meter mode to FREE or TOTAL based on the desired test method. See Mode Selection. The meter should be in the OFF position. Place the test sample into the sample bottle up to the 10mL line (minimum). Place the cap on the bottle and tighten. Clean and dry the outside of the sample bottle to ensure a clean surface. Open the cover of the test chamber and insert the bottle completely into the chamber. Line up the white mark on the bottle with the white mark of the test chamber. Close the cover and lock it in place. Press the “POWER” button to turn the meter ON. The display will show ‘Free’ or ‘Total’ for 1 second and then ‘CAL0’. The meter is now ready for the “zero” test. Press the “Zero” button, the display will flash “tEST” and then “0.00”ppm. The Zero Test is now complete. Do not power down the meter. Measurement of Test Solution Open the test chamber and remove the test bottle. Add the required DPD powder (Free or Total) into the sample and then shake for 20 seconds until combined. Place the cap on the bottle and tighten. For the Free Chlorine test, use the Free Chlorine DPD powder For the Total Chlorine test, use the Total Chlorine DPD powder Clean and dry the outside of the sample bottle to ensure a clean surface. Wait 2 minute before placing the test bottle into the meter to allow time for the solution to mix thoroughly. Open the cover of the test chamber and insert the bottle completely into the chamber. Line up the white mark on the bottle with the white mark of the test chamber. CL500-en-GB_V1.2 8/15 800.561.8187 [email protected] www. .com... -
Page 4: Auto Power Off
Data Record (MAX/MIN Readings) 1. The Data record function records the MAX and Min readings. 2. Press "REC" button once to begin Data recording. The LCD will display the "REC" symbol. 3. To view the MAX value while in the recording mode press "REC" once. The display will show the maximum reading and “REC MAX" will show on the LCD display. 4. Press "REC" button once again and "REC MIN" will display on the LCD along with the minimum reading. 5. To erase the Max value and continue recording, while in the record mode, momentarily press the “Rec” button. The display will show “REC MAX”. Momentarily press the “HOLD” button, the display will now show “REC”. The Max value has been erased. 6. To erase the Min value and continue recording, while in the record mode, momentarily press the “Rec” button. The display will show “REC MAX”. Press the “REC” button once again and now the display will show “REC MIN”. Momentarily press the “HOLD” button, the display will now show “REC”. The Min value has been erased. 7. To exit Record mode, press the “REC” button for 3 seconds. The display will return to the current reading. Mode Selection – Free or Total The meter should be powered OFF. Press the "HOLD" and "REC" buttons simultaneously and then momentarily press the "Power" button. Press the "TEST" button to select the desired function (Free or Total) Chlorine. Press the "REC" button to confirm and save the selection into memory. Momentarily press the “Power” button to turn off the meter. Auto‐Power OFF The auto power off feature automatically switches the CL500 OFF 10 minutes after the last key press. CL500-en-GB_V1.2 8/15 800.561.8187 [email protected] www. .com... -
Page 5: Zero Calibration Procedure
5. Line up the white mark on the bottle with the white mark in the chamber and close the cover and latch it. 6. Press "CAL" once more and the display will flash “tEST” and show the following: 0.00 7. The meter is now ready for "zero chlorine" calibration. 8. Press "CAL" button once. The LCD will flash “CAL” for 10 seconds and will then show the following display: 0.00 9. The LCD will then display: 1.00 10. Zero Chlorine calibration is now complete. The meter is now ready for the 1.00 ppm Test solution calibration. CL500-en-GB_V1.2 8/15 800.561.8187 [email protected] www. .com... - Page 6 1.00‐ppm Test solution calibration Clean the sides of the 1.00‐ppm Chlorine standard (Free or Total) solution bottle and insert it into the testing chamber. Line up the white mark on the bottle with the white mark in the chamber, close, and latch the cover. Press "CAL" once more; the display will flash “CAL” and then show the following: 1.00 When calibration is complete the LCD will return to the normal operating mode and measure the test solution. The display should show 1.00 ppm. The meter is now ready to measure test solutions. CL500-en-GB_V1.2 8/15 800.561.8187 [email protected] www. .com...
-
Page 7: Maintenance
Maintenance Low Battery Indication When the batteries become weak the “ ” icon will appear in the display. Refer to the battery replacement information below. Battery Replacement On the back of the meter, remove the 2 screws holding the battery cover in place. Replace the six (6) AAA batteries, observing polarity. Replace the battery compartment cover Battery Safety Reminders Never dispose of batteries in a fire. Batteries may explode or leak. Never mix battery types. Always install new batteries of the same type. Never dispose of used batteries or rechargeable batteries in household waste. As consumers, users are legally required to take used batteries to appropriate collection sites, the retail store where the batteries were purchased, or wherever batteries are sold. Disposal: Do not dispose of this instrument in household waste. The user is obligated to take end‐of‐life devices to a designated collection point for the disposal of electrical and electronic equipment. Electrode considerations The CL500 Chlorine Electrode arrives in a factory‐cleaned condition and is ready to be used. The electrode will perform best and yield more stable readings after the first few tests. Cleaning the Meter Occasionally wipe the meter housing with a damp cloth. Do not use abrasives or solvents. CL500-en-GB_V1.2 8/15 800.561.8187 [email protected] www. .com... -
Page 8: Specifications
Resolution 0.01 Accuracy 0.02 [email protected] ppm Light Source LED, 525 nm Light Detector Photo Diode Response Time Less than 10 seconds Sample Volume 10mL minimum Sample Time Approximately 1 second Power Six 1.5 V batteries Power Consumption Stand‐By Mode: approx. 4mADC Testing Mode: approx. 12mADC Dimensions 155 x 76 x 62mm (6.1 x 3.0 x 2.4”); 320g (0.70lbs.) Auto Power OFF Automatically switches OFF 10 minutes after the last key press Method The measuring method is an adaptation of the USEPA method 330.5 and standard method 4500‐Cl G Copyright © 2014‐2015 FLIR Systems, Inc. All rights reserved including the right of reproduction in whole or in part in any form ISO‐9001 Certified www.extech.com CL500-en-GB_V1.2 8/15 800.561.8187 [email protected] www. .com...