
Related Manuals for Philips 91816 Light Palette Classic 1500


Summary of Contents for Philips 91816 Light Palette Classic 1500
- Page 2 The use of this document for all other purposes is specifically prohibited. Certain features of the equipment described in this document may form the subject of patents or patent applications. Document Number: 2-450190-010 Version as of: December 13, 2010 Light Palette Lighting Control Console Installation & Setup Guide ©2010 Philips Group. All rights reserved.
- Page 3 Light Palette Lighting Control Console Installation & Setup Guide FOREWORD 1. Palette Software License SET OUT BELOW ARE THE TERMS AND CONDITIONS UNDER WHICH YOU ARE PERMITTED TO USE THE BUNDLE OF SOFTWARE COLLECTIVELY CALLED THE PALETTE SOFTWARE ("PALETTE"). PLEASE READ THIS INFORMATION CAREFULLY.
- Page 4 Light Palette Lighting Control Console Installation & Setup Guide Notes...
-
Page 5: Table Of Contents
Light Palette Lighting Control Console Installation & Setup Guide TABLE OF CONTENTS Introduction About This Guide ..............................1 Additional Documentation ............................. 1 Customer Service and Support ..........................2 Chapter 1. Overview Components Included Items ................................ 4 Processor................................. 4 Accessories and Expansion Devices ........................4 Monitor/Touchscreen ............................ - Page 6 Light Palette Lighting Control Console Installation & Setup Guide Chapter 3. Controls Desk Layout Console Overview ..............................18 Light Palette Classic Control Console......................18 Light Palette Live Control Console....................... 19 Light Palette VL Control Console......................... 20 Programming Buttons Layout ..........................21 Intelligent Lighting Encoders and Screen Selection Buttons ................
- Page 7 Light Palette Lighting Control Console Installation & Setup Guide Software Configuration Main PaletteOS Software Screen ......................... 40 Cue List Directory ..............................40 Cue List ................................41 Channel and Attribute Grids..........................41 Status Window Display ............................41 PaletteOS Control Panel ............................42 Application Controls .............................
- Page 8 Light Palette Lighting Control Console Installation & Setup Guide Appendix A. Specifications Light Palette Lighting Control Console........................ 80 Appendix B. Software Tips Helpful Tips and Shortcuts ........................... 82...
-
Page 9: Introduction
This guide describes the installation and operational procedures for Strand Lighting's Light Palette Series Control Consoles pertaining to the following models: • 91816 Light Palette Classic 1500 Console • 91817 Light Palette Classic 3000 Console • 91827 Light Palette VL 3000 Console •... -
Page 10: Customer Service And Support
Light Palette Lighting Control Console Installation & Setup Guide 3. Customer Service and Support How to Reach Us Contact Strand Lighting Customer Service at: 1-800-4STRAND (U.S.) or 1-214-647-7880 (international). For a complete list of support and field service contacts, go to www.strandlighting.com, select the Support tab and then the "Support/Field Service Contacts"... -
Page 11: Chapter 1. Overview
Light Palette Lighting Control Console Installation & Setup Guide Overview • Components • Features • Software Overview... -
Page 12: Components
Light Palette Lighting Control Console Installation & Setup Guide COMPONENTS 1. Included Items The Light Palette lighting control system includes the following items: • 1 x Console with built in keyboard and Trackpad • 3 x Power Cables for all countries •... -
Page 13: Software Upgrades
Light Palette Lighting Control Console Installation & Setup Guide 5. Software Upgrades Software upgrades are free of charge and are available at: www.strandlighting.com 6. Control Channel Upgrades The control channel functionality included with your console is pre-authorized at the level initially purchased. However, the channel count can be easily upgraded at any time. -
Page 14: Features
Light Palette Lighting Control Console Installation & Setup Guide FEATURES 1. Standard Features General: Control: - 1500 to 8000 channel memory operation (depending - Split up/down fade times on channel count purchased) - Split up/down delay times - 2048 DMX512 output - 26 parts per cue (A thru Z) - 32,768 channel Ethernet support - Independent timing... -
Page 15: Optional Add-On Features
Light Palette Lighting Control Console Installation & Setup Guide 2. Optional Add-On Features Connectivity To: External Control: - Vision.Net Architectural systems - Two remote trigger inputs - Supports Pathport®, ShowNet, Art-Net, - Standard MIDI events CKNet, and streaming ACN - MIDI show control - RS232 - MIDI/SMPTE time code in/out - PowerPoint... -
Page 16: Software Overview
Light Palette Lighting Control Console Installation & Setup Guide SOFTWARE OVERVIEW 1. Light Palette Software The console processor utilizes Microsoft® Windows to run a specially designed PaletteOS lighting control software developed by Horizon Control, Inc. The PaletteOS application works in conjunction with console hardware buttons/ sliders/playback faders/and encoders to provide control of external devices, data management, and show file storage. -
Page 17: Chapter 2. Installation And Power Up
Light Palette Lighting Control Console Installation & Setup Guide Installation and Power Up • Unpack • Hook-Up • Console Power Up... -
Page 18: Unpack
Light Palette Lighting Control Console Installation & Setup Guide UNPACK 1. Site Requirements The console and its components require a sturdy, flat surface for installation. The surface should be able to support the weight of the console (including the processor, monitor, etc.) and should provide suitable ventilation. Also, the site should be clean (i.e. -
Page 19: Hook-Up
Light Palette Lighting Control Console Installation & Setup Guide HOOK-UP 1. Connecting Console Components To connect console components, do the following: Step 1. At console rear panel, connect power supply (included). Step 2. Connect monitor or touchscreen (sold separately). Step 3. Install gooseneck lamps (sold separately). Step 4. -
Page 20: Remote Focus Unit (Rfu)
Light Palette Lighting Control Console Installation & Setup Guide 4. Remote Focus Unit (RFU) The Remote Focus Unit (sold separately) is an optional To RFU remote Ethernet device that can be connected to the console using either a wired or wireless configuration. Wireless The two connection options are as follows: Access... -
Page 21: Midi/Smpte Devices
Light Palette Lighting Control Console Installation & Setup Guide 6. MIDI/SMPTE Devices When using the optional MIDI/SMPTE Expansion Card (64228), the console will support MIDI Show Control, MIDI Notes and SMPTE in and out for synchronizing cue lists and external devices. The hardware will support up to two external SMPTE interface devices and the software additionally supports four internal SMPTE clocks and the Media Player Time Code. -
Page 22: Console Power Up
Light Palette Lighting Control Console Installation & Setup Guide CONSOLE POWER UP 1. Power Up Procedure Once the console has been installed and all components connected, the console and processor can be powered up. To power up: Step 1. At front of console, press power on/off button. When LED lights up, release button and console will boot. Step 2. - Page 23 Light Palette Lighting Control Console Installation & Setup Guide Step 6. While in "Hardware Setup>Console," verify that other important and systemic features are set correctly for you. a. Level Entry Mode - this is the format for Command Line Entry. 1) Use Enter Key - the Enter key finishes off all Command Line entries.
- Page 24 Light Palette Lighting Control Console Installation & Setup Guide Notes Installation and Power Up...
-
Page 25: Chapter 3. Controls
Light Palette Lighting Control Console Installation & Setup Guide Controls • Desk Layout • Button Details • Software Configuration • Restoring the Software... -
Page 26: Desk Layout
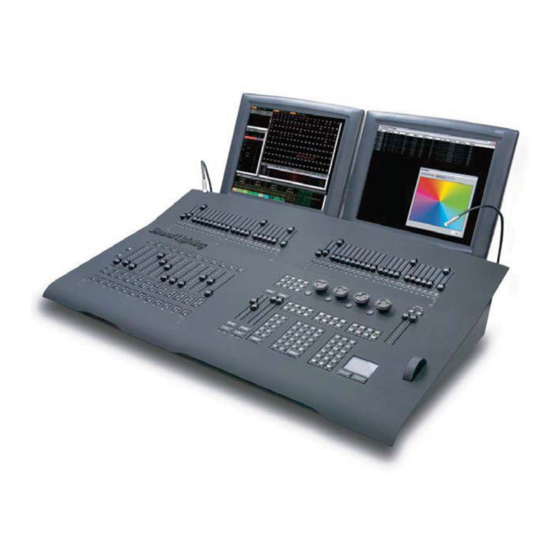
Light Palette Lighting Control Console Installation & Setup Guide DESK LAYOUT 1. Console Overview Light Palette Classic Control Console The following illustration provides an overview of console desk controls. Refer to subsequent pages for more in depth explanations of individual button and slider functions. Grand Master Sliders - (configurable) Softkeys -... -
Page 27: Light Palette Live Control Console
Light Palette Lighting Control Console Installation & Setup Guide Light Palette Live Control Console The following illustration provides an overview of console desk controls. Refer to subsequent pages for more in depth explanations of individual button and slider functions. Grand Master Sliders - (configurable) Softkeys - Encoders -... -
Page 28: Light Palette Vl Control Console
Light Palette Lighting Control Console Installation & Setup Guide Light Palette VL Control Console The following illustration provides an overview of console desk controls. Refer to subsequent pages for more in depth explanations of individual button and slider functions. Grand Master Sliders - Encoders - Softkeys - (configurable) -
Page 29: Programming Buttons Layout
Light Palette Lighting Control Console Installation & Setup Guide 2. Programming Buttons Layout The programming section of the desk provides direct access to intensity channels, channel attributes, playback control, console setup and display options. For more details on button operation, refer to "Button Details"... -
Page 30: Intelligent Lighting Encoders And Screen Selection Buttons
Light Palette Lighting Control Console Installation & Setup Guide 3. Intelligent Lighting Encoders and Screen Selection Buttons The encoders and buttons found in this section of the desk provide special controls for intelligent lighting fixtures and Screen Selection quick access to main screen displays. Buttons The rotary four encoders provide navigation of the PaletteOS software and control of channel attributes. -
Page 31: Softkeys
Light Palette Lighting Control Console Installation & Setup Guide [BLIND] • Press [BLIND] to enter the Blind display. • While in Blind Mode, the channel grid has a Grey background. The Blind button in the channel Grid toolbar will be highlighted. •... -
Page 32: Playback Controls Layout
Light Palette Lighting Control Console Installation & Setup Guide 5. Playback Controls Layout The playback section of the desk [Select] - Selects Cue List to display and default provides controls for executing Select Select record location. Solid Amber LED indicates active cues and fading between two there is a Cue List on this playback. -
Page 33: Playback Faders Layout
Light Palette Lighting Control Console Installation & Setup Guide 6. Playback Faders Layout The additional playback faders section of the desk provides 12 pageable, configurable playback faders. [Select] - Solid Amber LED indicates there is a Cue List on this playback. Flashing amber LED means this Cue List is selected. -
Page 34: Grandmasters Layout
Light Palette Lighting Control Console Installation & Setup Guide 7. Grandmasters Layout The Grandmaster can be setup to control different Grand Master functions as determined by the PaletteOS software. "Dead Black Out (DBO)" on page 64 for more details or refer to "Hardware Setup" in the PaletteOS software Help Menu. -
Page 35: Button Details
Light Palette Lighting Control Console Installation & Setup Guide BUTTON DETAILS Note: The personality in which you have selected your console to operate in will change the way many of the following buttons work. The following instructions will assume the Palette Classic US Console Personality. Direct access to actions like Record will go straight to the Command Line. -
Page 36: Copy
Light Palette Lighting Control Console Installation & Setup Guide 3. Copy Copy • Highlight the cues you want to copy with the blue box, then press [SHIFT] [COPY] [NUMBER] [ENTER] to copy the selected cue(s) to new cue(s). • Press [COPY] [LOOK] to copy a Look. •... -
Page 37: Edit
Light Palette Lighting Control Console Installation & Setup Guide 7. Edit Edit • Pressing the [EDIT] button allows changes to the highlighted cells in the Cue List or Look display (times, labels, follows etc.) or in the patch displays. Move the blue highlighted cells using the [ARROW KEYS]. •... -
Page 38: Goto
Light Palette Lighting Control Console Installation & Setup Guide 10. Goto Goto • Goto will place that cue on stage in the time setup in Show Options>Cue List. Press [GOTO] [#] [ENTER] to take the selected Cue List to the desired cue. •... -
Page 39: Load
Light Palette Lighting Control Console Installation & Setup Guide 13. Load Note: For those familiar with previous Strand Lighting Consoles, this does not work like the 500 Series of consoles to load a cue on a playback. • Unlike previous Strand consoles, Load will activate the recorded item’s information for editing. [LOAD] [CUE] [1] [ENTER] will place all contents of cue 1 into either the Live editor (if in Live Mode) or the Blind editor (if in Blind Mode). -
Page 40: Number Buttons
Light Palette Lighting Control Console Installation & Setup Guide 16. Number Buttons • By default, when typing on an empty command line these buttons will select Channels. • Use in conjunction with the other keys (+, -, Thru etc.) to select ranges of Channels. •... -
Page 41: Record
Light Palette Lighting Control Console Installation & Setup Guide 20. Record Recording Cues: • The Record function stores values into an item (usually Cues or Looks). To record a cue, press the [REC] button then [ENTER] to accept the auto-incrementing cue number or press the number of the cue you wish to record and press [ENTER]. -
Page 42: Release Playback
Light Palette Lighting Control Console Installation & Setup Guide 22. Release Playback Rel- • Pressing the [REL-PB] button will release the Cue List on the selected playback master. The cue pointer will remain at the current cue position, therefore pressing [GO] will put you back into the same state you were in before you hit [REL-PB]. -
Page 43: Shift
Light Palette Lighting Control Console Installation & Setup Guide 25. Shift SHIFT • Use with [REL-PB] to release all Cue Lists. • Use with [STEP FORWARD/BACKWARD] buttons to go to the top or bottom of a Cue List. • Use with [ARROW KEYS] to select a range of cells with the blue box. •... -
Page 44: Softkeys
Light Palette Lighting Control Console Installation & Setup Guide 26. Softkeys Example of Screen Display The softkey buttons are context sensitive to what you are doing. When no dialogue boxes are open, they provide additional functionality that is not available with the hard buttons on the console. When a dialogue box is open, the LEDs show you what buttons are used to jump to specific controls (lists, checkboxes, etc.). -
Page 45: Time
Light Palette Lighting Control Console Installation & Setup Guide 28. Time Time • After pressing [CUE] number, the Cue Time for the cue can be entered on the command line. 29. Tools Tools • Press [SHIFT] [TOOLS] to change the softkeys to the available tools. Select a tool ([S12] gives more options). Ini- tiates softkey tool functions such as flip, channel check, flash, etc. -
Page 46: View
Light Palette Lighting Control Console Installation & Setup Guide 32. View View • Opens the View Properties dialogue box where properties are displayed. • Press [VIEW] [NUMBER] [ENTER] to see a channel’s Label dialogue box. • Press [VIEW] [SELECT] to get a Cue List's properties. •... -
Page 47: Processor Keyboard Shortcuts
Light Palette Lighting Control Console Installation & Setup Guide 33. Processor Keyboard Shortcuts The following processor keyboard shortcuts can be used in place of the console buttons, if desired. For instructions on setting up Cue List Control, refer to "QWERTY Keyboard Cue List Control" on page Button Function Plus - Used in command line... -
Page 48: Software Configuration
Light Palette Lighting Control Console Installation & Setup Guide SOFTWARE CONFIGURATION 1. Main PaletteOS Software Screen The following pages are brief descriptions of the main PaletteOS software screen and its elements. More thorough information is always available in the software’s Help Menu. Help Menu (Available on the auto-hiding taskbar) Channel Grid... -
Page 49: Cue List
Light Palette Lighting Control Console Installation & Setup Guide 3. Cue List The Cue List display allows instant access to altering cue and attribute timing as well as labels, wait, follow, and loop parameters. The blue box is moved around by using [ARROW KEYS]. -
Page 50: Paletteos Control Panel
Light Palette Lighting Control Console Installation & Setup Guide 6. PaletteOS Control Panel The PaletteOS software runs on a custom processor under the Windows® Vista operating system (OS). An OS system means that only the software necessary to run the console is installed and no unauthorized software can be installed by the user. -
Page 51: Application Controls
Light Palette Lighting Control Console Installation & Setup Guide Application Controls The Applications section contains icons for launching the PaletteOS software or opening various accessory applications. Palette The Palette icon launches the PaletteOS software. Manage Files The Manage Files icon launches the file manager which will allow you to move, copy and delete files on the console. -
Page 52: System Controls
Light Palette Lighting Control Console Installation & Setup Guide System Controls The System section contains configuration items for your lighting control system. Configure Network Clicking Configure Network icon opens the Network Configuration dialogue box. Here you can set or change the static IP address of the console. Advanced Network The Advanced Network icon accesses the Windows networking tools for advanced network configuration. - Page 53 Light Palette Lighting Control Console Installation & Setup Guide If a Static IP address is required, then follow the steps below to setup a network connection. To manually setup a network connection: Step 1. At Control Panel, click "Advanced Network" icon. Step 2.
- Page 54 Light Palette Lighting Control Console Installation & Setup Guide Change Console Name Clicking the Change Console Name icon opens the Change Console Name dialogue box. Note that once you enter a new name and select "OK", the console will reboot to complete the configuration change. Set System Time Clicking the Set System Time icon opens the Date and Time dialogue box.
- Page 55 Light Palette Lighting Control Console Installation & Setup Guide Set Screen Resolution Clicking the Set Screen Resolution icon opens the Display Settings dialogue box. Here you can adjust the resolution and configuration for two monitors. Screen Saver Preferences Clicking the Screen Saver Preferences icon opens the Screen Saver Settings dialogue box. Here you can adjust or turn off the screen saver settings.
-
Page 56: Touch Screen Calibration
Light Palette Lighting Control Console Installation & Setup Guide Mouse Options Clicking the Mouse Options icon opens the Mouse Properties dialogue box. Here you can adjust the way your mouse works with the console’s computer. Touch Screen Calibration The console processor supports the use of a touchscreen monitor. Due to mouse driver requirements, only ELO Touchscreens should be used and connected with the USB cable, not the serial cable. - Page 57 Light Palette Lighting Control Console Installation & Setup Guide On Screen Keyboard Clicking the On Screen Keyboard icon opens the virtual keyboard. Regional Settings Clicking the Regional Settings icon opens the Regional and Language Options dialogue box. Here you can adjust the regional location, keyboard and other input languages. Volume Control The Volume Control icon opens the volume fader.
- Page 58 Light Palette Lighting Control Console Installation & Setup Guide Task Manager The Task Manager icon opens the Windows Task Manger dialogue box. Here the applications, processes, services, performance data and other things can be viewed. (Note that accessing this screen is not part of normal operation.) Command Prompt The Command Prompt icon opens the system’s command prompt which is primarily for technical...
- Page 59 Light Palette Lighting Control Console Installation & Setup Guide Printer Setup The Printer Setup icon opens the printer configuration controls. Here you can setup a printer for your console. Printing can be achieved by connecting the console to a Local Printer or a Local Area Network Printer. The Network Printer option saves you from having to move the printer close to the console.
- Page 60 Light Palette Lighting Control Console Installation & Setup Guide Step 4. At Printer dialog box, click "Add a Printer" button. Step 5. At Add Printer dialog box, click either "Add a local printer" or "Add a network wireless or Bluetooth printer" as required. Step 6.
- Page 61 Light Palette Lighting Control Console Installation & Setup Guide Firewall Settings The Firewall Settings icon opens the Windows Firewall Settings dialogue box. Here you can adjust the firewall settings of the console’s computer. Defrag Drive The Defrag Drive icon opens the Disk Defragmenter dialogue box. Here you can clean up your hard drive by performing the defrag optimization.
-
Page 62: Maintenance Controls
Light Palette Lighting Control Console Installation & Setup Guide Maintenance Controls The Maintenance section contains items that are primarily used by an authorized service center or by a user with instructions from technical support. Update Palette Software The Update Palette Software icon opens the Palette Software Upgrades dialogue box. Here you can perform a software update by launching a software update file. - Page 63 Light Palette Lighting Control Console Installation & Setup Guide Hardware Test The Hardware Test icon opens the console test options screen. This functions allow you to perform a hardware test to determine if there are any malfunctions with the buttons and sliders on your console. Run the hardware test, select your console, select the panel to test and then activate all hardware elements.
- Page 64 Light Palette Lighting Control Console Installation & Setup Guide USB View The USB View icon launches the USB View program. This should only be used when directed by a technical support specialist. Delete All Settings The Delete All Settings icon allows you to return the console to its factory default settings. End Console Processes The End Console Processes icon will stop all console programs from running.
-
Page 65: Information
Light Palette Lighting Control Console Installation & Setup Guide Information This section provides useful technical information about the hardware, software and settings. Run/Shutdown Controls and Application List Launch / Show PaletteOS This button launches the PaletteOS software application so you can begin programming a new show (or load an existing show file). -
Page 66: Tracking Backup
Light Palette Lighting Control Console Installation & Setup Guide System Shutdown This button will shutdown the console. Click "Yes" to proceed. If recent changes have not been saved, the console will ask to save (or discard) changes before exiting. Note: Answering either way (Yes or No) to the "Show Modified" dialogue box will shutdown the console. -
Page 67: Restoring The Software
Light Palette Lighting Control Console Installation & Setup Guide RESTORING THE SOFTWARE 1. Updating or Re-Installing PaletteOS Software If it is necessary to update or re-install the PaletteOS application onto the processor, follow the steps below. Note: The processor always looks to removable media first upon startup for software updates. Therefore, it is important not to leave a USB Key containing update software in the processor. - Page 68 Light Palette Lighting Control Console Installation & Setup Guide Notes Controls...
-
Page 69: Chapter 4. Setup
Light Palette Lighting Control Console Installation & Setup Guide Setup • Accessory - Hardware Components Note: This chapter provides software operations which are necessary to configure console hardware components. -
Page 70: Accessory - Hardware Components
Light Palette Lighting Control Console Installation & Setup Guide ACCESSORY - HARDWARE COMPONENTS 1. Overview The console is highly configurable and can be set up in different ways depending on your requirements. The Hardware Setup window provides setup options. Components such as button array panels, Grandmasters, triggers, and console lights can be configured by pressing the appropriate tab in the window. - Page 71 Light Palette Lighting Control Console Installation & Setup Guide All levels going up and down will be affected. All times will be re-scaled to the distance the handle has to travel, with the greatest time in the cue being measured using that distance and all others scaled to that. Wait times will be scaled too.
-
Page 72: Dead Black Out (Dbo)
Light Palette Lighting Control Console Installation & Setup Guide 3. Dead Black Out (DBO) The Dead Black out has multiple functions. Whenever it is enabled, it is like pulling the Grandmaster slider down to 0% in zero time. There are macros that allow you to control this feature programmatically. •... -
Page 73: Level Entry Mode
Light Palette Lighting Control Console Installation & Setup Guide Level Entry Mode This option affects the way that you enter levels for channels from the keypad. Use Enter Key: Command Line, where the action is confirmed with the Enter key. [1] [@] [7] [ENTER] : Channel 1 goes to 70% Single Digit Entry: Channel goes straight to the desired level after a single digit is entered following the [@] key (i.e. -
Page 74: Macro Editor And Commands
Light Palette Lighting Control Console Installation & Setup Guide 5. Macro Editor and Commands Macros can contain Commands or Scripts, however, they are not keystroke recorders. Macros Commands are very powerful, user-definable routines that the PaletteOS runs when assigned to cues, time events, macro buttons, variables or triggers. - Page 75 Light Palette Lighting Control Console Installation & Setup Guide Any arguments (parameters) of the command will be listed. Double-click on the Value column to set an appropriate value, then click OK. You can Insert as many individual commands as you like for each macro and order them by selecting their line and use [S5] and [S6] to move them Up and Down in the list.
- Page 76 Light Palette Lighting Control Console Installation & Setup Guide Notes Setup...
-
Page 77: Chapter 5. Operation
Light Palette Lighting Control Console Installation & Setup Guide Operation • Selecting Channels and Setting Levels • Recording a Cue or Look Note: This chapter provides software operations which will get the system up and running. For complete software operation instructions, refer to the Palette Series Software User Manual. -
Page 78: Selecting Channels And Setting Levels
Light Palette Lighting Control Console Installation & Setup Guide SELECTING CHANNELS AND SETTING LEVELS 1. Channel Grid Overview Channel information is displayed on the Channel Grid (shown below) with the channel number on the top row of numbers and the level on the bottom row. The color bubble below can be turned on or off using the Display menu. Selecting a channel is the first step towards setting or modifying levels. -
Page 79: Using The Keypad To Select Channels
Light Palette Lighting Control Console Installation & Setup Guide 2. Using the Keypad to Select Channels To Select Channels Using Keypad: Step 1. At keypad, enter number of channel(s) you wish to select. (Typing will be reflected in the Command Line.) Step 2. -
Page 80: Recording A Cue Or Look
Light Palette Lighting Control Console Installation & Setup Guide RECORDING A CUE OR LOOK 1. Recording a Cue Fast Description The following works in any console personality: Step 1. Select channels and set levels. Step 2. Press [REC] [ENTER] or [REC], Cue #, [ENTER] or [REC] [SELECT] on the Playback you want to use. Notes: •... - Page 81 Light Palette Lighting Control Console Installation & Setup Guide The following properties are optional: [S1] - If needed, select the "Cue List" to record to. The default is the cue list you currently have selected. [S3] - Change the "Record" option if needed. The default option is to record your Live as exactly what you see on stage coming from the selected cue list.
- Page 82 Light Palette Lighting Control Console Installation & Setup Guide • Update (see above) is the default. Pressing [ENTER] or [S2] will close this dialogue box and update the existing cue, not losing old cue data. • Pressing [S1] "Delete and Replace" will delete the existing cue and record the new cue data to this cue number using the channels specified in [S3] optional above.
-
Page 83: Detailed Description
Light Palette Lighting Control Console Installation & Setup Guide If you select "Block new values into cue range," each cue in the range will get the new values as determined by the Record Options you selected with [S3] in the "Record" dialogue box. This may result in Redundant Data which may or may not be desirable (normally only desirable in multiple cue list environments where you want to be sure each cue will be in total control of those lights, regardless of what other cue lists are doing). - Page 84 Light Palette Lighting Control Console Installation & Setup Guide c. Selected (all attributes) - only channels currently selected but will include all attributes for that fixture whether they have been adjusted or not. d. Captured Attributes - only channels that have been selected and changed. This will include only the attributes that have been changed.
-
Page 85: Look
Light Palette Lighting Control Console Installation & Setup Guide 3. Look Pages By clicking the icon in the top left-hand corner of your screen titled "Look," you will be taken to the Look screen. Here you are able to access all of your Looks pages and individual Looks within those pages. You have the ability to bring up each individual look by clicking on that Look and dragging up the Virtual Look Slider to the appropriate percentage, or by changing the percentage in the values column. - Page 86 Light Palette Lighting Control Console Installation & Setup Guide If you move the blue box over to "Look Type," you now have the ability to set your Look to various types. Operation...
- Page 87 Light Palette Lighting Control Console Installation & Setup Guide Specifications...
- Page 88 • Light Palette Live: 60.7 lbs (27.5 kg) Dimensions (LxWxH): • 91816 Light Palette Classic 1500 Console 39 x 17.8 x 4.5" (991 x 452 x 115 mm) • 91817 Light Palette Classic 3000 Console 39 x 17.8 x 4.5" (991 x 452 x 115 mm) •...
- Page 89 Light Palette Lighting Control Console Installation & Setup Guide Software Tips...
- Page 90 Light Palette Lighting Control Console Installation & Setup Guide 1. Helpful Tips and Shortcuts Below are some helpful tips and shorts to operate and program your Light Palette Control Console. Take a few moments to review these for future use. The tips are also available through the PaletteOS software. •...
- Page 91 Light Palette Lighting Control Console Installation & Setup Guide • The command line supports relative movement of moving light attributes. For example, you can type [1] [THRU] [1] [0] [PAN] [+] [9] [0] [ENTER]. • If you want one group of channels to move at a different rate than others in the same cue, you can either move those channels to a different part or use the Independent Timing where each and every attribute of every channel can have its own Wait and Fade time.
- Page 92 Light Palette Lighting Control Console Installation & Setup Guide • The NEXT/PREV button moves you through dialogue boxes. Use it with [SHIFT] to move backwards through a dialogue box. • You can delete cue parts by highlighting any cell part's line with the blue box and press the DEL key. The channels in that part can either be moved to the main cue or removed from the cue altogether.
- Page 93 Light Palette Lighting Control Console Installation & Setup Guide • If you want to remove information in a cue, LOAD the cue, select the channels, release them, then press the [UPDT] key to update the cue. • To quickly record a Look Master, set the desired levels then press [SHIFT] [REC] then a [BUMP] button. You can later edit the name of the Look by pressing [VIEW] then [BUMP] to get the Look's properties.
- Page 94 Light Palette Lighting Control Console Installation & Setup Guide • Go to the Control Panel to change your Screen Saver. Changing the Settings of "My Pictures Slideshow" allows you to point to your own directory of images that you place on the hard drive. •...
- Page 95 Notes...
- Page 96 Part No: 2-450190-010...