GE JVW5301 Installation Instructions Manual
Pyramid wall chimney vent hoods
Hide thumbs
Also See for JVW5301:
- Owner's manual (24 pages) ,
- Installation instructions manual (21 pages) ,
- Owner's manual (24 pages)
Table of Contents
Available languages
Available languages
Quick Links
Installation
Instructions
"If you have questions, call 800.GE.CARES (800.432.2737) or visit our website at: GEAppliances.com"
BEFORE YOU BEGIN
Read these instructions completely and
carefully.
IMPORTANT
•
for local inspector's use.
IMPORTANT
•
codes and ordinances.
• Note to Installer – Be sure to leave these
instructions with the Consumer.
• Note to Consumer – Keep these instructions
for future reference.
• Skill level – Installation of this vent hood
requires basic mechanical and electrical skills.
• Completion time – Approximately 1 to 3 hours
• Proper installation is the responsibility of the
installer.
• Product failure due to improper installation is
not covered under the Warranty.
CAUTION:
Due to the weight and size of
these vent hoods and to reduce the risk of
personal injury or damage to the product, TWO
PEOPLE ARE REQUIRED FOR PROPER
INSTALLATION.
FOR YOUR SAFETY:
WARNING:
Before beginning the
installation, switch power off at service panel and
lock the service disconnecting means to prevent
power from being switched on accidentally.
When the service disconnecting means cannot
be locked, securely fasten a prominent warning
device, such as a tag, to the service panel.
Pyramid Wall
Chimney Vent Hoods
JVW5301, JVW5361
Save these instructions
Observe all governing
WARNING:
OF FIRE, ELECTRIC SHOCK OR INJURY TO
PERSONS, OBSERVE THE FOLLOWING:
A. Installation work and electrical wiring
must be done by qualified person(s) in
accordance with all applicable codes and
standards, including fire-rated construction.
B. Sufficient air is needed for proper
combustion and exhausting of gases
through the flue (chimney) of fuel burning
equipment to prevent back drafting. Follow
the heating equipment manufacturer's
guidelines and safety standards such
as those published by the National Fire
Protection Association (NFPA), the
American Society for Heating, Refrigeration
and Air Conditioning Engineers (ASHRAE)
and the local code authorities.
C. When cutting or drilling into wall or ceiling,
do not damage electrical wiring and other
hidden utilities.
D. Ducted fans must always be vented to the
outdoors.
E. Turn off breaker to adjacent rooms while
working.
WARNING:
OF FIRE, USE ONLY METAL DUCT WORK.
(991.0364.803 rev 2) 31-10983-1 04-15 GE
TO REDUCE THE RISK
TO REDUCE THE RISK
Table of Contents

Related Manuals for GE JVW5301


Summary of Contents for GE JVW5301
- Page 1 Installation Pyramid Wall Chimney Vent Hoods Instructions JVW5301, JVW5361 “If you have questions, call 800.GE.CARES (800.432.2737) or visit our website at: GEAppliances.com” BEFORE YOU BEGIN WARNING: TO REDUCE THE RISK Read these instructions completely and OF FIRE, ELECTRIC SHOCK OR INJURY TO carefully.
-
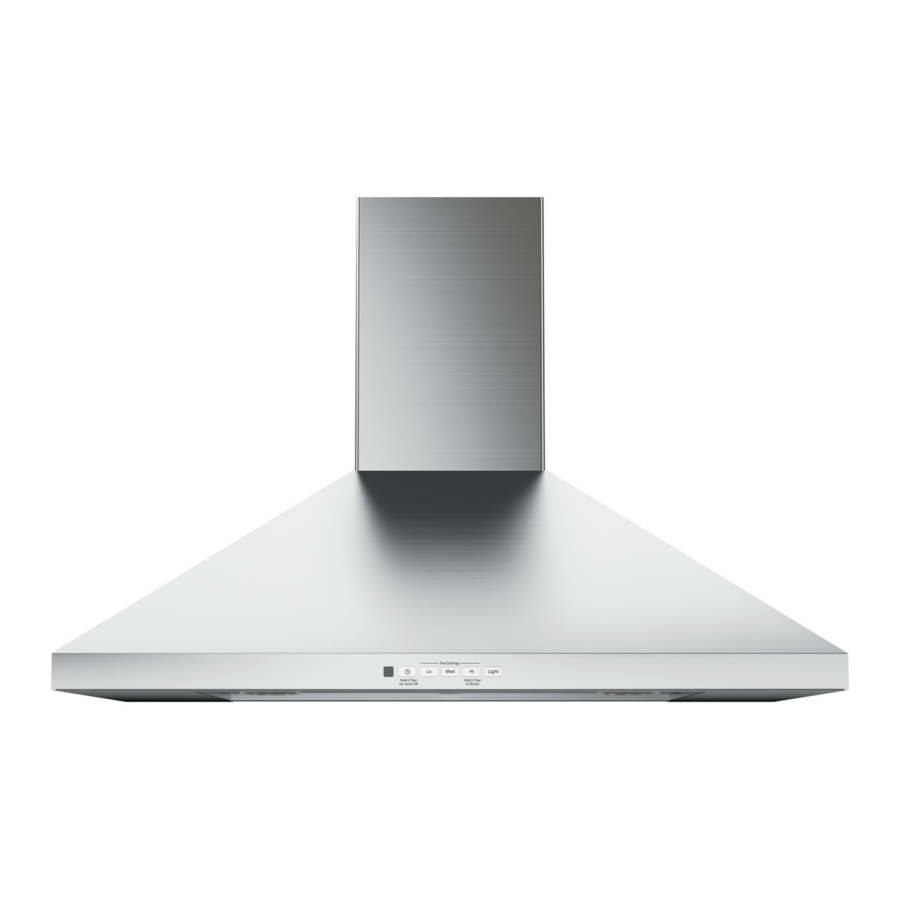
Page 2: Product Dimensions
Installation Preparation PRODUCT DIMENSIONS INSTALLATION CLEARANCES These vent hoods are designed to be installed 8-1/4” onto a wall with no above cabinets. 7-1/16” • Install these hoods between the required 24” minimum and 36” recommended maximum above the cooking surface. 17-3/8”... -
Page 3: Advance Planning
Installation Preparation POWER SUPPLY ADVANCE PLANNING IMPORTANT – (Please read carefully) Duct Install Planning • This hood is designed to be vented vertically WARNING: through the ceiling. Use a 6" round duct. Use FOR PERSONAL SAFETY, THIS APPLIANCE MUST BE locally supplied elbows to vent horizontally PROPERLY GROUNDED. - Page 4 Installation Preparation TOOLS AND MATERIALS REQUIRED PLAN THE INSTALLATION (NOT SUPPLIED) CAUTION: To reduce risk of fire and to properly exhaust air, be sure to duct the air outside – Do not vent exhaust air into spaces within walls or ceilings or into attics, crawl spaces, Safety glasses or garages.
-
Page 5: Installation Dimensions
Installation Preparation RANGE HOOD COMPONENTS INSTALLATION DIMENSIONS A. Canopy Section F. Duct Cover Screws The Pyramid Chimneys are adjustable and B. Lower Duct Cover G. Damper designed to meet varying ceiling heights. The duct C. Upper Duct Cover H. Canopy Mounting covers can be adjusted for ceilings between D. -
Page 6: Prepare The Wall
Installation Preparation PREPARE THE WALL Duct Covers Hood Body and Power Supply 1. Place one of the duct cover brackets against the wall so that its top edge is 1/16” from the 1. Put a protective covering over the surface ceiling and level. -
Page 7: Prepare Hood For Installation
Installation Instructions PREPARE HOOD FOR INSTALLATION Non-vented (recirculation) Installations 1. Remove the grease filters from the unit and (Continued) set aside. The grease filters are removed 2. Check that the recirculation duct is in the correct by pressing the handle orientation with the hole towards the front of in front of the filter. -
Page 8: Electrical Connection
Installation Instructions ELECTRICAL CONNECTION FINISH THE INSTALLATION 1. Connect the Power Supply Cable to the range (Continued) hood. Attach the white lead of the power supply 3. Using a flathead screwdriver, lift up the tabs on to the white lead of the range hood (A) with a the top of the canopy. -
Page 9: Antes De Comenzar
Instrucciones Campanas de Ventilación de Chimeneas de Pared Pirámide de instalación JVW5301, JVW5361 ¿Preguntas? Llame al 800.GE.CARES (800.432.2737) o visite nuestro sitio Web en: GEAppliances.com ANTES DE COMENZAR ADVERTENCIA: PARA REDUCIR EL Lea estas instrucciones por completo y con RIESGO DE INCENDIO, DESCARGA ELÉCTRICA detenimiento. -
Page 10: Dimensiones Del Producto
Preparación para la instalación DIMENSIONES DEL PRODUCTO ESPACIO DE INSTALACIÓN 8-1/4” Estas campanas de ventilación están diseñadas 7-1/16” para ser instaladas en una pared sin gabinetes superiores. • Instale estas campanas entre el mínimo requerido de 24” y el máximo recomendado de 36”... -
Page 11: Planificación Previa
Preparación para la instalación SUMINISTRO DE ENERGÍA PLANIFICACIÓN PREVIA IMPORTANTE – (Tenga a bien leer cuidadosamente) Planificación para la Instalación con Conducto • Esta campana está diseñada para ventilarse ADVERTENCIA: en forma vertical a través del cielorraso. Use un conducto circular de 6”. Utilice codos PARA SEGURIDAD PERSONAL, ESTE APARATO suministrados en forma local para ventilación DEBE CONECTARSE A TIERRA DE MANERA... - Page 12 Preparación para la instalación HERRAMIENTAS Y MATERIALES PLAN DE INSTALACIÓN REQUERIDOS (NO SUMINISTRADOS) PRECAUCIÓN: A fin de reducir riesgos de incendios y para que el aire salga de forma apropiada, asegúrese de que el aire sea conducido hacia fuera - No ventile el aire de la Gafas de seguridad salida hacia espacios dentro de paredes o Lápiz y cinta métrica...
-
Page 13: Dimensiones De Instalación
Preparación para la instalación COMPONENTES DE LA CAMPANA DIMENSIONES DE INSTALACIÓN EXTRACTORA Las Chimeneas de Pirámide son ajustables y están diseñadas para adaptarse a diferentes alturas de A. Sección de la Base F. Tornillos de la cielorraso. Las cubiertas de los conductos pueden B. - Page 14 Preparación para la instalación PREPARE LA PARED Cubiertas de Conductos Cuerpo de la Campana y Suministro de 1. Coloque uno de los soportes de la cubierta del Corriente conducto contra la pared, de modo que su extremo superior esté a 1/16” del cielorraso y que quede 1.
- Page 15 Instrucciones de instalación PREPARE LA CAMPANA PARA SU Instalaciones sin ventilación (recirculación) (continúa) INSTALACIÓN 2. Controle que el conducto de recirculación se encuentre en la orientación correcta con el agujero 1. Retire los filtros de grasa de la unidad y deje hacia el frente de la campana.
-
Page 16: Conexión Eléctrica
Instrucciones de instalación CONEXIÓN ELÉCTRICA FINALICE LA INSTALACIÓN (continúa) 1. Conecte el Cable de Suministro de Corriente a 3. Con un destornillador de punta plana, levante las la campana extractora. Conecte el conductor lengüetas sobre el extremo de la parte superior. blanco del suministro de corriente al conductor 4.