beautypg.com
Manuals
Brands
Fujitsu Manuals
Server
PRIMERGY TX1320 M5
Fujitsu PRIMERGY TX1320 M5 Manuals
Manuals and User Guides for Fujitsu PRIMERGY TX1320 M5. We have
1
Fujitsu PRIMERGY TX1320 M5 manual available for free PDF download: Upgrade And Maintenance Manual
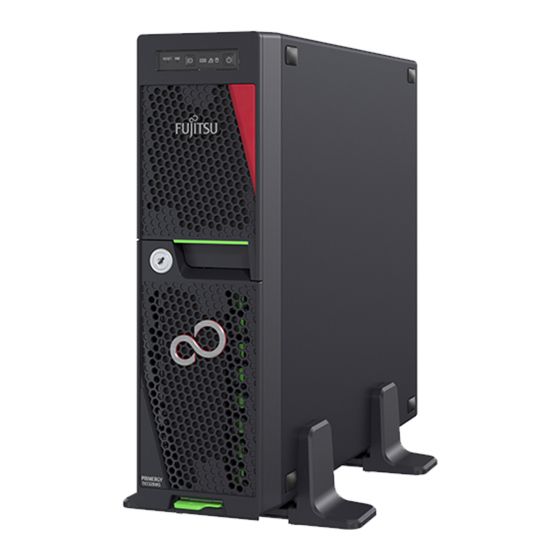
Fujitsu PRIMERGY TX1320 M5 Upgrade And Maintenance Manual (407 pages)
Brand:
Fujitsu
| Category:
Server
| Size: 8.85 MB
Table of Contents
Version History
7
Table of Contents
7
Introduction
17
Concept and Target Groups of this Manual
17
Notational Conventions
17
Before You Start
19
Basic Information
19
Proceeding
19
Advanced Thermal Design (ATD)
19
Installing Optional Components
20
Replacing a Defective Component
20
Classification of Procedures
21
Assignment of Unit Categories
21
Customer Replaceable Units (CRU)
21
Upgrade and Repair Units (URU)
22
Field Replaceable Units (FRU)
23
Average Task Duration
24
Tools You Need at Hand
25
Documentation Overview
26
Downloading Manuals
26
List of Documents
26
Important Information
29
Introduction
29
Safety Instructions
29
Basic Safety Instructions
29
Before Starting up
30
Installation and Operation
30
Batteries
33
Working with Optical Disk Drives (Odds) and Media
33
Laser Information
35
Modules with Electrostatic-Sensitive Devices (ESD Modules)
35
Transporting the Server
37
Installing the Server in the Rack
38
Other Important Information
38
Energy Star
39
CE Conformity
39
FCC Class a Compliance Statement
40
Environmental Protection
41
Basic Hardware Procedures
43
Using Diagnostic Information
43
Proceeding
43
Locating the Defective Server
43
Determining the Error Class
44
Locating the Defective Component
44
Shutting down the Server
45
Disconnecting the Power Cord
46
Getting Access to the Component
48
Safety Notes
48
Unlocking the Server
49
Removing the Server Cover
50
Removing the Accessible Drive Bay Cover
52
Removing the HDD Bay Cover
53
Reassembling
54
Safety Notes
54
Installing the Server Cover
54
Installing the HDD Bay Cover
55
Installing the Accessible Drive Bay Cover
55
Connecting the Power Cord
57
Connecting the Power Cord (Standard PSU, with Cable Tie)
57
Connecting the Power Cord (Hot-Plug PSU)
58
Switching on the Server
60
Handling the 2.5-Inch HDD Cage
60
Removing the 2.5-Inch HDD Cage
60
Installing the 2.5-Inch HDD Cage
62
Handling the HDD Fan Modules
64
Removing the HDD Fan Module (3.5-Inch HDD Variant)
64
Installing the HDD Fan Module (3.5-Inch HDD Variant)
65
Removing the HDD Fan Module (2.5-Inch HDD Variant)
67
Installing the HDD Fan Module (2.5-Inch HDD Variant)
68
Basic Software Procedures
71
Validation
71
Starting the Maintenance Task
71
Suspending Bitlocker Functionality
71
Disabling the Boot Watchdog
72
Removing Backup and Optical Disk Media
74
Verifying and Configuring the Backup Software Solution
74
Switching on the ID Indicator
74
Completing the Maintenance Task
75
Updating or Recovering the BIOS and Irmc S6
75
Verifying System Information Backup or Restore
78
Updating Expansion Card Firmware
79
Reconfiguring the Backup Software Solution
80
Resetting the Boot Retry Counter
81
Resetting the Error Status after Replacing Memory Modules
82
Resetting the Error Status after Replacing Memory Modules or CPU
82
Resetting the Error Status after Replacing Cpus
84
Enabling the Boot Watchdog
86
Enabling Replaced Components in the BIOS
87
Verifying the System Time Settings
87
Viewing and Clearing the System Event Log (SEL)
88
Updating the NIC Configuration File in a Linux and Vmware Environment
90
Resuming Bitlocker Functionality
91
Performing a RAID Array Rebuild
92
Looking for MAC/WWN/GUID and SAS Addresses
93
Basic Information
93
Looking for the MAC Address of a LAN Controller
93
Looking for the WWN Address of a Fibre Channel Controller
94
Looking for the GUID Address of an Infiniband or Omni-Path Controller
95
Looking for SAS Addresses of SAS Controllers for External Devices
95
Using the Chassis ID Prom Tool
96
Configuring LAN Teaming
98
Switching off the ID Indicator
99
Performing a Fan Test
100
Power Supply Unit (PSU)
101
Safety Notes
101
Basic Information
101
Standard Power Supply
103
Replacing the Standard PSU
103
Converting a Standard Power Supply to a Redundant Power Supply
109
Redundant Power Supply
116
Installing a Hot-Plug PSU
116
Removing a Hot-Plug PSU
120
Replacing a Hot-Plug PSU
122
Replacing the Power Distribution Board
124
Hard Disk Drive (HDD) / Solid State Drive (SSD)
133
Safety Notes
133
Basic Information
134
Inch HDD/SSD and 2.5-Inch Installation Frame
135
Handling Hdds or Ssds Without Installation Frame
135
Inch HDD Configurations
137
Configuration with up to Two 3.5-Inch Hdds
137
Installing 3.5-Inch Non Hot-Plug Hdds
137
Removing 3.5-Inch Non Hot-Plug Hdds
143
Replacing a 3.5-Inch Non Hot-Plug HDD
148
Inch HDD/SSD Configurations
150
Configuration with up to Four HDD/SSD Modules
150
Configuration with up to Eight HDD/SSD Modules
150
Configuration with up to Four Pcie SSD Modules
151
Installing 2.5-Inch HDD/SSD Modules
152
Removing 2.5-Inch HDD/SSD Modules
154
Replacing a 2.5-Inch HDD/SSD Module
157
Replacing a 2.5-Inch Backplane
159
Upgrading Configuration from up to Four to up to Eight 2.5-Inch Hdds/Ssds
166
Upgrading to 4X Pcie 2.5-Inch SSD Configuration
168
Basic Information
171
Safety Notes
171
Fans
171
Replacing the HDD Fan (3.5-Inch HDD Variant)
173
Replacing the HDD Fan (2.5-Inch HDD Variant)
176
Expansion Cards and Backup Units
181
Safety Notes
181
Basic Information
182
Installing Slot Brackets
183
Handling Slot Brackets
183
Removing Slot Brackets
186
Handling SFP+ Transceiver Modules
186
Installing SFP+ Transceiver Modules
186
Removing SFP+ Transceiver Modules
192
Expansion Cards
195
Installing Expansion Cards
195
Removing Expansion Cards
203
Replacing Expansion Cards
205
Flash Backup Unit (FBU)
207
Position of the FBU
207
Installing an FBU
208
Removing an FBU
215
Replacing an FBU
219
Main Memory
221
Safety Notes
221
Basic Information
222
Slots and Features
222
General Memory Population Rules
222
Modes of Operation
223
Installing Memory Modules
223
Removing Memory Modules
226
Replacing Memory Modules
227
Processor (CPU)
229
Safety Notes
229
Basic Information
229
Upgrading or Replacing the CPU
230
Replacing the Heat Sink
243
Accessible Drives
245
Safety Notes
245
Basic Information
245
Optical Disk Drive (ODD)
246
Installing the ODD
246
Removing the ODD
252
Replacing the ODD
255
RDX Drive
257
Installing the RDX Drive
257
Removing the RDX Drive
261
Replacing the RDX Drive
264
Front Panel
267
Safety Notes
267
Replacing the Front Panel Module
267
Installing a Front USB Connector
273
Front USB Connector
273
Removing a Front USB Connector
276
Replacing a Front USB Connector
279
Serial Interface
281
Safety Notes
281
Installing the Serial Interface
281
Removing the Serial Interface
284
Replacing the Serial Interface
285
Dust Cover
287
Safety Notes
287
Basic Information
288
Installing the Dust Covers
288
Removing the Dust Covers
293
Replacing the Dust Covers
297
System Board and Components
299
Safety Notes
299
Basic Information
299
CMOS Battery
300
Replacing the CMOS Battery
300
Trusted Platform Module (TPM)
302
Position of the TPM
302
TPM Kit
303
Installing the TPM
303
Removing the TPM
306
Replacing the TPM
311
Irmc Microsd Card
313
Note for Embedded Lifecycle Management (Elcm)
313
Installing the Irmc Microsd Card
313
Removing the Irmc Microsd Card
315
Replacing the Irmc Microsd Card
316
M.2 Ssd
317
Slots and Bolts for M.2 Ssds
317
Installing an M.2 SSD
319
Removing an M.2 SSD
324
Replacing an M.2 SSD
327
Dual Microsd 64GB Enterprise
329
Position of the Dual Microsd 64GB Enterprise
329
Installing the Dual Microsd 64GB Enterprise
329
Removing the Dual Microsd 64GB Enterprise
332
Replacing the Dual Microsd 64GB Enterprise
333
Replacing the Microsd Card
335
System Board
337
Replacing the System Board
337
Mechanical Overview
347
Server Front
347
Server Rear
349
Server Interior
351
Connectors and Indicators
354
Connectors and Indicators on the System Board
354
Server Front
359
Connectors on the Server Front
359
Indicators on the Front Panel
360
Indicator on the ODD
363
Indicators on the RDX Drive
363
Indicators on Hot-Plug HDD / SSD / Pcie SSD Modules
364
Server Rear
366
Connectors on the Server Rear
366
ID, CSS and Global Error Indicators
367
LAN Indicators
369
Indicator on Hot-Plug PSU
370
Acoustic Indicators
371
Onboard Settings
372
Minimum Startup Configuration
373
Supplied Documents
375
Table of Contents
377
SYS Board Connector D3931
379
Basiccabling
380
Basiccablingstdpsu
381
Basiccablingredpsu
382
Powercabling3.5Hdd
383
Powercabling2.5Hdd
384
Powercabling2.5Hdd with Nvme
385
Oobcabling2.5Hdd
386
Oobcabling2.5Hdd with Nvme
387
Accdrv_Odd_Rdx
388
Data FBU Ep5X0I/Ep5X0E
389
Data HDD Activity Cp/Ep5X0I
390
Data 3.5_2Xsata
391
Data 3.5_2Xsata_Cp/Ep5Xxi
392
Data 2.5_4Xsata
393
Data 2.5_4Xsas/Sata_Cp/Ep5Xxi
394
Data 2.5_8Xsas/Sata_Cp/Ep5Xxi
395
Data 2.5_4Xnvme_4Xsas/Sata
396
Dual_Micro_Sd_64Gb_Enterprise
397
System Fans
398
Serial Port
399
Related Products
Fujitsu PRIMERGY TX1320 M1
Fujitsu PRIMERGY TX1320 M2
Fujitsu PRIMERGY TX1320 M4
Fujitsu PRIMERGY TX1320 M3
Fujitsu Server PRIMERGY TX1330 M1
Fujitsu PRIMERGY TX1330 M2
Fujitsu PRIMERGY TX1330 M4
Fujitsu PRIMERGY TX1310 M3
Fujitsu PRIMERGY TX1310 M5
Fujitsu PRIMERGY TX1330 M3
Fujitsu Categories
Air Conditioner
Laptop
Server
Scanner
Storage
More Fujitsu Manuals