Table of Contents
Quick Links
User's Manual
VZ-HD4000A
VZ-HD4900A
Thank you for purchasing this Hitachi camera.
Please read this User's Manual thoroughly and use the camera as instructed.
After reading the User's Manual, store it safely.
Introduction
Installation and
Connection
Direct Remote
Control Function
Configuration via
Menus Function
Appendix
Table of Contents

Related Manuals for Hitachi VZ-HD4000A


Summary of Contents for Hitachi VZ-HD4000A
- Page 1 VZ-HD4900A Installation and Connection Direct Remote Control Function Configuration via Menus Function Appendix Thank you for purchasing this Hitachi camera. Please read this User's Manual thoroughly and use the camera as instructed. After reading the User's Manual, store it safely.
-
Page 2: Important Information
Important Information For Your Safety WARNING: TO PREVENT FIRE OR SHOCK HAZARD, DO NOT EXPOSE THIS UNIT TO RAIN OR MOISTURE. Identifications of caution marks The camera and AC adapter have the This symbol warns the user that following caution marks. uninsulated voltage within the unit may have sufficient magnitude to CAUTION... -
Page 3: Important Safety Instructions
IMPORTANT SAFETY INSTRUCTIONS In addition to the careful attention devoted to quality standards in the manufacture of your camera, safety is a major factor in the design of every instrument. But, safety is your responsibility too. This page lists important information that will help to assure your enjoyment and proper use of the camera and accessory equipment. -
Page 4: Cautions On Use Of This Product - Be Sure To Read This Information
Cautions on Use of this Product - Be sure to read this information - l Cautions on use Do not subject the camera to impact. • This camera is a precision machine. Take great care that you do not strike it against a hard object or let it fall. - Page 5 l Cautions on Storage Do not store the camera in a very humid or dusty place. • If dust gets inside the camera, it may malfunction. Under high humidity, the lens may become moldy, and the camera could become inoperable. We recommend storing the camera in a box with dessicant when storing in a closet, etc.
-
Page 6: Regulatory Notice
Regulatory Notice FCC Statement Warning This device complies with part 15 of the FCC Rules. Operation is subject to the following two conditions: (1) This device may not cause harmful interference, and (2) this device must accept any interference received, including interference that may cause undesired operation. -
Page 7: Table Of Contents
Table of Contents Connecting to a Monitor Important Information with an HD-SDI IN Cautions on Use of this Terminal ......24 Product Connecting to a Monitor - Be sure to read this with a 3G-SDI IN information - ......4 Terminal ...... - Page 8 Preset Items and Retained Configuration via Menus Function 37 Settings ........ 53 Operating Menus and Software License Understanding Screens ..37 Information ......54 Camera Functions Setup ..39 Main Specifications ....60 Selecting a Shooting Mode Dimensional Drawing ... 61 to Match the Conditions (Program AE) ....
-
Page 9: Introduction
Tele, allowing it to shoot over a wide range, from wide-angle to telephoto. Its digital zoom function lets it take telephoto shots at 300x. Multiple Video Output Interfaces The VZ-HD4000A has an HD-SDI interface, which is suitable for long distance transmission. (HD-SDI: complies with SMPTE292M serial digital interface standards) -
Page 10: Checking Accessories
Checking Accessories After you open the package be sure to check that the following accessories are inside. AC adaptor Power cord Remote control Connects to the Connects the AC camera. adapter to an outlet. Three M5 × 12 screws RS-422 terminal block Two AAA batteries Four M3 ×... -
Page 11: Insert The Batteries
Information on DVI-I and 3G-SDI/HD-SDI Cables l DVI-I and 3G-SDI/HD-SDI cables do not come with the product. Please purchase them separately to match the specifications of your monitor or other external device. Refer to pages 23, 24 and 25 for information on cable types. Alternatively, refer to page 63 for the terminal specifications for DVI-I cables. -
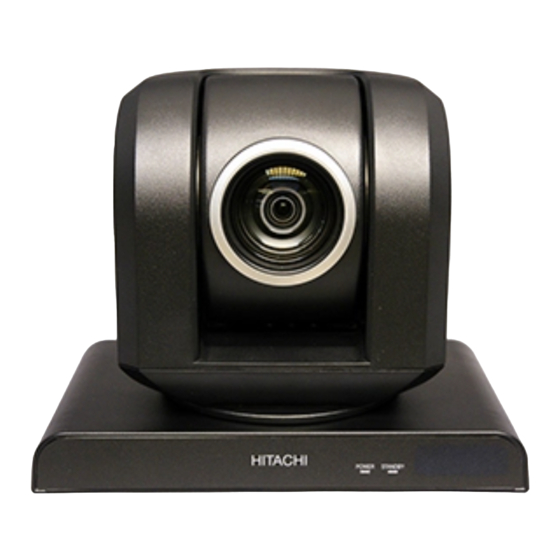
Page 12: Names Of Parts
Names of Parts Front / Side Lens VIDEO SELECT switch (P. 14) POWER lamp (P. 28) EXT SLOT This is an extension slot for maintenance and is not normally STANDBY lamp (P. 28) used. Remote receiver / IR sensor Anti-theft lock installation hole (P. - Page 13 VZ-HD4900A Base VZ-HD4000A VZ-HD4900A DC IN 12V terminal (P. 22) VIDEO OUT (HD-SDI) terminal [VZ-HD4000A] (P. 24) RS-232C IN terminal (P. 25) VIDEO OUT (3G-SDI) terminal RS-232C OUT terminal (P. 26) [VZ-HD4900A] (P. 25) Tripod mounting hole (P. 19) RS-422 terminal (P. 26) Screw mounting holes (P.
- Page 14 * This is the factory default setting. damage the grooves. This camera does not have Caution a function that automatically VZ-HD4000A does not output matches the video output signal 1080p/59.94 or 1080p/50. to the connected monitor’s The HD-SDI output does resolution.
- Page 15 Set this to add a Sync signal, especially when not connected to Analog Horizontal Sync/Analog Vertical Sync. OFF : Does not add Sync ON* : Adds Sync Switch 4 (Not used) [VZ-HD4000A] Always set to ON*. Switch 5 (Not used) Always set to OFF*.
- Page 16 Caution The VIDEO OUT SYNC option is for use with the VZ-HD4900A. With the VZ-HD4000A, always set to Make the settings for Serial communication baud rate Video OUT Sync switch[VZ-HD4900A] and installation method prior to turning the camera on. Do not make these settings after turning the power on.
-
Page 17: Remote Control
EXPOSURE Button (P. 33) Remote Control 10-key Buttons (for presets) (P. 35) PRESET Button (P. 35) HOME Button (P. 31) TELE / WIDE Buttons (P. 31) MENU Button (P. 37) BACK Button (P. 38) POWER Button (P. 28) FULL AUTO Button (P. 34) RESET Button (P. -
Page 18: Installation And Connection
Installation and Connection Installation Introduction When installing on a desktop, attach the included front panel (for desktop installation) on the front of the device; for a ceiling installation, attach the front panel (for ceiling installation). (P.10) When installing on a desktop, set System Select Switch 10 (installation method selection) to OFF (desktop installation) and for a ceiling installation, set System Select Switch 10 (installation method selection) to ON (ceiling installation). -
Page 19: Installing It On A Desk Or Table
Installing it on a Desk Warning or Table Do not mount the camera using Install it in a stable location where it the tripod screw when installing it is unlikely to fall off. in a high place. Mounting on a Tripod (Sold Separately) ... -
Page 20: Ceiling Installation
Ceiling Installation Mount the camera to the ceiling mount fixture (camera side) with Use the included ceiling mount the included screws (M3 × 8). fixtures (camera side and ceiling side), along with the safety wire and Four screws included screws when mounting the camera (M3 ×... - Page 21 Mount the ceiling mount fixture Align the tabs (A) sticking up (ceiling side) to the ceiling. on the ceiling mount fixture Use screws that fit in the screw (camera side) with ceiling mount hole of the ceiling mount fixture fixture's (ceiling side) holes (B) (ceiling side).
-
Page 22: Connections
Connections Connecting to an Electrical Outlet Follow the steps below to connect the camera to an electrical outlet via the included AC adapter and power cord. Connect the wire from the AC adapter to the DC IN 12V terminal on the camera. -
Page 23: Connecting To A Monitor With An Analog Component In Terminal
Connecting to a Connecting to a Monitor with an Monitor with an Analog Component Analog RGB IN Terminal IN Terminal VZ-HD4900A VZ-HD4900A To VIDEO OUT To VIDEO OUT (DVI-I) terminal (DVI-I) terminal DVI-component DVI-Analog RGB converter cable* converter cable* To component To Analog RGB IN terminal... -
Page 24: Connecting To A Monitor With A Dvi In Terminal
Connecting to a Connecting to a Monitor with a DVI IN Monitor with an Terminal HD-SDI IN Terminal VZ-HD4900A To VIDEO OUT To VIDEO OUT (HD-SDI) terminal (DVI-I) terminal DVI cable* HD-SDI cable To DVI IN To HD-SDI IN terminal terminal HD video monitor, etc. -
Page 25: Connecting To A Monitor With A 3G-Sdi In Terminal
Connecting to a Connecting to an Monitor with a 3G-SDI External Device with IN Terminal an RS-232C VZ-HD4900A l Use an RS-232C to connect the camera for control via an external device. Connect as follows with an RS-232C cable. To VIDEO OUT (3G-SDI) terminal 3G-SDI cable... -
Page 26: Connecting Multiple Cameras To An External Device
Connecting Multiple Cameras to an External Device l To control more than one camera with an external device via RS-232C or RS-422 cables, connect them in a daisy chain. Using RS-232C or RS-422 cables, make the connections as shown in the figures on P. 27. To make connections with RS-422 cables, use the included RS-422 terminal block connector... - Page 27 Connecting with RS-232C Cables Connecting with RS-422 Cables External Control Device External Control Device RS-232 cable RS-422 Cables Camera 1 Camera 1 Terminal RS-232 cable block connector Camera 2 Camera 2 RS-232 cable Camera 3 Camera 3 Caution When connecting devices in a daisy chain, it is necessary to make the selections the same for all the connected cameras, namely the SYSTEM SELECT SWITCH 1 (serial communication baud rate) and SYSTEM SELECT SWITCH 3 (RS-232C/RS-422).
-
Page 28: Direct Remote Control Function
Direct Remote Control Function Before Use Turning the Power ON l This chapter describes the functions that can operate the camera directly via remote control. Refer to P. 37 for functions that use menu screens. l Remote control buttons are indicated as [Button Name]. -
Page 29: Screen Display
Screen Display If you press [DISPLAY], the current settings of camera functions and zoom operations, etc., are displayed as in the following example. If you press [DISPLAY] again, the display turns off. Direct Remote Function Menu Operation Control Operation Zoom ●... - Page 30 Following are displays of settings that can be made for different functions, shown by setting content. (Default content shown first) Zoom Program AE No icon: Auto Current zoom position : Manual Digital Zoom: Off : Shutter Digital range : Iris : Spotlight Maximum optical zoom Digital Zoom: 100x...
-
Page 31: Panning, Tilting And Zooming
Zooming Panning, Tilting The camera can zoom up to 25x and Zooming optically or 300x digitally. (The digital zoom function is Off Panning and Tilting when purchased.) Pans or tilts, thus adjusting the orientation of the camera. TELE/WIDE While viewing the screen press [TELE] or While looking at the... -
Page 32: Adjusting The Camera
To set the Digital Zoom Adjusting the Press [DIGITAL ZOOM] repeatedly Camera to turn it On/Off. The zoom can be set to 100x, 200x, Adjusting the Focus 300x. Manually (Manual The digital zoom setting can also be Focus) switched via the menu. If it is difficult to adjust the focus Caution automatically, you can adjust it... -
Page 33: Adjusting The Brightness Of The Image (Exposure)
To Revert to Auto Focus Adjusting the Brightness of the Press [FOCUS] again to return to auto focus. Image (Exposure) Normally, the exposure is Focusing range automatically adjusted. However, l T (telephoto) side: Approx. depending on the shooting 1.5 m from the lens surface to conditions, the exposure can be infinity. -
Page 34: Compensating For Backlight
Compensating for Returning Changed backlight Settings to their Defaults (Full Auto) When the subject is lit from the rear, this function will compensate for The following settings can be lighting so that the subject is not too returned to their defaults with one dark. -
Page 35: Making Camera Presets
Making Camera When the camera is in the state you wish to Presets save, press [PRESET] 1 and then press the You can set up presets for different number you wish to camera settings, such as its pan, tilt and zoom. Once presets are made, save (from [1] to [32]) they are retained even if the power 2 ... - Page 36 Remote Control Indicators Caution l Whenever you operate While trying to save, call up or a camera via the remote delete a camera preset, if you control, the indicators of the enter a number other than from configured camera numbers [1] to [32], or if you press (CAMERA*) light up.
-
Page 37: Configuration Via Menus Function
Configuration via Menus Function Operating Menus and Understanding Screens MENU With some functions, the camera can be operated via onscreen BACK menus displayed on a monitor ENTER connected to the camera. l Within explanation of procedures, menu items are indicated as being inside Press [MENU] quotes. - Page 38 Press [ ] or [ENTER] Use [ ] or [ ] to to access menu select the desired selections on the 2nd setting and activate it level from the screen in with [ENTER] step 1 The sample screenshot is set Camera Functions Setup 4 ...
-
Page 39: Camera Functions Setup
Camera Functions Iris The aperture is adjusted Setup manually. Selecting a Shooting Spotlight Mode to Match the When a strong light is on the Conditions subject, this prevents the (Program AE) person’s face from washing out. You can also select a shooting mode that better suits the situation White Board for even clearer images. -
Page 40: Slow Shutter
Slow Shutter 59.94/29.97 50/25 This sets the minimum value 1/2000 1/1750 of the slow shutter speed 1/1500 1/1250 1/1000 1/1000 when Auto is selected. 1/725 1/600 When the image output format 1/500 1/425 is 59.94/29.97, you can select 1/350 1/300 from 1/60, 1/30 or 1/15. -
Page 41: Setting The White Balance
Selecting Program AE Setting the white balance Modes When you wish to adjust the color, you can change the white balance 1 Press [MENU] setting. Select [Camera White balance mode Function Setup] 2 Auto (No icon appears.) [Program AE] Manual Program AE mode Select values for the R gain... - Page 42 Selecting a white Setting the white balance mode balance manually (Set) Prepare a white object such a thick 1 Press [MENU] sheet of white paper that is not translucent. Select [Camera Function Setup] 2 Point the camcorder at [White Balance] the white object so that white balance mode it fills the screen.
-
Page 43: Setting The Digital Zoom
Setting the digital To close, press [MENU]; zoom to redo the process, go back to step 4 and Although the digital zoom setting can be made using [Digital Zoom] repeat (P.32), it can also be done via the The white balance menu. -
Page 44: Image Setup
It can be set in a range from 0 to 16 Image Setup (17 steps). The smaller the setting value, the This sets the depth of more it corrects the brightness of the color (Saturation) intermediate level to the brighter side. This allows you to set the color level. -
Page 45: Swivel Setup
Swivel Setup Caution If the System Select Switch 10 Reversing Pan/Tilt (installation method selection) Movement is changed, the limits of the camera's movable range turn This allows you to reverse the pan/ OFF and the configured movable tilt movement when the cursors range goes to the maximum ] are pressed. -
Page 46: Initial Setup
Reverting All Menu Initial Setup Settings to their Initial Setting the Output Setup (Reset) Format (Color System) 1 Press [MENU] VZ-HD4900A Press [Initial Setup] 2 This allows you to configure the [Reset] DVI-I image output format. Press [ENTER] You can select from between RGB and YPbPr to match the connected The following screen opens. -
Page 47: Appendix
Appendix Troubleshooting Before requesting repairs, look at the following things. After doing so, if there is still some problem in its operation and you cannot resolve it yourself, please contact the store where you purchased it. Refer to P. 67 for information on after sales service. - Page 48 Refer to If this Happens Way to Resolve the Problem Page When not connected to a monitor with (Cont.) an HD-SDI input terminal, the image is not output at 1080p/59.94 or 1080p/50. P. 14 Change the Video Select switch and try P.
- Page 49 Refer to If this Happens Way to Resolve the Problem Page The brightness of When the brightness of the background subjects end up changes, the brightness of your subject ― changing. will also change due to the auto exposure adjustment of the camera. The area around This is not a fault.
- Page 50 Refer to If this Happens Way to Resolve the Problem Page The remote control Are you pointing the remote control at the doesn’t work. receiver on the camera? P. 12 Point the remote at the receiver of the camera and then operate it. Is the receiver on the camera in direct sunlight or under a bright light, such as a fluorescent one? When the receiver is...
-
Page 51: Menu Structure
Menu Structure The camera’s menus are structured as follows. Refer Menu Item Menu Item Setting (Top Level) (2nd Level) Auto* Manual Shutter Program AE P. 38 Iris Spotlight White Board Auto* Camera Manual Functions Setup White Balance P. 40 Outdoor Indoor 1 Indoor 2 300x... - Page 52 Refer Menu Item Menu Item Setting (Top Level) (2nd Level) Pan Reverse Off* Tilt Reverse Off* Pan Tilt Limit Swivel Setup Off* P. 45 Mode 1 Mode 2 Speed Setup Mode 3* Mode 4 Mode 5 RGB* Color System P. 45 [VZ-HD4900A] Initial Setup YPbPr...
-
Page 53: Preset Items And Retained Settings
Preset Items and Retained Settings The following table shows the items that can be saved to presets (P. 35) and the settings that are retained in the absence of anything registered to Preset 1. l When settings have been registered to Preset 1, the camera starts up with the settings of Preset 1. -
Page 54: Software License Information
The software incorporated into this product is composed of multiple independent software modules and the copyright for each of the individual software modules belongs to Hitachi Industry & Control Solutions, Ltd. or a third party. These products incorporate software modules that were developed and/or created by Hitachi Industry &... - Page 55 Software License Information GNU GENERAL PUBLIC LICENSE Version 2, June 1991 Copyright© 1989, 1991 Free Software Foundation, Inc. 51 Franklin St, Fifth Floor, Boston, MA 02110-1301 USA Everyone is permitted to copy and distribute verbatim copies of this license document, but changing it is not allowed. Preamble 2.
- Page 56 expressly provided under this License. Any attempt otherwise to copy, modify, MAY MODIFY AND/OR REDISTRIBUTE THE PROGRAM AS PERMITTED ABOVE, sublicense or distribute the Program is void, and will automatically terminate BE LIABLE TO YOU FOR DAMAGES, INCLUDING ANY GENERAL, SPECIAL, IN- your rights under this License.
- Page 57 Software License Information GNU LESSER GENERAL PUBLIC LICENSE Version 2.1, February 1999 Copyright© 1991, 1999 Free Software Foundation, Inc. 51 Franklin St, Fifth Floor, Boston, MA 02110-1301 USA Everyone is permitted to copy and distribute verbatim copies of this license document, but changing it is not allowed. [This is the first released version of the Lesser GPL.
- Page 58 an argument passed when the facility is invoked, then you must make a tices, you must include the copyright notice for the Library among them, as well good faith effort to ensure that, in the event an application does not supply as a reference directing the user to the copy of this License.
- Page 59 Software License Information and this License would be to refrain entirely from distribution of the Library. END OF TERMS AND CONDITIONS If any portion of this section is held invalid or unenforceable under any partic- How to Apply These Terms to Your New Libraries ular circumstance, the balance of the section is intended to apply, and the sec- If you develop a new library, and you want it to be of the greatest possible use tion as a whole is intended to apply in other circumstances.
-
Page 60: Main Specifications
Horizontal ± 175° Pan & Tilt Functions Vertical -30° to+90° (Desktop Installation) -90° to+30° (Ceiling Installation) VZ-HD4000A: HD-SDI terminal ×1, Video OUT Terminals VZ-HD4900A: DVI-I terminal ×1, 3G-SDI terminal ×1 RS-232C: 8 -pin miniDIN terminal (IN × 1, OUT × 1) -
Page 61: Dimensional Drawing
Dimensional Drawing Desktop Installation Front Side Base 4-M3 Ø 5 1/4-20UNC Unit: mm... - Page 62 Dimensional Drawing Ceiling Installation Base 4-Ø5.6 hole Front Side Bottom Unit: mm...
-
Page 63: Video Out (Dvi-I) Terminal
VIDEO OUT (DVI-I) terminal VZ-HD4900A (DVI 29 pin) DVI-I Pin No Function Pin No Function TMDS Data 2– TMDS data 0+ TMDS Data 2+ TMDS data 0/5 shield TMDS Data 2/4 shield TMDS data 5– (Not used) TMDS Data 4– (Not used) TMDS data 5+ (Not used) -
Page 64: Rs-232C In Terminal
RS-422 terminal RS-232C IN terminal (connect terminal block, 9 pin) (8 -pin mini DIN, female) 1 2 3 4 5 6 7 8 9 RS-422 Pin No Function Pin No Function DTR IN RxD OUT– DSR IN RxD OUT+ TxD IN TxD OUT–... -
Page 65: Connection Wiring Diagram
RS-422 Connection Wiring Diagram External device terminal Camera1 RS-422 terminal TxD OUT+ TxD IN+ TxD OUT– TxD IN– RxD OUT+ RxD IN+ RxD OUT– RxD IN– TxD OUT+ TxD OUT– RxD OUT+ RxD OUT– Camera2 RS-422 terminal TxD IN+ TxD IN–... -
Page 66: Using Rs-422 Terminal Block Connectors
Using RS-422 terminal When Unplugging block connectors Connector Plugs Grasp both ends of the RS-422 terminal block connector plug and Insert the wire (AWG 28-18) into unplug it as shown in the diagram. the hole you wish to connect and tighten the corresponding screw with a slotted screwdriver. -
Page 67: Warranty And After-Service
Product with new or refurbished parts, or (ii) replace the Product with a new or refurbished product with equal or greater features and functions as the Product. If Purchaser rejects, refuses or otherwise does not accept Hitachi’s repair or replacement o er, this Limited Warranty shall be void and of no further force or e ect. - Page 68 Product that has been modi ed or repaired in a manner not previously authorized by Hitachi in writing; (b) any Product whose serial number (if any) has been removed, altered, replaced, defaced or rendered illegible; (c) any defect, malfunction, or failure caused by or resulting from non-authorized service, maintenance, repair or part replacements;...
- Page 72 QR85801 ©Hitachi Industry & Control Solutions, Ltd. 2015 Printed in Japan (I)