Mitsubishi Electric XD430U User Manual
Data projector
Hide thumbs
Also See for XD430U:
- Service manual (84 pages) ,
- User manual (30 pages) ,
- Control manual (5 pages)

Related Manuals for Mitsubishi Electric XD430U


Summary of Contents for Mitsubishi Electric XD430U
-
Page 1: User Manual
DATA PROJECTOR MODEL XD430U SD430U User Manual This User Manual is important to you. Please read it before using your projector. http://www.pureglare.com.au... - Page 2 Please follow WARNING instructions. Never use them for other products. Note: This symbol mark is for Your MITSUBISHI ELECTRIC product is designed and manufactured with high quality EU countries only. materials and components which can be recycled and reused. This symbol means that electrical and electronic equipment, at their end-of-life, should This symbol mark is according to be disposed of separately from your household waste.
-
Page 3: Table Of Contents
Lamp replacement ..........................22 Troubleshooting ............................23 Indicators ..............................26 Specifications ............................27 Declaration of Conformity Model Number : XD430U/SD430U Trade Name : MITSUBISHI ELECTRIC Responsible party : Mitsubishi Digital Electronics America, Inc. 9351 Jeronimo Road, Irvine, CA 92618 U.S.A Telephone number : +1-(949) 465-6000 This device complies with Part 15 of the FCC Rules. -
Page 4: Important Safeguards
Important safeguards Please read all these instructions regarding your projector and retain Overloading them for future reference. Follow all warnings and instructions marked Do not overload wall outlets and extension cords as this can on the projector. result in a fire or electric shock. Read instructions Objects and liquids All the safety and operating instructions should be read before... - Page 5 WARNING: Do not touch the air outlet grilles and bottom plate. Do not touch them or put other equipment close to the air outlet Unplug immediately if there is something wrong with grilles because they become hot during operation. The heated air your projector.
-
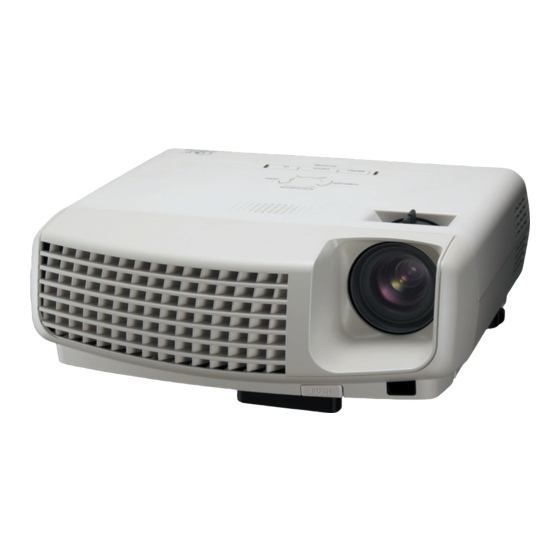
Page 6: Overview
Overview FOCUS ring ZOOM ring Control panel Air outlet grille Remote control sensor (Front) Air inlet grille Air inlet grille Terminal board Air inlet grille 10 Speaker 11 Adjustment feet (front) 12 Adjustment feet (rear) 13 Lock bar 14 Foot Adjustment button (Front) Control panel Power button AUTO POSITION /... -
Page 7: Bottom Side
Bottom side Lamp cover Adjustment feet (rear) Adjustment feet (front) Caution: Do not replace the lamp immediately after using the pro- jector because the lamp would be extremely hot and it may cause burns. Remote control ON button STILL button AUTO POSITION button ENTER button MENU button... -
Page 8: Remote Control
Remote control Battery installation Use two AA size batteries. Remove the back cover of the remote control by pushing the battery compartment door in the direction of the arrow. Load the batteries making sure that they are positioned correctly (+ to +, and - to -). •... -
Page 9: Installation
Installation Layout of the projector Image size varies depending on the distance between the screen and the projector. Front projection L : Between the screen and the front edge of the projector Hd : Height of the projected image Screen Distance from the screen : L Diagonal size Width : W... -
Page 10: Basic Connections
Basic connections This projector can be connected with various devices such as a VCR, video camera, videodisc player, and personal computer that have analog RGB output connectors. Important: • Make sure that the connected device is turned off before starting connection. •... - Page 11 Projector + Computer For computer with Mini D-SUB RGB cable for PC COMPUTER IN Computer to monitor port AUDIO IN AUDIO OUT MONITOR OUT AUDIO OUT Audio cable (option) MONITOR OUTPUT RGB cable for PC (option) Necessary when outputting to both a PC monitor and the projector.
-
Page 12: Preparation
Preparation Preparation for projection Using the adjustment feet (rear) Attach the provided power cord to the projector. Tilt up the projector to the appropriate angle. Plug the power cord in the wall outlet. Press the foot adjustment buttons next to the adjustment feet (rear), and the adjustment feet will come out. -
Page 13: Basic Operation
Basic operation FOCUS ZOOM 3, 1, Power-on Choose your desired external input source using the COM- PUTER or VIDEO button. Turn on the device connected to the projector first. • The input source is switched from VIDEO to COMPUTER at Plug the power cord in the wall outlet. - Page 14 Basic operation (continued) Power-off Volume from the speaker Use the following procedure to turn off the projector. Press the VOLUME + or -button to change the volume Press the POWER button on the control panel or the OFF button from the speaker. on the remote control.
-
Page 15: Menu Operation
Menu operation IMAGE CONTRAST ±30 BRIGHTNESS ±30 WHITE ENHANCE AUTO, 0 - 10 COLOR TEMP. STANDARD CONTRAST R ±30 CONTRAST B ±30 HIGH BRIGHTNESS R ±30 USER BRIGHTNESS B ±30 COLOR ±10 TINT ±10 SHARPNESS ±5 GAMMA MODE AUTO, DYNAMIC, STANDARD, THEATER INSTALLATION AUTO POWER ON ON , OFF... - Page 16 Menu operation (continued) 1 IMAGE CONTRAST ..........Use to adjust the image contrast. The contrast becomes opt. XGA60 higher as the value increases. BRIGHTNESS..........Use to adjust the image brightness. The image becomes IMAGE brighter as the value increases. CONTRAST WHITE ENHANCE........Use to adjust the white level of the projected image. BRIGHTNESS Select AUTO for normal use.
- Page 17 3 FEATURE MENU POSITION ........Use to select the position of the menu on the screen, 1. opt. XGA60 (upper left) or 2. (lower right). CINEMA MODE ......... When AUTO is selected, the film mode will be automati- FEATURE cally activated when a film source signal is inputted. MENU POSITION When OFF is selected, the film mode will not be acti- AUTO...
-
Page 18: Image Adjustment
Image adjustment Image adjustment Color temperature You can adjust the image using the IMAGE menu. Select COLOR TEMP. in the IMAGE menu. Press the button to select USER opt. XGA60 Press the ENTER button. IMAGE USER CONTRAST CONTRAST R BRIGHTNESS CONTRAST B WHITE ENHANCE AUTO... -
Page 19: Adjustment Of The Image From The Computer
Adjustment of the image from the computer Simple adjustment method This projector adjusts the format of the video signal supplied from the Select HORIZ. POSITION in the SIGNAL menu. computer. However, sometimes images are not projected correctly Press the button to adjust the horizontal start position owing to the type of the computer used. -
Page 20: Advanced Feature
Advanced feature Still To stop the motion in the image temporarily (or to display a still image): Press the STILL button on the remote control. • The image will freeze temporarily. To resume the motion in the image: Press the STILL button on the remote control again. Important: •... -
Page 21: Password Function
Password function To cancel the password function: This projector is equipped with the password function that is Display the FEATURE menu. designed for prevention of wrong operation by children and restriction Press the button to select PASSWORD FUNCTION. on operation by other than specified users. Press the ENTER button. -
Page 22: Lamp Replacement
• Do not spill liquid on the removed XD430U/SD430U lamp box or do not place it near any flammable object or where children 3000 Hours can reach to prevent injury or fire. -
Page 23: Troubleshooting
Troubleshooting The following offers solutions to some of the common problems you may encounter. We suggest that you consult this chart before contacting your dealer. Images aren’t projected on the screen. Problem Cause and solution • Check the states of the indicators. POWER STATUS Solution... -
Page 24: Images Aren't Projected Correctly
Troubleshooting (continued) Images aren’t projected correctly. Problem Cause and solution • Check that the cable connected to the external device isn’t intermittent. Projected images are shaking. • Connect the cable’s plug with the external device’s connector firmly. • Press the AUTO POSITION button. Projected images are displaced. - Page 25 Others Problem Cause and solution Hot air is emitted from the air outlet grilles. • This air comes out as a result of cooling the inside of the projector. This isn’t a product malfunction. No audio is output. • Check that the volume isn’t set to low. •...
-
Page 26: Indicators
Indicators This projector has two indicators, each of which shows the operation condition of the projector. The following offer solutions to possible problems. If these problem persist, turn the projector off and consult your dealer. STATUS indicator POWER indicator Normal condition POWER STATUS CONDITION... -
Page 27: Specifications
Light source lamp 230 W (XD430U/SD430U) Picture size 40 - 300 inch (aspect ratio 4:3) Resolution:640x400 (Expand) - 1024x768 (Real) - 1280x1024 (Compress) (XD430U) PC compatibility Resolution:640x400 (Expand) - 800x600 (Real) - 1024x768 (Compress) (SD430U) Sync on Green available NTSC / NTSC 4.43 / PAL (including PAL-M, N) / SECAM, PAL-60... - Page 28 1 Safety manual/Quick start up for UK 02552-0065-01 1 CD-ROM 1 RGB cable for PC 02552-0072-00 2 Battery 1 VIDEO cable 02552-0068-00 1 Lens cap Replacement part (Option / Not included in the box) Spare lamp (for XD430U/SD430U) (VLT-XD430LP) EN-28 http://www.pureglare.com.au...
- Page 29 Specification of RGB signals in each computer mode of the projector resolution horizontal vertical XD430U SD430U Signal mode (H x V) frequency (kHz) frequency (Hz) (H x V) (H x V) TV60, 480i(525i) 15.73 59.94 1024 x 768 800 x 600 TV50, 576i(625i) 15.63...
- Page 30 Centro Direzionale Colleoni, Palazzo Persero-Ingresso 2, :+886-2-2833-9813 Phone :+852-2422-0161 Via Paracelso 12, 20041 Agrate Brianza, Italy :+852-2487-0181 MKY (Mitsubishi Electric Kang Yong Watana Co., Ltd. ) Sales & Technical Inquiries http://www.mitsubishi-kyw.co.th/ SINGAPORE (Mitsubishi Electric Asia Pte. Ltd.) Phone :+39-(0)39-60531 Road, Huamark Bangkapi, Bangkok 10240, Thailand http://www.mitsubishielectric.com.sg...