
Related Manuals for Motorola SCOUTTRAINER100


Summary of Contents for Motorola SCOUTTRAINER100
- Page 1 User’s Guide DELUXE REMOTE TRAINING SYSTEM Model: SCOUTTRAINER100 The features described in this User's Guide are subject to modifications without prior notice.
- Page 2 Push-To-Talk function. Please retain your original dated sales receipt for your records. For warranty service of your Motorola product, you will need to provide a copy of your dated sales receipt to confirm warranty status. Registration is not required for warranty coverage.
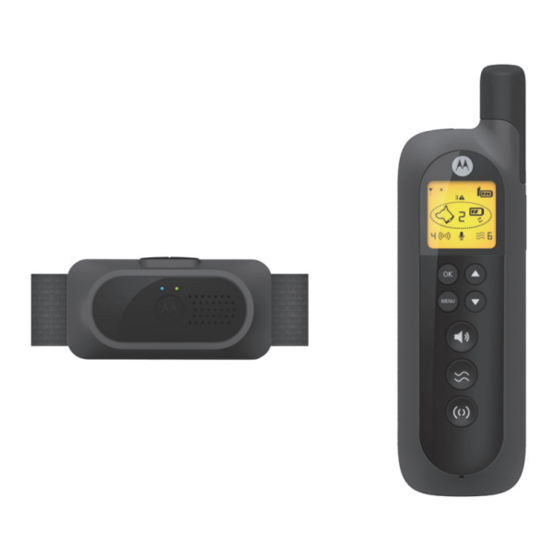
- Page 3 Overview of the Pet Collar Unit Pair Key Charging LED Power Key Lights up in blue when charging. Press and hold to power ON. Speaker The Indicator LED lights up in green Delivers tone or voice sent from the for 5 seconds when powered on. Remote Control Unit.
- Page 4 Overview of the Remote Control Unit Display (LCD screen) Vibration Key OK Key Press to vibrate the Pet Collar Unit. Press to select the desired option Static Correction Key and lock the setting. Press and hold to deliver static Menu Key correction to the Pet Collar Unit.
- Page 5 Symbols on the Remote Control Unit RF signal strength of the Remote Control against the Pet Collar Unit. Displays when you enter Menu mode. Alert indication on Collar 3 (battery low, out of range, etc). Battery level on Remote Control Unit. Pet Collar Number.
- Page 6 How the Deluxe Remote Training System works The Training System comes with a Remote Control Unit that is paired with the Pet Collar Unit. At the push of the STATIC CORRECTION KEY on the Remote Control Unit, a signal is sent to the Pet Collar Unit, which delivers static correction to your dog to assist you with shaping and modifying its behavior.
-
Page 7: Table Of Contents
Table of contents 1. Safety Instructions ..................8 2. Getting Started ..................9 Remote Control Unit Battery Installation ........... 9 Attach the Adjustable Strap to the Pet Collar Unit ........10 Charging the Pet Collar Unit ..............10 Fit the Pet Collar Unit on your Dog’s Neck ..........11 Trim Away Excess Strap Length .............. -
Page 8: Safety Instructions
1. Safety Instructions WARNING: DO NOT USE ON AGGRESSIVE DOGS - This product is not for use on aggressive dogs. If you are not sure if this product is suitable for your dog, please consult a certified trainer or your veterinarian. RISK OF SKIN DAMAGE •... -
Page 9: Getting Started
2. Getting Started Remote Control Unit Battery Installation The Remote Control Unit uses 2x AAA-sized alkaline batteries. Small cross-head or flat end screwdriver. 1. Use a small cross-head or flat end screwdriver to unscrew the battery compartment cover as shown above. 2. -
Page 10: Attach The Adjustable Strap To The Pet Collar Unit
Attach the Adjustable Strap to the Pet Collar Unit IMPORTANT Power off the Pet Collar Unit before attaching the strap. 1. Set the Pet Collar Unit facing down with the Collar Contacts facing up. 2. With the front side of the buckle facing down, thread the strap through the first slot, moving it towards the second slot. -
Page 11: Fit The Pet Collar Unit On Your Dog's Neck
3. Put the strap over your dog’s neck, centering the Pet Collar Unit underneath its neck and making sure that the Motorola logo is upright facing you. 4. String the end of the strap through the strap buckle. 5. Pull the end of the strap until the desired level of tightness is reached and push the retainer bar through the nearest strap hole. -
Page 12: Trim Away Excess Strap Length
NOTE The Pet Collar Unit should fit snugly on your dog’s neck so that you can only fit two fingers underneath it. It should not be able to rotate around the neck. If necessary, trim some of your dog’s hair where the collar makes contact with the skin to allow for consistent performance. -
Page 13: Change Collar Contacts
Change Collar Contacts IMPORTANT • Power off the Pet Collar Unit before changing collar contacts. • Make sure that the collar contacts are securely fastened. Do not over tighten. Included with the Training System are Collar Contacts in three different lengths (short, medium and long) that deliver static correction to your dog. -
Page 14: Using The Test Light
Using the Test Light You can use the Test Light that is supplied with your Deluxe Remote Training System to test if the Remote Control Unit is sending static correction to the Pet Collar Unit. 1. Press and hold the POWER KEY on the Pet Collar Unit to power it on. -
Page 15: Using The Pet Collar Unit
3. Using the Pet Collar Unit Powering On/Off the Pet Collar Unit To power on, press and hold the POWER KEY on the Pet Collar Unit. The Power LED will light up in green for 5 seconds. To power off, press and hold the POWER KEY on the Pet Collar Unit until the green Power LED light goes off. -
Page 16: Training Your Dog With The Deluxe Remote Training System
4. Training Your Dog with the Deluxe Remote Training System Whether you’re hoping to provide your dog more freedom at the park or trying to solve frustrating behavior problems, your new Training System provides a quick and easy training solution. To get the most from your Training System, carefully follow these instructions. -
Page 17: Determine The Training Level For Your Dog
level of correction. indicates that the current level of correction is 8. 3. The Indicator LED on the Pet Collar Unit flashes alternately in green and red when delivering static correction. NOTE The maximum duration you can press the STATIC CORRECTION KEY to deliver static correction to your dog continuously is 60 seconds. -
Page 18: Push-To-Talk Function
dog respond when it is really distracted or excited. If the TRAINING LEVEL you established was level 5, then you will need to increase it to level 7, so on and so forth. Push-To-Talk Function On the side of your Remote Control Unit is a Push-To-Talk key. You can press and hold down on the right-hand side of the Remote Control Unit to convey commands, praises or verbal reprimands to your dog through the Pet Collar... -
Page 19: Training Tips
5. Training Tips Use only the static correction level necessary to get the desired response. • In most circumstances, your dog should never yelp in discomfort or pain. • Reserve the highest settings for critical, dangerous or life threatening behaviors such as running towards a traffic. After stopping an inappropriate behavior, immediately direct your dog to an appropriate behavior followed by a reward. - Page 20 Teaching your dog the “Sit” command. 1. Put a separate collar on your dog’s neck above the Pet Collar Unit, without adding pressure to the Collar Contacts on the Pet Collar Unit. 2. Attach a long leash to the separate collar. 3.
-
Page 21: Disposal Of The Device (Environment)
6. Disposal of the Device (Environment) At the end of the product lifecycle, you should not dispose of this product with normal household waste. Take this product to a collection point for the recycling of electrical and electronic equipment. The symbol on the product, user's guide and/or box indicates this. -
Page 22: Cleaning And Care
7. Cleaning and Care IMPORTANT Power off the Pet Collar Unit before touching the Collar Contacts. Cleaning and care • Check Collar Contacts for tightness weekly. • Clean Collar Contacts with alcohol weekly. • Check your dog’s neck area for irritation and wash neck weekly. •... -
Page 23: Frequently Asked Questions
8. Frequently Asked Questions Will the Deluxe Remote Training System be effective on my dog? • The Training System is designed to be a convenient and effective training device on all healthy breeds and sizes. However, it should not be used on aggressive dogs. - Page 24 What is the range of operation of the Deluxe Remote Training System? • The range of operation is up to 460 feet* line of sight. It varies according to the position you are holding the Remote Control Unit, the weather, terrain, transmission from other radio devices, etc.
-
Page 25: Troubleshooting
9. Troubleshooting When your dog does not seem to respond to the Static Correction • Make sure that the Pet Collar Unit is properly fitted on your dog. Loosely fitted collar will affect performance. For proper fit, the collar should be snug, yet loose enough to allow two fingers to fit between the strap and your dog's neck. -
Page 26: General Information
US and Canada 1-888-331-3383 Email: [email protected] Consumer Products and Accessories Limited Warranty Thank you for purchasing this Motorola branded product manufactured under license by Binatone Electronics International LTD (“BINATONE”). What Does this Warranty Cover? Subject to the exclusions contained below, BINATONE warrants that this Motorola branded product (“Product”) or certified accessory (“Accessory”) - Page 27 PROVIDED UNDER THIS EXPRESS LIMITED WARRANTY IS THE EXCLUSIVE REMEDY OF THE CONSUMER, AND IS PROVIDED IN LIEU OF ALL OTHER WARRANTIES, EXPRESS OR IMPLIED. IN NO EVENT SHALL MOTOROLA OR BINATONE BE LIABLE, WHETHER IN CONTRACT OR TORT (INCLUDING...
- Page 28 (c) use of the Products or Accessories for commercial purposes or subjecting the Product or Accessory to abnormal usage or conditions; or (d) other acts which are not the fault of MOTOROLA or BINATONE, are excluded from coverage.
- Page 29 (b) broken seals or that show evidence of tampering; (c) mismatched board serial numbers; or (d) nonconforming or non-Motorola branded housings, or parts, are excluded from coverage. Communication Services. Defects, damages, or the failure of Products or Accessories due to any communication service or signal you may subscribe to or use with the Products or Accessories is excluded from coverage.
- Page 30 FCC, ACTA and Industry Canada (IC) regulations WARNING Changes or modifications to this equipment not expressly approved by the party responsible for compliance could void the user’s authority to operate the equipment. NOTE This equipment has been tested and found to comply with the limits for a Class B digital device, pursuant to Part 15 of the Federal Communications Commission (FCC) rules.
-
Page 31: Technical Specifications
Technical Specifications RF Frequency Band 902MHz - 928MHz Modulation Direct Sequence Spread Spectrum Operating Temperature 5ºC to 45ºC Remote Control Unit 2x1.5V AAA Alkaline Cells Voltage Collar Unit Voltage 3.7V 277mAh Li-battery pack 100 - 120 V (AC voltage, 60Hz) 6V DC, 500mA (Adapter output) Water Resistance IP54... - Page 32 Manufactured, distributed or sold by Binatone Electronics International LTD., official licensee for this product. MOTOROLA and the Stylized M Logo, are trademarks or registered trademarks of Motorola Trademark Holdings, LLC. and are used under license. All other trademarks are the property of their respective owners.