Table of Contents
AUDIO VIDEO SURROUND RECEIVER
KR-V888D
INSTRUCTION MANUAL
KENWOOD CORPORATION
About the supplied remote control . . .
Compared to standard remote controls, the remote control supplied with this receiver has several
operation modes. These modes enable the remote control to perform on screen operations and control
other audio/video components. In order to effectively use the remote control it is important to read the
operating instructions and obtain a proper understanding of the remote control and how to switch its
operation modes (etc.).
Using the remote control without completely understanding its design and how to switch the operation
modes may result in incorrect operations.
B60-3017-10 CH (T) WS
98/12 11 10 9 8 7 6 5 4 3 2 1 97/12 11 10 9 8 7 6 5 4 3
KR-V888D (En/T)
1
Table of Contents

Related Manuals for Kenwood KR-V888D


Summary of Contents for Kenwood KR-V888D
- Page 1 Using the remote control without completely understanding its design and how to switch the operation modes may result in incorrect operations. B60-3017-10 CH (T) WS 98/12 11 10 9 8 7 6 5 4 3 2 1 97/12 11 10 9 8 7 6 5 4 3 KR-V888D (En/T)
-
Page 2: Getting Started
AC adaptor (1) Power cord (1) RCA pin cord (2) Caution : Read this page carefully to ensure safe operation. they empty, you should not throw away. In- stead, hand them in as small chemical waste. Remote control unit (1) KR-V888D (En/T) -
Page 3: Table Of Contents
Operating other components ... 40 Changing (confirming) the operation mode ... 41 Preparing for automatic operations (MACRO play) ... 42 Executing an automatic operation ... 44 Setup code correlation ... 45 FutureSet upgrade option ... 46 KR-V888D (En/T) carefully to ensure safe operation. -
Page 4: Special Features
This function takes advantage of your monitor TV to simplify the surround setup procedures so you can quickly and easily match the surround processing to your speaker system, and your listening environment. You can also use OSD during playback to customize the DSP surround modes, etc. KR-V888D (En/T) ¤... -
Page 5: How To Use This Manual
When the broadcast ends, the receiver returns to the original station. When listening to KENWOOD source components connected with system control cords, the input selector on the receiver automatically switches to the tuner when a program you desire is broadcast. -
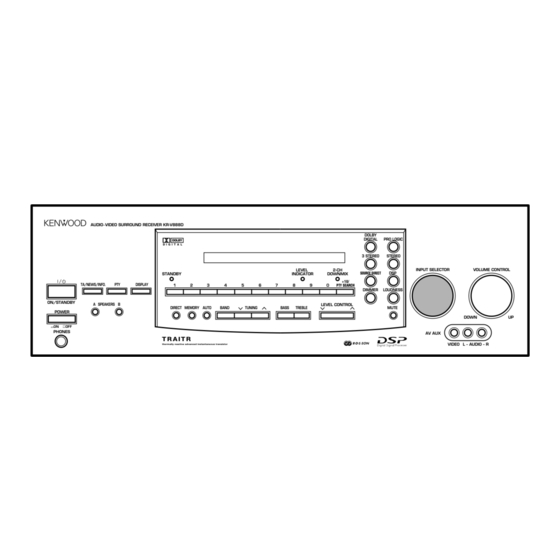
Page 6: Names And Functions Of Parts
Names and functions of parts RDS indicators NEWS INFO. AUDIO VIDEO SURROUND RECEIVER KR-V888D TA/NEWS/INFO ON/STANDBY POWER SPEAKERS -ON –OFF PHONES 1 POWER key Use to turn the main power ON/OFF. 2 ON/STANDBY ( ) key Use to switch the power ON/STANDBY when the POWER is turned ON. - Page 7 KENWOOD audio component. If you connect audio components from KENWOOD and other makers to the TAPE/ MD or CD jacks, you can set the remote to operate these components by registering the appropriate setup code at the respec- tive input.
-
Page 8: Setting Up The System
3 Return lever. FM75 ANTENNA Use an optional antenna adaptor FM outdoor antenna Lead the 75 coaxial cable connected to the FM outdoor antenna into the room and connect it to the FM 75 KR-V888D (En/T) FM outdoor antenna terminal. -
Page 9: Connecting Audio Components
Setting up the system SYSTEM CONTROL cord ƒ SL 16 XS 8 SYSTEM CONTROL switch To AC wall outlet Shape of AC outlets U.K. Except for U.K. ADAPTOR Graphic equalizer ¡ PLAY Cassette deck or MD recorder CD player KR-V888D (En/T) -
Page 10: Connecting Video Components
* The video signal input to the VIDEO 2 jacks can be paired with Setting up the system To AC wall outlet TV/CABLE tuner LD player* Video deck Video inputs and outputs audio signals input to the AUX.6CH.INPUT. KR-V888D (En/T) (Yellow RCA pin cords) 9¡... -
Page 11: Digital Connections
POWER LOCK To connect an LD player with a DIGITAL RF OUT. Connect the LD player to the KENWOOD RF digital demodulator (DEM-999D). Then connect the demodu- lator to the VIDEO 3 DIGITAL IN. Connect the video signal and analog audio signals to the VIDEO 3 jacks. -
Page 12: Connecting The System Control
• Once you finish making the system connections, be sure to register the appropriate setup code for each component. • If you own remote controllable KENWOOD audio components that are not compatible with system control (or cannot be combined with your other system control components), registering the setup code enables you to control those components using the remote control supplied with this unit (without connecting system control cords). -
Page 13: Connecting The Speakers
Be sure to connect the speakers correctly. Center Speaker (4 ~16 ) ª · SURROUND SPEAKERS (4 16 · · ª Surround Speakers (4 ~16 ) Left KR-V888D (En/T) -
Page 14: Preparing The Remote Control
CENTER WOOFER 2 Insert the batteries. • Insert four AAA-size (LR03) batteries as indicated by the polarity markings. 10 m 30˚ Setting up the system KR-V888D (En/T) Power amp Center Speaker Powered Subwoofer 3 Close the cover. Remote sensor 30˚... -
Page 15: Preparing For Surround Sound
Keys or controls used in this operation. EXAMPLE: when the pointer is P. CALL moved to the DSP command. ¢ 3 STEREO The DSP screen appears. WALL ROOMSIZE MEDIUM EFFECT LEVEL MEDIUM MAIN ARENA JAZZ CLUB STADIUM CHURCH THEATER KR-V888D (En/T) -
Page 16: Surround Setup
LRG (large): Select when using a relatively large surround speaker. OFF: Select when not using surround speakers. 2 Continue to the SP.LVL (speaker level) screen. Preparing for surround sound • Pressing the MAIN icon lets you access MAIN the main sound menu. IN LVL KR-V888D (En/T) ›... - Page 17 • Input level adjustment is not possible when using the AUX.6CH INPUT or ADAPTOR jacks. 3 Press the SETUP key on the remote to turn off the on-screen display. 4 Press either VIDEO, AUDIO, or TV key on the remote to cancel the OSD remote control mode. Preparing for surround sound KR-V888D (En/T)
-
Page 18: Normal Playback
DOWN • The INPUT SELECTOR on the front panel of the receiver always cycles Increase volume through all inputs. POWER MACRO SHIFT AUDIO VIDEO P. CALL AUDIO VIDEO SURROUND RECEIVER KR-V888D BAND ¢ GUIDE LEVEL STANDBY INDICATOR TA/NEWS/INFO. DISPLAY VOLUME... -
Page 19: Adjusting The Sound
• The bass and treble levels are adjustable from -10 to +10 in 2 step increments. To cancel Press again. MUTE To cancel Press again. Normal playback SHIFT P. CALL AUDIO VIDEO SURROUND RECEIVER KR-V888D ¢ 3 STEREO GUIDE LEVEL 2-CH STANDBY INDICATOR DOWNMIX SOURCE DIRECT +10/ TA/NEWS/INFO. -
Page 20: Listening With Headphones
• Turning off both SPEAKERS A and B when using a surround mode will cancel the respective mode and activate stereo playback. VOLUME CONTROL DOWN Increase volume Normal playback POWER MACRO SHIFT AUDIO VIDEO P. CALL AUDIO VIDEO SURROUND RECEIVER KR-V888D BAND ¢ GUIDE LEVEL STANDBY INDICATOR TUNING/SKIP VOLUME TA/NEWS/INFO. DISPLAY MUTE... - Page 21 • When the adaptor is on, the overall volume is slightly decreased. • To undo this setting, repeat this procedure to display "ADPT OFF". Normal playback SHIFT P. CALL AUDIO VIDEO SURROUND RECEIVER KR-V888D ¢ GUIDE LEVEL 2-CH STANDBY...
-
Page 22: Recording
• The AV AUX jacks on the front panel provide a convenient way to connect a video camera (playback only). • When recording a Dolby Digital (AC-3) source, press the STEREO key to light the "2 CH DOWNMIX" indicator. SHIFT P. CALL AUDIO VIDEO SURROUND RECEIVER KR-V888D ¢ GUIDE LEVEL 2-CH STANDBY... -
Page 23: Listening To Radio Broadcasts
• If the radio waves are weak and there is a lot of interference, switch to manual tuning. (With manual tuning, stereo broadcasts will be received in monaural.) For higher frequencies TUNING Auto tuning Manual tuning P. CALL AUDIO VIDEO SURROUND RECEIVER KR-V888D DOLBY DIGITAL 3 STEREO LEVEL STANDBY INDICATOR MUTE SOURCE DIRECT +10/ TA/NEWS/INFO. -
Page 24: Tuning Radio Stations By Frequency (Direct Tuning)
DIRECT • If you make a mistake entering the frequency, the frequency display Listening to radio broadcasts POWER MACRO SHIFT AUDIO VIDEO P. CALL P. CALL AUDIO VIDEO SURROUND RECEIVER KR-V888D BAND ¢ GUIDE STANDBY TUNING/SKIP VOLUME TA/NEWS/INFO. DISPLAY MUTE... -
Page 25: Using Rds (Radio Data System)
Note Note countries and areas. Each press switches the display mode as follows: 1 PS (Program Service name) display 2 Frequency display 3 RT (Radio Text) display BBC 1 ABCDEFG HI fl KR-V888D (En/T) fl 92 5) § 1)2 5) -
Page 26: Presetting Rds Stations (Rds Auto Memory)
• To change the information in the display, press the DISPLAY key. Listening to radio broadcasts POWER MACRO SHIFT AUDIO VIDEO P. CALL P. CALL AUDIO VIDEO SURROUND RECEIVER KR-V888D BAND ¢ GUIDE LEVEL STANDBY INDICATOR TUNING/SKIP VOLUME TA/NEWS/INFO. -
Page 27: Presetting Radio Stations Manually
When you press 4 ¢ 1+2+3+ Holding down the button, lets you skip through the presets, receiving each for 0.5 seconds apiece. Listening to radio broadcasts P. CALL AUDIO VIDEO SURROUND RECEIVER KR-V888D DOLBY DIGITAL 3 STEREO LEVEL SOURCE DIRECT STANDBY... -
Page 28: Tuning By Program Type (Pty Search)
• The operations shown in A can also be performed with the P.CALL keys on the remote control. Listening to radio broadcasts POWER MACRO SHIFT AUDIO VIDEO P. CALL P. CALL AUDIO VIDEO SURROUND RECEIVER KR-V888D BAND ¢ GUIDE LEVEL STANDBY INDICATOR TUNING/SKIP VOLUME TA/NEWS/INFO. - Page 29 • If the desired program type is found, that program is received. The program type display changes temporarily to the frequency display, and then to the station name display. Listening to radio broadcasts Blinks ROCK M Program type name display Goes out BBC 1 F M Station name display KR-V888D (En/T)
-
Page 30: Reserving The Desired Information
• When “EON” does not light although an RDS station is received, that station is not transmitting EON data. Please select a different station. Listening to radio broadcasts POWER SHIFT AUDIO P. CALL AUDIO VIDEO SURROUND RECEIVER KR-V888D BAND ¢ GUIDE LEVEL STANDBY INDICATOR VOLUME TA/NEWS/INFO. -
Page 31: To Cancel Eon Reservation
EON reservation. Each press switches the reservation mode as follows: 1 TA (Traffic Announcement) 2 NEWS (News) 3 INFO. (Information) 4 off (EON off) Should be off NEWS INFO. BBC 2 F M KR-V888D (En/T) -
Page 32: Ambience Effects
). This receiver Surround speakers (monaural signal) * Optional in this mode. * Optional in this mode. KR-V888D (En/T) Center speaker Subwoofer (LFE)* Front Speaker Surround speakers (stereo signal) Center speaker... -
Page 33: Dsp Mode
fi Surround speakers fi * Optional in this mode. Manufactured under licence from Dolby Laboratories Li- censing Corporation. "Dolby","AC-3","Pro Logic" and the double - D symbol are trademarks of Dolby Laboratories Licensing Corporation. Ambience effects KR-V888D (En/T) Center speaker Subwoofer*... -
Page 34: Surround Play
2 CH DOWNMIX indicator on the front panel lights up and the signals are downmixed to 2 channel stereo. Source Direct (S.DIR) Lets you pass the source material direct to the amplifier, bypassing any audio process- ing. KR-V888D (En/T) fl... -
Page 35: Convenient Functions
• Midnight mode has no effect on parts of the sound track that are not specified for compression. FUNCTION SHIFT FUNCTION SHIFT FUNCTION SHIFT Ambience effects KR-V888D (En/T) ARENA : Simulates the presence of an indoor concert arena. JAZZ CLUB : Simulates the presence of a jazz club. STADIUM : Simulates the presence of an outdoor stadium. - Page 36 2 AC-3 3 PRO LOGIC 4 3 STEREO 5 ARENA 6 JAZZ CLUB 7 STADIUM 8 CHURCH 9 THEATER Display when SUBWOOFER is pressed. SUBWOOFER « VOLUME Ambience effects KR-V888D (En/T) +1 dB SURROUND The displayed value changes. +2 dB SURROUND...
- Page 37 KR-V888D (En/T)
-
Page 38: Getting The Most From Your Remote Control
Refer to "Remote operation of other components" for details about the operations available for each component. * When registering setup codes for KENWOOD audio components which are connected to this unit by system control cords, use the following codes to insure proper system control operation: Cassette: 7000, CD: 8099, MD: 9000. - Page 39 Note Note Getting the most from your remote control • Example: Press 5258 to register a LD player made by KENWOOD. THEME • The backlight flashes once each time a number is entered. • If an invalid setup code is entered the remote will output one long blink, disregard that code and return to the beginning of step 4.
-
Page 40: Operating Other Components
3 Press the operation keys you desire. Be sure to point the remote control at the remote sensor on the receiver when you want to operate KENWOOD components connected by system control cords. Otherwise, point the remote control at the component you want to operate. -
Page 41: Changing (Confirming) The Operation Mode
To return control to the original component, press SHIFT and then press the VIDEO or AUDIO key to return to the original control mode. Keys or controls used in this operation. Go to step 2 within 3 seconds. KR-V888D (En/T) fl... -
Page 42: Preparing For Automatic Operations (Macro Play)
Keys or controls used in this operation. DISPLAY TV + SHIFT + POWER 3 steps FUNCTION SHIFT + 4 2 steps VIDEO + VIDEO 2 steps SHIFT + POWER 2 steps 9 steps Perform each of the following steps within 5 seconds. KR-V888D (En/T) - Page 43 • The macro is stored at the locations specified in step 3. If another macro was previously stored at the same location, it is erased. MACRO Repeat steps 1 through 5 to program up to 3 macros. MACRO 1 KR-V888D (En/T)
-
Page 44: Executing An Automatic Operation
• Pressing a button other than AUDIO, VIDEO, or TV cancels the macro program mode. When VIDEO is pressed P. CALL GUIDE Keys or controls used in this operation. Go to step 2 within 3 seconds. MACRO 1 KR-V888D (En/T) -
Page 45: Setup Code Correlation
• If the backlight does not blink, the third digit in the setup code is 0. • If the backlight does not blink, the fourth digit in the setup code is 0. Perform each step within 5 seconds. KR-V888D (En/T) -
Page 46: Futureset Upgrade Option
• The free phone upgrade service is not available in countries other than listed above. • For customers outside the U.K., please contact your Kenwood dealer who will be able to assist you. • This number is designed specifically for Future Set upgrades, questions about system operation should be first addressed to your place of purchase. - Page 47 • At this time, the remote exits the special set-up mode and returns to its normal operation mode. AUDIO key TV key 1 CD (CD) 2 TAPE/MD (TAPE) 3 PHONO Perform each of the following steps within 5 seconds. KR-V888D (En/T) 1 TV1 2 TV2 3 CABLE...
-
Page 48: Set Up Code Chart
Gradiente 4000 Graetz 4041, 4104, 4240 Granada 4046, 4081, 4104 Grandin 4000, 4037, 4072 Grundig 4034, 4072, 4081 Hanseatic 4037 Harley Davidson 4000 KR-V888D (En/T) 6900 8900 Maker Set up codes Harmon/Kardon 4038 Harwood 4072 4072 Headquarter 4046 HI-Q 4047... - Page 49 4104 4240 4081 Selco 4041 Sharp 4048 Shintom 4072, 4104 Shogun 4240 Siemens 4037, 4081, 4104 Set up code chart KR-V888D (En/T) Maker Set up codes Silva 4037 Singer 4045, 4072 Sinudyne 4081 Sontec 4037 Sony 4032, 4033, 4034, 4035...
- Page 50 1021 Mitsubishi 1019, 1150, 1178 Motorola 1055, 1093 1019, 1030, 1056, 1060 Multitech 1180 1156, 1166, 1178 Set up code chart KR-V888D (En/T) Maker Set up codes 1019, 1030, 1056 Nesco 1179 Nikko 1030, 1092, 1178 Noshi 1018 1092 Onwa...
- Page 51 5204 Philips 5194 Pioneer 5023, 5059 Maker Set up codes Jerrold 3627 Panasonic 3701 Primestar 3627 Set up code chart KR-V888D (En/T) Maker Set up codes Triumph 1177 Universal 1027 Vector Research 1030 Victor 1053, 1250 Vidikron 1054 Vidtech 1019, 1178...
- Page 52 8000, 8032, 8037, 8179, 8305, 8468 Panasonic 8029, 8303 Philips 8157 Pioneer 8032, 8305, 8468 Proton 8157 Set up code chart KR-V888D (En/T) Maker Set up codes Scientific Atlanta 0008, 0017, 0477 Signal 0015, 0040 Signature 0011 SL Marx 0040...
- Page 53 Optimus 7027, 7220 Panasonic 7229 Philips 7029 Pioneer 7027, 7220 Maker Set up codes Scientific Atlanta 8460 Set up code chart KR-V888D (En/T) Maker Set up codes Sony 7093 Technics 7158 Maker Set up codes Revox 7029 Sansui 7009, 7029...
-
Page 54: In Case Of Difficulty
• The preset memory was cleared because the power cord had been unplugged for a long period of time. KR-V888D (En/T) Remedy • Connect them properly referring to “Connect- ing the speakers” • Adjust the volume to a proper level. -
Page 55: Remote Control Unit
• The microprocessor of the remote control malfunctions. In case of difficulty KR-V888D (En/T) Remedy • Replace with new batteries to preserve the currently registered setup information.$ • Turn the subwoofer ON. -
Page 56: Specifications
VIDEO inputs / outputs VIDEO (composite) ... 1 Vp-p / 75 KENWOOD follows a policy of continuous advancements in development. For this reason specifications may be changed without notice. Note Note Caution : Read this page carefully to ensure safe operation. -
Page 57: Remote Operation Of Other Components
THEME P. CALL TV/SAT/VID INFO ALT AUD +100 REPEAT RANDOM DISPLAY Numeric keys FUNCTION SHIFT commands KR-V888D (En/T) Cassette deck operations TUNING/SKIP P. CALL P. CALL BAND ¢ + (3 Play) – (2 Play) 6 (3 Play) 8 (Pause) 7 (Stop) 4 (1 Rewind) (¶... -
Page 58: Vcr Operations
+100 REPEAT RANDOM DISPLAY INFO (Frame- time) REPEAT (Repeat) RANDOM (Random) DISPLAY (Display) FUNCTION SHIFT MENU THEME TV/SAT/VID INFO ALT AUD +100 REPEAT RANDOM DISPLAY +100 (+100) KR-V888D (En/T) (¶ Record) GUIDE (OSD menu) GUIDE (OSD menu) GUIDE (OSD menu) -
Page 59: Dvd Player Operations
RANDOM +100 REPEAT DISPLAY DISPLAY Numeric keys FUNCTION SHIFT commands ALT AUDIO (Alternate audio) +100 (+100) REPEAT (Repeat) RANDOM (Random) DISPLAY (Display) KR-V888D (En/T) GUIDE INFO ALT AUD RANDOM (OSD menu) INFO ALT AUD (¶ Record) RANDOM GUIDE (OSD menu) - Page 60 For your records Record the serial number, found on the back of the unit, in the spaces designated on the warranty card, and in the space provided below. Refer to the model and serial numbers whenever you call upon your dealer for information or service on this product.