Quick Links
4-454-824-12 (1)
Portable Wireless Server
Quick Start Guide
Thank you for your purchase. This Quick Start Guide
is designed to easily get you set up so you can start
enjoying the benefits of the device.
Read this Quick Start Guide when using this unit with
a smartphone or tablet.
When using this unit with a computer, download
“Quick Start Guide for Computer users” from the
following web site.
http://www.sony.net/pws/
WG-C10 Series
© 2013 Sony Corporation Printed in China
Setting Procedure
Step1: Charging this Unit
Step2: Installing the App
Connecting by Wireless LAN for the First
Step3:
Time
Step4: Security Set-up
Step5: Reconnecting to the Wireless LAN
Examples of Use
Wi-Fi Storage
Wi-Fi
connection
View &
Smartphone
Transfer
content
Memory card
Transfer
USB memory
content
Tablet
WG-C10
PC
Battery Charger
USB
connection
Power feeding
Smartphone
WG-C10
USB Card Reader
USB
connection
Memory card
Transfer
content
PC
WG-C10
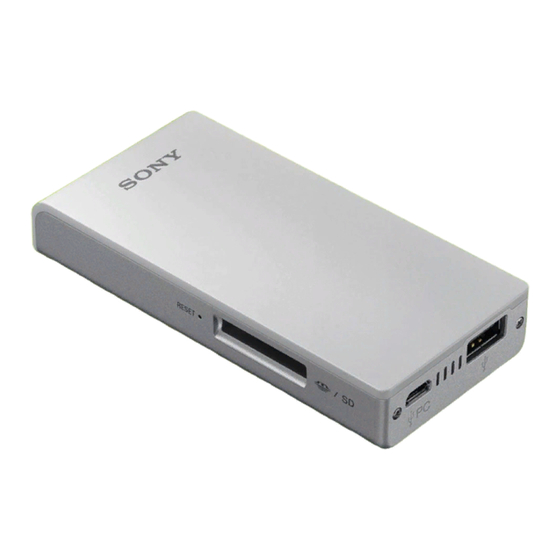
Identifying the Parts
Wireless LAN
indicator lamp
Battery indicator lamp
(power) button
Strap holder
RESET (reset) switch
Memory card slot
Memory card access lamp
USB A port
For charging a smartphone or
tablet
For connecting to a USB
memory or digital still camera
USB micro B port
For charging this unit
For connecting to a
computer
The MAC address and serial number shown
on the label on the bottom of this unit may
be needed for various settings. Write them
down in the below space.
MAC address
Serial number
Expressions in this Guide
WG-C10
This unit
Smartphone/tablet
Device
Lamp Indicator of this Unit
Battery indicator lamp
Charging indicator
Lamp condition
Status
Amber
Charging underway
Amber -> off
Charging is complete
Remaining battery level indicator in use
Lamp condition
Status
Green, blinking slowly Battery level is high
Green, blinking
Battery level is medium
Red, blinking rapidly
Battery level is low
Off
Battery runs out or power-off
Wireless LAN indicator lamp
Lamp condition
Status
Green
Wireless LAN is starting up
Green, blinking
Wireless LAN is on
Off
Power-off
Memory card access lamp
Lamp condition
Status
Amber, blinking
Accessing memory card
Step1: Charging this Unit
This unit has a built-in rechargeable battery pack.
Charge this unit before use.
Charge this unit from a computer or with a USB AC
adaptor (sold separately).
When charging from a computer
Connect this unit to your computer with the USB
cable (supplied).
Battery indicator
lamp (amber)
During charging:
On
Charging
complete: Off
USB cable (supplied)
Approximate charging time: Approx. 8 hours
Charging underway:
• Wireless LAN function cannot be used.
• You can do up to Step2.
When charging with a USB AC adaptor
(sold sepalately)*
Connect the USB cable (supplied) to this unit and
the USB AC adaptor (sold separately or the one
supplied with your device), and connect the USB AC
adaptor to the wall outlet (wall socket).
Approximate charging time: Approx. 3.5 hours
(When using AC-UD10)
Approximate charging time varies depending on
the USB AC adaptor (sold separately) used.
Charging underway:
• Can read and write data to a memory card via a
wireless LAN.
• USB devices connected to this unit cannot be
used.
• You can do from Step2 onward.
* A USB AC adaptor is not supplied with this unit.
For more information about USB AC adaptors that
have been confirmed to work with this unit, see the
Help Guide (http://rd1.sony.net/help/pws/c10/
gb/).
When charging is complete, the battery indicator
lamp turns off.
When charging is complete, remove the USB cable.
Step2: Installing the App
To operate this unit, install PWS Manager onto your
device.
See the Help Guide (http://rd1.sony.net/help/pws/
c10/gb/) for compatible operating systems and a
list of devices that have been confirmed to work
with this unit.
1
Install the app.
Search for PWS Manager in
Google Play or the App Store
and install it.
PWS Manager
Note
The app is free. However, there may be a
communication fee for downloading.
Android
:
After installing, tap [Complete] and the icon is
displayed.
iOS
*:
After installing, the icon is displayed.
* iOS is the operating system of iPhone, iPad
and iPod touch.
After installing, go Step3 without launching the
app.
Step3: Connecting by Wireless
LAN for the First Time
Connect this unit to your device by wireless LAN.
Do this setting after installing the PWS Manager
app.
Note
When this connection is made, the internet
connection of your device is disconnected. To
reconnect to the internet, see the Help Guide.
1
Turn on the power.
Press and hold down the
(Power) button (for 3
seconds or more).
When this unit’s start-up
is complete, the green
wireless LAN indicator lamp
stops blinking and remains
lit.
2
From the setup menu of your device,
turn Wi-Fi on and open the Wi-Fi
Networks screen.
Android
iOS
Wi-Fi
Settings
Wi-Fi
ABC123456
ON
Wi-Fi
Secured with WPA (protected network
available)
Choose a Network...
WG-C10-XXXXXX
Secured with WPA2
ABC123456
BBBBBB
WG-C10-XXXXXX
000000
BBBBBB
Secured with WPA2 (protected network
available)
000000
AAAAAA
AAAAAA
Secured with WPA/WPA2 (protected
network available)
DEFGH789
DEFGH789
Secured with WPA/WPA2 (protected
network available)
XXXXXX
XXXXXX
EEEEEE
Secured with WPA/WPA2 (protected
network available)
CCCCCC
Scan
Add network
3
Tap this unit’s SSID [WG-C10-XXXXXX]*
from the list of Wi-Fi networks to
connect.
* “xxxxxx” is the last 6 digits of the MAC
address.
The MAC address is shown on the back side
of this unit.
4
Confirm the connection.
Android
iOS
Wi-Fi
Wi-Fi
Settings
ABC123456
ON
Wi-Fi
Secured with WPA (protected network
available)
Choose a Network...
WG-C10-XXXXXX
Connected
ABC123456
BBBBBB
WG-C10-XXXXXX
Android
:
Connection is completed when “Connected”
is displayed under the selected SSID and
is
displayed at the top of the screen.
iOS
:
Connection is completed when there is a
tick to the left of the selected SSID and
is
displayed at the top of the screen.
This unit is now connected to your device by
wireless LAN.

Related Manuals for Sony 158WGC10A


Summary of Contents for Sony 158WGC10A
-
Page 1: Quick Start Guide
When charging with a USB AC adaptor MAC address (sold sepalately)* Networks screen. © 2013 Sony Corporation Printed in China Connect the USB cable (supplied) to this unit and Android the USB AC adaptor (sold separately or the one Setting Procedure... -
Page 2: Step4: Security Set-Up
* See the online manual here for a list of devices c: Data in your device that support power feeding. d: Date in the camera roll Confirm the connection. http://rd1.sony.net/help/pws/c10/gb/ Data update Back Save Copy Check in the same way as in 4 of “Step3: Delete Connecting by Wireless LAN for the First Time”.