
Related Manuals for Clarke HFBC12-24


Summary of Contents for Clarke HFBC12-24
- Page 1 HIGH FREQUENCY AUTOMATIC BATTERY CHARGER MODEL NO: HFBC12-24 PART NO: 6267005 OPERATION & MAINTENANCE INSTRUCTIONS LS0814...
-
Page 2: Environmental Recycling Policy
Battery Charger will give you long and satisfactory service. GUARANTEE This CLARKE product is guaranteed against faulty manufacture for a period of 12 months from the date of purchase. Please keep your receipt as proof of purchase. -
Page 3: The Charging Process
THE CHARGING PROCESS The HFBC12 has a sophisticated computer system that performs a 7 stage automatic charging cycle. The stages of this charging cycle are as follows: STAGE 1 DIAGNOSIS (UPON CONNECTION TO THE BATTERY) • Polarity check: to make sure that the connections are correct. -
Page 4: Safety Precautions
SAFETY PRECAUTIONS WARNING: BECAUSE HIGHLY INFLAMMABLE HYDROGEN GAS IS RELEASED IN THE PROCESS OF BATTERY CHARGING, PLEASE REMEMBER TO SWITCH OFF THE CHARGER FIRST, AND SO AVOID SPARKING WHICH WILL OCCUR WHEN CONNECTING OR DISCONNECTING LIVE LEADS. PLEASE READ BEFORE USING THIS UNIT 1. -
Page 5: Electrical Connections
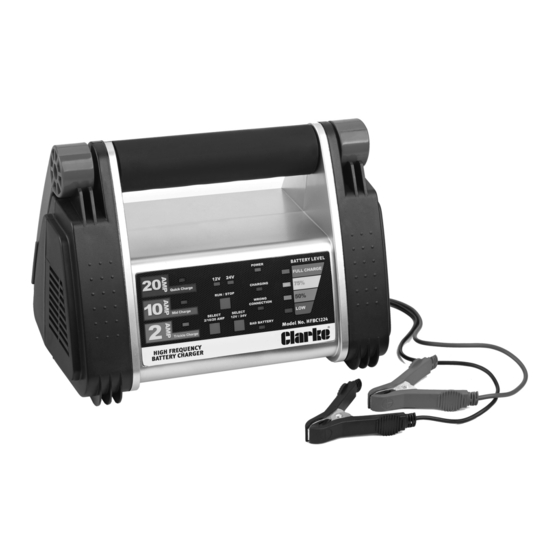
ELECTRICAL CONNECTIONS WARNING! Read these electrical safety instructions thoroughly before connecting the product to the mains supply. Before switching the product on, make sure that the voltage of your electricity supply is the same as that indicated on the rating plate. This product is designed to operate on 230VAC 50Hz. - Page 6 OVERVIEW 1 Handle 11 NEGATIVE (BLACK) lead 2 12 V Selected LED 12 Wrong Connection LED 3 24 V Selected LED 13 Bad Battery LED 4 Power LED 14 Battery Voltage Selector 5 Charging LED 15 Run / Stop Button 6 Full Charge LED 16 Charging Current Selector 7 75% Full LED...
-
Page 7: Charger Location
PREPARATION 1. If it is necessary to remove the battery from a vehicle to charge it, always remove the grounded terminal from the battery first. Make sure that all accessories in the vehicle are off to prevent sparking. 2. During charging, make sure that the area around the battery has good airflow. -
Page 8: Connecting To A Battery
CONNECTING TO A BATTERY WARNING: A SPARK NEAR THE BATTERY MAY CAUSE BATTERY EXPLOSION. TO REDUCE THE RISK OF A SPARK NEAR THE BATTERY: • Turn off the charger before you connect/disconnect the DC output clips. • Do not let the clamps touch each other. •... -
Page 9: Operation
BATTERY HAS BEEN REMOVED FROM THE VEHICLE 1. Make sure that you know the polarity of the battery posts. 2. Connect the POSITIVE (RED) lead to the POSITIVE post on the battery. 3. Position yourself and the free end of the NEGATIVE (BLACK) lead as far away from the battery as possible. -
Page 10: When Charging Is Complete
WHEN CHARGING IS COMPLETE 1. When charging is complete the green Charged LED will come on. 2. Switch off the charger and disconnect the plug from the power socket. 3. Remove the leads from the battery as described in the previous sections. STORAGE Store the mains lead and clamps in the compartment shown when not... -
Page 11: Parts Diagram
PARTS DIAGRAM Parts & Service: 020 8988 7400 / E-mail: [email protected] or [email protected]... -
Page 12: Parts List
PARTS LIST ESCRIPTION Black Clip GRHFBC122401 Clapboard GRHFBC122402 Main PCB GRHFBC122403 Front Case GRHFBC122404 Front Panel with label GRHFBC122405 Rear case GRHFBC122406 Red Cable / Clamp GRHFBC122407 Power Cord GRHFBC122408 Cover GRHFBC122409 Handle GRHFBC122410 Screw GRHFBC122411 Black Cable / Clamp GRHFBC122412 Parts &... -
Page 13: Troubleshooting
TROUBLESHOOTING Problem Cause Solution Bad Battery light The battery voltage is between Have the battery tested by a comes on 0.5V and 1.5V. qualified technician; The battery voltage is lower Replace the bad battery if than 11V(12V),22V(24V) after necessary. being charged for 4 minutes. The battery voltage drops below 12V, 24V two minutes after being fully charged. -
Page 14: Specifications
SPECIFICATIONS Model Number HFBC12-24 Battery Voltages: 12V, 24V IP Rating IP20 Minimum Battery Size 5 AH Maximum Battery Size 200 AH Operating Temperature Range 0 to 40°C Dimensions (D x W x H) 170 x 265 x 180 mm Weight 2.3 kg... -
Page 15: Declaration Of Conformity
DECLARATION OF CONFORMITY Parts & Service: 020 8988 7400 / E-mail: [email protected] or [email protected]...