Asus Xonar U7 User Manual
7.1 usb soundcard & headphone amplifier
Hide thumbs
Also See for Xonar U7:
- Quick start manual (119 pages) ,
- User manual (24 pages) ,
- Quick start manual (2 pages)
Table of Contents
Table of Contents

Related Manuals for Asus Xonar U7


Summary of Contents for Asus Xonar U7
-
Page 1: User Manual
Xonar U7 7.1 USB Soundcard & Headphone Amplifier User Manual... - Page 2 Product warranty or service will not be extended if: (1) the product is repaired, modified or altered, unless such repair, modification of alteration is authorized in writing by ASUS; or (2) the serial number of the product is defaced or missing.
-
Page 3: Table Of Contents
Bottom view ..................7 Driver Installation ................9 Installing the Xonar U7 Card Driver ........9 Uninstalling or Reinstalling the Xonar U7 Card Driver ..9 Connecting Speakers and Peripherals ........10 Input connection .............. 10 Output connection ............13 Xonar U7 Driver Guide .............. -
Page 4: Introduction
S/PDIF TOSLINK optical adapter x 1 • Quick Start Guide • USB Cable x 1 System requirements To ensure a successful installation of the Xonar U7 audio card, make sure that your computer meets the following requirements: • USB port 2.0 and above • Microsoft... -
Page 5: General Specification
Sample Rate and Resolution Analog Playback Sample Rate and 44.1K/48K/88.2K//96K/172.4K/192KHz @ 16/24bit Resolution Analog Recording Sample Rate 44.1K/48K/88.2K//96K/172.4K/192KHz @ 16/24bit and Resolution S/PDIF Digital Output 44.1K/48K/88.2K//96K/172.4K/192KHz @ 16/24bit ASIO 2.0 Driver Support 44.1K/48K/88.2K//96K/172.4K/192KHz @ 16/24bit ASUS Xonar U7 User Manual... - Page 6 3.50mm mini jack * 1 (Shared by Line-In / Mic-In) Button Output volume knob/Output selection / Microphone Volume) Digital S/PDIF Output High-bandwidth coaxial port supports 192HKz/24bit with one S/PDIF TOSLINK optical adapter Driver Features Operation System Windows 8 / 7 / XP (32/64bit) ® ASUS Xonar U7 User Manual...
-
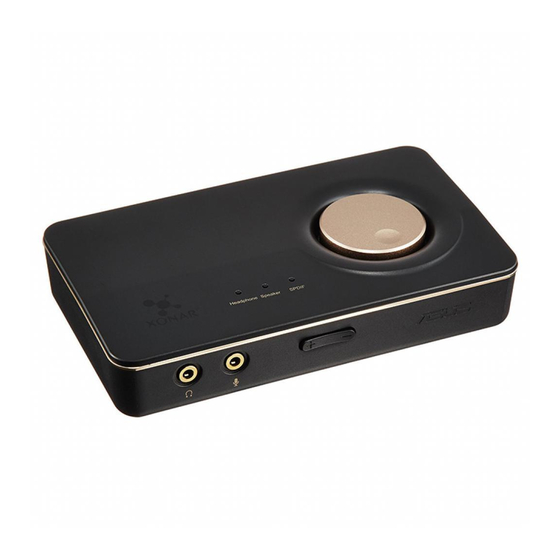
Page 7: Hardware
Hardware Xonar U7 Audio Card Top view Rear view Bottom view ASUS Xonar U7 User Manual... - Page 8 USB Audio 1.0/2.0 switch is located at the bottom side of the audio card. USB Audio 1.0 connection has the following limitations: • Only supports playback features. • 7.1 speakers, Headphone, Mic In / Line-In, and SPDIF Out can only support sample rates of 44.1KHz/48KHz @16-bit. ASUS Xonar U7 User Manual...
-
Page 9: Driver Installation
Xonar U7 audio card to work with Windows ® operating system. • The driver is required only when you connect the Xonar U7 to a PC or notebook. • The version and content of the support CD are subject to change without notice. -
Page 10: Connecting Speakers And Peripherals
3.2.2 Reinstalling the Xonar U7 Card Driver To reinstall the Xonar U7 card driver: Uninstall the existing software or driver. Follow the installation process to reinstall the driver. Connecting Speakers and Peripherals Input connection 4.1.1 Connecting to a USB 2.0 port on your computer... - Page 11 4.1.2 Connecting digital audio systems S/PDIF Items Description S/PDIF Output port Connect an AVR to this S/PDIF output port. ASUS Xonar U7 User Manual...
- Page 12 Connect the microphone’s 3.5mm plug into this Mic-In Line In port port for voice communication, recording, or karaoke. Connect the 3.5mm plug of the CD/MP3 Player or any other Line level analog audio sources into this Line-In port for sound recording. ASUS Xonar U7 User Manual...
-
Page 13: Output Connection
Output connection 4.2.1 Connecting Stereo Headphones HP Out Mic In/Line In Items Description Headphone Out The Headphone Out port has a built-in high-quality Port amplifier to drive headphones. Connect your stereo headphones directly to this port. ASUS Xonar U7 User Manual... - Page 14 RCA cable. Center/Subwoofer Connect the Center/Bass-channel 3.5mm plug of your Out port 5.1 channel headphone into this jack. Rear Surround Connects to the rear surround input port of your 5.1 Out port channel headphone. ASUS Xonar U7 User Manual...
- Page 15 Front (R) Out port Connects to the front right input port of 2 channel speakers using the RCA cable. Front (L) Out port Connects to the front left input port of 2 channel speakers using the RCA cable. ASUS Xonar U7 User Manual...
- Page 16 Connects to the front right input port of 4 channel speakers. Front (L) Out port Connects to the front left input port of 4 channel speakers. Rear Surround Out Connects to the rear surround input port of 4 channel port speakers. ASUS Xonar U7 User Manual...
- Page 17 Connects to the front left input port of 5.1 channel speakers. Center/Subwoofer Connects to the Center and Subwoofer input ports of 5.1 Out port channel speakers. Rear Surround Out Connects to the rear surround input port of 5.1 channel port speakers. ASUS Xonar U7 User Manual...
- Page 18 7.1 channel speakers. Center/Subwoofer Connects to the Center/Subwoofer input port of 7.1 Out port channel speakers using the mini-jack cable. Rear Surround Out Connects to the rear surround input port of 7.1 channel port speakers. ASUS Xonar U7 User Manual...
-
Page 19: Xonar U7 Driver Guide
After finishing the driver installation and rebooting your computer, you will find the Xonar U7 Audio Center’s icon in the system tray on the bottom right-hand corner of the screen. Double click this icon to open the Xonar Audio Center utility. - Page 20 Click to switch the status bar to the Profile panel. Panel button Volume Adjustment Click to increase or decrease volume. Mute / Unmute Click to mute or unmute a device. ASIO Click to launch the ASIO control panel. ASUS Xonar U7 User Manual...
-
Page 21: Input Device Function Introduction
Click to delete a user-defined mode. Switch Button Click to switch between the Profile panel and Audio Status Panel. Input Device Function Introduction Click the device icon on the left side to open the pop-up menu. ASUS Xonar U7 User Manual... - Page 22 The following items will be replaced by Dolby Home Theater V4 under ® Windows 7 and above Operating System. - 7.1 Virtual Speaker Shifter - 10-Band Equalizer • Refer to Dolby’s official manual for Dolby ® Home Theater V4 functions. ASUS Xonar U7 User Manual...
-
Page 23: Volume Control
Click to lock the left / right channel to sync L/R channel. Lock Mute / Un-mute Click to mute or ummute all channels. dB Input Area Key in a dB value in this field to set the volume level. ASUS Xonar U7 User Manual... -
Page 24: Speaker Settings
Select an item to set. Speaker Test Click to test the speaker that you select. LFE / Center When enabled, the function can swap the audio stream Channel Swap between Center/LFE (Available for 5.1 and above). ASUS Xonar U7 User Manual... - Page 25 This function allows you to configure gain settings based on you headphone’s impedence. Items Description Low Gain 0dB for < 32 ohms Medium Gain 6dB for 32 ~ 64 ohms High Gain 12dB for > 64 hms ASUS Xonar U7 User Manual...
-
Page 26: Sample Rate
176.4 KHz - set the playback sample rate to 176K 192 KHz - set the playback sample rate to 192K Bit Depth button 16bit - set the playback bit depth to 16bit 24bit - set the playback bit depth to 24bit ASUS Xonar U7 User Manual... - Page 27 New setting will appear in the Manual Mode List. Click trash to delete settings. Preset mode Select a preset mode for equalizer that is designed accordingly. There are 12 preset modes such as Bass, Treble, Live, Rock, Jazz, etc. ASUS Xonar U7 User Manual...
- Page 28 Effect. switch Environment Effect Click on an Environment Effect button or drop the mode dropdown list to choose an Environment Effect. Room Size Change the Room Size icon to simulate a larger or smaller space. ASUS Xonar U7 User Manual...
- Page 29 Use the pointer to click and drag to move the location of (Free Moving individual virtual speakers. Mode) Manually Rotation Use mouse to rotate the virtual speakers on the screen Mode manually. Auto Rotation The virtual speakers rotate clockwise or counterclockwise Mode slowly. ASUS Xonar U7 User Manual...
- Page 30 Speaker Diagram You can also check the speaker size from this home theater diagram. Cut Off Frequency The cut off range of low frequency is from 50Hz to 250Hz. ASUS Xonar U7 User Manual...
- Page 31 Use the slide bar to change the key level. Vocal Fading It provides the vocal removing function for any stereo music content (eg. Mp3, WMA and CD). Use the slide bar to change the vocal fading level. ASUS Xonar U7 User Manual...
- Page 32 Xear Audio Brilliant Tick to enable or disable the Xear Audio Brilliant function. enable/disable option Brilliant Level Drag to increase or decrease the Brilliant Level. Reset button Click to reset to the factory default settings. ASUS Xonar U7 User Manual...
- Page 33 Tick to enable or disable the Xear Dynamic Base function. enable/disable option Base Level Drag to increase or decrease the Brilliant Level. Cut-off Frequency Drag to adjust the Cut-off Frequency. Reset button Click to reset to the factory default settings. ASUS Xonar U7 User Manual...
- Page 34 Xear Smart Volume function normalizes the music’s sound volume automatically. Items Description Xear Smart Volume Tick to enable or disable the Xear Smart Volume function. enable/disable option Volume Level Drag to increase or decrease the Volumet Level. Mode Select Music mode or Speech mode. ASUS Xonar U7 User Manual...
- Page 35 Voice Clarity Level Drag to increase or decrease the Voice Clarity Level. Noise Suppression Click to select the level of background noise elimination. for communication Reset button Click to reset to the factory default settings. ASUS Xonar U7 User Manual...
- Page 36 5.2.15 Xear Surround Max Function Introduction Items Description Xear Surround Tick to enable or disable the Xear Surround Max function. Max enable/disable option ASUS Xonar U7 User Manual...
-
Page 37: Mic-In, Line In Device Function Introduction
Mic-In, Line In Device Function Introduction Function Introduction Click the device icon on the left side to open the pop-up menu. ASUS Xonar U7 User Manual... - Page 38 96 KHz - set the playback sample rate to 96K 192 KHz - set the playback sample rate to 192K Bit Depth button 16bit - set the playback bit depth to 16bit 24bit - set the playback bit depth to 24bit ASUS Xonar U7 User Manual...
- Page 39 Tick to enable or disable the Magic Voice mode. Select an enable / disable icon below to apply the magic voice mode (monster, carton, option male and female). Reset button Click to reset to the factory default settings. ASUS Xonar U7 User Manual...
-
Page 40: Information
Sound Recorder: Click the Sound Recorder item to open the Windows Sound recorder. Multimedia Properties: Launch the Multimedia Properties page of Windows OS to select the working sample rate & bit rate. (1) Select the Speakers device and then click the properties button. ASUS Xonar U7 User Manual... - Page 41 (3) Language Select: Change the UI language. (4) Don’t show start up message: Check the box to hide or show the start up message. Exit: Click Exit to exit the tray Icon from the system tray. ASUS Xonar U7 User Manual...
-
Page 42: Troubleshooting
I cannot find the Xonar U7 Audio Center. (1). Make sure you have installed the driver. (2). Find the Xonar U7 Audio Center icon in the system tray on the right bottom of the screen. Double click the icon to launch the Xonar U7 Audio Center utility. - Page 43 Control Panel to check ® whether the playback default device is set to Xonar U7 Audio Device, instead of other onboard AC97 or HDA codec device. If it’s not, please set it to Xonar U7 Audio Device and restart your applications.