Table of Contents
Quick Links
Table of Contents

Related Manuals for ReSound Azure Silhouette BTE AZ71-DVI


Summary of Contents for ReSound Azure Silhouette BTE AZ71-DVI
- Page 1 User GUide resound Azure silhouette BTe AZ71-dVi, AZ71-di...
-
Page 2: Table Of Contents
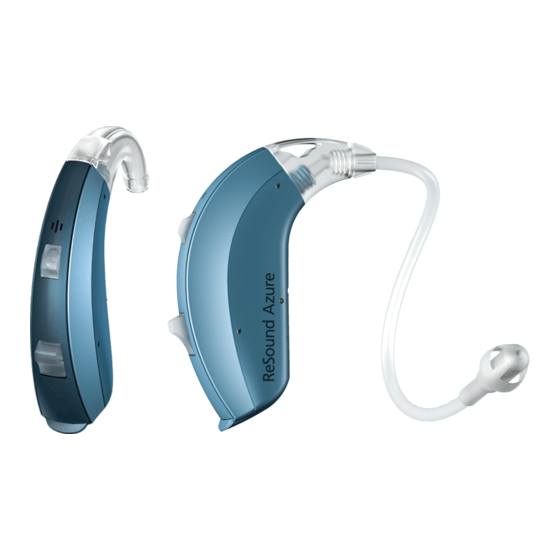
Contents Page Your new digital ReSound Azure Silhouette hearing instruments Illustration of the hearing instrument......4 will enable you to hear sounds that you may not have heard in years Adjusting to a world of new sounds . - Page 3 Your ReSound Azure Silhouette AZ71-DVI and AZ71-DI 7. Direct Audio Input 8. Left/Right indicator Hearing Instrument (Right=Red, Left=Blue) 9. Battery lock 1. Programme Selector 10. Model and serial number on ID-plate 2. Battery Compartment & On/Off Switch 11. Manufacturer (printed inside the battery compartment) 3.
-
Page 4: Adjusting To A World Of New Sounds
Adjusting to a World of New sounds How to adjust If you are inexperienced with hearing instruments it is advisable to: New sounds 1. Use your hearing instruments every day A hearing loss is typically acquired gradually over many years. You may have become accustomed to an everyday life with fewer sounds, which 2. -
Page 5: How To Use The Hearing Instrument
How to Use the Hearing instrument inserting the instrument (with earmould) 1) Hold the earmould between your thumb and On/Off Function index finger and position its sound outlet in 1) When the battery compartment is fully closed, the instrument is your ear canal turned on and programme 1 will be activated 2) Slide the earmould all the way into your ear... -
Page 6: Removing The Hearing Instrument
inserting the instrument (with dome) Volume Control 1) Place the hearing instrument behind the ear When using the instrument you can increase the volume by turning the volume control up, and reduce volume by turning it down. 2) Hold the tube where it bends and gently push the dome into your ear canal (the dome should For each volume step, you will hear a be placed far enough into the ear that the tube... -
Page 7: Programme Selector
Programme selector Your Programme environments: (to be completed together your hearing care professional): You can have up to four different programmes on your hearing instru- ment. The selection of programmes can be changed by your hearing Programme Description of when to use care professional. -
Page 8: Stand-By Function
stand-by Function When using the telecoil programme, the receiver of the telephone should be held as shown in the drawing. You may need to move the In stand-by mode, the hearing instrument will not process sound or handset around slightly to find the best reception. deliver an acoustic signal to the ear. -
Page 9: Direct Audio Input
direct Audio input (dAi) Low Battery Warning Using the Direct Audio Input socket enables direct, undisturbed connec- Your hearing care professional can activate a Low Battery Warning tion to facilities such as: Television - Radio - Remote microphone function in your hearing instruments. When the battery voltage/power How to connect the Audio boot to the hearing instrument: decreases to a certain level, the instrument will emit five soft beeping sig- 1) Make sure the tip of the audio boot is placed firstly in the HAI... -
Page 10: Maintenance
Maintenance Cleaning the earmould daily Maintenance The earmould should be cleaned regularly: It is important to keep your hearing 1. Remove the earmould and the tubing from the hearing instrument instrument clean and dry every day. To before you clean it clean the instrument, use a soft cloth. -
Page 11: Cleaning The Tube And Dome
Cleaning the Tube and dome How to Mount the dome The tube and the dome should be cleaned regularly: We recommend that your hearing care professional changes the dome 1. Remove the tube from the instrument before cleaning by for you, since failure to change the domes in accordance with the unscrewing it instructions could result in injury. - Page 12 Tulip dome The Tulip-Dome consists of two “leaves”. It is important that the largest “leaf” is the outermost “leaf” (C): 1. Push the largest “leaf” away from the Tube with your finger (A) 2. This will make the large “leaf” bend forward 3.
-
Page 13: General Precautions
General Precautions 5. Due to choking hazard hearing instrument usage by children or mentally challenged persons should be supervised at all times 1. Do not leave your hearing instrument in the sun, near an open fire or in a 6. Hearing instruments should be used only as prescribed by your hearing hot, parked car care professional. -
Page 14: Repairs
Technical data If your ReSound hearing instrument malfunctions it must be repaired Maximum Output (2cc Coupler / IEC 60118-7) by a qualified technician. Do not attempt to open the case of the hear- ing instrument since this will invalidate the warranty. If your hearing... -
Page 15: Troubleshooting Guide
Troubleshooting Guide sYMPTOM CAUse POssiBLe reMedY No sound • Not turned on • Turn on by closing the battery door • Dead single use battery • Replace battery • Dead rechargeable battery • Recharge battery • Battery improperly inserted • Insert battery properly •... - Page 16 Troubleshooting Guide sYMPTOM CAUse POssiBLe reMedY squealing • Loose earmould • Remove and reinsert • The Dual Stabilizer II • Consult your hearing care professional system needs re-initialization • Dome not placed correctly • Remove and reinsert • Build-up of earwax •...
-
Page 17: Key Word Index
Key Word index Sound dissapeared..........30 Advice/Adjusting to the hearing aid . - Page 19 Oxon OX25 3SX Auckland Tel.: 0 1869 343 500 Tel.: (free) 0800 900 126 Fax: 0 1869 343 466 Fax: (free) 0800 007 695 www.gnresound.co.uk www.gnresound.co.nz Any issues relating to the EU Medical Device Directive 93/42/EEC should be directed to ReSound A/S.