
Related Manuals for Honeywell TE653ELW


Summary of Contents for Honeywell TE653ELW
-
Page 1: Table Of Contents
Honeywell Barometric Weather Forecaster (TE653ELW) USER MANUAL TABLE OF CONTENTS INTRODUCTION STANDARD PACKAGE CONTENTS BEFORE YOU BEGIN PRODUCT OVERVIEW REMOTE TEMPERATURE & HUMIDITY SENSOR MAIN UNIT WEATHER FORECAST PRESSURE HISTORY CHART MOON PHASE ICONS PRESSURE MODE REMOTE AND INDOOR TEMPERATURE & HUMIDITY... -
Page 2: Introduction
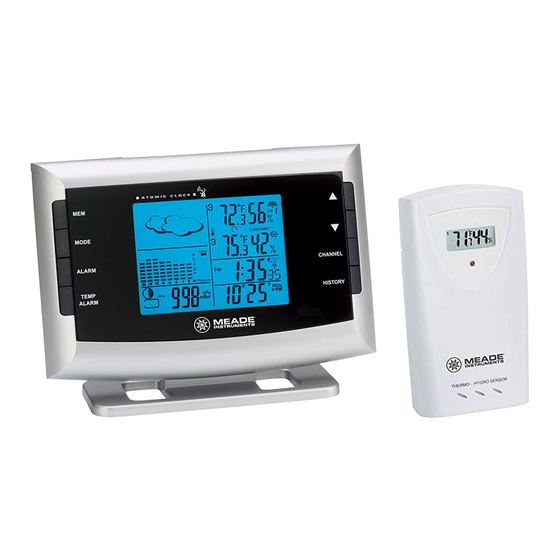
INTRODUCTION Thank you for selecting the Honeywell Barometric Weather Forecaster. This device combines precise time keeping with monitoring and displaying the temperature/humidity data from up to three remote locations. In this package you will find: • One main unit (receiver) TE653ELW •... -
Page 3: Product Overview
and maintenance. We recommend cleaning the remote sensor periodically, as the dirt and debris may affect sensor accuracy. PRODUCT OVERVIEW REMOTE TEMPERATURE & HUMIDITY SENSOR FEATURES • Remote data transmission to the main unit via 433 MHz frequency • LCD displays temperature, humidity and channel •... -
Page 4: Main Unit
with a free air circulation and sheltered from the direct sunlight and an extreme weather conditions. • Ideally, place the thermo-hygrometer sensor above the natural surfaces (such as a grassy lawn). • Avoid placing the thermo-hygrometer sensor near sources of heat, such as chimneys and heating elements. - Page 5 REAR/SIDE A. WEATHER AND TIME IN EASY-TO READ DIGITS button • Allows displaying current, minimum, maximum readings of the indoor and remote temperature & humidity • When depressed and held, clears collected records memory MODE button • Allows toggling between two different clock modes – time with seconds and time with the day of the week •...
- Page 6 • Allows displaying pressure history records SNOOZE/LIGHT button • Stops all alarms temporarily • Activates a backlight for 5 seconds K. Back panel UP (▲) button Increases the parameters of pressure and altitude L. Back panel DOWN (▼) button Decreases the parameters of pressure and altitude M.
-
Page 7: Weather Forecast
SEA LEVEL barometric pressure option should be selected. In this case, the SEA LEVEL barometric pressure value can be adjusted according to the local metro area weather information. (Sources – local TV or radio station, etc). NOTE: Locate your altitude with a portable GPS receiver or topographical map .Locate barometric pressure at: http://weather.noaa.gov/weather/ccus.html or, alternatively, from local radio or TV weather channels. -
Page 8: Moon Phase Icons
MOON PHASE ICONS PRESSURE MODE The pressure mode indicates the current local barometric pressure, the sea level pressure and a moon phase. It also displays barometric pressure value for the past 36 hours in 1 hour intervals. Pressure can be set in inHG or HPa/mBar and altitude can be set in feet or meters. -
Page 9: Auto-Scanning
The indoor temperature and humidity with the icon IN are located below the remote temperature and humidity information line. NOTE: If the indoor or remote temperature or humidity goes above or below operating range stated in specifications, the main unit’s display ( weather) will show dashes “- - -”... -
Page 10: Maximum And Minimum Readings
-5°C to 50°C OVER (23°F 70%RH to122°F) 5°C to 50°C BELOW (23°F 40%RH to122°F) MAXIMUM AND MINIMUM READINGS The maximum and minimum record of the indoor and remote temperature and humidity will be automatically stored in the memory of the main unit (receiver). To display the minimum, maximum or the current reading press MEM button. -
Page 11: Atomic Clock
atomic time signal from the NIST Atomic clock in Boulder, Colorado. The WWVB tower icon on the unit’s display will flash indicating a radio signal reception from the WWVB station. If the tower icon is not fully lit, or if the time and date are not set automatically, please consider the following: •... -
Page 12: Clock Alarms
next parameter (month) • Continue setting month, date, hour, minutes, language for the day of the week and temperature in Fahrenheit or Celsius • Press MODE for the last time to return to the time of day with seconds, after the last parameter is set CLOCK ALARMS The Barometric Weather Forecaster has two time alarms –... -
Page 13: Backlight
If the alarm is not disabled after that, it will sound for two more minutes and then will stop by itself. BACKLIGHT The backlight feature is enabled only after the time is set. To activate the backlight press the SNOOZE/LIGHT button once, and both – clock and weather station displays - will light up for five seconds. -
Page 14: Fcc Statement
User-selectable (°F or °C) temperature display Remote channels auto-scan feature Maximum number of remote sensors: 3 (one included) Readings update interval: every 45 seconds Low battery indicators – for each remote channel and main unit EL backlight Clock Precise atomic time 4 US Time Zones 12/24 hour time format Crescendo 4 minutes alarm with 5 minutes snooze... -
Page 15: Declaration Of Conformity
Hideki Electronics, Inc. reserves the right to repair or replace the product at our option. Copyright (2005) Hideki Electronics Inc. All Rights Reserved. The Honeywell Trademark is used under license from Honeywell Intellectual Properties Inc. Honeywell International Inc. makes no representations or warranties with respect to this product.