
Related Manuals for GE VG4275


Summary of Contents for GE VG4275
- Page 2 Dea ler/Address/Phone: VCR Plus+ and PlusCode are registered trademarks of Gemstar Development Corporation. The VCR Plus+ system is manufactured under the license from Gemstar Development Corporation. TO REDUCE THE RISK OF ELECTRIC SHOCI( DO NOT REMOVE COVER (ORBACK). NO USERSERVTCEABLE PARTS INSIDE.
-
Page 3: Table Of Contents
VCR Plus+ S yste m Ch a n n e ls VCR P l us+ S y ste m Wo rk s h ee t ...... -
Page 4: Co M M E Rc I Al S C A N (S Ea R Ch Bu T T O
P r o g ram t he R emo te ...,.. Ab out Progr am m in g th e R e m o te Pr ogr am m i ng th e R e m o te to C o n t ro l a T V, .., . 36 Oper ati ng the TV ... -
Page 5: First Things First
Welcome to your new VCR... To help you get started using your VCR with a s l it t le r eadi ng as po s s ib le , we ' ve p u t a ll t h e b a s ic information needed in the first three sections. - Page 6 Step 4: Plug in the VCR Y o u r VCR's p ower cor d h a s a p l a s tic b a n d s tru n g t h ro ugh the blades. Remove plastic band before plugging the cord into the power outlet.
-
Page 7: U Se Th E Oui C Ks E T G U Id E Fo R In I Tia L Se T U P
T he r em ai ni ng m enu s th r o u g h o u t th e s e t u p will a p p ear in t h e ch osen langua ge . J u s t fo llo w th e s te p -b y -s t e p... - Page 8 1 .
-
Page 9: Setting Up The Vcr
Au to Cl ock ( also se ts tim e z o n e a n d Dayl ig ht -S a vi ng T m e ) -o r - Ma nual Cl ock S et VCR Pl us+ Cha nn e ls L i s t Remote VCRl//CR2 Auto Play* Ener gySaver *... -
Page 10: Using Menus To Set Up Features
Using Menus to Set Up Features You can set up your VCR's features by using the remote control's buttons to enter your choices from on-screen ins tru c ti o n s. Ea ch me nu i t e m i s e xp l a in e d i n t h is se ct io n . -
Page 11: Cable Box Setup
Y o u r VCR wi l l use thi s c h a n n e l fo r a l l fu t u re t im e r r eco rdi ng s. -
Page 12: Vcr Channels List
5 . On ce you comp lete th e se tu p , th e V CR c o n f irms t h at t h e VCR wi ll now r e ce i v e a ll s i g n a ls o n t h e d e s ig nat ed c han nel . -
Page 13: Changing The Signal Type
L Th e VCR scans for a v a il a b le c h a n n e l s wh ic h ta k e s a bout one-to-two minutes. When the scan is complete, the VCR t u n e s t o t he l owe st c h a n n e l n u m b e r av a ila b le . -
Page 14: Time And Date
3 . P r e ss 3 ag ain to di sp l a y th e SE T T IM E Z O NE me n u . Selecting Channels The Channel up and down buttons access those channels active in your VCR channel list. You can still access channels not in the channel list by using the number buttons on the remote. -
Page 15: Setting Daylight-Saving Time
4 . Sele ct t he co rr ect tim e z o n e . lf "Automatic" is selected as the time zone, the VCR set s t he clo ck u si n g th e fir st C o o r din a t e d Un iv e rsal Ti m e i nf or m ati o n it fi n d s in a b r o a d c a s t s ig n a l. - Page 16 VC R M AI N M EN U 1 V C R P tu s + 4 Channet s 5 S et up 6 P references 7 Audi o 8 Language 0 Exi t 2. P r ess 3 t o di spl ay th e TIM E m e n u . 3 Set T ine Zon e...
-
Page 17: Vcr Plus+@ System Channels
VCR Plus+@ System Channels Using t he VCR P lu s+ s y s te m m a k e s p ro g ra mmin g t ime r recordings for cable or off-air antenna easier, but you h a ve to put i n a l i ttle tim e r ig h t n o w to s e t u p a c h a nnel list. -
Page 18: Vcr Plus+ System Worksheet
Cable-TV Station Name Channel Number** E'PN *Check your local or cable listing for the channel number you receive this station on. *"Check your local listing for broadcast or VCR Plus+ channel number assigned, Channel Number You Receive the Station On*... -
Page 19: Addi Ti Onal S E T- Up Fe A Tu R E S
Remote VCRI /VCRZ Option lf you own a compatible GE, RCA, or PROSCAN remote t h a t has a VCR2, V CR 2 .L D , o r V CR 2 .DVD b u t t o n , t h is feature allows you to set this VCR to respond to that butto n. -
Page 20: Auto P L A Y
O N an d OF F. Select ON if you want the VCR to switch to the VCR m ode whe n th e V C R is tu r n e d o n o r a c a s s e t t e is inserted. -
Page 21: Energysaver
OF F: The V CR wil l r e m a i n tu r n e d on u n til y o u s hut it off. 1:00, 2:00, or 3:00: The VCR turns off after one, two, or t hre e hour s of i n a c ti v ity . - Page 22 T h e VCR wi l l a utom a tic a l ly s w itc h to p la y b a c k d u rin g r e w i nd i f t he counte r e q u a l s o r i s le s s t h a n 0 : 0 0 .
-
Page 23: 3 Vcr Basics
You Started T h e se VCR basics s h o u ld b e e n o u g h f o r y o u t o b e gin en joyi ng your V CR . L e a r n i n g th e r e mo t e c o n tro l f un ct ions, pl ayi ng a r e c o r d e d ta p e , a n d re c o rd in g a pr og ram shou ld do ju s t th a t. -
Page 24: Remote Buttons
CH A N Up o r D own S e le c ts n e x t h ig h e r o r lo we r c h annel in t h e VCR's ch anne l me m o r y. -
Page 25: Tv Function Buttons
INPUT Selects between the TV's input channel or tuner. P r ess to see t he V CR s ig n a l i f yo u c o n n e c t e d y o u r VCR using the AUDIOI/IDEO jacks. -
Page 26: Playing A Tape
Press FWD on the VCR (FORWARD on remote) or REV on the VCR ( RE V E R S E o n r e m o te ) to p o s it io n th e ta pe. Press PLAY PAUSE (if necessary) on the VCR (PLAY on r e m ote)t o begi n ta p e p la y . -
Page 27: Re Cor Di N G
Automatic Rewind T he VCR au tom ati ca l ly r e w in d s th e ta p e if it re a c h es the e n d of t he t ap e du ri n g p la y b a c k . W h ile re win d in g , you can press POWER on the VCR (ON.OFF on remote) and the... -
Page 29: R E Co R D In G
Now that you've gone through the necessary steps to operate your VCR, it's time to explain the different reco r d i n g f e a t u r e s a va i l a b l e t o s u i t yo u r n e e d s... -
Page 30: Recor Din G F E Ature S
. Yo u c a n th e n s e t t h e VC R t o automatically stop recording after a designated period o f t im e. Timer Recording programming the VCR to automatically start and stop recording at a predetermined time. -
Page 31: Timer Recording
PROGRAMS OVERLAP appears if you have entered two programs where the times overlap. The Timer indicator (TIMER) appears in the display when the VCR is turned off and a timer recording has been set. lt flashes if there is no tape in the VCR. -
Page 32: Timer Recording With Vcr Plus+ System
2 . D ispl ay th e V CR P l u s+ Ch a n n e l L is t me n u 3. Go to, Setting Up Your VCR, rt you need more i nf orm ati on o n settin g u p y o u r V C R Plu s +... - Page 33 The Timer indicator (TlMERl appears in the display when you turn off the VCR and a timer recording has been set. lt flashes if there is no tape in the VCR. PlusCode system...
-
Page 34: Stopping A Timer Recording
2. Insert a tape with safety tab in place. 3 . lf you r VCR vie wi ng c h a n n e l is 3 o r 4 , ma k e s u re t h e V CR i ndi cat or ap pea rs i n th e V C R' s d i s p la y p a n e l. -
Page 35: R Eco Rd I Ng A Ud Io O N | Y
Playing Back Audio Orly T o ge t st ere o so und , c o n n e c t th e A U DI O O UT ja c k s of t he VCR t o t he app rop r ia te in p u t o n y o u r a mp lifie r o r recei ver. -
Page 36: C O P Y I Ng A N D E D Iti N G Ta P E S
Using Two VCRs For Copying and Editing Tapes Use one VCR as the playback VCR and the other as the recording VCR. 1. Co n nect t he VC Rs usi n g th e d ia g r a m a t th e rig h t. -
Page 37: Program The Remote
Control Your Television The remote can be programmed to control a television. It is programmed to control a GE, RCA, or PROSCAN TV. Other manufacturer's brands need to be p r o gra mmed. PRoGRAM THE REMoTE... -
Page 38: Ab Out Pro G R A M M In G Th E R E M O Te
T Vs . lt i s a l re a d y p r o g ra mme d to o pe r ate most GE , R CA, a n d PR O S CA N te le v is io n s . - Page 39 06, 1 1 Fisher 19, 20, 21, 22 GE ... . , . 04 , 06, 11 , 14, 23 , 2 4, 46 Goldsta r.., . . 05,...
-
Page 41: Ot H E R Fea Tu Res
Features to Enhance VCR Operation P ict ure S ear ch O p tio n s Com m erci al S ca n Tracking Pro-Tect PlusrM Locking Ti m e C ounter On- Screen Di sp l a y s... -
Page 42: Picture Search Options
5. Press PLAY to return to normal playback. The VCR s wi tches au tomati c a lly fr o m sl o w- m o tio n p la y b a c k t o stop after a few minutes. -
Page 43: Index Search
5. Pr ess STO P to e n d in d e x s e a r c h in g . S ome i nd ex m arks m a y b e m is s e d b y t h e VCR:... -
Page 44: T R Ac Ki N
Pro-Tect Plus" Locking Feature T o d isa bl e t he usa ge o f th e V CR , o r to p r ot e c t y o u r time r r ec o r d i ngs, yo u can lo ck th e V C R s o th a t t h e b u t t o n s o n the VCR or remote won't work. -
Page 45: Time Counter
On-Screen Displays The lNFo button shows the status of the vcR (sroB PLAY, R E CO RD, et c.), chan n e l n u m b e r, tim e c o u n t e r, d a t e , t ime, an d tape spe ed on th e TV s cr e e n . -
Page 46: Audio Setup Features
AUDIO m en u a n d a r e s h o w n in th e d is p la y s below. 1 . P r e ss M ENU to di sp la y th e VC R M A IN ME NU. VCR M AI N M ENU 1 VCR P Lus+ 2 Ti m er... -
Page 47: Tape Playback
P layback: Hl -Fl , LINE A R, a n d M lX . To enjoy Hi-Fi sound, connect your VCR to a stereo t ele vi sio n or am pli fie r l re c e i ve r u si n g th e a u d io / v id e o jac ks. -
Page 49: Go N N E C Ti On S
Things to Know Before Connecting Components Protect Your Components from Power Surges C onn ect all comp o n e n ts b e fo r e p l ug g in g a n y power cords into the wall outlet. Always turn off the TV and other components bef or e you con ne ct o r d is co n n e c t a n y c a b le s . -
Page 50: Co N Necti Ng Y O Ur V C
N and OUT TO T V . T he c o a x ia l ca b le s u p p lie d wit h y o ur VCR is used to connect the VCR's OUT TO TV jack and y o ur T V's an tenna i npu t. -
Page 51: Choosing A Vcr Connection
Choosing a VCR Connection There are several different ways to connect your VCR, depending on whether or not you have cable service, if yo u ha ve a cabl e box to se e th is s e rv ic e , wh e t h e r s ome of t he cab le chann el s a r e s c ra m b le d , a n d s o o n . -
Page 52: T V Wi Th Rf Ja C K On | Y
1 . B egi n reco rdi ng a p r o g r a m u s i n g o n e o f t h e r e cor di ng f eatur es. 2. Press the TV.VCR button and select a different cha nnel on t he TV . -
Page 53: T V Wi Th A U D Io &I D E O Ja Ck S
1. C onn ect cabl es as s h o w n . 2. Return to First Things Firsf, then follow the steps. Using This Connection Tune your TV to its video input channel. Use of TV.VCR button is not required. Auto TVIVCR Setting: Set the Auto TV^/CR feature to OFF. -
Page 54: Tv With Audioffideo Jacks And Cable Box To
1. Co n nect cab le s a s s h o w n . 2. Return to First Things First then follow the steps. Using This Connection Tune your TV to its video input channel. Use of TV.VCR button is not required. Auto TVIVCR Setting: Set the Auto TVA/CR feature to OFF. -
Page 55: Reference
Detailed Help and Information T h is secti on g ives yo u s o m e a d d itio n al in f o rma t io n a b o u t the VC R, i nclu d i n g a d e s c ri p tio n o f t h e u n it ' s c o n t rol s an d displ ay . -
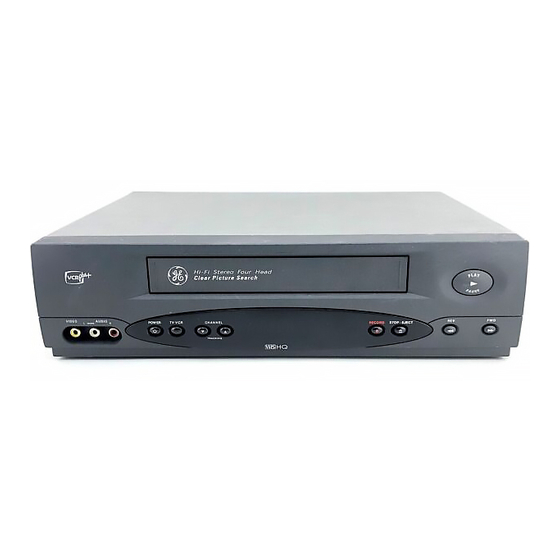
Page 56: Front Panel
VIDEO/AUDIO (LEFT MONO and RIGHT) INPUT jacks Receives s ig na ls fr om an other com p o n e n t, lik e a VCR o r c a mc o rder, when i t is connected to these jacks. Use INPUT on the VCR's remote to select L2 to record from these jacks. -
Page 57: Display Panel
Indicator Ch an nel Number o r L in e l n p u t In d ic a to r T h e c h anne l number appea rs when t he VCR i s tu n ed t o a chan nel . Th e li n e in d i ca to r ( L 1 o r L 2 l a p p e ars when the V CR' s l ine input is s elect ed. -
Page 58: Back Panel
Selects the VCR signal channel, This is the CH3 CH4 switch channel the TV must tune to in order to see the VCR's images. Necessary if connecting the VCR using one of the basic hookups, AUDIO (L and R) and VIDEO lN Jacks Receives signals from another component (like a VCR or camcorder) when it is connected to the VCR with these jacks. -
Page 59: How To Find Your Tv's Video Input Channel
The video channel on TVs varies for different brands and different models. Below are some steps to try: lf your TV brand is GE, RCA, or PROSCAN, press the TV button on the remote control that came with the VCR. Then press the INPUT button on the remote. -
Page 60: Troubleshooting Tips
No power C hec k t o m ake sure i t is p lug ge d in to a n o p e ra ti ng o ut le t, Ch eck t o m a ke s ure y ou r co nn e ction s a re cor r ecr. - Page 61 Chec k t o m a ke s ure the tao e is n ot b ro ke n. Ch eck t o m a ke s ure the VCR is n ot in pa us e mod e. P r ess P AUS E or PLAY to return to normal playback.
- Page 62 " --2-- " lights on the front panel display Clock is not set. Time cotrnter disappears during searching T his i s nor m al . On-screen menus appear in English, French, or Spanish Chec k L A NG UA GE feat ure .
- Page 63 Hi -F i i n o r de r to u se th e Hl- Fl fea tur e . Must use the AUDIO//IDEO jacks on the back of the VCR to hear s t er eo s ound .
-
Page 64: Specifications
Temperature Range: *Check your cable company's compatibility requirements. Cleaning the VCR Use a soft cloth or dusting attachment of your vacuum c lea n er t o dust you r V C R . R e m o v e d u s t f ro m t h e v e n t ilat ion h o le s of the cabi ne t. -
Page 65: Limited Warranty
A ut h oriz ed GE VC R Se r vice ce nt e r for th e ne w or , at ou r opti on, refu rb ished rep lacement parts r equ ire d... -
Page 66: L Nd E X
10 VCR list 10 CH ANNE LS menu 9 , 10, 11, 15, 30 Choosing a VCR connection 49 Cleaning t he V CR 62 CLEAR button 22, 23, 31, 32, 41, 42,... - Page 67 GO BACK button 22, 23 Included accessories 4 lndex search 41 INFO bu tt on 22, 23 , 4 1 , In i t ial setup 5, 8 INPUT button 5, 9, 22, 23, 30, 33, 54, 56, 57 Jacks, types of 48 Language feature 8 LANGUAGE menu 6, I L in e i ndi cat or s ( 11 a nd L 2 )
- Page 68 Remote VCR1A/CR2 option 17 Re mov i n g / a d d i n g ch a nn e l s 1 1 REV button 24, 54 REVERSE button 23, 40, 42 Review Existing Progs. screen 32 Reviewing programs 32 Rewind, automatic 25 Safety tab 24, 25 Search...
- Page 69 6, 8 , 9, 1 0, 1 1, 12 , 1 3 , 1 5 , 1 7 , 2 9 , 3 0 , 32, 44 VCR P l u s+ 15 ch a n nel l i st 1 5...
- Page 72 VCR nee ds ser vi ce , p le a s e c o n ta c t yo u r d e a le r or th e n e ar est Se rvice ce nte r fr o m th e y e l lo w p a g e s .